background image

Page 9

SERIES 28RTS/HE BOILER INSTALLATION AND OPERATION INSTRUCTIONS

2.   Carefully place the back section in position on the 

angles as shown in Figure 4.

WARNING: The section MUST be fully supported 
to prevent it from falling!  Failure to comply with 
this warning may result property damage, severe 
personal injury or death!

Figure 4 - Section Placement

3.   Clean the hydronic port connector sealing surfaces 

and the rope grooves with a wire brush to remove 
any rust or debris.

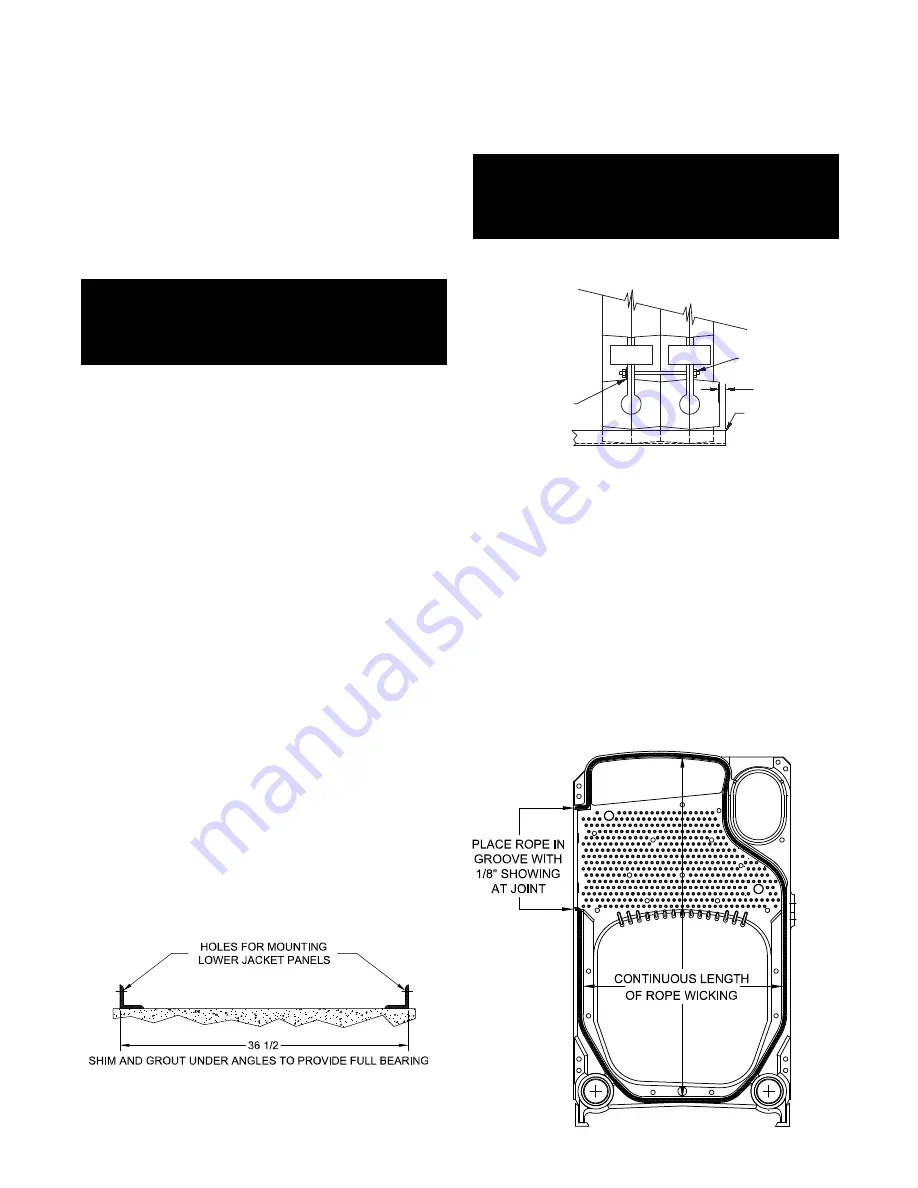
4.   Apply two coats of the spray adhesive supplied with 

the boiler to the rope groove. Allow time for the fi rst 
coat to dry before applying the second coat. When 
the second coat is tacky press the rope into the rope 
groove. Trim the rope off leaving 1/8 in.,  3.2 mm 
extending beyond the surface of the cast iron 
section, Figure 5.

Figure 5 - Rope Installation

Completed boilers must be tested as follows:

Water Boilers – the assembled boiler sections shall be 
subjected to a hydrostatic test pressure of not less than 
1-1/2 times the maximum allowable working pressure.

The hydrostatic pressure shall not exceed the required 
test pressure by more than 10 psig70 kPa during the 
test.

WARNING: Never leak test the boiler using 
compressed air! Failure to comply with this 
warning may result in property damage, severe 
personal injury or death!

1.   Plug all openings in the boiler and fi ll it with water.

2.   Bleed any air off through one of the top tappings 

then increase the pressure as outlined above.

3.   Maintain the test pressure while carefully checking 

for leaks. If a leak is found it must be eliminated, see 
Table 4 and supporting text. Once the assembled 
boiler sections pass the hydrostatic test drain them 
and remove the plugs from any tappings that will be 
used in service.

NOTE: The shipping lugs, lifting lugs and metal 
banding should be removed before installing the 
jacket on factory assembled sections.

CAUTION: Remove the left jacket panels on fully 
packaged boilers and ensure that the cleanout 
covers are secure and gas tight. Loose covers could 
damage the boiler.

Assembly of Knocked-Down Boilers
Drilled and tapped steel angles are furnished to provide 
a level footing, ease of section assembly and a point of 
jacket attachment.

1.   Set the angles as shown in Figure 3. They must be 

parallel and level. Grout under the angles to provide 
a continuous bearing surface.

Figure 3 - Steel Angle Placement

MIN.- FLUSH

MAX. 3/8

INTER.

SECTION

BACK

SECTION

FLOOR ANGLE

 FIXED NUT-NO WASHER

 DO NOT TORQUE

WASHER ON SIDE TO BE

TORQUED. USE ANTISIZE

 ON THREADS

Содержание SERIES 28RTS/HE

Страница 1: ...ier call the fire department Installation and service must be performed by a qualified installer service agency or the gas supplier WESTCAST INC 260 NORTH ELM STREET WESTFIELD MA 01085 TEL 413 562 963...

Страница 2: ...assembled block or as complete factory assembled packaged boilers All boiler components should be inspected for damage upon receipt Any damage should be immediately reported to the trucker or wholesa...

Страница 3: ...nsive property damage severe personal injury or death BOILER RATINGS CAPACITIES Before undertaking the installation of the RTS Series boiler check the boiler rating plate to ensure that the boiler has...

Страница 4: ...200 7733 3600 23 227 3800 950 6129 1267 8162 3800 24 518 4000 1000 6452 1334 8592 4000 25 808 4200 1050 6775 1400 9022 4200 27 098 4400 1100 7097 1467 9451 4400 28 389 4600 1150 7420 1533 9881 4600 29...

Страница 5: ...spection of the chimney must be performed Ensure that the chimney is clean properly constructed lined and properly sized see Figure 2 Table 2 lists the equivalent breeching and flue sizes required for...

Страница 6: ...the boiler s smoke hood This includes the removal or alteration of any baffles Never install a vent pipe of a diameter smaller than that of the boiler smoke hood outlet Failure to comply with this wa...

Страница 7: ...n ensuite d terminer si le coupetirage d borde l ouverture de d charge Utiliser la flamme d une allunette ou d une chandelle ou la fum e d une cigarette d un cigare ou d une pipe Always provide a mini...

Страница 8: ...31 Installation of Oil Burning Equipment for oil burners Si la grosseur d une section du syst me d vacuation doit tr modifi e le syst me devrait tr modifi pour respecter les valeurs minimales des tabl...

Страница 9: ...Never leak test the boiler using compressed air Failure to comply with this warning may result in property damage severe personal injury or death 1 Plug all openings in the boiler and fill it with wat...

Страница 10: ...on draw rod and washer coating thread and washer on one end only Torque the draw rods from the end with anti seize washer Follow the steps as described below Do not completely tighten one side gradua...

Страница 11: ...efficiency 28RTS HE comes with design certified heat transfer rod sets Each tube of 15 heat transfer rods will baffle one flue In order to obtain the high efficiency for which the boiler was designed...

Страница 12: ...ut cover and tighten the nuts to 15 ft lbs 21 Nm 6 Apply a bead of high temperature silicone caulk around the perimeter of the cleanout cover to ensure an air tight seal Figure 10 Cleanout Cover Assem...

Страница 13: ...xpansion pin item 7 through the hinge bosses to secure the door to the cover 3 Insert the hex bolt item 6 through the hole in the observation port cover 4 Install the spring nut and knob items 3 2 1 o...

Страница 14: ...mokehood Installation Figure 13 1 Screw the four 5 16 18 x 1 1 2 in studs into the tapped holes around the smokehood opening in the back section 2 Apply smokehood insulation tape to smokehood 3 Place...

Страница 15: ...arrangement for multiple heaters Burner Mounting 1 Clean the burner mounting flange to remove any rust or debris 2 Install the four 3 8 in x 1 1 4 in studs into the tapped holes in the burner mounting...

Страница 16: ...Never use automotive antifreeze in the boiler or heating system If antifreeze is necessary it must be formulated specifically for hydronic heating systems such as ethylene or propylene glycol Failure...

Страница 17: ...nstallation NOTE Install the smoke hood before proceeding 1 Install 3 in x 4 in NPT bushings in the two 4 in NPT tappings at the bottom of the back section Install two 3 in NPT x 3 in nipples with bal...

Страница 18: ...gure 21 RTS Installation Figure 23 RTS Installed IMPORTANT NOTE A removable elbow or section of pipe must be attached to the Back Section return port to allow for RTS removal should maintenance be req...

Страница 19: ...sonal injury or death Control Installation Locate the temperature pressure gage low water cutoff high limit and operating controls per Figures 17 24 and Table 5 Optional controls must be installed in...

Страница 20: ...TE Some locations do not allow this solution to be used Check with the local authority having jurisdiction 4 Mix the cleaning chemicals with water to create a concentrated solution Pour the cleaning s...

Страница 21: ...maximum trace of smoke The flue gas samples should be taken at the smoke hood Confirm proper burner adjustment with a calibrated combustion analyzer BURNER INSTALLATION WARNING The burner must be ins...

Страница 22: ...ver exceed the maximum set point of 240 F 116 C The aquastat high limit cannot be repaired If it fails to function properly replace it CAUTION If the flue gas temperature exiting the smoke hood is les...

Страница 23: ...ulation and rope seal If damaged or deteriorated replace them 10 Install the clean out covers and reseal them with a silicone caulk rated for 500 F 260 C 11 Install the left jacket panels and remount...

Страница 24: ...Page 24 SERIES 28RTS HE BOILER INSTALLATION AND OPERATION INSTRUCTIONS Figure 25 Boiler Assembly SIOM 161 Rev 1...

Страница 25: ...let Increaser 16 to 18 69904 1 1 Smoke Hood Assembly 10 70633 1 1 1 16 1 Smoke Hood Assembly 12 70611 1 1 Smoke Hood Assembly 14 70612 1 1 1 1 1 Smoke Hood Assembly 16 70613 1 1 1 1 1 16a Smokehood in...

Страница 26: ...nsulating Block 69645 1 1 1 1 1 1 1 1 1 1 1 1 1 1 1 34 Burner Mounting Plate Rope Seal 1 4 x 7 60026 1 1 1 1 1 1 1 1 1 1 1 1 1 1 1 n s Can of Spray Adhesive 70492 1 1 1 1 1 1 1 1 1 1 1 1 1 1 1 n s Flu...

Страница 27: ...nting system pipes or chimney escaping into the living space Flames coming out around the appliance Yellow colored flames in the appliance Stale or smelly air The presence of soot or carbon in or arou...

Страница 28: ...WESTCAST INC 260 NORTH ELM STREET WESTFIELD MA 01085 TEL 413 562 9631 FAX 413 562 3799 In Canada 7555 Tranmere Drive Mississauga Ont L5S 1L4 905 670 5888 Fax 905 670 5782...

Отзывы: