to get to the Main Menu).
Transferring Files
1. Adding Pictures – Copy & Paste
1)
Connect the player using the USB cable.
2)
Once the player has been detected, go to My Computer.
3)
Select the Removable Disk that correlates to your player.
4)
In a new window, go to the folder of your pictures and copy the picture file(s) you want (jpeg
files only).
5)
Paste the files to the Removable Disk under the PICTURE folder
6)
After copying is complete, safely remove the Removable Disk.
2.
Adding Music – Copy & Paste
1)
Connect your player using the USB cable.
2)
Once your player has been detected, go to My Computer.
3)
Select the Removable Disk that correlates to your player.
4)
In a new window, go to the folder where you keep your music on your computer (usually “My
Music” in My Documents) and then copy the audio file(s) you want.
5)
Open the Removable Disk, then Open the AUDIO folder and Paste the songs. You may create
subfolders within the AUDIO folder.
•
We recommend that you do not use Windows Media Player with this device. However, if
you do sync your player with Windows Media Player , follow these steps:
•
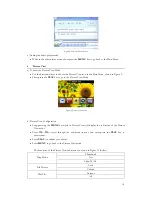
With Windows Media Player open and the player connected, click on the sync tab.
•
Click on the arrow at the bottom of the sync tab.
•
Go to “Mass Storage” and choose Set Up Sync from the submenu.
•
Uncheck the box marked “Sync this device automatically” in the window that pops up
and click “Finish”.
•
Highlight the files you want transferred to your device and drag them into the Sync List
column.
•
Hit “Start Sync” to transfer the files.
•
When the conversion is finished, open the removable disk that correlates to your player.
There will be a new folder called “Music”.
•
Drag the “Music” folder into the AUDIO folder. Your songs will now be available on
the device.
*Note: After the initial syncing of the device, if you want to sync it again and add more songs
using Windows Media Player , you MUST move the “Music” folder back to the main level of
the removable disk before adding additional songs, then move it back to the AUDIO folder when
finished syncing. To do this, follow these steps:
•
Open the removable disk and go to the AUDIO folder.
•
Right-click on the “Music” folder and select Cut.
•
Hit “Back” on the window to go back to the main level of the removable disk.
4
Содержание SL414CM
Страница 1: ......


