SKC AirChek TOUCH 220 Series Скачать руководство пользователя страница 8

Form 38054 Issue 1506

Page 8 of 30

www.skcinc.com

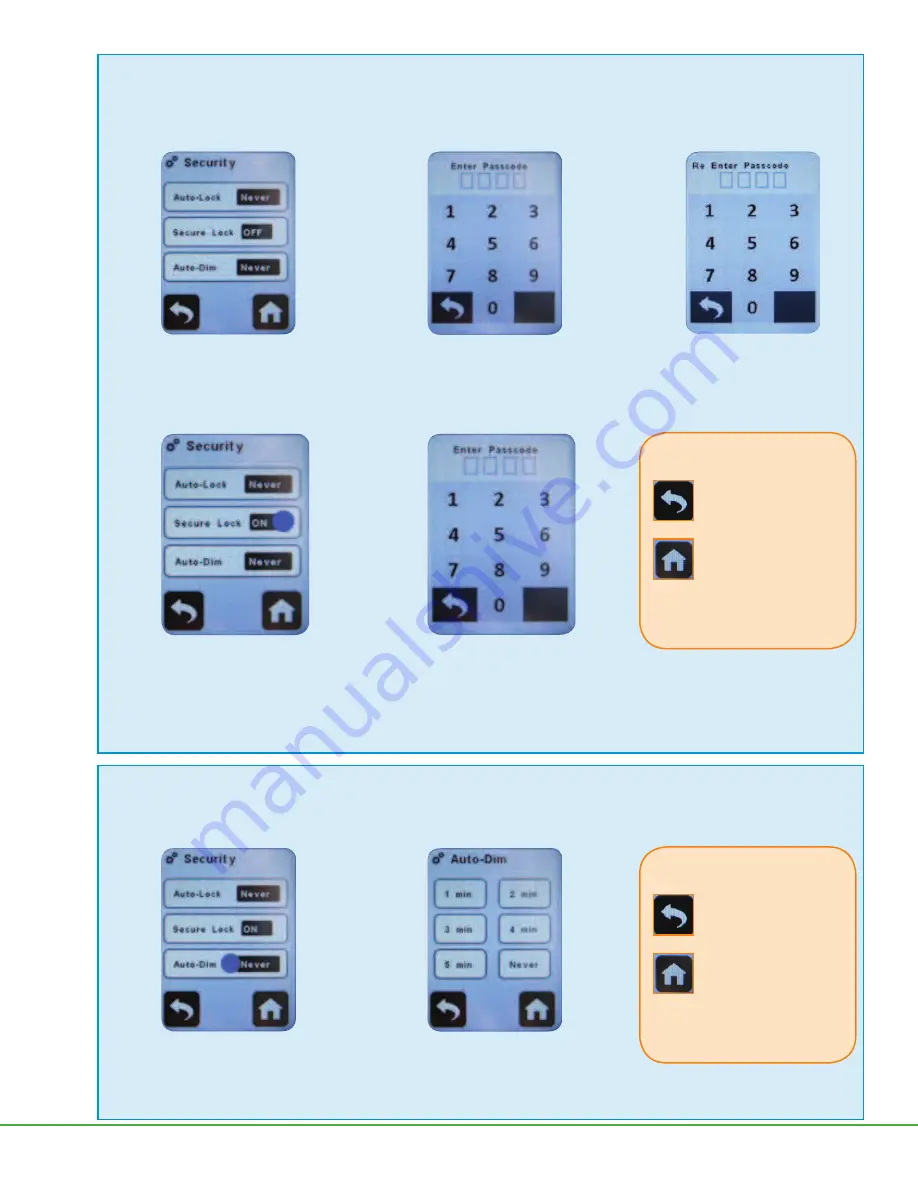
1.  Secure Lock displays OFF. 

Touch Secure Lock to turn ON 

(displayed se

t

 ing in e

 ect)

2.  Enter your own four-digit passcode.

Secure Lock

Secure Lock prevents tampering during sampling by requiring a 

user-set passcode

 to be entered to unlock the touch screen 

and power bu

t

 on. 

Changing Secure Lock from OFF to ON:

1.  Secure Lock displays ON. 

Touch Secure Lock to turn OFF. 

(displayed se

t

 ing in e

 ect)

.

2. 

Enter the previously set four-digit 
passcode or master passcode (8472)

 and 

return to Security screen. Secure Lock 
displays as OFF.

B a c k

 moves to Device 

screen; changes accepted.

H o m e

  m o v e s   t o   H o m e 

screen, changes accepted.

or

Touch 

another security soft key.

Select option:

3. 

Re-enter the same four-digit 
passcode

 to con

 rm and return 

to Security screen. Secure Lock 
displays as ON.

Changing Secure Lock from ON to OFF:

Note: Forgot the Secure Lock passcode?

 Use master passcode 8472 to unlock the screen and power bu

t

 on. 

1.  Touch Auto-Dim to access options 

(displayed se

t

 ing in e

 ect)

2.  Touch desired Auto-Dim option. Pump 

will return to Security screen. Selection 
displays.

Auto-Dim

Auto-Dim saves ba

t

 ery power by automatically dimming the touch screen backlighting within a set amount of time after the 

Run soft key is touched. 

Note:

 To restore backlighting to 100% at any time, simply touch the screen.

B a c k

 moves to Device 

screen; changes accepted.

H o m e

  m o v e s   t o   H o m e 

screen, changes accepted.

or

Touch 

another security soft key.

Select option:

Содержание AirChek TOUCH 220 Series

Страница 1: ...driver set Charging e Cradle power supply with cord filter cassette holder CalChek communication cable USB cable Defender calibrator with charger and Pelican case 220 5000TC K5 5 pumps with battery packs screwdriver set 4 Standard Charging Cradles 1 Charging e Cradle power supply with cord 5 filter cassette holders and Pelican case 220 5000TC K5D 5 pumps with battery packs screwdriver set 4 Standard...

Страница 2: ... Charging e Cradle Cat No 220 900 Insert wall cube into a 100 to 240 volt wall outlet b Up to 5 cradles Press together the connector on the side of the first cradle with the connector on the side of the succeeding cradle Repeat connection to chain up to 5 Standard Charging Cradles or up to 4 Standard Cradles and 1 Charging e Cradle Insert connector of Multi Cradle Power Supply Cat No 220 700 into p...

Страница 3: ... of a hazardous atmosphere batteries must only be changed removed and replaced in an area known to be non hazardous ADVERTISSEMENT Afin de prévenir l inflammation d atmosphères dangereuses ne changer les batteries que dans des emplacements désignés non dangereux CAUTION Risk of Fire and Burns Do Not Disassemble heat above 212 F 100 C or incinerate Keep battery out of reach of children and in origina...

Страница 4: ...en to set up and operate the pump Learning the Home Screen Home screen displays when the pump is powered on The Home screen displays different soft keys depending on pump status running not running pause See Figures 3 and 4 Reading Pump Status Indicators Observe the status LEDs that bracket the touch screen on the pump to determine pump status Note Status LEDs will flash red green to indicate that t...

Страница 5: ...xt menu screen or Home screen Back moves to previous menu screen Erase removes values from fields right to left Once all fields are empty it moves to previous menu screen Keypad allows entry of values such as flow rate sample time start time date Exit moves to Home screen without accepting selections values Home moves to Home screen Run starts a manual sample timed run and timed run with start date t...

Страница 6: ...ng in effect 6 Touch date and time display to change date and time 6 a Enter date as prompted using keypad Touch checkmark to accept and move to time screen 6 b Enter time hh mm Touch am pm 24 to select type of time display Touch checkmark to accept and return to Date and Time screen Modifying Device Settings Date and Time Security and Units Changing Date Time and Display Back moves to Device scree...

Страница 7: ...to Security screen Selection displays Auto Lock Auto Lock prevents accidental changes to pump status during sampling by requiring a simple 1 2 3 4 unlock code to be entered to unlock the touch screen and power buton Note Running a Timed Sample even if Auto Lock is set on Never will always initiate Auto Lock see Operation Seting Up and Running a Timed Sample Back moves to Device screen changes acce...

Страница 8: ...me screen changes accepted or Touch another security soft key Select option 3 Re enter the same four digit passcode to confirm and return to Security screen Secure Lock displays as ON Changing Secure Lock from ON to OFF Note Forgot the Secure Lock passcode Use master passcode 8472 to unlock the screen and power buton 1 Touch Auto Dim to access options displayed seting in effect 2 Touch desired Auto ...

Страница 9: ... Celsius displayed seting in effect Touch Pressure to toggle mbar millibars mmHg millimeters of mercury and inHg inches of mercury displayed seting in effect Back moves to Device screen changes accepted Home moves to Home screen changes accepted Select option Note STP parameters are displayed on this screen but can only be changed using DataTrac Pro Software See DataTrac Pro Operating Instructions ...

Страница 10: ...t 10 and then proceeds in steps of 10 Calibrating Flow Rate from 1 to 5 L min Allow pump to equilibrate after moving it from one temperature extreme to another Charge pump battery completely before calibration and sampling Choose from Manual or CalChek Single calibration methods Manual Calibration 1 Touch flow rate display Set Flow soft key on a pump that is not running Pump will run and display Se...

Страница 11: ...ome screen Touch X to cancel flow adjustment return to Home screen 6 Disconnect pump from representative method specified sampling medium and calibrator and proceed to Sampling Alternative Manual Calibration Access Home Settings Calibrate Manual Connectcalibration train checkmark enter flow rate checkmark use arrows to adjust flow checkmark checkmarktoacceptorXtocancel Home screen Figure 7 Calibration...

Страница 12: ...0 700 on a chain of up to 5 Standard Cradles or up to 4 Standard Cradles and 1 e Cradle See Figure 2 Note Calibration can be performed on only one pump at a time 2 Align contacts on botom edge of pump with contacts in cradle and insert pump in cradle Repeat for each additional pump cradle Preparing the Pump 1 Touch Run soft key on touch screen and run pump for five minutes 2 Set up a calibration tr...

Страница 13: ...ata Port d Press the left or right arrow to toggle to SKC e Press the down arrow to highlight Confirm press Enter 3 Enter Defender calibration mode a Press the right arrow and then the down arrow to highlight Measure press Enter b Press the right arrow to highlight Cont press Enter Preparing the CalChek Communication Cable Connect CalChek Communication Cable to Defender calibrator and pump charging...

Страница 14: ...nt calibration completed successfully Touch checkmark to accept and return to Home screen b Failure CalChek Single screen CalChek Single Point calibration failed error xx explanation of error Check xxx Touch Back to repeat calibration or touch X to exit calibration and return to Home screen 7 Following successful calibration a If calibrating a single pump Replace sample medium with a fresh unexpos...

Страница 15: ...or single tube sampling Set flow rate to 1 50 L min b For multiple tube sampling Set flow rate to the sum of all flows 15 Note Do not exceed 500 ml min flow rate per tube for multiple tube sampling 3 Allow pump to run for five minutes and then touch flow rate display Manual Cal soft key tools icon in upper right corner Preparing the Tube Holder 1 On the Adjustable Low Flow Tube Holder insert an opened r...

Страница 16: ...n the brass flow adjust screw directly beneath the port holding the tube to be calibrated and repeat Step 1 3 Repeat Steps 1 and 2 for each remaining active tube 4 Once flow is calibrated for each active tube it is recommended practice to re check the flow rate through each tube before removing representative tubes Any adjustment should be minimal 5 When finished touch checkmark on the pump touch scre...

Страница 17: ... certifications and any warranty Pump can be operated from cradle Following calibration replace representative sampling media used for pre sample calibration with unexposed method specified media for sampling Manual Sampling 1 Set pump flow rate to a method specified flow see Seting Pump Flow Rate 2 Calibrate pump flow rate using representative sampling media see Calibrating Pump Flow Rate from 1 to 5 L...

Страница 18: ...harge overloadedsamplemedia orkinkedtubing Low battery Pump stops powers off without warning time varies with load Run time data is retained in history see Accessing History Charge pump battery see Figure 2 Red Fault icon displays when pump is turned on Fault icon will disappear during subsequent sampling Flow fault If fault is sustained longer than 15 seconds Pump status LEDs flash red green Pump ...

Страница 19: ...ting the timed sample Select option 5 Touch Stop soft key to stop sample Accumulated time and volume will reset 6 Record sample stop time remove sample medium and cap 7 Re install representative sample medium and perform post sampling calibration see Calibrating Pump Flow Rate Setting Up and Running a Timed Sample 1 Calibrate pump flow rate using representative sampling medium see Calibrating Pump ...

Страница 20: ...h Continuous b To program an intermittent sample Touch Intermitent Top Programmed Preset Bottom Empty Preset Setting Up Timed Sample Presets Includes Continuous and Intermitent Sampling An alternative to programming a quick timed sample before each run is to save sample runs that are performed on a regular basis as timed sample presets P1 P2 P3 or P4 Presets that are already programmed will displa...

Страница 21: ... start time Touch Yes P1 Start Time screen displays 3 b iEnter a start time hh mm touch am pm 24 hour to select type of time display and touch checkmark to accept Date touch to edit start date Run starts sampling Screen will lock automatically regardless of security settings See Options During Sampling Back moves to Timed Sample screen Edit moves to Flow Rate screen allows flow rate type of sample...

Страница 22: ...h checkmark to accept P1 Start Time screen displays 5 a To bypass seting a start time Touch No Preset 1 screen displays b To enter a start time Touch Yes P1 Start Time screen displays Date touch to edit start date Run starts sampling Screen will lock automatically regardless of security settings See Options Modes During Sampling Back moves to Timed Sample screen Select option 3 Enter number of min...

Страница 23: ...ws to scroll through a maximum of 1042 history records 1 Touch Menu soft key 2 Touch About Accessing History Accessing Pump Information Note Once the maximum number of records is reached old records will be overwriten without warning To avoid loss of data upload sampling history to PC using DataTrac Pro Software on a weekly basis 3 Pump information displays ...

Страница 24: ...adle as stated in Step 2 a Press together the connector on the side of the e Cradle with the connector on the side of the succeeding Standard Cradle Repeat connection to chain up to a total of 4 Standard Cradles to the e Cradle 3 Align contacts on botom edge of pump with contacts inside cradle and insert pump in cradle Repeat for each additional pump cradle 4 Turn on pump s 5 Launch DataTrac Pro o...

Страница 25: ...mm hex driver Allen wrench to tighten two screws on botom of batery pack housing Tighten screws in alternating fashion d Charge the batery pack completely before use See Charging the Batery Pack Performing a Full Calibration Reset Compensation System CalChek Full Calibration also known as CalChek Full or Multiple point Calibration is used to calibrate the pump compensation system across the range ...

Страница 26: ...ng Up the Defender Calibrator 1 Press and hold power buton on the Defender calibrator until the piston moves screen will light 2 Select the Defender data port a Press the right arrow to highlight Setup press Enter b Press the right arrow to highlight Preferences press Enter c Press the down arrow to navigate to Data Port d Press the left or right arrow to toggle to SKC e Press the down arrow to hi...

Страница 27: ...Data light on cradle flashes alternately green and amber Top box on screen displays a progress bar botom box displays flow rate reading from Defender Note CalChek Full can take several minutes to complete Calibration can be cancelled at any time by touching Home a Completion CalChek Full screen CalChek Full calibration completed successfully Touch checkmark to accept and return to Home screen b Fail...

Страница 28: ... not respond to touch screen commands reset the pump microprocessor manually 1 Remove batery pack and then re install the batery pack See Changing the Batery Pack a Touch screen If screen is responsive continue pump operation b If screen remains unresponsive proceed to Step 2 2 Remove batery pack see Changing the Batery Pack Lay pump case on a flat surface with the AirChek TOUCH logo facing upward ...

Страница 29: ...Supply for use with one charging cradle 220 600 Multi Cradle Power Supply for use with 2 to 5 charging cradles 220 700 Replacement Battery Pack Li Ion P75718 Li Ion bateries may be subject to special shipping regulations SKC Limited Warranty and Return Policy SKC products are subject to the SKC Limited Warranty and Return Policy which provides SKC s sole liability and the buyer s exclusive remedy ...

Страница 30: ... F 20 to 45 C Humidity ranges Operating 95 RH non condensing Storage 95 RH non condensing Altitude Corrects flow for changes in temperature 32 to 113 F 0 to 45 C and ambient pressure up to 15 000 feet above and down to 4 500 feet below sea level Display Parameters Color LCD real time flow rate ambient temperature ambient pressure accumulated volume elapsed time User interface Resistive touch screen ...

Отзывы: