background image


  Chapter 3. Routine Maintenance 


3-1 


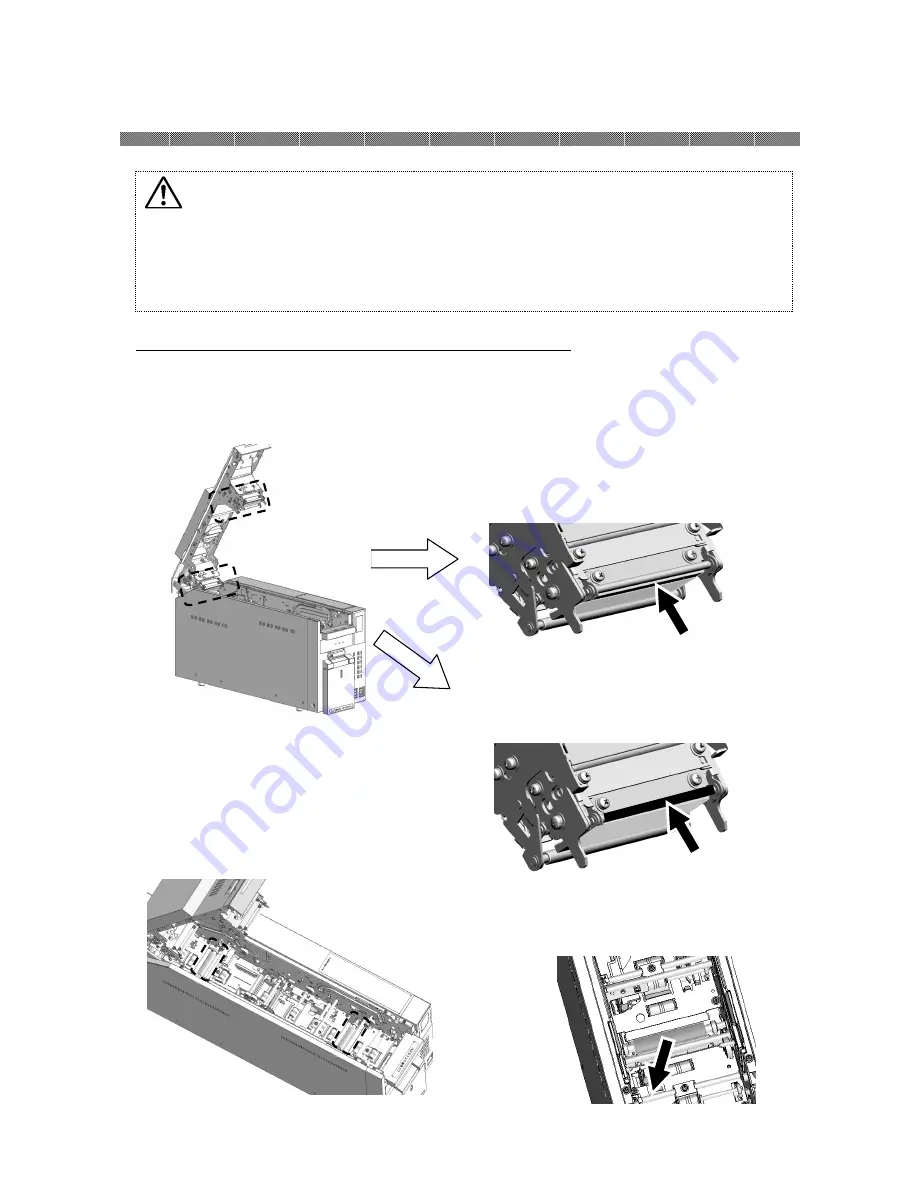
Cleaning of Thermal Head, Platen, and Cleaning Roller 

By using thermal transfer technology, daily maintenance is not really necessary if the printer is 
being used properly. 
However, in order to keep the best print quality, it is recommended to do the cleaning of Thermal 
Head, Platen, and Cleaning Roller once in a month. 


1.


Using gauze, clean the heat element (glass 
bar) of the thermal head with isopropyl 
alcohol or ethyl alcohol.


2.


Using  gauze  dipped  with  isopropyl  alcohol 
or  ethyl  alcohol,  clean  the  edge  of  the 
peeling roller.


3.


Using  gauze  dipped  with  isopropyl  alcohol 
or ethyl alcohol, clean the rubber section of 
the platen roller. 


Caution: 


Make sure that the power is turned off before starting cleaning. 

Thermal Head reaches high temperature just after printing. Do not touch directly 
by hand.


Make sure that the thermal head has been sufficiently cooled down before 

starting cleaning. 
When fingerprint stick to the heat element, it can damage the Thermal Head. Do 
not touch directly by hand. 
Be careful not to be hurt by the projections of the printer. 


Содержание CHC-C320-5

Страница 1: ...http www sinfo t jp Operation Manual Card Printer CHC C320 5...

Страница 2: ...finding the fault in this manual your information to SINFONIA TECHNOLOGY will be highly appreciated I I I Introduction ntroduction ntroduction ntroduction This manual describes detailed instructions f...

Страница 3: ...bbon 2 7 Setting the Card 2 8 Transporting the Printer 2 10 How to print 2 10 Chapter Chapter Chapter Chapter 3 3 3 3 Routine Maintenance Routine Maintenance Routine Maintenance Routine Maintenance 3...

Страница 4: ...ot guaranteed Environments To use the printer safety please pay attention to the followings Attention Indicates the cause of the trouble and the environmental condition Caution Inappropriate handling...

Страница 5: ...me very hot Ignoring this warning may cause electric shock fire or burns Warning The card will be released from the discharge port at a high speed Do not look into the outlet while in use It may cause...

Страница 6: ...ribbon in cool place to avoid the direct Sunlight Temperature less than 30 C humidity less than 60 Do not leave the ink ribbon on the floor or in a dusty place It might cause foreign matter adhesion A...

Страница 7: ...back of the printer 3 Accessory details Ribbon Cassette Color Ribbon Cassette SP Dust Box Cleaning Roller Attention Keep the packaging materials The box and protection materials are necessary when mov...

Страница 8: ...intenance Card set unit open button Push this button to open the card set unit Power Switch This switch turns on off the power of the printer When press the marked side of the switch the power turn on...

Страница 9: ...ng The printer is ready to make prints The card set unit or upper unit are opened Card jammed in printer Mechanical part is faulty Trouble of printer control board The ink ribbon loaded is not support...

Страница 10: ...the power cable Never put heavy items on the power cable give a strong pull to the power cable or twist the power cable It may cause fire or electric shock Warning When it is not using the printer di...

Страница 11: ...lled direction of the cleaning roller 4 Close the upper unit Caution Keep holding the upper unit until the upper unit is fixed Pull the upper unit open lever and slowly move it upward to open the uppe...

Страница 12: ...bbon cassette 3 Place the ribbon cassette to the printer How to take out the ribbon cassette 4 Close the upper unit Place the ink ribbon on the curved part Push until you hear a click to confirm it is...

Страница 13: ...Remove any slack in the ribbon before setting Be careful to do not get any dust etc on the ink ribbon When would reset the ink ribbon once used make sure that the boundary of used part and unused par...

Страница 14: ...e card set unit 3 Remove only the underside of the card packing film 4 Pull the blue lever and set the card The side which will be printed first need to be settled first print side should be on Empty...

Страница 15: ...Chapter 2 Installing and Set Up 2 9 5 Close the card set unit Do not touch the printing surface white side by finger Be careful not to get any dust etc on the card...

Страница 16: ...nk ribbon and card from the printer before transporting the printer If the ink ribbon or card cannot be removed due to a fault consult with the distributor 2 Use a genuine box If the box used at the p...

Страница 17: ...or ethyl alcohol 2 Using gauze dipped with isopropyl alcohol or ethyl alcohol clean the edge of the peeling roller 3 Using gauze dipped with isopropyl alcohol or ethyl alcohol clean the rubber section...

Страница 18: ...Maintenance 3 2 4 Using gauze dipped with isopropyl alcohol or ethyl alcohol clean the rubber section of the cleaning roller Attention Printing should be performed after the alcohol dried up completel...

Страница 19: ...If the dust collects on the openings clean it with vacuum cleaner Warning Continuous use under the abnormal condition such as high temperature smoke and strange smell can cause the fire and electric s...

Страница 20: ...Card jam occurred Remove the card If card jam occurs frequently consult with the service center Trouble of printer control board The printer mechanical section is faulty If it occurs frequently consu...

Страница 21: ...and the upper unit are closed Check if card is jammed in the printer The card set unit does not open Check if the printer is installed in a flat location Check if any object is placed in front of the...

Страница 22: ...requently consult with the service center Card Jam 1 Open the card set unit and remove the ribbon cassette 2 Confirm the card jamming position and remove the card according to the following procedure...

Страница 23: ...e of the printer move the card to the front side 2 If the card move to the position shown in the following figure pick up the top of the card and pull it up as tilt it slightly forward and remove it W...

Страница 24: ...port side 1 Turn the knob green on the left side of the printer move the card to the front side 2 When the card is discharged from the port pull the card from front and remove it When cannot see the c...

Страница 25: ...little from the gate pull it up and remove it 4 When the tip of the card is not appearing close the card set unit and turn the printer power off Turn the printer on again and restart printing When the...

Страница 26: ...the following figure 3 When the card move to the position shown in the following figure pick up the top of the card and pull it up as tilt it slightly forward and remove it When the card is hold on th...

Страница 27: ...se follow the instruction below 1 Turn off the power of the printer 2 Turn on the power 1 minute or more after turning off the power 3 When card Jam is displayed on the printer status lamps open the f...

Страница 28: ...es uses and can radiate radio frequency energy and if not installed and used in accordance with the instruction manual may cause harmful interference to radio communications Operation of this equipmen...

Отзывы: