Sima SUR-35 Скачать руководство пользователя страница 6

SUR-35 User Manual

Ch.

SUR-35 User Manual

Ch.

Page

6

Unpacking the SUR-35

Unpacking the SUR-35

Unpacking the SUR-35

Unpacking the SUR-35

Unpacking the SUR-35

This package includes:
1      SUR-35
1      User’s Manual (this document)
1      Pre-programmed code guide
If any of these items are missing or appear damaged,

contact your dealer immediately. Keep the shipping
carton in case you need to ship your SUR-35.

Identif

Identif

Identif

Identif

Identifying Components

ying Components

ying Components

ying Components

ying Components

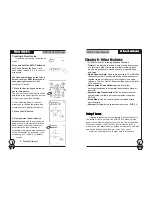
Please refer to the following illustrations to identify the

components of the SUR-35.

Batter

Batter

Batter

Batter

Battery Cover

y Cover

y Cover

y Cover

y Cover

Remove this cover to
replace the four AAA
Alkaline batteries.

TTTTTouch Screen

ouch Screen

ouch Screen

ouch Screen

ouch Screen

The Touch Screen
panel enables you to
configure and operate
your devices by
touching the screen.
Tap the screen once
to turn on the SUR-35

LLLLLearning Eye

earning Eye

earning Eye

earning Eye

earning Eye

Point your device’s
remote control at this eye
to enable the SUR-35 to learn
your device’s
infrared codes.

Infrared Eye

Infrared Eye

Infrared Eye

Infrared Eye

Infrared Eye

Point the infrared eye at
the device you want to
operate

Figure 1: Front and Rear Views

Over

Over

Over

Over

Overview

view

view

view

view

11111

Page

55

Appendix A – Specifications

Model
Dimensions (WxHxD):

Weight (With Batteries):
Weight (W/out Batteries):
Number of Device:
LCD Screen (WxH) :
Soft Buttons

Hard Buttons:
Backlighting:
Learning Frequency:
Memory:
Batteries:
Power consumption:

Battery Life:
Operating Distance:
PC Interface:

SUR-35
3.2" x 7.3" x 1.1"
(8.2cm x18.5cm x 2.8cm)
9oz (260g)
7.8 oz (220g)
16 devices
2.7" x 3.2" (6.0cm x 8.0cm)
2 pages / 24 keys :
 total of 48 keys
7 usable
Blue  (LCD)
10kHz - 125kHz, 455KHZ & Pulse
256KB non-volatile flash memory
4 AAA Alkaline Batteries
LCD Off : 50uA
LCD On : 200uA
Operate : 30 - 100 mA
Approx. 3 - 6 months
Approx. 30 feet
optional

Specifications

Specifications

Specifications

Specifications

Specifications

AAAAA

All specifications subject to change without notice

Содержание SUR-35

Страница 1: ...nnsylvania Ave Bldg 5 Oakmont PA 15139 412 828 3700 or 800 345 7462 This warranty is void if any defects are caused by abuse misuse negligence or unauthorized repairs 4 All liability for incidental or...

Страница 2: ...s Do not learn near an incandescent lamp Memory capacity is full 56 keys for each of 16 models The learning process has no errors but you still can t control your AV devices repeat the learning proced...

Страница 3: ...button down for about 2 seconds Make sure you did not program more than one remote for a given device Make sure the two remotes are not too close or too far apart and are aiming directly at each other...

Страница 4: ...hooting roubleshooting roubleshooting roubleshooting roubleshooting C C C C C LCD does not show anything when you touch it or press the rubber buttons You cannot operate a device even after teaching t...

Страница 5: ...ing list identifies the SUR 35 s key features Large touch screen display Each macro can store a sequence of 60 commands Controls up to sixteen devices including DVDs TVs Satellite dishes VCRs and CDs...

Страница 6: ...the SUR 35 L L L L Learning Eye earning Eye earning Eye earning Eye earning Eye Point your device s remote control at this eye to enable the SUR 35 to learn your device s infrared codes Infrared Eye I...

Страница 7: ...g Started Getting Started Getting Started Getting Started 2 2 2 2 2 Page 54 Beep Toggling Beep Toggling Beep Toggling Beep Toggling Beep Toggling This setting specifies whether you want the SUR 35 to...

Страница 8: ...may have more than one device For example the TV button may have TV1 and TV2 for different TVs in your house Repeatedly press the same device button to cycle through all the device names The SUR 35 h...

Страница 9: ...en Weak batteries reduce the effective distance of the unit To reduce danger of leakage and damage remove used batteries when used longer than two years 1 Turn the remote over push on the tab and lift...

Страница 10: ...d Don t expose the SUR 35 to extreme temperatures Keep it away from heat sources Avoid dropping the SUR 35 Don t drop anything on the touch screen Clean the LCD touch screen with a soft cloth If neede...

Страница 11: ...o during Touch Screen Layout will display all possible LCD choices Backlight Sleep Button Pressing it quickly will turn on the backlight while holding it down for three seconds will enter the SLEEP Me...

Страница 12: ...Page 49 3 Press the UP and DOWN arrows to rotate through the channels currently assigned 4 Press OK to delete a particular channel 5 Repeat above steps to delete other channels 6 Press OK when finish...

Страница 13: ...l n u t c e l l o C s l o r t n o c e t o m e r N A R T s e d o c d e r a r f n i r o e r a w t f o s m e t s y s t i m s n a r T a o t r o r e h t o n a o t 5 3 R U S e n o m o r f r e t u p m o c l...

Страница 14: ...M Delete Menu Delete Menu Delete Menu Delete Menu Delete Menu 2 2 2 2 2 Page 47 2 Use the number keys to enter a channel number Some devices may need you to also press ENTER if they normally require...

Страница 15: ...age 46 Using Quick Channel Lists Using Quick Channel Lists Using Quick Channel Lists Using Quick Channel Lists Using Quick Channel Lists Quick Channel lists allow you to group channels together into d...

Страница 16: ...pears 2 Use the arrow buttons on the Touch Screen to select DATE displayed in the upper right corner and then press the OK button Enter the year month and date first 3 Use the LEFT and RIGHT arrow key...

Страница 17: ...or label After creating a device you will be able to enter a pre programmed code teach an existing remote or customize the control layout to suit your needs There are two ways to do this based on what...

Страница 18: ...features Timers Can be used to start a macro or send a command at a later time Many timers are available including daily weekly weekends only weekdays only or specific days and times Quick Channel Li...

Страница 19: ...e the UP and DOWN arrows to change the letters Use the LEFT and RIGHT arrows to position the cursor Labels can be 4 digits long Step 3 Press the OK button when finished Page 42 Using Macros To start a...

Страница 20: ...n Press each number button 2 4 6 8 until it disappears Use the arrow buttons on the Touch Screen to select LAY and then press the OK button 1 Press a device button to select the device you want to mod...

Страница 21: ...If you press another button and then return the first button will default to a blank setting 4 Press OK to confirm your changes Then press EXIT to leave the SETUP Menu LCD L LCD L LCD L LCD L LCD Lay...

Страница 22: ...R 35 will learn the proper signals to send This method is perfect for newer or less common devices or if a certain button still not does perform the desired function after using pre programmed manufac...

Страница 23: ...TUP button on the Touch Screen for 3 seconds Press each number button 2 4 6 8 until it disappears Use the arrow buttons on the Touch Screen to select CODE and then press the OK button 1 Use the device...

Страница 24: ...5 Creating and Using Macros Introduction to Macros Introduction to Macros Introduction to Macros Introduction to Macros Introduction to Macros A macro is simply a series of commands The MACRO feature...

Страница 25: ...en buttons Press one of the rubber buttons on the bottom half of the SUR 35 s Note Record Button Must Be Held Down for 3 Seconds As a safety feature the record button needs to be pressed for 3 seconds...

Страница 26: ...operation mode A very small number of infrared codes are not learnable by the SUR 35 You may need to first collect the codes see Collecting Unrecognized Infrared Codes for more information and then e...

Страница 27: ...lowing illustration L L L L Learning codes earning codes earning codes earning codes earning codes Figur Figur Figur Figur Figure 7 e 7 e 7 e 7 e 7 Using the Lear Using the Lear Using the Lear Using t...

Страница 28: ...g a Device Deleting a Device If you have an unused or an unwanted device you may erase the infrared codes for the device and keep Deleting devices Deleting devices Deleting devices Deleting devices De...

Страница 29: ...en will flash automatically When all buttons on the current page are programmed it will automatically switch to the next page Page 32 Deleting a Specific Key Deleting a Specific Key Deleting a Specifi...

Страница 30: ...e ERROR indicator when Using the Learning Function Once collected you can use the Remote Connector see Appendix B Accessories to upload the unrecognized codes to your personal computer and then email...

Отзывы: