


SUR-35 User Manual
Ch.
SUR-35 User Manual
Ch.
Page
29
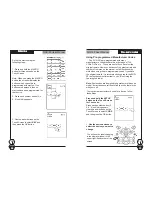
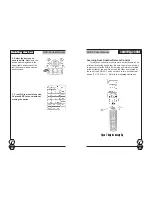
1. Use the device keys to select the
device you want to program.
Make
sure the other remote control is
pointed directly at the SUR-35’s
Learning eye. Keep them 2~4 inches
apart. (5~10 cm)
Rubber Keys
LLLLLearning codes
earning codes
earning codes
earning codes
earning codes
33333
&
&
&
&
&
1
The up and down arrows represent the Channel up and down keys
(or Play and Stop). The left and right arrows represent the Volume up
and down buttons (or FF/Rew). The center button is the Enter button.
and the lower right button is the Mute button. The bottom button
corresponds to the device buttons and you can program it to send a
command to turn on a device when you select it. You can program
each rubber button by using this screen.
2. The Power button (upper right) should now be flashing on the
touch screen.
3. Press and hold the Power button on the other remote control
for at least 2 seconds.
4. Check to see whether ERROR or OK is displayed on the top of the
SUR-35 Touch Screen. If ERROR appears, try again. The next
programmable button on the Touch Screen will flash automatically .
When all buttons on the current page are programmed, it will
automatically switch to the next page.
Page
32
Deleting a Specific Key
Deleting a Specific Key
Deleting a Specific Key
Deleting a Specific Key
Deleting a Specific Key
To erase the infrared codes for a
specific Touch Screen or Rubber
button and retain it in the layout,
follow these steps:
Press and hold the
DELETE
button on the Touch Screen for
3 seconds.
Press each number
button (2, 4, 6, 8) until it
disappears. Use the arrow
buttons on the Touch Screen to
select
KEY
and then press the
OK
button.
1. Select the device that has
the key that you want to erase.
2. Select the key you want to
erase.
If you want to erase more
keys, you may select them now.
3. When finished, press
OK
to
confirm erasing the keys or press
EXIT
to cancel without erasing.
Then press the
EXIT
key to
leave the
DELETE Menu
.
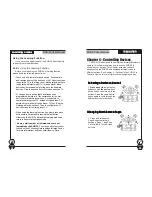
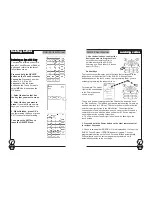
Deleting buttons
Deleting buttons
Deleting buttons
Deleting buttons
Deleting buttons
33333
The touch screen will display a set of buttons that correspond to the
rubber keys on the bottom half of the SUR-35. Although these
buttons appear on the touch screen, in programming them, you are
actually programming the rubber buttons.
For example: The upper
right button corresponds
to the Power button as
shown at right.


