background image


  USER MANUAL                              

Cutter operating instructions


9

5

Cutter operation instructions     

5.1    Names and functions of parts 

5.1.1  Front view 


1. 

Left 

cabinet      11. 

Power 

switch 

2. 

Pinch 

rollers 

     12. 

Foot 

cushion 

3. 

Upper 

cover 

     13. 

Transmission 

Shaft 

4. Beam  


        14. Alignment rulers 

5. 

Tool 

carriage 

belt 

    15. 

Cutting 

pad 

6. LCD (Liquid Crystal Display)   


16. Blade guide 

7. 

Control 

panel 

     17. 

Tool 

carriage 

8. 

Right 

cabinet 

     18. 

Blade 

holder 

9. 

Keyboard 

base 


19. 

Reset 

10. Power connection 


5.1.2  Back view 


Reverse side 

Right side 


1. Pinch roller handle              3. Serial RS232 Receptacle 

2. Baseboard (containing main board, power source) 

Содержание Vinyl Express Cougar 24"

Страница 1: ...ValueCut 24 Vinyl Express Cougar 24 Owner s Manual...

Страница 2: ...utter operating instructions 9 5 1 Name and functions of parts 9 5 2 Basic operation 11 5 3 Operating instructions 14 5 4 Technical features 21 6 Troubleshooting 22 metric imperial 1 millimeter mm 0 0...

Страница 3: ...mpt to repair machine as damage may occur Personal injury or electric shock may result Do not use a power source that does not meet required voltage Fire or electric shock may result Do not leave mach...

Страница 4: ...ay result in fire or electric shock Do not leave power cord plugged into socket when machine is not being used for a long period of time to prevent damage Do not place hands into machine during operat...

Страница 5: ...ease check the following accessories after unpacking contact customer service if you find anything missing Serial No Item Quantity Icon 1 Power cable 1 2 Serial cable 1 3 Blade holder 1 4 High speed t...

Страница 6: ...ion diagram Available to the type with minimum width of 1000mm only Unpack the parts of the stand Locate and open the parts bag Assemble the stand according to the diagram After assembly place the cut...

Страница 7: ...hock may result Do not unplug the machine when the power is on to avoid damage Place the machine on a stable surface to prevent damage from sliding or falling 3 1 1 Place the cutter on a flat stable s...

Страница 8: ...ustrations outside view enlarged view 3 2 2 Adjust the length of the blade as required for specific media Blade length screw Blade handle Blade Blade holder Basic operation USER MANUAL 6 Vinyl surface...

Страница 9: ...machine difficulty and lock up RS 232 Serial Interface RS 232 Serial Interface meets features of ELA Electric Industries Association General features Standard CCITT V14 EIA RS 232C JIS 5101 Baud rate...

Страница 10: ...r port DB 25S Signal computer port DB 25P Map of serial interface cable connecting between IBM PC computer and cutting plotter Cutting plotter port Signal computer port Signal Foot Foot Signal Chassis...

Страница 11: ...3 Upper cover 13 Y Transmission Shaft 4 Beam 14 Alignment rulers 5 Tool carriage belt 15 Cutting pad 6 LCD Liquid Crystal Display 16 Blade guide 7 Control panel 17 Tool carriage 8 Right cabinet 18 Bla...

Страница 12: ...ay 8 Reset cutter 2 Blade lowering button 9 Origin setting button 3 Blade raising button 10 Paper feeding button 4 Left direction button 11 Systemic parameter setting button 5 Paper withdrawal button...

Страница 13: ...ain shaft and tool carriage to prevent injury Step 1 Make sure the power switch is set to the OFF position Step 2 Plug the power cable into the receptacle of the host press the power on off on the lef...

Страница 14: ...the pinch rollers and the main shaft and pull the media to an appropriate length from the front of the machine Using a roll of media Using a single sheet of media Pull it out to the required length Cu...

Страница 15: ...e ON LINE button to put the machine in an off line state 5 2 3 2 While in off line state press PAUSE twice and the machine will automatically cut a small square in the media 5 2 3 3 Peel off the squar...

Страница 16: ...e state The LCD will display the following information 5 3 2 Moving the blade tip While in the off line state press buttons to move the tool carriage left or right When pressing the buttons the main s...

Страница 17: ...origin Arbitrary origin Absolute origin 5 3 4 Raising and lowering the blade While in the off line state press the DN button to lower the blade and then press UP to raise the blade 5 3 5 RESET By pres...

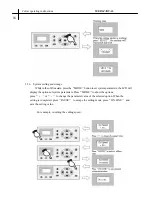
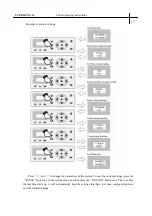
Страница 18: ...on to set system parameters the LCD will display the options of system parameters Press MODE to show the options press or to change the parameter value of the selected option When the setting is compl...

Страница 19: ...nge the parameters of the system To save the current settings press the PAUSE button to exit the setting mode and then press the ON LINE button once The next time the machine starts up it will automat...

Страница 20: ...nge of testing times is 0 255 Press the ON LINE button to start a plot Demo Test graph Testing with the installed blade should only be done once To repeat the testing replace the blade with a plot pen...

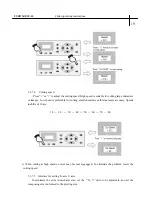
Страница 21: ...for cutting small characters as this increases accuracy Speeds in shifts of 10 are 10 20 30 40 50 60 70 80 When cutting at high speeds curves may become zigzagged To eliminate the problem lower the c...

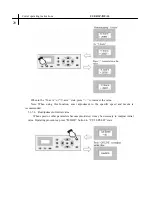
Страница 22: ...ct adjustment to the specific speed and media is recommended 5 3 7 6 Readjustment of initial value When speed or other parameters become disordered it may be necessary to readjust initial value Operat...

Страница 23: ...5 4 Equipment specifications USER MANUAL Cutter operating instructions 21...

Страница 24: ...eed is not adjusted to the character size Generally to cut small glossy characters precisely cutting speed should not exceed 40 In most cases a speed of 50 60 is preferred To quickly cut large charact...

Страница 25: ...ve operation please contact technical support 6 10 Question Why can t some characters close in strokes when it is plotting Answer You may need to set closing compensation in your cutting software Plea...

Страница 26: ...may be necessary to widen page width or set seaming distance 2 When using a large format cutter to cut large characters make sure that the media is correctly aligned to prevent deviation and waste 6...

Отзывы: