


.
11.
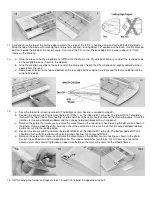
Carefully carve the top of the trailing edge to match the slope of the to T.E. sheeting using an X-Acto #26 whittling blade.
Wrap the top of the blade with masking tape (to protect sheeting), leaving about 1/2" exposed at the base. Use the masked
portion to guide the blade at the correct angle. Final sand the T.E. so that the back edge of the wing is about 1/4" thick
(same as the ailerons).
12.
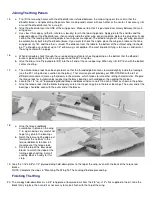
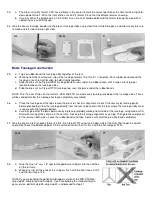
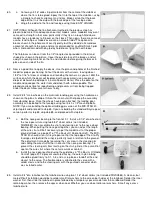
a. Glue the die-cut Lite-Ply wingtip brace (WTB) onto the die-cut Lite-Ply wingtip. When dry, sand off the rounded ends
of the wingtip brace as shown in the diagram.
b. Glue the wingtip assembly to the outer end of the wing panel. Notice that the wingtip cants slightly upwards (when
viewed from the rear).
c. Add scraps of balsa to the top and bottom of the rear edge of the wingtip. Carefully sand the balsa to blend into the
wing trailing edge.
13.
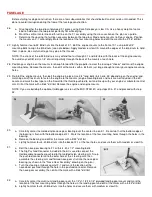
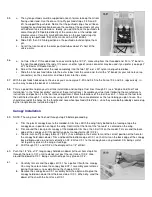
a. Sand the top center sheeting smooth. (The bottom center sheeting is sanded in step 22.)
b. Position the die-cut Lite-Ply rib cutout guide #1 (RCG-1) on the inboard W-1 wing rib. The top of RCG-1 should be
flush with the top of the center sheeting, and the notches at the rear should fit around the main wing spars. Trace the
notches for the wing hold-down dowel and the canopy hold-down block with a sharp pencil.
c. Remove the guide, then measure and mark the cutout area on the top center sheeting using the dimension shown in
the photo. Using a modeling knife, carefully cut out the outline area. Also cut the slot for the wing-hold down dowel,
but do not cut into the leading edge.
d. Position the die-cut Lite-Ply rib cutout guide #2 (RCG-2) on the inboard W-1 wing rib. The bottom edge of RCG-2
should be flush with the bottom surface of the wing sheeting. Trace around RCG-2.
e. Remove the guide, then measure and mark the cutout area on the bottom center sheeting as shown in the photo.
Cut out the outlined area with a modeling knife. This step accomplishes two things. First it clears an area for the
aileron servo; and second, it provides an open area between the main wing spars for the dihedral brace.
14.
Set this wing panel aside, and repeat steps 1 through 13 to build the opposite wing half.