


.
COVERING
General Instructions
Before choosing the covering for your model, please refer to the list of approved covering materials that has been included
with this kit. The open-structure design of the Mid-Star 40 wing relies partially on the covering to aid in torsional stiffness,
so it is very important that you use an approved covering material.
All of the Mid-Star 40 prototypes were covered with Sig Supercoat Iron-On Plastic
Covering. Supercoat is ideal for sport models because it's lightweight and easy to
apply. You will need two rolls of Supercoat to cover the model.
We recommend that you cover the wing, fuselage, tail surfaces, and control
surfaces all separately before hinging and final assembly. This way the parts are
much easier to handle.
The following instructions provide advice and procedures specific to the Mid-Star 40. If this is your first attempt at covering,
be certain to read the two pages of step-by-step, photo-illustrated instructions included with each roll of Sig Supercoat. If
you choose another brand of covering material, be sure to read the manufacturer's directions (supplied with the covering)
and follow them carefully.
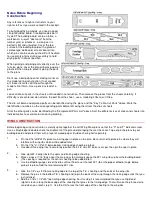
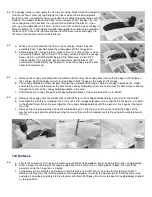
Surface Preparation
A good covering job starts with good surface preparation. Regardless of what type of covering you choose, it won't hide
poor workmanship. Any gaps around the tabs and slots in the fuselage should be filled with medium or slow CA. Fill any
small surface gaps or dents with a lightweight filler or spackling paste. Sand the entire model, including the ailerons and
tail surfaces, with 220-grit sandpaper, then again with 360 or 400-grit sandpaper.
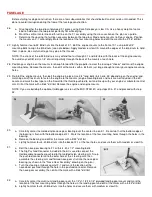
Temporarily mount your engine on the model so that you can make cutouts as
necessary in the side "cheeks" to clear the muffler and to allow access to needle
valves, carburettor adjusting screws etc. When satisfied, remove the engine and
touch up the cutouts with some sandpaper. Since it's too difficult to apply
covering material inside the engine compartment, it must be fuel proofed using
several coats of clear dope or two coats of polyester (glass) resin, sanded
between coats. Finish off the engine area with a few coats of colored Sig
Supercoat Dope. (Most of the Sig Supercoat Plastic Iron-On Covering colors
have a matching Sig Supercoat Dope color).
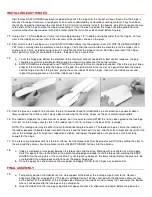
Covering The Fuselage
The fuselage should be covered with seven pieces in the order described here:
Fuselage Bottom - 1 pieces
Fuselage Sides - 2 pieces, left and right
Fuselage Top - 4 pieces, nose brace, hatch, stringers, CF-2
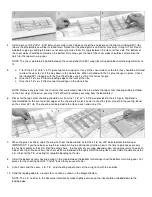
All seams should overlap about 3/16". When covering solid wood surfaces like the front of the fuselage sides, better
results can be obtained by starting at the center and working toward the outer edges, allowing air to escape as you iron.
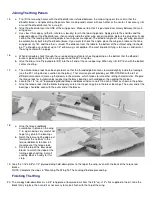
The trickiest part of covering the fuselage is the stringer area. Start by ironing the middle of your material to the top of the
stringers, then work with each side separately. Carefully tack the material to the top edge of the fuselage side, then trim off
the excess, leaving a 3/16" overlap. To avoid slicing into the material underneath, slide a piece of thin cardboard under the
excess stringer covering before cutting it with a knife. Use a straight edge to make a nice, straight cut.
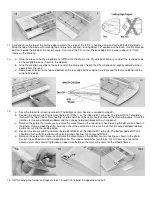
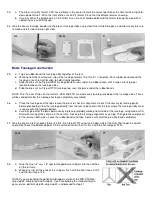
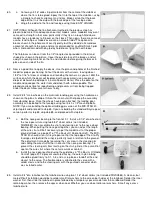
Go back over the side seams with your iron, then seal the material to the top edge of CF-2 at the front and F-6 at the back.
Trim the excess at each end leaving an overhang of about 1/8" to iron around the corners. Seal down the 1/8" overhang to
the front of CF-2 and back of F-6. Now you can use a heat gun or iron to shrink the rest of the material over the stringers.
A small, separate piece of covering material can be applied to the front of CF-2 to improve its look and protect it from
engine exhaust.