


.
62. The canopy interior is now ready to finish to your liking. Since it won't be exposed
to fuel or exhaust, most any type of paint can be used on the wood and plastic.
For best results, we recommend spraying light coats of Sig Supercoat Dope or Sig
Skybrite. The wood can be covered with an iron-on plastic film, but don't try it on
the canopy base (the heat from the iron will melt and distort the plastic). If you
wish, you can add a pilot at this time - just be sure it fits under the clear canopy. A
Williams Brothers 2" scale Sportsman pilot looks good, but needs to be sanded at
the base to fit. Cut out the instrument panel from the decal sheet and apply it to
the face of the console for that finishing touch.
63.
a. When you're satisfied with the finish of your canopy interior, tape the
assembly back in position along the outer edges of the canopy base.
b. Before gluing the canopy in place, make certain it's inside surface is clean -
you won't be able to get at it later! The canopy can be glued to the canopy
base and CF-1 with Wilhold RC-56 glue, Sig-Ment glue, or clear RTV
silicone rubber. CA's will work, but will sometimes fog the plastic (CA
accellerators will definately fog the plastic). Tape the canopy in place and
allow to completely dry.
64.
a. Remove the canopy assembly from the model and trim away the canopy base flush with the edge of the flange on
the canopy. Sand the edges smooth leaving about a 3/32" flange on the sides of the canopy.
b. The canopy hold-down screw will pass through the extended front flange. Tape the canopy in place on the model
and carefully mark the location of the hole for the canopy hold-down screw. Be certain that the hole will pass directly
through the center of the canopy hold-down block in the wing.
c. Drill through the canopy flange and canopy hold-down block at the same time with a 1/8" drill bit.
65.
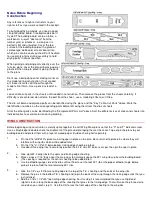
a. Remove the canopy from the model, then redrill the hole in the canopy hold-down block with a 3/16" dia. drill bit.
b. Assemble the 4-40 brass threaded insert, the 4-40 x 3/8" canopy hold-down screw, and the #4 flat washer as shown
in the photo. Screw the entire assembly into the canopy hold-down block until the washer is flush against the top of
the wing.
c. Remove the screw and washer leaving the threaded insert in the wing. (You may have to hold the edges of the
washer with a pair of pliers while loosening the screw.) Secure the threaded insert to the wing with a drop or two of
thin CA.
Tail Surfaces
66.
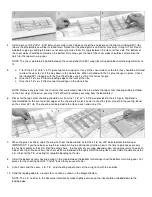
a. Locate the two pre-cut 1/4" balsa elevators and sand their trailing edges round, including their inner, angled edges.
b. Draw a hinge line centered on the leading edge of each elevator. Use a sanding block to bevel the front of the
elevators using the hinge line as a guide.
c. Temporarily pin the elevators to the plans and mark where the 3/32" dia. music wire elevator joiner will attach.
Remove the elevators, then drill and groove their leading edges to accept the elevator joiner. Sand the joiner wire
and wipe it clean before gluing it to the elevators with Kwik-Set Epoxy. Be certain to keep the leading edges aligned
as the glue dries.