


.
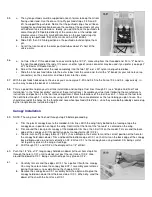
There is no one type of muffler that is best suited to the MID-STAR 40. It all depends on the particular engine that you have
selected. If you have a 2-stroke engine, use the muffler that was supplied with it or one of the many aftermarket mufflers that
are available. As with any mid-wing model, its a good idea to install a commercially-available exhaust diverter to keep the
engine exhaust from hitting directly on the leading edge of the wing. Most 4-stroke engines don't require a muffler because of
their low noise production. Angle the exhaust stack on your 4-stroke engine up and away from the model.
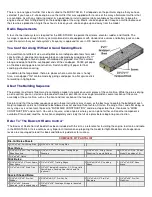
Radio Requirements
A four-channel radio system is required for the MID-STAR 40 to operate the ailerons, elevator, rudder, and throttle. The
fuselage is spacious enough that any common brand of radio equipment with standard size servos and battery pack can be
used. Be certain that your radio system's frequency is approved for use in R/C nodel aircraft.
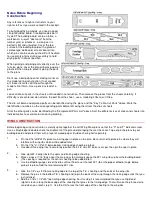
You Can't Get Along Without A Good Sanding Block
An assortment of different size sanding blocks are indispensable tools for model
construction. A good general purpose block can be made by wrapping a 9"x11"
sheet of sandpaper around a piece of hardwood or plywood. Use three screws
along one edge to hold the overlapped ends of the sandpaper. Put 80-grit paper
on the block during general construction. Switch to 220 grit paper for final
sanding just before covering.
In addition to the large block, there are places where a smaller one is handy.
Also, a sandpaper "file" can be made by gluing sandpaper to a flat spruce stick
for working in tight places.
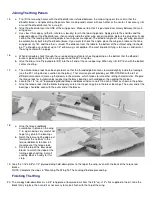
About The Building Sequence
The quickest and most efficient way to complete a model is to work on several pieces at the same time. While the glue is drying
on one section, you can start on or proceed with another part. Work can even go forward on several sections of the same
assembly at the same time, such as the front and rear sections of the fuselage.
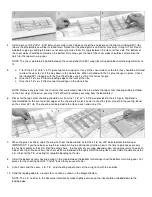
Keep in mind that the number sequence used in these instructions was chosen as the best way to explain the building of each
major component and is not intended to be followed in exact one-two-three fashion. Start on the wing at No.1 and after doing as
many steps as is convenient, flip over to "FUSELAGE CONSTRUCTION" and do a step or two there, then back to "WING
CONSTRUCTION" and so forth. You will, of course, arrive at points where you can go no farther until another component is
available. Plan ahead, read the instructions completely and study the full size plans before beginning construction.
Refer To "The Basics Of Radio Control"
"The Basics of Radio Control" booklet has been included with this kit as a reference for installing the engine, fuel tank, and radio
in the MID-STAR 40. It also contains very important information on preparing the model for flight. Modellers of all experience
levels are encouraged to read this book and follow its guidelines for success.
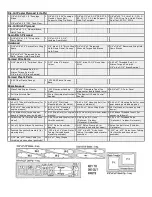
COMPLETE KIT PARTS LIST
Die-Cut Balsa Sheets
3 3/32"x3"x9" W-1 Wing Ribs
4 3/32"x3"x 18" W-2 Wing Ribs
Sheet Balsa
2 1/16"x1-1/4"x30" Top Trailing
Edge Sheeting
2 1/16"x1-1/2"x30" Bottom Trailing Edge
Sheeting
2 1/16"x3"x30" Wing Center
Sheeting, Top and Bottom
18 3/32"x3"x1-3/16" Shear
Webs (3 bundles of 6)
1 1/4"x4"x6" Hatch
Stick Balsa
6 3/16"x3/16"x30" Front Spars,
Rear Spars
2 1/4"x1/4"x30" Trailing Edges
2 5/16"x5/16"x30" Leading
Edges
1 1/4"x1"x3-5/8" Nose
Brace
2 1/4"x1"x4-3/16" Stab Tips
1 1/2"x30" traingle Braces for F-1, Wing Hold
Down Blocks, Landing Gear Bolck and Fin
(optional)
Special Shaped Balsa
1 3/16"x2-1/2"x9" Pre-Cut
Rudder
1 3/16"x4"x8-1/2" Pre-Cut Fin
2 1/4"x2'x9-1/2" Pre-Cut
Elevators
1 1/4"x5"x18" Pre-Cut
Stabilizer
2 1/4"x1"x30" Ailerons
(tapered, with rounded edge)
2 1/4"x1/4"x18" Fuselage Stringers (beveled
edges)