


14
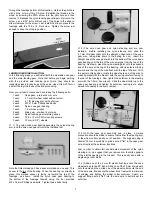
MOUNTING THE COWL, SPINNER, & PROPELLER:
For the following steps, locate the following parts from the kit
contents:
1 each
Molded and painted plastic cowl.
4 each
T2.6 x 8 mm PWA screws
1 each
2" dia. black plastic spinner
In addition, you will also need to have the propeller that you plan
to use available.
❑
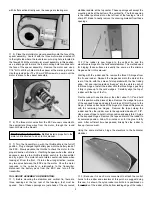
1) Slide the cowl in place over the motor and nose gear wire,
onto the nose of the fuselage. Use pieces of tape to hold the cowl
as far onto the fuselage as it will go. Mount the rear spinner base
onto the motor propeller adaptor, followed by the propeller. Mount
the propeller in place to the propeller adaptor. Place the front
spinner cone over the propeller and engage its base into the
grooves molded into the spinner base. Secure the spinner fully in
place to the spinner base with the provided self-tapping screws.
Tighten the screws to fully seat the spinner cone.
❑
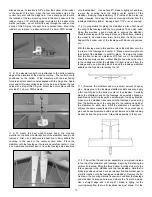
2) Remove the tape holding the cowl to the fuselage. Slide the
cowl forward to within 1/16" - 3/32" of the rear face of the spinner
base plate. In side view, the spinner should be approximately
centered between the top and bottom curvatures of the front of the
cowl.
In top view, the cowl should be sitting squarely on the
fuselage. This is the optimum mounting position for the cowl in
relationship to the propeller and spinner.
Use pieces of tape to firmly hold the cowl in this position. Use a
1/32" bit to drill four pilot holes through the pre-drilled holes in the
cowl, into the fuselage. Use the four provided T2.6 x 8 mm PWA
screws to now mount the cowl in place to the fuselage.
❑
3) Remove the spinner and propeller from the motor. Remove
the cowl from the fuselage. "Harden" the four cowl mounting holes
in the fuselage with a single small drop of thin CA glue in each
hole. Remount the cowl to the fuselage with the four mounting
screws.
❑
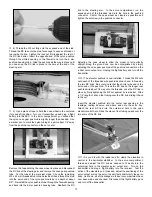
4) The propeller and spinner can now be final-mounted to the
motor propeller adaptor.
Note that when trying to tighten the
propeller nut, the spinner backplate may slip against propeller
shaft adaptor on the motor, allowing the propeller to slip out of
position. If this happens, remove the propeller nut and spinner
backplate and glue a small disk of coarse sandpaper (80 - 100 grit)
on the front of the propeller adaptor flange. Then, assemble the
parts as before and tighten the propeller nut firmly.
Be sure to align the propeller correctly against the molded studs
on the spinner base plate.
This allows the spinner cone to
correctly engage to mounting grooves. Once these parts are in the
proper position, the spinner cone can be snugged in place with the
mounting screws.
SAFETY WARNING: Now that the propeller is mounted to the
motor, it is very important that you always remain aware of the
position of the throttle stick on your transmitter, whenever a
battery pack plugged into the airborne system. The typical motor
unit used in this model is powerful enough to cause damage to
people or property if it is activated prematurely, accidentally, or
unexpectedly. With electric model aircraft, we always urge you to
get in the habit of always keeping the throttle stick in the full "low
position" even when the transmitter is in storage. Be sure to
always check the throttle stick position before plugging the
airborne battery into the ESC. Under no circumstances should
you hold this model by the nose when the battery is plugged in
to the ESC. Never plug the battery pack into the ESC until you
are on the flight line and ready to fly.