CHAPTER 2. INSTALLATION, ADJUSTMENT, SETTING
PN-T321/T322B
INSTALLATION, ADJUSTMENT, SETTING
2 – 3
■
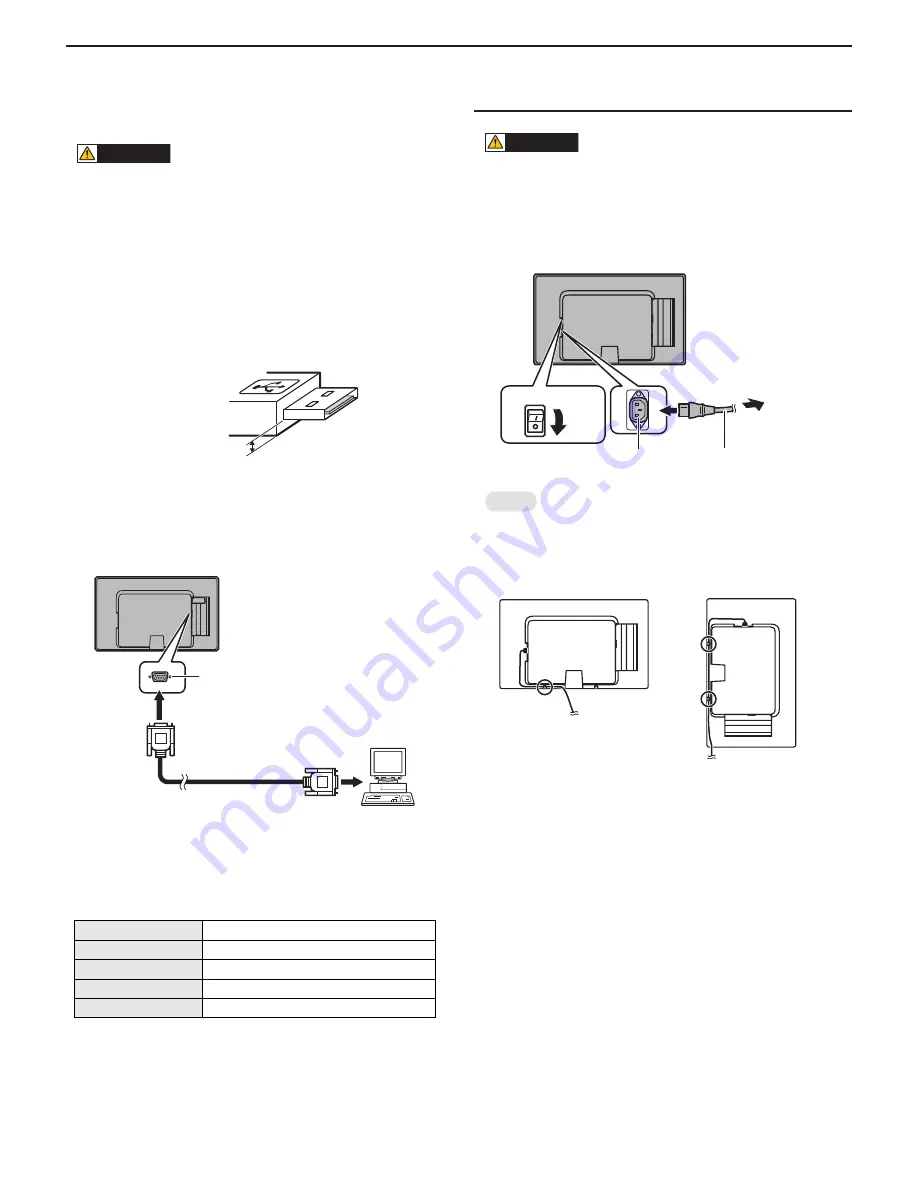
USB FLASH DRIVE CONNECTION
Connect a USB flash drive to the USB port.
CAUTION
n
Do not connect a USB device other than a USB flash drive.
n
Turn off the power of the monitor when connecting or removing a
USB flash drive.
n
Do not use a USB extension cable.
n
Do not use a USB flash drive with a security function.
n
Use a USB flash drive with a shape that can be inserted in the
USB port. Some USB flash drives with special shapes cannot be
inserted.
n
A USB flash drive that has a thickness of more than 1/8 inch (3.6
mm) below the connector cannot be connected.
■
CONTROLLING THE MONITER WITH A PC
(RS-232C)
Connect with RS-232C straight cable between the PC’s COM port (RS-
232C connector) and the RS-232C input terminal on the monitor.
<COMMUNICATION CONDITIONS>
Set the RS-232C communication settings on the PC to match the moni-
tor's communication settings as follows.
1 - 2.
CONNECTING THE POWER CORD
CAUTION
n
Do not use a power cord other than the one supplied with the
monitor.
1 ) Turn off the main power switch.
2 ) Plug the power cord (supplied) into the AC input terminal.
3 ) Plug the power cord (supplied) into the AC power outlet.
MEMO
n
Insert the power code through the claw at the bottom of the mon-
itor (left side of the monitor if oriented vertically).
Baud rate
9600bps
Data length
8 bits
Parity bit
None
Stop bit
1 bit
Flow control
None
1/8 inch [3.6 mm]
RS-232C input terminal
RS-232C straight cable
(commercially available)
To COM port
PC
1
2
3
Main power switch
AC input terminal
Power cord (Supplied)
For power
outlet
For the monitor in
horizontal orientation
For the monitor in
vertical orientation


