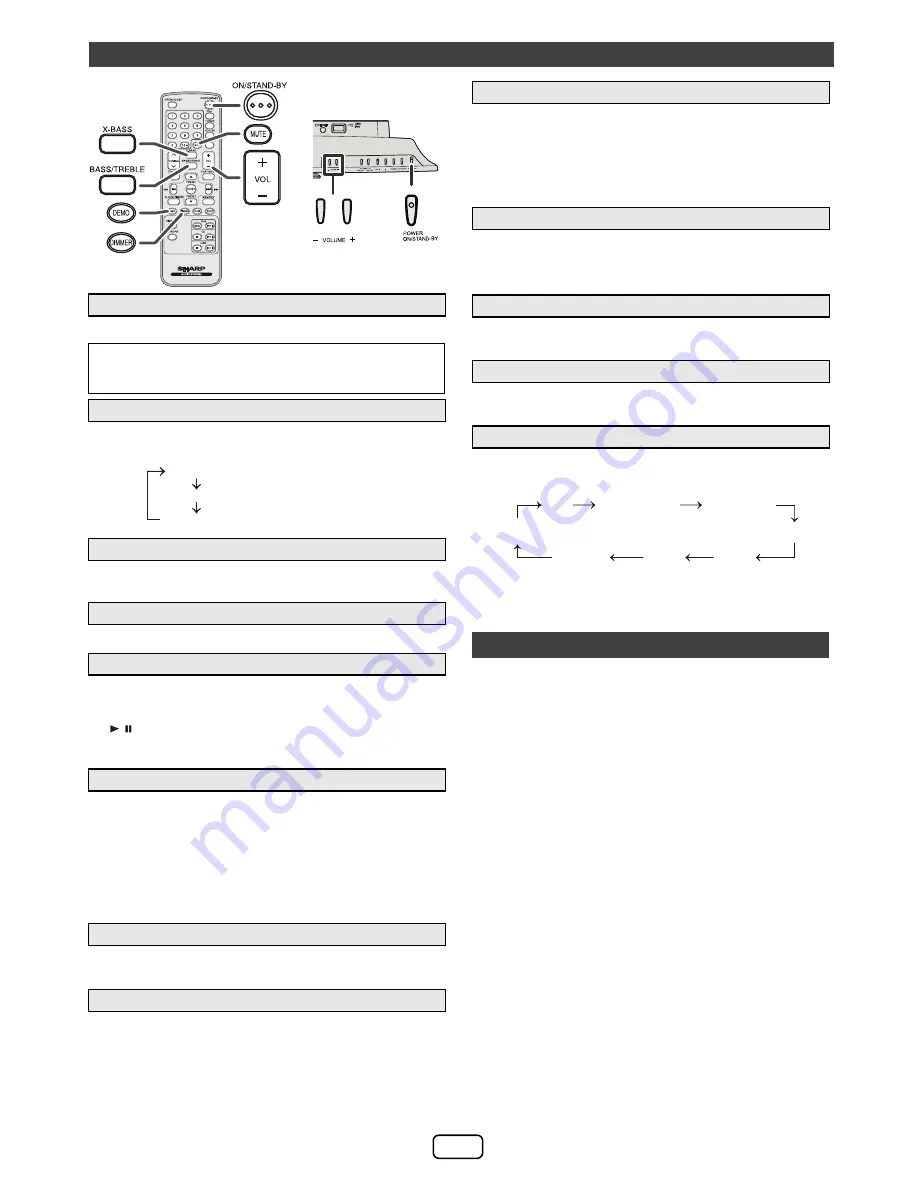
background image

E-2

Press the POWER ON/STAND-BY button to turn the power on.

To dim the display brightness, press the DIMMER button on
the remote control.

If you turn off and on the main unit with the volume set to 27 or
higher, the volume starts at 16 and fades in to the last set level.

Press VOL +/- to increase or decrease the volume.

When you press any of the following buttons, the unit turns on.

iPod, CD/USB, AUDIO IN, TUNER, NETWORK on the
remote control: Selected function is activated.

/  button on the main unit: The unit turns on and

playback of the last function will start (CD, TUNER, USB,
iPod, AUDIO IN, NETWORK)

The main unit will enter the stand-by mode (when iPad, iPod or
iPhone is not connected) after 15 minutes of inactivity during:
iPod :

Not docked.

Audio In : No detection of input signal.
CD :

In the stop mode or no disc.

USB :

In the stop mode or no media.

Note:

However, if iPod or iPhone is docked, the unit will begin
charging. “Charge Mode” will be displayed.

The volume is muted temporarily when pressing the MUTE
button on the remote control. Press again to restore the volume.

During stand-by mode, when you select DK-KP95P speaker
through AirPlay icon on your AirPlay device, the unit will
automatically power on to Network function and stream the
music from your AirPlay device.
This condition applies when:

The AirPlay network has previously been set up
between the unit and your AirPlay device.

Set the Network Stand-by mode to ON. (refer page 4)

During other function (CD, TUNER, USB, iPod, Audio In), when you select DK-
KP95P speaker through AirPlay icon on your AirPlay device, the unit will
automatically switch to Network function and stream the music from your AirPlay
device.
This condition applies when:
The AirPlay network has previously been set up between the unit and your
AirPlay device.

When the power is first turned on, the unit will enter the extra
bass mode which emphasises the bass frequencies, and
“X-BASS” indicator will appear. To cancel the extra bass mode,
press the X-BASS button on the remote control.

1

Press the BASS/TREBLE button to select “Bass”.

2

Within 5 seconds, press the VOLUME (+ or –) button to adjust the bass.

1

Press the BASS/TREBLE button to select “Treble”.

2

Within 5 seconds, press the VOLUME (+ or –) button to adjust the treble.

When the FUNCTION button on main unit is pressed, the current
function will change to different mode. Press the FUNCTION
button repeatedly to select desired function.

Note:

The backup function will protect the memorized function mode for
a few hours should there be a power failure or the AC power cord
becomes disconnected.

(AirPlay)

With Apple AirPlay technology, you can stream your music from your
iTunes on a Mac, PC, iPhone, iPod touch, or iPad to external speakers
(DK-KP95P) via a Wi-Fi network.

AirPlay usage requires:

MacBook or MacBook Pro running MacOS 10.6.6 or greater.

iTunes 10.2 or greater (Mac/PC).

iOS 4.3 or later
- iPod touch (4th, 3rd and 2nd generation)
- iPhone 4
- iPhone 3GS (iPhone 3G cannot support AirPlay)
- iPad 2
- iPad

(DLNA)

DLNA technology enables you to share media from one device to 
another via a Wi-Fi network.

DLNA usage requires:

DLNA compatible devices with appropriate application. (Refer to
your devices’ manual) Support status varies depending on model
and software features such as client and server functions.

PC with Windows 7.

DLNA version 1.5

This product supports audio source with playback capability only.
Streaming (audio and video) from DLNA devices is not supported
by this product.

DRM file playback (DTCP-IP) is not supported.

SHARP does not guarantee that this product will work with all
DLNA compatible devices and wireless LAN routers.

Note:

When this unit is placed too near a Wireless LAN device or microwave,
noise interference may occur, causing crackling sound. It may also
reduce the communication speed and cause invalid connection. If these
happen, do the following:
- Place the unit away from the Wireless LAN device or microwave.
-  Place the unit closer to the source device.

General control

To turn the power on

After use:

Press the POWER ON/STAND-BY button to enter the 
power stand-by mode.

Display brightness control

Volume auto fade-in

Volume control

Direct key power on function

Auto power off function

Muting

Auto power on

Dimmer 1

Dimmer 2

Dimmer off

(Display is dim).

(Display is bright).

(Display gets dimmer).

AirPlay auto switch

X-Bass control

Bass control

Treble control

Function

Wi-Fi network Setup for AirPlay / DLNA

FM STEREO

FM MONO

USB

iPod

Audio In

AM

CD

NETWORK

Содержание DK-KP95P

Страница 1: ... with this product in revenue generating broadcast systems terrestrial satellite cable and or other distribution channels revenue generating streaming applications via Internet intranets and or other networks other revenue generating content distribution systems pay audio or audio on demand applications and the like or on revenue generating physical media compact discs digital versatile discs semi...

Страница 2: ...ack or batteries installed shall not be exposed to excessive heat such as sunshine fire or the like Notes concerning use Replace the battery if the operating distance is reduced or if the operation becomes erratic Purchase an AA size battery UM SUM 3 R6 HP 7 or similar Periodically clean the transmitter on the remote control and the sensor on the unit with a soft cloth Exposing the sensor on the u...

Страница 3: ...1 PresstheBASS TREBLEbuttontoselect Treble 2 Within5 seconds press the VOLUME or buttonto adjustthe treble When the FUNCTION button on main unit is pressed the current function will change to different mode Press the FUNCTION button repeatedly to select desired function Note The backup function will protect the memorized function mode for a few hours should there be a power failure or the AC power...

Страница 4: ...r devices manual 8 Select your router from the list of available networks Enter your network password if required 9 Continue with step 8 to 9 in Direct wireless connection Note WPS process network search takes about 2 minutes If fail to connect the display will show Cannot connect to Network Repeat step 4 to retry 1 Press the POWER ON STAND BY button 2 Press the NETWORK button on the remote contro...

Страница 5: ...ectly do the Network reset refer page 14 Various function can be controlled from the remote control or your AirPlay DLNA device Notes For DLNA compatible devices the function control may vary depending on DLNA application used To enable this unit to control iTunes software the setting below is required On Network Stand by mode is enable During stand by mode if select DK KP95 speakers through AirPl...

Страница 6: ... Once the calls are answered the conversation can only be heard through the built in iPhone speaker Turn on the iPhone speaker or undock the iPhone to start conversation Caution Unplug all accessories from the iPod or iPhone before inserting it into the dock Note Docking station is not recommended for iPad connection For iPod nano or iPod touch For additional support apply dock spacer supplied as ...

Страница 7: ...iPod iPhone or iPad continued iPod or iPhone playback 1 Press the POWER ON STAND BY button to turn the power on 2 Press the iPod button on the remote control or FUNCTION button repeatedly on the main unit to select iPod function 3 Insert iPod or iPhone unit into the dock of main unit DOCK OK will appear 4 Press the iPod button to start playback Navigating the iPod iPhone or iPad menus 1 Press the ...

Страница 8: ...l Repeat One appears Press the CD button To repeat all tracks Press the PLAY MODE button repeatedly until Repeat All appears Press the CD button To repeat desired tracks Perform steps 1 4 in Programmed play section on page 8 and then press the PLAY MODE button repeatedly until Repeat All appears Caution After performing repeat play be sure to press the CD button Otherwise the disc will play contin...

Страница 9: ... Numeric button on the remote control to select the desired track Note To select track number 10 or higher refer Direct track search 3 Repeat step 2 for other tracks Up to 32 tracks can be programmed If you want to check the programmed tracks press the MEMORY button repeatedly If you make a mistake the programmed tracks can be cleared by pressing the CLEAR button 4 Press the CD button to start pla...

Страница 10: ...o various unforeseen reasons from some devices Should this happen turn off the unit and then turn it on again During CD function MP3 player will not be charging Listening to USB mass storage device MP3 player To play back USB MP3 player with folder mode off 1 Press the CD USB button on the remote control or FUNCTION button repeatedly on main unit to select USB function Connect the USB memory devic...

Страница 11: ...y and recall them at the push of a button Preset tuning Note The backup function protects the memorized stations for a few hours should there be a power failure or the AC power cord becomes disconnected Press the PRESET or button for less than 0 5 seconds to select the desired station The stations saved in the memory can be scanned automatically Preset memory scan Advanced USB playback Listening t...

Страница 12: ...r button once to advance the time by 1 hour Hold it down to advance continuously 6 To adjust the minutes press the or button and then press the ENTER button Press the or button once to advance the time by 1 minute Hold it down to advance the time by 5 minutes interval 1 Clear all the programmed contents Refer to Factory reset clearing all memory on page 14 for details 2 Perform Setting the clock f...

Страница 13: ...perates at the same time every selected day It will continue until the daily timer setting is canceled Cancel the daily timer when it is not in use 1 Turn the power on and press and hold down the CLOCK TIMER button 2 Within 10 seconds press the or button to select Once or Daily and press the ENTER button 3 Within 10 seconds press the or button to select Timer Call and press the ENTER button 1 Turn...

Страница 14: ... sound is heard Is the volume level set to Min Are the headphones connected CD player Symptom Possible cause Playback does not start Playback stops in the middle or is not performed properly Is the disc loaded face down Does the disc satisfy the standards Is the disc distorted or scratched Playback sounds are skipped or stopped in the middle of a track Is the unit located near excessive vibrations...

Страница 15: ... away from direct sunlight heat and excessive moisture Always hold the CDs by the edges Fingerprints dirt or water on the CDs can cause noise or mistracking If a CD is dirty or does not play properly clean it with a soft dry cloth wiping straight out from the centre along the radius Troubleshooting chart continued Wi Fi connection Symptom Possible cause Wi Fi network connection failed Is your rout...

Страница 16: ...ifier Output power RMS Total 50 W 25 W per channel into 6 ohms at 1 kHz 10 T H D FTC 22 W minimum RMS per channel into 6 ohms from 100 Hz to 20 kHz 10 T H D Output terminals Headphones 16 ohms recommended 32 ohms Input terminals Audio In audio signal 500 mV 47 k ohms CD player Type Single disc multi play compact disc player Signal readout Non contact 3 beam semiconductor laser pickup D A converter...

Отзывы: