ENGLISH
70
CD-DVD500H
Enjoying 2 channel audio with digital con-
nection
Digital connection to audio equipment or MD player without a Dolby digital decoder
Audio CD
Play the disc as you normally would, with the audio mode set (see page 34). With a
digital connection, audio of a disc recorded with DTS sounds abnormal in this case.
DVD video disc
The digital connection is the connection to audio equipment that is not equipped
with a decoder. Because of this, it cannot produce 5.1 channel sound when playing
a DVD whose audio track is recorded in Dolby Digital (5.1 channel), Dolby Sur-
round (Pro Logic), DTS or MPEG audio. To play the audio on such a DVD, you must
configure a digital connection with an audio processor or amplifier equipped with a
decoder for the type of audio on the DVD. If you do not have such an audio proces-
sor or amplifier, use a 2-channel analogue (Down Mix) connection. Discs recorded
with Linear PCM audio should play normally using the digital connection.
Digital connection to an MD to record a CD
When you are using a digital connection to record the contents of a CD on an MD, the
track numbers of the CD may not match the track numbers recorded on the MD.
After making the connection
Set the “
DIGITAL” or “MPEG” in “AUDIO SETUP” to “D-PCM” or “PCM” (see page 24).
Enjoying Dolby Digital (5.1 channel), DTS
and MPEG audio with digital connection
Connecting an amplifier with a Dolby Digital/DTS/MPEG audio digital surround pro-
cessor or a Dolby Digital/DTS/MPEG audio digital surround decoder to this unit’s
optical digital socket provides richer, more powerful audio play.
To use DTS digital surround, use the disc menu screen (page 40) or the function
control screen (page 31) to select DTS audio.
After making the connection
Set the “
DIGITAL” or “MPEG” in “AUDIO SETUP” to “BITSTREAM” (see page 24).
Notes:
To play a disc recorded with DTS, you need to use a DTS processor or amplifier.
This connection is not possible if the processor or amplifier to which you want to
connect does not have an optical digital input socket.
Refer to the operation manual for the processor or amplifier for information about
connecting to it.
To record on a tape from VCR etc.
1
Load a cassette in the TAPE 2 cassette compartment.
2
Press the VIDEO/AUX button.
3
Press the REC PAUSE
I 6
I 6
I 6
I 6
I 6
(
I 6
I 6
I 6
I 6
I 6
) button.
4
Press the
0
0
0
0
0
button.
5
Play back the VCR etc.
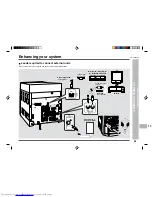
Using alternate subwoofer speakers
When a commercially available speaker with a built-in amplifier is connected to this
unit, you can enjoy sound with emphasised bass.
1
Connect an RCA lead from a commercially available speaker with a built-in
amplifier to the SUBWOOFER PRE OUT socket.
2
Set the unit to “SW-EXT” in “Speaker size setting” (see page 43).
Note:
No sound is heard from the external subwoofer when in the Bypass/Virtual mode.
Headphones
Before plugging in or unplugging the headphones, reduce the volume.
Be sure your headphones have a 3.5 mm (1/8") diameter plug and are between 16
ohms and 50 ohms impedance. The recommended impedance is 32 ohms.
Plugging in the headphones disconnects the speakers automatically. Adjust the
volume using the VOLUME control.
Note:
It is not possible to use the Normal/Phantom or Dolby Digital surround mode when
using your headphones.
When headphones are connected to the headphone socket, the Normal/Phantom mode
will be cancelled. (The unit will be set to the Bypass mode automatically.)
Enhancing your system (continued)
Advanced features
–
Enhancing your system
–

