background image

7

8

1-800-798-7398

sharkclean .com

GETTING TO KNOW YOUR  

SHARK ION ROBOT™

WELCOME!

Congratulations on 
your purchase. Use this 
instruction manual to 
learn about your new 
vacuum’s great features. 
From assembly to use 
to maintenance, you will 
find it all in here.

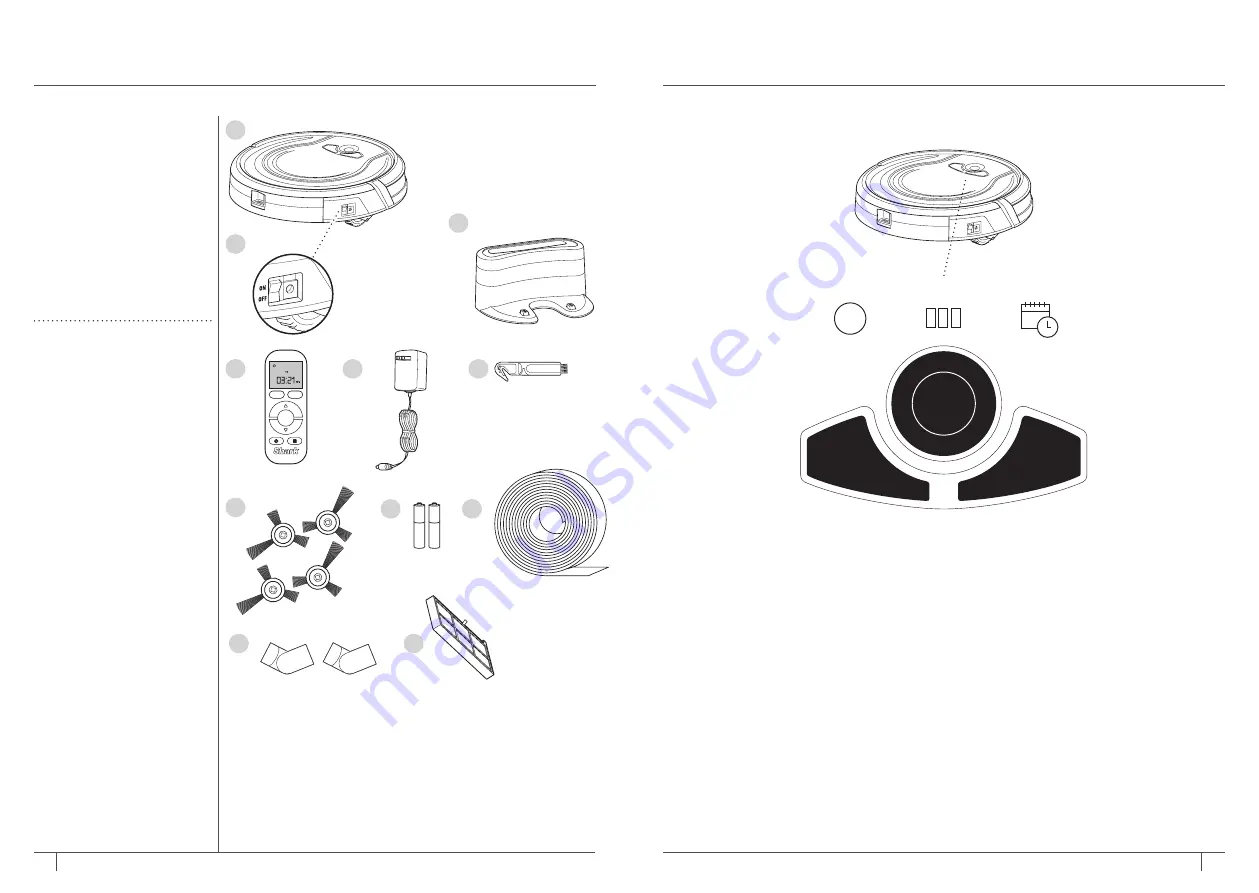
A

  Shark ION ROBOT

B

  Main Power Switch

C

  Charging Dock

D

  Remote Control 

(select models) 

E

 Charger

F

  Hair Removal Tool

G

  Side Brush (x4) 2 Extra

H

  AAA Batteries (x2)

I

  BotBoundary™ Strip

J

  BotBoundary Connectors (x2)

K

  Extra Filter

NOTE: 

When using for the 

first time, fully charge and 
discharge your Shark ION 
ROBOT to condition the 
battery. Failure to do so 
may cause LED indications 
to work incorrectly.

CLEAN BUTTON

To begin cleaning with your Shark ION 
ROBOT™, press the 

CLEAN

 button.  

Press button again to stop.

DOCK BUTTON

Press 

DOCK

 button to stop cleaning and 

send the unit back to the charging dock.

SPOT BUTTON

For thorough cleaning of an area of 
concentrated dust or debris, press the 

SPOT

 button.

“!” ERROR INDICATOR

When a blockage or a filter problem 
occurs, the “!” error indicator light will 
illuminate. Clear any blockages and clean 
filters. Remove dust bin and make sure 
nothing is blocking suction. See page 25 
for a full list of error codes.

BATTERY CHARGE INDICATOR LIGHTS

The indicator lights display the amount of 
charge remaining in the battery. See page 
10 for more details.

SCHEDULE INDICATOR

Illuminates when a cleaning time is actively 
scheduled.

A

C

B

D

F

E

H

I

G

J

K

Dock

Spot

Clean

Enter

Clean 

!


Spot

Dock

!


Clean 

Spot

Dock

Содержание ION ROBOT RV720 Series

Страница 1: ...RV720 Series INSTRUCTIONS sharkclean com 1 800 798 7398 ION ROBOT...

Страница 2: ...Cleaning the Side Brushes 20 Replacing the Side Brushes 20 Cleaning the Removable Front Wheel 21 Replacing the Battery 22 Tips and Tricks for Great Performance 23 Prepping Your Home Using BotBoundary...

Страница 3: ...e there are lit candles or fragile objects on the floor or on furniture that the unit may accidentally bump into 18 Unit should not be used near balconies or stairs Use a physical barrier or BotBounda...

Страница 4: ...can radiate radio frequency energy and if not installed and used in accordance with the instructions may cause harmful interference to radio communications However there is no guarantee that interfere...

Страница 5: ...incorrectly CLEAN BUTTON To begin cleaning with your Shark ION ROBOT press the CLEAN button Press button again to stop DOCK BUTTON Press DOCK button to stop cleaning and send the unit back to the char...

Страница 6: ...installed rechargeable battery Battery must be fully charged before using The Power switch must be in the ON position in order to charge the battery When the cleaning cycle is complete or the battery...

Страница 7: ...DOWN arrows to select AM or PM then press the CLEAN ENTER button to set 6 Once you have finished setting the time you can proceed to setting a cleaning schedule Dock Spot Clean Enter Dock Spot Clean...

Страница 8: ...ark ION ROBOT and ensure that Shark ION ROBOT is powered on 7 Use the UP DOWN arrows to select AM or PM then press the CLEAN ENTER button to set Use the UP DOWN arrows on the remote to select another...

Страница 9: ...N ROBOT will not bump into it NOTE You do not need to use BotBoundary Strips on stairs Your robot has cliff sensors what will prevent from falling off any cliffs or stairs CLEANING MODES Manual Start...

Страница 10: ...D CLEANING SCHEDULE Dust Bin Empty after each use Main Brushroll Check weekly Side Brushes Check weekly Dust Bin Filter Clean weekly Front Caster Wheel Remove and clean weekly RECOMMENDED REPLACEMENT...

Страница 11: ...fibers or other debris CLEANING THE CLIFF SENSORS AND CHARGING PADS For best results clean cliff sensors and charging pads periodically as needed With a dry cloth or a cleaning brush gently dust off t...

Страница 12: ...ocated in the cavity clean with a clean dry towel 4 Remove any debris built up on the axel of the black and white sensor wheel you can pop this wheel off for easy cleaning 5 Reattach the black and whi...

Страница 13: ...included connectors to create angles with your included BotBoundary strips Before Prep Robot Friendly 5 ft 3 ft 3 ft Use the BotBoundary strips to quickly and easily create no go zones to keep your ro...

Страница 14: ...Ninja 7 Products purchased used or operated outside of North America Problems with your unit How to get service If your appliance fails to operate properly while in use under normal household conditio...

Страница 15: ...ng to improve our products therefore the specifications contained herein are subject to change without notice SHARK is a registered trademark of SharkNinja Operating LLC BOTBOUNDARY and SHARK ION ROBO...

Отзывы: