SHAREBOT Next Generation XXL+ Скачать руководство пользователя страница 8

Sharebot Next Generation XXL+

user's manual

1 - Preliminar Operations 

Experience Sharebot XXL+

Your   professional   3D   printer   Sharebot   Next

Generation XXL+ is a tool of precision, designed,
developed and assembled in Italy by qualified staff.

Before leaving the factory it was submitted to a
quality control and to a quality test that guarantees

its operation. It’s very important, before you can use
the printer, knowing all the technical terms used in

this   handbook   and   identify   all   the   specific
components that form a Sharebot XXL+.

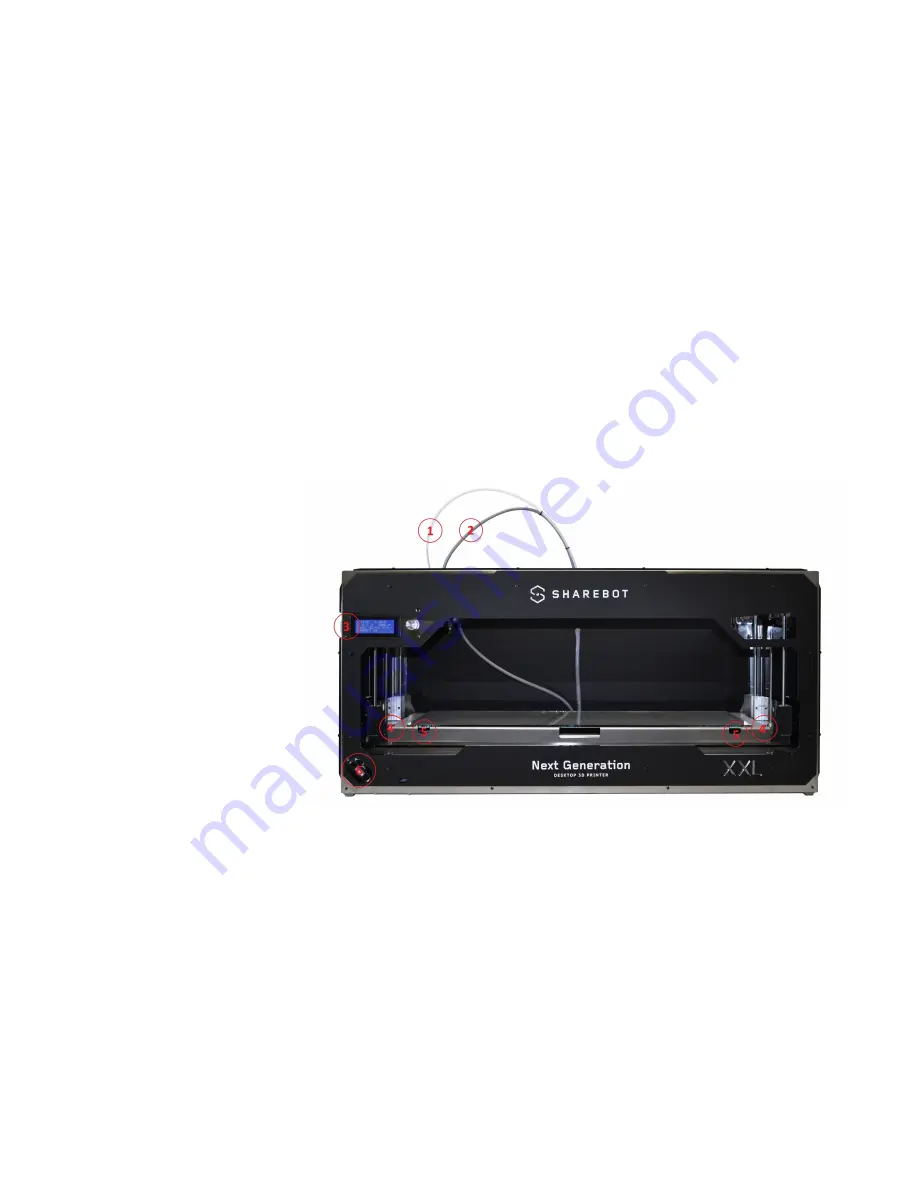
1 Filament teflon sheath
2 Extrusion head cable

3 LCD screen
4 Calibration screws

5 Clips position
6 Frontal ventilation of electronic

Sharebot srl 

Nibionno Italy

All rights reserved

. No part of this manual


may be reproduced or transmitted in any form or by any means without prior permission 

 page 8 

Содержание Next Generation XXL+

Страница 1: ...Generation XXL user s manual Version 0 4 06 2017 Sharebot srl Nibionno Italy All rights reserved No part of this manual may be reproduced or transmitted in any form or by any means without prior perm...

Страница 2: ...temperature of the glass plate will be less than the one shown for several minutes after the beginning of the heating process but likewise it may be warmer than what is indicated on the display for se...

Страница 3: ...nternet 13 From a 3D model to a printing file 14 A good STL a good slicing a good print 14 The printing file G code 15 Storing the files 15 3 LCD screen 15 Informative screen 16 The Control knob 16 Ac...

Страница 4: ...of Slic3r 30 The Slicing process 30 Simplify3D 31 7 Printing behaviour of thermoplastic materials 32 Printing behaviour of PLA 33 The heated bed 33 8 Consideration about models orientations 33 The or...

Страница 5: ...elts tension 39 Checking of proper ventilation 39 Firmware Update 39 Warnings on the safety 39 Sharebot srl Nibionno Italy All rights reserved No part of this manual may be reproduced or transmitted i...

Страница 6: ...r for assistance Upon receiving your printer our technicians will assess whether the problem results from a failure in this case the repair under warranty will be carried out for free or by improper u...

Страница 7: ...ure heated printing bed 90 Supported and tested printing filaments PLA External Dimensions 955 x 470 x 445 mm Weight 40 kg Power consumption 500 watt Electronic board compatible with Arduino Mega 2560...

Страница 8: ...lity test that guarantees its operation It s very important before you can use the printer knowing all the technical terms used in this handbook and identify all the specific components that form a Sh...

Страница 9: ...ntrol knob 9 Glass printing bed 10 Lateral ventilation of electronic 11 USB connection only for update Sharebot srl Nibionno Italy All rights reserved No part of this manual may be reproduced or trans...

Страница 10: ...l with Identification Code inside the printer on the right part of the chassis 3 Switch and power cable socket Sharebot srl Nibionno Italy All rights reserved No part of this manual may be reproduced...

Страница 11: ...cable that comes to the extruder it is a power cord and NOT an handle Proceed with the recovery from the packaging of all the parts and check that the material listed below are all in the package Warn...

Страница 12: ...ion is behind the printer on the same floor unrolling the filament bottom up There are alternative positions that possibles but in that case you have to disable the filament presence from the prepare...

Страница 13: ...lable There are many and each of them has specific characteristics In this respect it is worth noting that you can have different modelling requirements and this is reflected in the variety of applica...

Страница 14: ...slices according to a number of parameters slicing In order that the process is completed correctly the mesh should be closed and not have triangles that are oriented incorrectly confusing the inside...

Страница 15: ...rinting G Code a G Code file is definitely running for the printer for which it was created but could be unusable with other printers Do not print G codes downloaded from internet if they are not clea...

Страница 16: ...nd row displays the current position of the extruder and the z axis The values are in millimetres with two decimals indicate hundredths of millimetres The third row has on the left the percentage cont...

Страница 17: ...r decreasing the speed of all the movements and so the printing speed Access to principal menu Pressing the control knob you access the main menu Remember that the menu displayed depends on the state...

Страница 18: ...ractice you have complete control of the printer and you can perform all management and maintenance operations Info screen Change filament Disable steppers Autohome Preheat Preheat all Preheat bed Coo...

Страница 19: ...e start of each print the value is reset to ON The same procedure is possible from tune menu The following voice is used to change the filament while printing since the printer has the check filament...

Страница 20: ...leads to not have more precise and uniform spacing of the glass plate from the extruder which inevitably fails to apply the first layer with the accuracy and uniformity necessary for quality printing...

Страница 21: ...sensor disabled you can load the filament bypassing the sensor itself positioning the spool holder in a upper position in such manner that the filament reaches all the print area smoothly Sharebot srl...

Страница 22: ...ou will want to do before every prestigious print taking only a few tens of seconds With experience you might even make regulations on the fly while printing the first layer if there is evidence of so...

Страница 23: ...te too high You will notice that the narrowest parts detach themselves from the plate too much easily this is because the plate is too far from the extruder and so there is not adhesion between the ma...

Страница 24: ...you try to stop the filament you should hear a ping like a tak tak The springs have not to be tightened too much to avoid motor losses of step 5 Our first 3D printing If you followed the instructions...

Страница 25: ...only paused the printing process this operation may take a few seconds waiting for you to give the command Resume print Pay attention if you pause the printing process you may damage the printed part...

Страница 26: ...t Remember to pay maximum attention during the proceedings please wear protective gloves to avoid injury due to the warm glass plate or knife Whether you use a spatula or knife you have to try to put...

Страница 27: ...ed you may have the printing plate and certainly the extruder at high temperatures The nozzle remains for several minutes at a temperature such as to cause a burn check its temperature on lcd screen a...

Страница 28: ...op During the first run the software should ask you to set the parameters of your printer click cancel and load the config bundle Sharebot as shown in the next paragraph Load the Sharebot profiles in...

Страница 29: ...b click Add to import your 3D model with STL extension or you can just drag and drop it inside the software window Slic3r puts the model in the center of the printing area laying it on the printing pl...

Страница 30: ...nternal infill areas of the object rectilinear hexagonal etc The default value of 10 is a good compromise between speed and print quality Support material in the support material menu you can flag the...

Страница 31: ...algorithm allows to generate gcode very quickly The second but not less important is the management of the support material Simplify3D allows you to put it only where you really need it or alternativ...

Страница 32: ...the filament is extruded the first layer must be daub by the nozzle on the printing surface i f by cooling down the plastic loses grip the printing process can fail or decrease in quality because of t...

Страница 33: ...airspray supplied put back in the printer the printing glass blocking in with the clips and launch the print It is essential to spray the lacquer only outside of the printer apply the lacquer on the g...

Страница 34: ...nal position Cutting the object There are cases in which you need to print in a single piece but there are many cases where it is possible to cut into pieces the object to print it in an easier and be...

Страница 35: ...if it is activated within the printi ng parameters Depending on the parameters and the shape of the model are then created supporting structures thin walls to allow the filament to have a support At t...

Страница 36: ...ant impact in the object definition especially for all surfaces that grow upward Z with a very bland inclination Imagine an inclined plane and mentally sliced the size of the slices can vary widely an...

Страница 37: ...f thousands then they can even arise processing problems As you can guess below a certain threshold the details are no longer solved by the printer and then they are essentially useless Or rather are...

Страница 38: ...it with your fingers if this cause a skidding of the cogwheel on the filament the springs must be tightened up to cause a loss of steps to the engine you should hear a ping like tak tak The springs sh...

Страница 39: ...he fans Behind the stepper motor of the extruder there is a cooling fan dedicated to it also this fan is vital for the proper success of prints if not adequately cooled the engine transmits the heat t...

Страница 40: ...y labels Description of the safety signs SIGN DESCRIPTION A CE Label B Indicates the danger of electrocution at electrical casings of the machine Sharebot srl Nibionno Italy All rights reserved No par...

Страница 41: ...rushing at the point where the machine is located E Report the danger to the presence of hot surfaces at the point of the machine where it is placed Sharebot srl Nibionno Italy All rights reserved No...

Отзывы: