background image


73 


To set up and use PTZ patrols: 


1.


Enter the PTZ Control interface, shown in Figure 3 by clicking PTZ in the mouse menu or the PTZ 
button on the front panel. 

2.


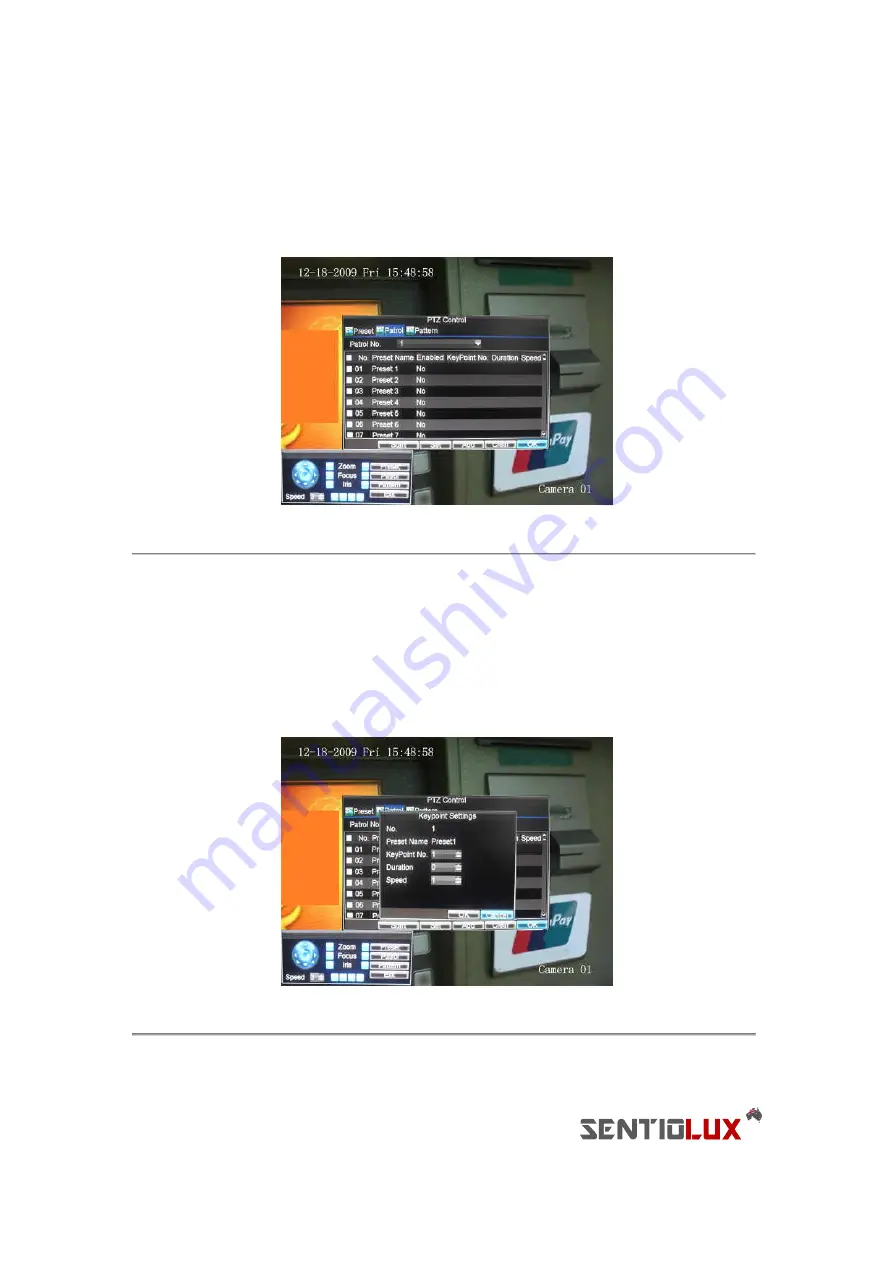
Select the Patrol button to enter the Patrol Management menu, shown in Figure 5. 


Figure 5. Patrol Management Menu 


3.


In the Patrol Management menu, you may: 

• Configure Patrol: 

1.


Select a 

Patrol Number 

to set. 

2.


Select valid presets (See 

Customizing Presets

) and click the Set button to enter the 

Patrol configuration menu. A sequence should have at least 2 valid presets. 

3.


Set the 

Key Point No.

Duration

, and 

Speed 

(Figure 6). The 

Key Point No. 

determines 

the order at which the PTZ will follow while cycling


through the patrol. The 

Duration 

refers to the time span to stay at the


corresponding key point. The 

Speed 

defines the 

rate at which the PTZ


will move from one key point to the next.


Figure 6. Patrol Configuration Menu 


4.


Click OK to return to Patrol Management menu and repeat steps 2-3 to configure other 
key points. 

Содержание RTDVD-8100-4CIF Series

Страница 1: ...RTDVR 8100 4CIF Series DVR USER S MANUAL Version3 1 0...

Страница 2: ...BILITY AND FITNESS FOR A PARTICULAR PURPOSE REGARDING THE SENTIOLUX SOFTWARE SENTIOLUX DOES NOT WARRANT GUARANTEE OR MAKE ANY REPRESENTATIONS REGARDING THE USE OR THE RESULTS OF THE USE OF THE SENTIOL...

Страница 3: ...a rack or shelf Major shocks or jolts to the unit as a result of dropping it may cause damage to the sensitive electronics within the unit Use the DVR in conjunction with an UPS if possible Power dow...

Страница 4: ...iguring Live Preview Displays 26 Setting Camera Order 28 C H A P T E R 4 29 Record Settings 29 Configuring Settings for Recording 30 Initializing Record Settings 30 Scheduling a Recording 31 Starting...

Страница 5: ...Remote Alarm Host 65 Configuring Multicast 66 Configuring Server and HTTP Ports 67 Email 67 C H A P T E R 9 69 PTZ Controls 69 Navigating PTZ Menus 70 Configuring PTZ Settings 70 Setting PTZ Presets...

Страница 6: ...ounts 89 Adding a New User 89 Deleting a User 92 Modifying a User 92 Managing System 93 Importing Exporting Configuration 93 Updating System Firmware 93 Restoring Default Settings 95 Viewing System In...

Страница 7: ...6 C H A P T E R 1 Introduction...

Страница 8: ...ncluding resolution frame rate bit rate image quality Each channel supports normal continuous and event compression parameters Support both composite stream and video only stream Audio and video are s...

Страница 9: ...gement Support video clips backup when playback Alarm Exception Support alarm in out arming schedule setting Support various alarm input such as hard disk full illegal access network break IP conflict...

Страница 10: ...ts Powerful DVR log including operation alarm and exception log Product Application Diagram Figure 2 Product Application Diagram Operating Your DVR There are numerous ways to navigate and operate your...

Страница 11: ...ed in various menus of the DVR Some uses include Switching to the corresponding channel in Preview or PTZ Control mode Inputting numbers and characters in Edit mode Switching between different channel...

Страница 12: ...TION Buttons The DIRECTION buttons are used to navigate between different fields and items in menus In Playback mode the Up and Down button is used to speed up and slow down recorded video The Left an...

Страница 13: ...10 MENU Button Same as MENU WIPER button on front panel 11 PREV Button Same as PREV FOCUS button on front panel 12 DIRECTION ENTER Buttons Same as DIRECTION ENTER buttons on front panel 13 PTZ Button...

Страница 14: ...ons on the mouse corresponds to 1 Left Button Single Click Select a component of a menu such as a button or an input field This is similar to pressing the ENTER button on the remote front panel contro...

Страница 15: ...input is being used Switch to Lowercase Switch to lowercase input Switch to Uppercase Switch to uppercase input Number Designates number input is being used Symbols Switch to symbols input Backspace...

Страница 16: ...h VIDEO OUT 4 LINE IN BNC connector for audio input 5 VGA VGA output Display local video output and menu 6 RS232 DB9 connector for RS232 7 LAN Interface Connector for LAN Local Area Network 8 USB Inte...

Страница 17: ...16 C H A P T E R 2 Getting Started...

Страница 18: ...es to message Are you sure you want to shut down now 3 Turn off switch on rear panel OPTION 2 Manual Shutdown 1 Press and hold the POWER button for 3 seconds 2 Enter the administrator s username and p...

Страница 19: ...e Setup Wizard at a later time by leaving the Start Wizard when DVR starts checkbox checked Figure 2 Setup Wizard To start using the Setup Wizard 1 Click the Next button on the Wizard window This will...

Страница 20: ...stalled select the HDD from the list to initialize it Initializing the HDD will format and remove all data from it 8 After the HDD has been initialized click the OK button which will take you back to...

Страница 21: ...will enable the recording schedule and have it record continuously all day Figure 7 Edit Schedule Settings 14 Click the OK button This will take you back to the Schedule tab To copy the schedule to a...

Страница 22: ...etup Wizard The next step in the initial setup process is to setup the system date and time Setting Date Time It is extremely important to setup the system date and time to accurately timestamp record...

Страница 23: ...22 Figure 9 General Settings 4 Enter the correct date and time under System Time 5 Click the Apply button to save the settings...

Страница 24: ...23 C H A P T E R 3 Live Preview...

Страница 25: ...ng Front Panel Remote Click PREV button Using Mouse Select Multi Camera in right click menu 3 Manual Switch Using Front Panel Remote To move to the previous screen click the Left direction button To m...

Страница 26: ...m Enter Digital Zoom interface Menu Enter Main menu Start Auto switch Enable sequencing in Live Preview mode Note The dwell time of the preview configuration should be set before using Start Auto swit...

Страница 27: ...ck Menu Setting Record to access the Display Settings menu The settings available in this menu include Video Output Designates the output to configure the settings for Outputs include Main Vout and Au...

Страница 28: ...utput Event Output Port Designates the output to show event video on Event Dwell Time The time in seconds to show event screen Note DVR will automatically detect if a VGA display is connected If VGA i...

Страница 29: ...mera order 1 Enter the Display Settings menu shown in Figure 5 Menu Setting Display 2 Click the Set button 3 Select the display mode you would like to set the camera order for under Mode 4 Using the u...

Страница 30: ...29 C H A P T E R 4 Record Settings...

Страница 31: ...u shown in Figure 1 Figure 1 General Record Settings 3 Select the camera you would to configure the settings for 4 Configure settings for Encoding Parameters Select the encoding parameters either Norm...

Страница 32: ...edundantly Record Select to enable or disable redundant recording on the particular channel Record Audio Select to record audio of the camera or not 7 Click the OK button to finish and return to the p...

Страница 33: ...ing Type Recording type can be based on time and triggered by motion detection and or alarm Motion detected and alarm triggered recordings are further explained in Configuring Alarms 9 Click the OK bu...

Страница 34: ...off the HDD It s highly recommended that important recorded events be protected from deletion Recorded files can either be locked or the HDD that the files reside on can be set to read only Locking an...

Страница 35: ...unlock 5 Click on the Lock button to lock file If the file is already locked click on the Unlock button to unlock file Locked files will be shown with a closed lock while unlocked files with an opene...

Страница 36: ...t set the HDD to R W Read Write in the HDD Property Settings menu If multiple HDDs are used the DVR will automatically record to the next HDD that is not set to read only Configuring Advanced HDD Sett...

Страница 37: ...R W read write 6 Click the OK button to save settings and return to the previous menu Figure 11 HDD Property Settings 7 Navigate to the Record Settings menu by clicking Menu Setting Record Setting 8 C...

Страница 38: ...37 Figure 12 Additional Record Settings 1 Set Redundantly Record to Yes 2 Click the OK button to save settings 3 Repeat steps 8 12 for other cameras you would like to redundantly record...

Страница 39: ...38 C H A P T E R 5 Playback...

Страница 40: ...e by channel by file type and by log Understanding the Playback Interface There are various controls on the Playback interface that makes viewing recordings more efficient A screenshot of the Playback...

Страница 41: ...ch parameters by selecting cameras to search video file type and the start end time as shown in Figure 3 Figure 3 Video Search Menu 3 Click the Play button to start playback of all the files found wit...

Страница 42: ...ess the Play button to view the day s recording for the selected channel 3 You may also select additional channels up to 16 ch for playback from the channel list on the right hand side of the Playback...

Страница 43: ...e Slow Forward button on the Playback Control Panel until the speed changes to Single frame 2 Click the Pause button to advance the video frame by frame Using the Front Panel Remote 1 Rotate the inner...

Страница 44: ...43 Figure 7 Digital Zoom Area Selection...

Страница 45: ...44 C H A P T E R 6 Backup...

Страница 46: ...he Export Video menu shown in Figure 1 by clicking Menu Video Export Figure 1 Export Video Menu 2 Select desired parameters to search for files to export 3 Press the Export button This will take you t...

Страница 47: ...to export to from drop down list USB Flash Drive USB HDD DVD Writer If backup device is not recognized Click the Refresh button Reconnect device Check for compatibility from vendor 7 Click Start to b...

Страница 48: ...e Playback Control Panel select the start and end of the video clip during playback 3 Repeat for additional clips 4 Click the Quit Playback button to exit from the Playback interface You ll then be pr...

Страница 49: ...process Managing Backup Devices To manage backup devices you must first be in the Export menu shown in Figure 7 The Export menu can be accessed by following the steps shown in the previous section See...

Страница 50: ...49 C H A P T E R 7 Alarm Settings...

Страница 51: ...navigating to Menu Setting Camera Select channel to configure motion detection on 2 Select the Advanced tab to open up the Advanced Camera Settings menu shown in Figure 1 Figure 1 Advanced Camera Sett...

Страница 52: ...shown in Figure 3 The higher value corresponds to the higher sensitivity level Figure 3 Motion Sensitivity Setting 7 Click OK to return to the Camera Settings menu 8 Click the Handle button to open th...

Страница 53: ...schedule to start recording when motion is detected See Scheduling a Recording Setting up Sensor Alarms Recordings can also be triggered from an external sensor alarm device To setup sensor alarms 1...

Страница 54: ...elect cameras to trigger for recording when alarm occurs by checking the checkboxes under the desired cameras as shown in Figure 7 Figure 7 Triggered Cameras Menu 7 Click the OK button to complete set...

Страница 55: ...9 Alarm Output Settings 3 Configure the settings for selected output 4 Select OK to save and exit Note If the Hold For option is selected as Manually Stop the alarm will only stop when you manually st...

Страница 56: ...ll alarm outputs at once 3 Select OK to return to the previous menu Detecting Video Loss Your DVR can be setup to detect video loss and trigger an action To setup video loss detection 1 Enter Camera S...

Страница 57: ...le can be set for all week or any day of the week with up to 8 time periods per day 8 Click the Apply button to finish 9 Repeat above for other channels Detecting Video Tampering Video tampering i e m...

Страница 58: ...ure 14 Tampering Area Setup 7 Set detection sensitivity The higher the value set the higher the sensitivity 8 Click OK to return to the Camera Settings Management menu 9 Click the Handle button to ent...

Страница 59: ...D are full HDD Errors Errors occurred during writing of the HDD or HDD had failed to initialize Network Disconnected Disconnected network cable IP Conflicted Conflict in IP address setting Illegal Log...

Страница 60: ...ously images will be displayed one at a time every 10 seconds default dwell time A different dwell time can be set by going to Menu Setting Display Dwell Time Once the alarm stops cycling of the image...

Страница 61: ...60 C H A P T E R 8 Network Settings...

Страница 62: ...k Settings menu shown in Figure 1 by clicking Menu Setting Network Figure 1 Network Settings Menu 1 Select the General tab 2 If you have a DHCP server running and would like your DVR to automatically...

Страница 63: ...e preferred and alternate Domain Name System DNS Server to be used with your DVR 4 Click OK to save and exit the Network Settings menu Configuring PPPoE Settings Your DVR also allows for Point to Poin...

Страница 64: ...om your network administrator Once the setup is completed your DVR will automatically dial up into your network after rebooting 7 Click OK button to save and exit Network Settings menu You may now res...

Страница 65: ...are three different DDNS type to choose from IpServer PeanutHull and DynDNS IpServer Enter Server Address for IpServer PeanutHull Enter DVR Domain Name and Password obtained from the PeanutHull websi...

Страница 66: ...tion interval has a range of 1 10080mins normally 60mins If the DVR is used on a public network you should use a NTP server that has a time synchronization function such as the server at the National...

Страница 67: ...twork access device A multicast address spans the Class D IP range of 224 0 0 1 to 239 255 255 254 It is suggested that the IP address range of 239 252 0 0 to 239 255 255 254 be used To set up multica...

Страница 68: ...the Advanced tab 3 Click the Set button next to Host Others to enter the Host Others menu 4 Enter new Server Port and HTTP Port as shown in Figure 11 Figure 11 Host Others Menu Note The Server Port h...

Страница 69: ...tached JPEG File if you want to send email with alarm images the interval is the time of two adjacent alarm images You can also set SMTP port and enable SSL here 7 Click the OK button to save and exit...

Страница 70: ...69 C H A P T E R 9 PTZ Controls...

Страница 71: ...Camera Select a PTZ camera Call Preset Call a PTZ preset Call Patrol Call a PTZ sequence Call Pattern Call a PTZ pattern Patrol Setting Enter PTZ sequence configuration menu Pattern Setting Enter PTZ...

Страница 72: ...esets patrols and patterns for a connected PTZ camera Understanding PTZ Controls Before setting presets patrols and patterns it s important to understand some of the features of the PTZ control panel...

Страница 73: ...tton to enter the Preset Management menu 3 In the Preset Management menu shown in Figure 4 you may Configure Preset Use the PTZ control panel to adjust the position of the preset Select a Preset numbe...

Страница 74: ...See Customizing Presets and click the Set button to enter the Patrol configuration menu A sequence should have at least 2 valid presets 3 Set the Key Point No Duration and Speed Figure 6 The Key Point...

Страница 75: ...to call the patrol select the stop button to stop the patrol as shown in Figure 7 Figure 7 Patrol Management Menu Customizing Patterns Patterns can be setup by recording the movement of the PTZ To se...

Страница 76: ...of the movements of the PTZ Use the PTZ control panel to move the PTZ The PTZ movements will be recorded until the Stop Record button is clicked 5 To run a pattern click the Run Pattern button on a va...

Страница 77: ...76 C H A P T E R 1 0 Camera Management...

Страница 78: ...Setting Camera 2 Select channel to setup OSD settings under Channel 3 Configure desired OSD settings as shown in Figure 1 Figure 1 OSD Settings Menu Setting up Privacy Mask You may setup privacy mask...

Страница 79: ...k area as shown in Figure 3 Up to 4 areas can be set Figure 3 Setting Mask Area 7 Select OK to save and exit mask setup Adjusting Display Settings Display settings such as the brightness contrast satu...

Страница 80: ...t display settings under Channel 4 Click the Set button next to the Image Settings label 5 Adjust the display settings as shown in Figure 4 Brightness contrast saturation and hue can be adjusted The a...

Страница 81: ...80 C H A P T E R 1 1 HDD Management...

Страница 82: ...lize 3 Click the Init button 4 Select OK button to begin initialization After the HDD has been initialized the status of the HDD will change from Abnormal to Normal Setting HDD Groups Your DVR can sep...

Страница 83: ...e status of a HDD can be set to redundancy read only or read write R W Setting HDD to Read Only A HDD can be set to read only to avoid important recorded files from being overwritten when the HDD beco...

Страница 84: ...ct OK to save and exit menu Note The HDD that is set to redundancy is used to store an extra copy of the recording If a HDD is set to redundancy at least one HDD should be set to the R W status Checki...

Страница 85: ...ter Start Time and End Time 5 Click the Search button to begin log search A result list similar to that of Figure 5 will be returned Figure 5 Log Search Results 6 Select log item to view and click the...

Страница 86: ...uninitialized or in an abnormal state To set HDD alarms 1 Enter Exception menu shown in Figure 7 by clicking Menu Settings Exception Figure 7 Exception Menu 2 Select HDD Error under Exception Type 3 S...

Страница 87: ...86 C H A P T E R 1 2 DVR Management...

Страница 88: ...Default language used in DVR menus CVBS Output Standard Video output standard NTSC and PAL VGA Resolution VGA output resolution Time Zone Time zone to use for DVR Menu Date Format Format to use for da...

Страница 89: ...ss Transparency Menu transparency Operation Timeout Set timeout time for menu inactivity For example if timeout time was set to 5 minutes after 5 minutes of inactivity in the General Settings menu you...

Страница 90: ...ial device Note Please note that the remote control features through the RS 232 port are limited Managing User Accounts By default your DVR comes with one user account the Administrator account The Ad...

Страница 91: ...enabled the user may only access the DVR from that particular MAC address 5 Select the Permission button to enter the Privilege Settings menu shown in Figure 6 Figure 6 Privilege Settings Menu 6 Conf...

Страница 92: ...r video output Two Way Audio Ability to use two way audio between the remote client and the DVR Remote Alarm Control Remote alert or control the relay output of the DVR Alarm and exception settings mu...

Страница 93: ...u Note If you forget the password to your DVR contact your supplier with the serial number of your DVR to obtain a secure code to reset your DVR Deleting a User To delete a user from the DVR 1 Enter t...

Страница 94: ...Export Configuration Menu 2 Click Export to export a configuration file to USB device USB device must be connected at this point to the DVR 3 To import a configuration file select the file from the US...

Страница 95: ...boot the DVR To update via a FTP server 1 Configure PC running FTP server and DVR to be in the same Local Area Network Run the 3rd party TFTP software on the PC and copy the firmware into the root dir...

Страница 96: ...restore factory defaults Note Network information such as IP address subnet mask and gateway will not be restored Viewing System Information To view system information 1 Enter into the Information me...

Страница 97: ...click the Details button 5 If applicable you may also view the associated video to the selected log entry by clicking the Play button 6 Log files can also be exported onto a USB device To export a log...

Страница 98: ...97 Figure 17 Log Search Export Menu 7 Click Cancel to exit out of menu...

Страница 99: ...98 C H A P T E R 1 3 Appendix...

Страница 100: ...ADSL transceiver modem over Ethernet and in plain Metro Ethernet networks DDNS Dynamic DNS is a method protocol or network service that provides the capability for a networked device such as a router...

Страница 101: ...luorescent lamps in use Why does the PTZ seem unresponsive If the PTZ seem unresponsive please check 1 Check that the RS 485 cable is properly connected 2 Check that the dome decoder type is correct 3...

Отзывы: