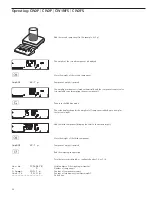
Classification
O
cl
With the Classification application,
you can determine whether the weight
of a given sample lies within the limits
of a defined weight class.
Features:
– Configure 3 or 5 classes (menu item 4.8)
– Define contiguous classes
– Define classes that cover the entire
weighing range of the weighing
instrument
– Range below the specified minimum
load is designated “Class 0"
– Define the upper limit of a given
class by storing weight on weighing
instrument or by entering a weight
value and a percentage
– Show the current weight in the
main display as a weight value or as
belonging to a certain class
– Class of current weight also indicated
by 1 LED (when using 3 classes)
or 2 LEDs (when using 5 classes) 2 LEDs
(when using 5 classes)
– Toggle the display between weight
and class by pressing
w
.
– Digital input/output interface
– Info mode for display of class limits by
pressing
w
(> 2 sec)
To use the Classification application,
you need to enter the delimiters that
separate one class from another.
– Start the initialization by pressing
O
.
The lower limit of Class 1 is defined
by the preset minimum load.
Weight values below minimum load
are classified as belonging to Class 0, in
part to prevent an unloaded weighing
instrument from displaying a value that
designates a class.
You can enter the other class delimiters
as absolute values or percentages
(menu item 4.9).
– Entering the class delimiters
as absolute values (weighed values)
(menu item 4.9.1):
For each upper limit (except that of
the highest class), place a load on the
weighing instrument and press
O
to
store it as the upper limit of a class.
The bar graph and the numeric
display show the limit currently being
configured.
Each time you store a value for an
upper limit, a check is run to make sure
the value is equal to or greater than
the upper limit of the previous class.
If the value is invalid, an acoustic signal
is emitted; the limit must be entered
again.
– Entering delimiters as percentages
(menu item 4.9.2):
Define the upper limit of Class 1 by
placing the corresponding weight on
the weighing instrument and pressing
O
. The value is equal to 100 %.
The upper limit of Class 2 is equal
to 100 % plus the percentage you select
by pressing
r
(1, 2, 5, 10, 15, 30, 50,
70, 100, 150, 199 %).
Example: A load of 100 g is stored from
the weighing instrument as the upper
limit of Class 1. The value 15% is then
entered, defining the upper limit of
Class 2 as 115 g.
In this case, the weight ranges when
working with 5 classes are:
Class 0: up to the minimum load
Class 1: Minimum load – 100 g
Class 2: 100 g – 115 g
Class 3: 115 g – 130 g
Class 4: 130 g – 145 g
Class 5: 145 g – maximum capacity
Before a new initialization,
the previous initialization values must
be deleted by pressing
c
.
– Tare function:
1) If you store a tare (weight value) by
pressing the
)
key, you can later
enter a tare value manually. The tare
value you enter is added to the stored
tare value.
Setting: menu code 3.25.1 (factory
default)
2) A tare value entered manually over-
writes a stored tare value (weight value).
If you enter a tare value manually, a
tare value (weight value) stored later
overwrites the manually entered value.
Setting: menu code 3.25.2
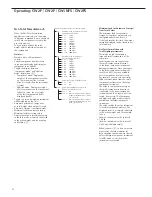
Operating menu setting:
APPL
:
O
cl
:
3.25.
Application Parameters: Classification
3. 5.
Minimum Load for Automatic Taring
and Automatic Printing
3. 5. 1 * 1 digit
3. 5. 2
2 digits
3. 5. 3
5 digits
3. 5. 4
10 digits
3. 5. 5
20 digits
3. 5. 6
50 digits
3. 5. 7
100 digits
3. 5. 8
200 digits
3. 5. 9
500 digits
3. 5.10
1000 digits
3. 6.
Minimum Load for Initialization and
Defining the Class 1 Lower Limit
3. 6. 1 * 1 digit
3. 6. 2
2 digits
3. 6. 3
5 digits
3. 6. 4
10 digits
3. 6. 5
20 digits
3. 6. 6
50 digits
3. 6. 7
100 digits
3. 6. 8
200 digits
3. 6. 9
500 digits
3. 6.10
1000 digits
3. 7.
Automatic Taring: 1st Weight Tared
3. 7. 1 * Off
3. 7. 2
On
3. 8.
Start Application with Most Recent
Application Data when Combics
is Switched On
3. 8. 1
Automatic (on)
3. 8. 2 * Manual (off)
3.25. Tare
function
3.25. 1* The tare value entered is added to
the stored tare value
3.25. 2
Overwritable tare value
4. 3.
Activate Control Line for “Set" as:
4. 3. 1 * “Set" output
4. 3. 2
Ready to operate (for process
control systems)
4. 7.
Activation of Outputs
4. 7. 1
Off
4. 7. 2
Always active
4. 7. 3 * Active at stability
4. 8.
Number of Classes
4. 8. 1 * 3 classes
4. 8. 2
5 classes
4. 9.
Parameter Input
4. 9. 1 * Weight values
4. 9. 2
Percentage
4.10. Automatic
Printing
4.10. 1* Off
4.10. 2
On
40
Operating: CW2P | CW2P | CW1NFS | CW2FS
Содержание CH1NE
Страница 102: ...CH Platform Dimensions Scale Drawings CH G CH E 102 ...
Страница 108: ...108 ...
Страница 109: ...109 ...
Страница 110: ...110 ...
Страница 111: ...111 ...
Страница 112: ...112 ...
Страница 113: ...113 ...
Страница 114: ...114 ...
Страница 115: ...115 ...
Страница 116: ...116 ...
Страница 117: ...117 ...
Страница 118: ...118 ...
Страница 120: ......


