35
Checkweighing
O
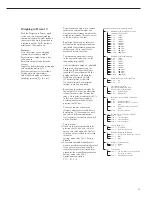
When the Checkweighing application is
selected, you can check whether sample
weights correspond to a specified target
weight; i.e., whether the weight on the
weighing instrument is within a given
tolerance range. The tolerance range
is defined by upper and lower limits.
The result is displayed in the main
indicator, in the bar graph and by color-
coded LEDs.
Features:
– The target value can be taken over
as a weighed value from a weighing
instrument, and the tolerance limits
are defined as a perceptual deviation
from the target value. The following
percentages can be selected as the
deviation: 0.1%, 0.2%, 0.5%, 1%, 1.5%,
2%, 3%, 5% or 10%.
– The target value, lower tolerance
limit (minimum) and upper tolerance
limit (maximum) can be taken over
as weighed values from the weighing
instrument.
– Target and tolerance limits checked
during input; values must conform to:
Upper limit
>
Target
>
Lower limit
>
1 digit
– Checkweighing range: either 30%
to 170% of the target, or from 10%
to infinity
– Application started automatically
with most recent application data
when Combics switched on
– Automatic taring
– Automatic printing
– Toggle the display between weight
and tolerances limits by pressing
w
.
When tolerances are displayed, weights
exceeding the tolerance limits are
shown with “
LL
" (too low) or “
HH
"
(too high).
– Digital input/output interface
– Info mode for display of tolerance limits
by pressing
w
(> 2 sec)
Checkweighing entails comparing
the current weight value to a defined
target. The target value has a tolerance
range which can be entered either as
an absolute value or percentage (menu
item 4.5).
– Entering the tolerance range as
an absolute value (weighed value)
(menu item 4.5.1):
Start initialization by pressing
O
;
the middle segments of the bar graph
flash to prompt the placement of the
weight on the weighing instrument.
Place the weight on the instrument and
press
O
to store.
The bar graph segment for the lower
limit flashes to prompt the weight for
lower limit. Place the weight on
the weighing instrument and press
O
to store.
The bar graph segment for the upper
limit flashes to prompt the weight for
upper limit. Place the weight on the
weighing instrument and press
O
to
store.
– Entering the tolerance range as
a percentage (menu item 4.5.2):
A value for the percentage is shown in
the numeric display (lower right-hand
corner) together with the “%" sign.
Press
r
to change the percentage
value (0.1%, 0.2%, 0.5%, 1%, 1.5%, 2%,
3%, 5%, 10%).
Start initialization by pressing
O
;
the middle segments of the bar graph
flash to prompt the placement of the
weight on the weighing instrument.
Place the weight on the instrument and
press
O
to store. To can change the
percentage value for the tolerance limits
again before the target value is stored,
press
r
.
Before the new initialization, the
previous initialization values must be
deleted by pressing
c
.
– Tare function:
1) If you store a tare (weight value) by
pressing the
)
key, you can later
enter a tare value manually. The tare
value you enter is added to the stored
tare value.
Setting: menu code 3.25.1 (factory
default)
2) A tare value entered manually over-
writes a stored tare value (weight value).
If you enter a tare value manually, a
tare value (weight value) stored later
overwrites the manually entered value.
Setting: menu code 3.25.2
Operating menu setting:
APPL
:
O
:
3.25.
Application Parameters: Checkweighing
3. 5.
Minimum Load for Automatic Taring and
Automatic Printing
3. 5. 1 * 1 digit
3. 5. 2
2 digits
3. 5. 3
5 digits
3. 5. 4
10 digits
3. 5. 5
20 digits
3. 5. 6
50 digits
3. 5. 7
100 digits
3. 5. 8
200 digits
3. 5. 9
500 digits
3. 5.10
1000 digits
3. 7.
Automatic Taring: 1st Weight Tared
3. 7. 1 * Off
3. 7. 2
On
3. 8.
Start Application with Most Recent
Application Data when Combics
is Switched On
3. 8. 1
Automatic (on)
3. 8. 2 * Manual (off)
3.25. Tare
function
3.25. 1* The tare value entered is added to
the stored tare value
3.25. 2
Overwritable tare value
4. 2.
Checkweighing Range
4. 2. 1 * 30% to 170%
4. 2. 2
10% to infinity
4. 3.
Activate Control Line for “Set" as:
4. 3. 1 * “Set" output
4. 3. 2
Ready to operate
4. 4.
Activation of Outputs
4. 4. 1
Off
4. 4. 2
Always active
4. 4. 3
Active at stability
4. 4. 4 * Active within checkweighing
range
4. 4. 5
Active at stability within the
checkweighing range
4. 5.
Parameter Input
4. 5. 1 * Min, max, target
4. 5. 2
Only target with percent limits
4. 6.
Automatic Printing
4. 6. 1 * Off
4. 6. 2
On
4. 6. 3
Only values within
tolerance
4. 6. 4
Only values outside
tolerance
Содержание CH1NE
Страница 102: ...CH Platform Dimensions Scale Drawings CH G CH E 102 ...
Страница 108: ...108 ...
Страница 109: ...109 ...
Страница 110: ...110 ...
Страница 111: ...111 ...
Страница 112: ...112 ...
Страница 113: ...113 ...
Страница 114: ...114 ...
Страница 115: ...115 ...
Страница 116: ...116 ...
Страница 117: ...117 ...
Страница 118: ...118 ...
Страница 120: ......


