76
The Sapling Company, Inc.
670 Louis Drive
Warminster, PA 18974
USA
P. (+1) 215.322.6063
F. (+1) 215.322.8498
www.sapling-inc.com
Troubleshooting
How can it be determined if the clock is receiving a good signal?
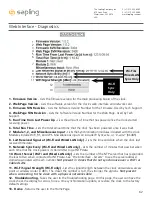
Refer to the Diagnostics page on the Web Interface.
Where do I plug in the GPS antenna?
Clocks that are ordered with a GPS module rely on an internal antenna for acquiring time from GPS
satellites. No further components or actions by the user are required.
The Wi-Fi/Wireless clock is in a location with a poor signal or no signal at all. What do I do?
You have two options:
1. Install a Wireless Access Point (Wi-Fi) or Wireless Repeater (Wireless) closer to the clock.
2. For Wi-Fi clocks, you may also be able to boost the transmitter power output of the closest Wireless
Router or Wireless Access Point. Consult the Access Point’s manual for details.
I am uncertain if my clock is accessing my LAN. How do I check this?
If the clock is disconnected from the network, the colon(s) on the clock will blink.
The clock is not receiving data from the NTP server, despite the fact that other nearby clocks are
receiving data and properly adjusting. What should I do?
Enter the clock’s Web Interface and confirm that the network and server settings are configured correctly.
Ask your network administrator to help you confirm the settings.
If the clock still does not correct, call technical support.
The clock is on the computer network, so why isn’t the Wi-Fi or cabled LAN clock showing up
on my Monitor software?
Perform these steps in order until a step causes the clock to appear on the Network Monitor:
1. Wait about two minutes. Some clocks take a few minutes before they appear on the monitor.
2. Confirm that the viewing filters on the Network Monitor are set to display Wi-Fi Clocks.
3. Confirm that you have the latest version of the Network Monitor software, as older versions are not
able to detect Large Digiatl Clocks. Older versions will not have Large Digital Clocks available as an
option on the viewing filter. Your version should be 1.3.1 or newer.
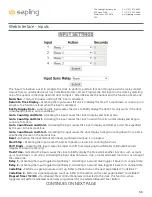
4. Log on to the Clock and, on the Network Settings page, set Broadcast to Monitors to OFF, set Send
Specific Monitor IP to ON, enter your computer’s IP address into the Monitor IP Address field, then press
Submit followed by Log Out. Wait about two minutes for a result.
5. Confirm that the computer or network firewall is not blocking ports 80, 123, or 1777. On Windows
machines,the user may receive a prompt the first time that the Network Monitor is used inquiring about
network access. Ensure that the monitor software has unrestricted access.
6. Confirm that the computer running the Network Monitor software is on the same subnet as the Wi-
Fi clocks. If the clock and computer are on different subnets, one will not see the other. For instance,
assuming that a computer has IP address 192.168.1.3, a clock has IP address 192.168.0.4, and both
devices have subnet masks of 255.255.255.0, then an Network Monitor on the computer will not be
able to see the clock. Consult your network administrator for further help with subnet identification.
7. If the clock has a recorded Static IP, log into the clock’s Web Interface and confirm under Network
Settings that the clock is broadcasting to all monitors on the network.
8. If all else fails, reconfigure the clock by following the instructions written in the section of this manual
named “Synchronization System Setup.” Once finished, repeat steps 1 and 2.
9. If the clock is still not communicating with the Network Monitor, contact tech support.

