background image

English

15

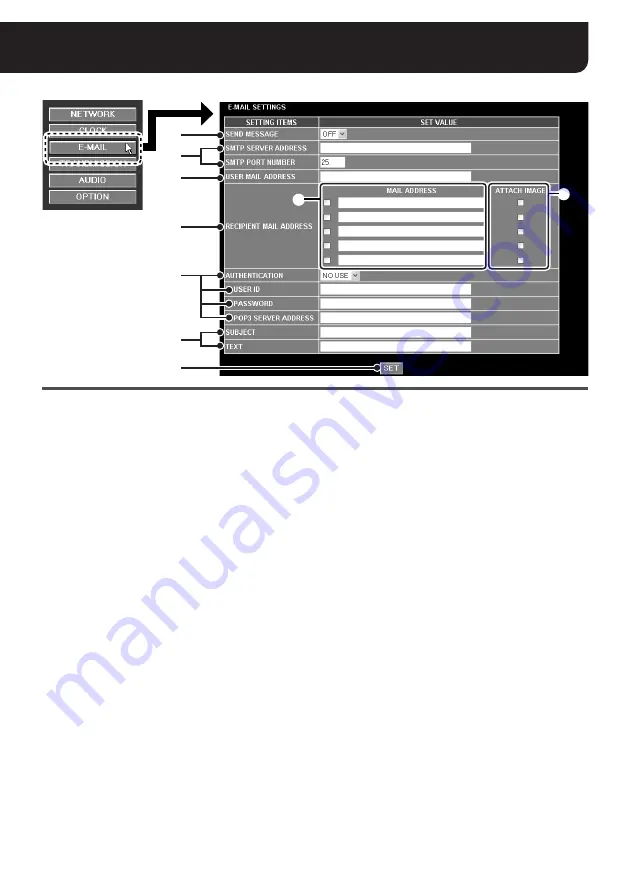
E-MAIL SETTINGS

 (“admin” only)

1

SEND MESSAGE

When sending the alarm notification e-mail, set this 
value to “

ON

”.

2

Mail server configuration

The following mail server information is specified in 
these setting items.

• SMTP SERVER ADDRESS

(domain name or IP address)

• SMTP PORT NUMBER

(port number used for communicating with the 
SMTP server)

3

USER MAIL ADDRESS

Specifies the sender’s e-mail address.

4

RECIPIENT MAIL ADDRESS

Specifies the recipient’s e-mail address to which the 
alarm notification is sent. You can specify up to five 
e-mail addresses.

1

Type the recipient’s e-mail address and select 
the check box to the left of the e-mail address 
field.

2

When you want to attach the alarm image to the 
e-mail, select the check box for the recipient 
under the [ATTACH IMAGE] title.

5

AUTHENTICATION settings

When authentication is required for sending e-mails, 
configure the following settings:

• AUTHENTICATION

• USER  ID

• PASSWORD

• POP3 SERVER ADDRESS

(domain name or IP address)

6

Editing the alarm notification e-mail

The basic message for the alarm notification e-mail 
contains the camera title, the date and time when 
the alarm is detected, and the camera’s IP address. 
You can configure the following information and add 
to the basic message.

• SUBJECT: the title appearing at the 

beginning of the message 
(up to 32 alphanumeric characters)

• TEXT: additional comment appended to the 

basic message (up to 64 alphanumeric 
characters)

7

[SET] button

After completing the settings, click this button to 
confirm the settings.

1

2

3

6

4

5

7

1

2

Содержание VA-50LAN

Страница 1: ...Color CCD Camera Manual for Remote Operation by Network Connection ...

Страница 2: ... Using the UPnP Connection for Windows XP only 7 Viewing Live Video Main Screen Overview 8 Using the Control Panel 9 Establishing Voice Communication 11 Selecting the Operating Conditions 12 NETWORK SETTINGS 13 CLOCK SETTINGS 14 E MAIL SETTINGS 15 IMAGE TRANSFER SETTINGS 16 For HTTP connection 16 For FTP connection 17 AUDIO SETTINGS 19 OPTION SETTINGS 20 Changing the Camera Settings 21 Settings Li...

Страница 3: ...ing on the environment of use Copyright notice This instruction manual is copyrighted by SANYO Electric Co Ltd No materials contained in this manual may be reproduced in any format without the prior permission of the copyright holder Microsoft Windows and Internet Explorer are registered trademarks or trademarks of Microsoft Corporation in the United States and other countries The official name fo...

Страница 4: ...e slower as the number of connected users increases 1 Installing the option board on the camera Refer to the supplied INSTALLATION MANUAL for how to install the option board on the camera and make connection using LAN cables Refer to 2 Configuring the TCP IP settings on PC Page 4 3 Accessing the camera Enter your user name and password to access the camera using the Web browser Page 6 4 Viewing li...

Страница 5: ...en appears The LAN interface Ethernet adapter configurations appear in the LAN or High Speed Internet section 3 Right click on the LAN interface Ethernet adapter configuration used for accessing the camera and click Properties in the context menu General tab appears in the Local Area Connection 2 Properties dialog box 4 In the This connection uses the following items list box select the Internet P...

Страница 6: ...orer s settings by clicking Tool and then Internet Options When accessing the camera using SSL encryption for video signal 1 Click the Advanced tab 2 Make sure that the Use SSL 2 0 and Use SSL 3 0 options under the Security section are enabled If disabled select the options When the video is unstable 1 Click the General tab 2 Under the Temporary Internet Files section click the Settings button 3 I...

Страница 7: ...ages English French German Spanish Japanese After selecting the display language the main screen appears and the live video from the camera is displayed in the video display area From the second time onwards if the language selection screen is left for longer than 10 seconds the last display language is automatically selected and the main screen appears MEMO After the camera is turned on it will t...

Страница 8: ...P connection In the OPTION SETTINGS screen set the UPnP option to ON See page 20 The factory setting value is ON How to access the camera 1 Open the My Network Places window The icon for the camera detected on the network appears in the window 2 Double click the icon This automatically establishes the connection to the camera and the authentication dialog appears Display name in the My Network Pla...

Страница 9: ...e video from the camera is displayed MEMO For cameras with panning and tilting functions clicking the video image changes the camera s orientation so that the point where you click is located at the center of the image 4 DATE See page 14 The date and time specified in the CLOCK SETTINGS screen is displayed 5 Voice control buttons See page 11 Allows you to enable or disable the voice input output s...

Страница 10: ... to change the DAY NIGHT switching conditions configured using the camera menu 6 AUX These buttons are reserved for additional functions The function corresponding to the number selected in the pull down menu will be performed The function allocated to respective numbers depends on the camera models 7 MAIN SETTINGS button See page 12 Displays the menu buttons for an administrative user admin Displ...

Страница 11: ... the preset position select the number to be used for current setting from the pull down menu and click the MEMORY button Changes the camera orientation toward the direction indicated by arrow mark Clicking the video image changes the camera s orientation so that the point where you click is located at the center of the image The camera control buttons cannot be operated while the camera configura...

Страница 12: ...pen the Sounds and Audio Devices window from the Control Panel 2 Select the Voice tab and click the Volume button under Voice playback 3 In the Volume Control window select Properties from the Options menu Select the Mic Volume check box under Show the following volume controls and click OK 4 Click the Advanced button under Mic Volume if no Advanced button is shown select Advanced Controls from th...

Страница 13: ...u can send the notice e mail which tells that the alarm is detected to the specified user 4 TRANSMISSION See pages 16 17 Used for configuring the recording preferences when recording the live video using the recorder software You can select the image transfer mode either from HTTP or FTP 5 AUDIO See page 19 Used for configuring the voice communication Configure the audio settings if you want to li...

Страница 14: ...cified in the SSL setting above You can assign a value between 1 and 65535 to the SSL port number Note Set the port number in the range of 1 65535 but make sure that it doesn t overlap with the AUDIO PORT NUMBER on the AUDIO SETTINGS screen F PASSWORD Specify the login password according to each user name guest admin MEMO When you enter a blank guest password no password is specified the authentic...

Страница 15: ...me for the automatic clock adjustment last performed 6 SET button After completing the settings click this button to confirm the settings If you change the setting on the TIME ZONE or DAYLIGHT SAVING MODE SUMMER TIME MODE preference the connection will be automatically disconnected and after about 20 seconds it will be established again 1 2 3 4 5 6 REFRESH button NO USE Do not set summer time AUTO...

Страница 16: ...en you want to attach the alarm image to the e mail select the check box for the recipient under the ATTACH IMAGE title 5 AUTHENTICATION settings When authentication is required for sending e mails configure the following settings AUTHENTICATION USER ID PASSWORD POP3 SERVER ADDRESS domain name or IP address 6 Editing the alarm notification e mail The basic message for the alarm notification e mail...

Страница 17: ...OLUTION see the Note above QUALITY AUDIO see the Note above 2 Select the BUFFER SIZE option for specifying the buffering capacity on the camera used for recording the alarm image According to the option you selected perform the following settings One alarm image set containing both the pre and post alarm images is stored in the camera and then the alarm image set is transferred one by one to the V...

Страница 18: ...or alarm recording ALARM Configures alarm recording as ON OFF CAMERA ID This is inserted to the file name of the alarm recording image It is also used as the name of the folder created on the server side Note If the CAMERA ID is not configured sanyo and alarm are substituted as the file name and folder name respectively OVERWRITE Configures whether or not to overwrite file data transmitted to the ...

Страница 19: ... as ON OFF CAMERA ID This is inserted in the file name of timer transmitted images It is also used as the name of the folder created on the server side Note If the CAMERA ID is not configured sanyo and timer are substituted as the file name and folder name respectively OVERWRITE Configures whether or not to overwrite file data transmitted to the FTP server TX RATE Configures the image transmission...

Страница 20: ...Set to ON when outputting voice from the PC microphone to the speakers on the camera side OUTPUT LEVEL Output volume from the speakers connected to the camera can be selected out of four levels MUTE When set to ON voice output from the PC speakers is muted during PAN TILT or ZOOM operation 3 AUDIO PORT NUMBER Set the number of the port for voice communications Note The following port numbers canno...

Страница 21: ...e SET button to display the FIRMWARE UPDATE screen Click the Browse button to locate the firmware update file and click the EXECUTE button This starts the firmware update process Note Neither make any operations on the screen nor turn power off while the LOADING FIRMWARE FILE message is displayed You cannot update the firmware while recording a video Trying to update the firmware during recording ...

Страница 22: ...e the cursor to your desired menu and click to open the submenu To return to the previous screen Click to move the cursor to MENU at the bottom of the submenu set the value to BACK and click To exit from the menu Click to move the cursor to MENU at the bottom of the menu make sure that the value is set to END or change to END if BACK is displayed and click To reset the values to the factory settin...

Страница 23: ... PORT NUMBER SSL OFF 80 SSL ON 443 PASSWORD User name guest guest 4 to 8 alphanumeric characters User name admin admin 4 to 8 alphanumeric characters NETWORK SPEED NO LIMIT 128K 256K 512K 1M 2M 3M 4M bps CLOCK SETTINGS CLOCK SET Month day year hour minute TIME ZONE 75 zones GMT Dublin Edinburgh Lisbon London DAYLIGHT SAVING MODE SUMMER TIME MODE NO USE AUTO MANUAL CLOCK ADJUST OFF ON NTP LOGIN PC ...

Страница 24: ...10 90 20 80 30 70 40 60 50 50 RATE NTSC 1FPS 2FPS 3FPS 5FPS 10FPS 15FPS 30FPS PAL 1FPS 2FPS 3FPS 5FPS 8FPS 12 5FPS 25FPS When you set the RESOLUTION preference to 640 x 480 only the 1FPS 2FPS and 3FPS options are available for configuration DURATION 5SEC 10SEC 20SEC 40SEC 1MIN 2MIN 3MIN 4MIN 5MIN 10MIN 15MIN FTP PORT NUMBER 21 SERVER ADDRESS up to 64 characters USER ID up to 48 characters PASSWORD...

Страница 25: ...PS 3FPS 5FPS 10FPS 15FPS 30FPS PAL 1FPS 2FPS 3FPS 5FPS 8FPS 12 5FPS 25FPS When you set the RESOLUTION preference to 640 x 480 only the 1FPS 2FPS and 3FPS options are available for configuration DURATION 5SEC 10SEC 20SEC 40SEC 1MIN 2MIN 3MIN 4MIN 5MIN 10MIN 15MIN TX RATE 1SEC 2SEC 3SEC 5SEC 10SEC 20SEC 40SEC 1MIN 2MIN 3MIN 4MIN 5MIN 10MIN 15MIN TIMER TIMER ON OFF CAMERA ID up to 20 characters OVERW...

Страница 26: ...OpenSSL Toolkit and OpenSSL Project must not be used to endorse or promote products derived from this software without prior written permission For written permission please contact openssl core openssl org 5 Products derived from this software may not be called OpenSSL nor may OpenSSL appear in their names without prior written permission of the OpenSSL Project 6 Redistributions of any form whats...

Страница 27: ...list of conditions and the following disclaimer in the documentation and or other materials provided with the distribution 3 All advertising materials mentioning features or use of this software must display the following acknowledgement This product includes cryptographic software written by Eric Young eay cryptsoft com The word cryptographic can be left out if the rouines from the library being ...

Страница 28: ...bps full duplex Microphone input 62 to 32 dB monaural microphone 3 5 φ mini jack Voice output LINE OUT monaural voice output Maximum 8 dBs 3 5 φ mini jack Voice encryption system PCM 16 bit Bandwidth 128 256 512 Kbps 1 2 3 4 Mbps no limitation Alarm buffer Up to 8 MB configurable Interface 10BASE T 100BASE TX RJ45 connector PoE support Compliant with IEEE802 3af Protocol TCP UDP HTTP HTTPS SMTP NT...

Отзывы: