Chapter 2 Setup procedures
Installation of Driver for USB display
It is required to install the software into your computer to use the USB display function . Please install
the software as follows.
1. Select “Display” in the “USB terminal” from the setting menu of the projector.
2. Select “USB Display” with the Point
ed
buttons and press SELECT button. Then the Menu will
disappear, the “Please wait...” message will appear, and switching operation will start. Switching will
take a while and after completing the operation, the “Ready for use” message will appear.
3. Connect the computer to the projector with a USB cable.
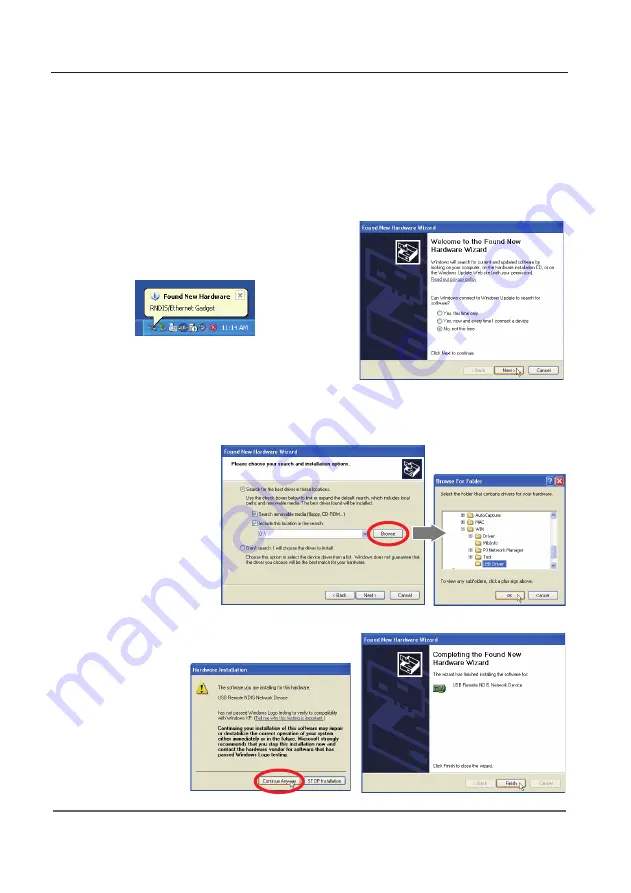
4. New Hardware is detected and then "Found New
Hardware Wizard" window will be displayed. Select "No,
not this time" and click
Next
button.
5. Set the supplied Network Viewer & Capture 5 CD-ROM into the CD-ROM drive of your computer.
(If your computer does not provide the CD-ROM drive, insert the supplied USB memory into your
computer.) Select "Install from a list or specific location" and click
Next
button.
6. Select "Search for the best
driver in these locations",
check 2 boxes, and then click
Browse
button, and select
"USB Driver" folder in the
CD-ROM or USB memory, and
click
OK
button to proceed
with installing.
7. During the installation, following window may appear,
click
Continue Anyway
button.
8. Click
Finish
to complete
the installation.
✐
You can find out "USB Driver" folder is in "WIN" folder in the CD-ROM or the root directory of the supplied USB
memory.
Содержание LC-XB200
Страница 16: ...16 Chapter 1 About LAN functions ...
Страница 112: ...112 Chapter 8 Network capture functions ...
Страница 132: ...132 Chapter 9 Network Viewer functions ...
Страница 133: ...Chapter 133 10 10 Appendix Use of telnet Web browser setting Firewall setting Troubleshooting Terminology ...


