


63
8.2
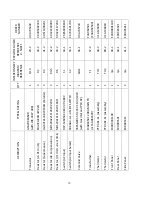
POWER SOURCE ERROR CODES
Description
Possible Cause
Remedy
Remarks
1.
E01 error code displayed
Temperature sensor TH1
(protects IGBTs) is
greater than 80ºC for
about 1 second.
A.
The Welding Power Source’s
duty cycle has been
exceeded.
A.
Let Power Source cool down
then keep within its duty
cycle.
Weld current ceases.
Buzzer sounds constantly.
Fan operates at max speed.
E01 resets when TH1 decreases
to 70ºC for about 30 seconds.
B.
Fan ceases to operate.
B.
Have an Accredited SanRex
Service Agent investigate.
C.
Air flow is restricted by vents
being blocked.
C.
Unblock vents then let Power
Source cool down.
2.
E02 error code displayed
Temperature sensor TH2
(protects secondary
diodes) is greater than
80ºC for about 1 second.
A.
The Welding Power Source’s
duty cycle has been
exceeded.
A.
Let Power Source cool down
then keep within its duty
cycle.
Weld current ceases.
Buzzer sounds constantly.
Fan operates at max speed.
E02 resets when TH1 decreases
to 70ºC for about 30 seconds.
B.
Fan ceases to operate.
B.
Have an Accredited SanRex
Service Agent investigate.
C.
Air flow is restricted by vents
being blocked.
C.
Unblock vents then let Power
Source cool down.
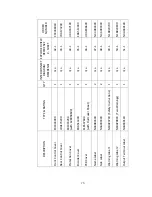
3.
E03 error code displayed
Primary (input) current
too high.
A.
Primary current is too high
because welding arc is too
long
A.
Reduce length of welding arc.
Weld current ceases.
Buzzer sounds constantly.
Switch machine off, wait 3
seconds, and then switch on to
reset E03 error.
B.
Mains supply voltage is more
than 10% below nominal
voltage.
B.
Have an Accredited SanRex
Service Agent or a qualified
electrician check for low
Mains voltage.
4.
E04 error code displayed
Output voltage exceeds
the secondary voltage
specification.
TIG torch cable and/or work
lead are too long or leads are
coiled.
Reduce the length of the TIG
torch cable and/or work lead
or un-coiled leads.
Weld current ceases.
Buzzer sounds constantly.
Switch machine off, wait 3
seconds, and then switch on to
reset E04 error.
Содержание SANARG 200AP
Страница 2: ......
Страница 4: ......
Страница 8: ......
Страница 24: ...24 PAGE LEFT INTENTIONALLY BLANK ...
Страница 35: ...35 Figure 3 2 Electrical Input Connections 200AP ...
Страница 56: ...56 6 4 4 SPOT MODE Contactor Hot start Iw ON ON HF Solenoid Output current ON Preflowtime Hot cur Spot time ...
Страница 60: ...60 PAGE LEFT INTENTIONALLY BLANK ...
Страница 66: ...66 PAGE LEFT INTENTIONALLY BLANK ...
Страница 79: ...79 PAGE LEFT INTENTIONALLY BLANK ...
Страница 80: ...80 10 1 INTERCONNECT DIAGRAM 200AP ...
Страница 81: ...81 ...
Страница 82: ...82 10 2 EXPLODED VIEW 200AP ...
Страница 83: ...83 ...
Страница 84: ...84 PAGE LEFT INTENTIONALLY BLANK ...
Страница 89: ...PAGE LEFT INTENTIONALLY BLANK ...


