PAGE 14
ROUTINE MAINTENANCE
HAZARDOUS MOVING PARTS
Semiannually:
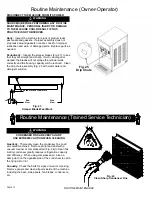
It is advisable to clean and lubricate the
idler arms (Fig. 26) to ensure their smooth operation. Use
the following procedures:
1. Make certain that
ALL
power to the dispenser is off.
2. Remove both side panels first, then remove the rear
panel of the machine.
3. Use a pencil to mark the position of the nut (Fig 26) on
the side of the belt idler arm spring adjustment
mechanism. Relieve the tension on the spring by turning
the adjustment screw near the label which warns:
DO
NOT ADJUST
. Disconnect the spring from the belt idler
arm by placing needle nose pliers on one end of the
spring and pulling the end out of the retainer.
4. Remove the nut from the pivot point of the belt idler
arm assembly.
5. Remove the belt idler arm and inspect the pivot point
sleeve. These areas should be free of rust, debris, or
dried lubricant. If any of these substances are found,
they must be removed.
6.
Clean and polish the sleeve surface with a fine grade
of emery cloth.
7. Reinstall the belt idler arm.
NOTE: BE CERTAIN NOT TO OVERTIGHTEN THE
LOCKING NUT. ON SOME UNITS IT IS POSSIBLE TO
OVERTIGHTEN THE LOCKING NUT AND CAUSE THE
IDLER ARMS TO BIND. THE ARMS SHOULD MOVE
FREELY.
8. Repeat the process for the torque idler arm.
9. Install the belt making certain that there is no grease
on the belt or pulleys. Step to the side of the unit and
view the belt to determine whether or not it is properly
aligned (straight from top to bottom).
10. Reinstall the silver torque idler arm spring and the
silver belt idler arm spring and turn the adjustment screws
returning the adjustment nuts to the pencil marks you
placed on the side of each adjustment mechanism in step
3 above.
11. Repeat steps 3 - 9 for the other side if your machine
has two freezing cylinders and then place the unit back
into operation. Check the product for proper consistency
and adjust as required. When the consistency is right,
replace the rear and both side panels.
Fig. 26
Spring Adjustment Mechanism
Torque Idler Arm Pivot
Rotation
Rotation
Torque
Adjustment
Mark Nut
Position
With Pencil
Mark Nut Position
With Pencil
Belt Idler
Arm Pivot
Routine Maintenance (Trained Service Technician)
WARNING
Содержание A7081HEP
Страница 2: ......
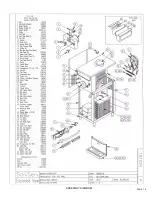
Страница 17: ...PAGE 16 ASSEMBLY DIAGRAM ...
Страница 18: ...Notes ...
Страница 19: ...Service Log ...


