English
_55
MAIN MENU
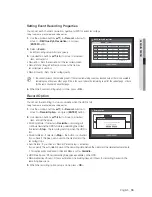
Setting Event Recording Properties
You can set each channel’s resolution, quality and FPS for event recordings.
Using the mouse may help make setup easier.
1.
Use the up/down buttons (
▲▼
) in <
Record
> window to
move to <
REC Quality & Resolution
>, and press
[
ENTER
] button.
2.
Select <
Event
>.
Event recording setup window appears.
3.
Use direction buttons (
▲▼◄ ►
) to move to a desired
item, and select it.
1
Resolution : Sets the resolution of the recorded screen.
1
Record Rate : Image Per Second, means the frames
recorded per a second.
1
Record Quality : Sets the recording quality.
M
You cannot increase the remaining count if the current remaining count has reached zero or there is no available
remaining count from any other page. If this is the case, reduce the remaining count for the current page, or do so
for the same channel on any other page.
4.
When the Event recording setup is done, press <
OK
>.
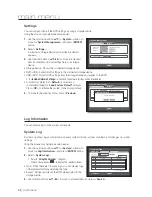
Record Option
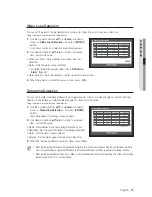
You can set the recording to stop or overwrite when the HDD is full.
Using the mouse may help make setup easier.
1.
Use the up/down buttons (
▲▼
) in <
Record
> window to
move to <
Record Option
>, and press [
ENTER
] button.
2.
Use direction buttons (
▲▼◄ ►
) to move to a desired
item, and set the value.
1
Disk End Mode : If selected <
Overwrite
>, recording will
continue despite the HDD full while overwriting the oldest.
If selected <
Stop
>, the recording will stop when the HDD is
full.
1
Disk End Beep : If selected <
Stop
>, the button is activated.
If you check it, the beep will sound on the disk full and the
recording stops.
1
Auto Delete : If you check it, Record Period setup is activated.
If you specify the auto deletion period, the recording data before the period will be deleted automatically.
This option will be enabled only if Disk End Mode is set to <
Overwrite
>.
1
HDD Free Space : Shows remaining free space available on the HDD.
1
Recordable (days/hours) : Shows estimation of remaining days and hours for recording, based on the
remaining free space.
3.
When the recording option setup is done, press <
OK
>.
CH
Resolution
b
Record
Rate
b
Record
Quality
b
1
4CIF
b
7fps
b
Level4
b
2
4CIF
b
7fps
b
Level4
b
3
4CIF
b
7fps
b
Level4
b
4
4CIF
b
7fps
b
Level4
b
5
4CIF
b
7fps
b
Level4
b
6
4CIF
b
7fps
b
Level4
b
7
4CIF
b
7fps
b
Level4
b
8
4CIF
b
7fps
b
Level4
b
REC Quality & Resolution
Standard
Event
Previous/Next Page
OK
Cancel
Record Option
OK
Cancel
x
Disk End Mode
Overwrite
Disk End Beep
x
Auto Delete
180
day
x
Record Status
x
HDD Free Space
:
986 GB / 989 GB
x
Recordable (Date/Time) :
Auto Delete
OK
Cancel
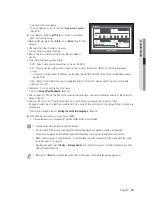
The recording information will be deleted.
Do you want to proceed?
Содержание SDR-3102
Страница 12: ...12_ English ...
Страница 13: ...4 8 16 CHANNEL DVR User Manual SDS P3042 V3042 S3042 P3022 P4042 V4042 S4042 P4082 P5082 S5082 P5102 P5122 ...
Страница 132: ...120_ appendix appendix PRODUCT OVERVIEW 1 SDR 5102 unit mm inches 57 2 24 52 2 05 315 12 4 235 9 25 224 8 82 ...
Страница 133: ...English _121 APPENDIX 1 SDR 4102 unit mm inches 235 9 25 224 8 82 57 2 24 52 2 05 315 12 4 ...
Страница 134: ...122_ appendix appendix 1 SDR 3102 unit mm inches 235 9 25 224 8 82 57 2 24 52 2 05 315 12 4 ...
Страница 239: ...PROFESSIONAL INSTALLATION Why not get it Prt fesstonolly I e and save yourself the hassle DVR Security system ...

