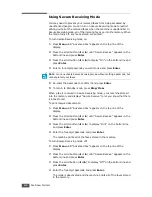
background image

M

AINTENANCE

5.9

5

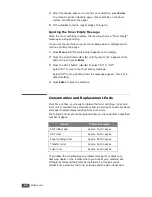
Replacing the ADF Rubber Pad

You can purchase a ADF rubber assembly from a Samsung dealer or the 
retailer where you bought your machine.

1

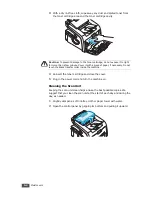
Open the control panel by gripping its bottom and pulling it upward.

2

Disconnect the support on the left side of the machine from the control 
panel and lift the control panel up to the complete open position

3

Remove the control panel from the machine by disconnecting the 
hinge on the right.

N

OTE

:

 Be careful no to disconnect the connector on the control panel from the 

machine as it turns the LCD off.

4

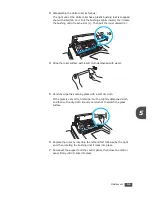
Using a screw driver, press the slots on the ADF rubber plate to unlatch 
the plate and the ADF rubber.

5

Align the holes on the new ADF rubber and the plate and inset the tabs 
on the plate into the slots on the machine. Press them until they are 
latched.

6

Replace the control panel by connecting the hinge on the right first 
then inserting the left arm while pushing the control panel to the right.

7

Reconnect the support and the control panel, then close the control 
panel firmly until it clicks into place.

Содержание SCX-5315F

Страница 1: ......

Страница 2: ...g Electronics is not responsible for any direct or indirect damages arising from or related to use of this manual 2007 Samsung Electronics Co Ltd All rights reserved SF 560R and Samsung logo are trademarks of Samsung Electronics Co Ltd All other brand or product names are trademarks of their respective companies or organizations ...

Страница 3: ...amsung com latin CZECH REPUBLIC 844 000 844 www samsung com cz Distributor pro Českou republiku Samsung Zrt česka organizační složka Vyskočilova 4 14000 Praha 4 DENMARK 70 70 19 70 www samsung com dk ECUADOR 1 800 10 7267 www samsung com latin EL SALVADOR 800 6225 www samsung com latin ESTONIA 800 7267 www samsung ee KAZAHSTAN 8 10 800 500 55 500 www samsung kz KYRGYZSTAN 00 800 500 55 500 FINLAND...

Страница 4: ...1 2676 www samsung com latin REPUBLIC OF IRELAND 0818 717 100 www samsung com uk RUSSIA 8 800 555 55 55 www samsung ru SINGAPORE 1800 SAMSUNG 7267864 www samsung com sg SLOVAKIA 0800 SAMSUNG 726786 www samsung com sk SOUTH AFRICA 0860 726 7864 SAMSUNG www samsung com za SPAIN 902 10 11 30 www samsung com es SWEDEN 0771 400 200 www samsung com se SWITZERLAND 0800 7267864 www samsung com ch TAIWAN 0...

Страница 5: ...achine ID 1 13 Entering Characters Using the Number Keypad 1 14 Setting the Date and Time 1 15 Changing the Clock Mode 1 16 Setting the Paper Type and Size 1 16 Setting Sounds 1 17 Speaker Ringer Key Sound and Alarm Sound 1 17 Speaker Volume 1 17 Using the Save Modes 1 18 Toner Save Mode 1 18 Toll Save Mode 1 18 Power Save Mode 1 19 Setting Up the Fax System 1 19 Available Fax Setup Options 1 20 C...

Страница 6: ...ring a Number for One touch Dialing 2 15 Sending a Fax using a One touch Number 2 15 Speed Dialing 2 16 Storing a Number for Speed Dialing 2 16 Sending a Fax using a Speed Number 2 16 Group Dialing 2 17 Setting a Group Dial Number 2 17 Editing Group Dial Numbers 2 18 Sending a Fax Using Group Dialing Multi address Transmission 2 18 Searching for a Number in the Memory 2 19 Searching Sequentially t...

Страница 7: ...6 TROUBLESHOOTING Clearing Document Jams 6 2 Input Misfeed 6 2 Exit Misfeed 6 2 Clearing Paper Jams 6 3 In the Paper Tray 6 3 In the Paper Exit Area 6 3 In the Fuser Area or Around the Toner Cartridge 6 4 In the Manual Feeder 6 5 Tips for Avoiding Paper Jams 6 5 Clearing LCD Error Messages 6 5 Solving Problems 6 8 Paper Feeding Problems 6 8 Copying Problems 6 9 Faxing Problems 6 9 Appendix A SPECI...

Страница 8: ... machine through case or cabinet openings They may touch dangerous voltage points creating a risk of fire or shock Never spill liquid of any kind onto or into the machine 12 To reduce the risk of electric shock do not disassemble the machine Take it to a qualified service technician when repair work is required Opening or removing covers may expose you to dangerous voltages or other risks Incorrec...

Страница 9: ...ate or service the printer with the protective cover removed from Laser Scanner assembly The reflected beam although invisible can damage your eyes When using this product these basic safety precautions should always be followed to reduce risk of fire electric shock and injury to persons Ozone Safety During normal operation this machine produces ozone The ozone produced does not present a hazard t...

Страница 10: ...s item for environmentally safe recycling Business users should contact their supplier and check the terms and conditions of the purchase contract This product should not be mixed with other commercial wastes for disposal Radio Frequency Emissions FCC Information to the User This device complies with Part 15 of the FCC Rules Operation is subject to the following two conditions This device may not ...

Страница 11: ...ephone company communications facilities or require modification or alteration of such terminal equipment or otherwise materially affect its use or performance the customer shall be given adequate notice in writing to allow the customer an opportunity to maintain uninterrupted service Ringer Equivalence Number The Ringer Equivalence Number and FCC Registration Number for this machine may be found ...

Страница 12: ...as of the dates indicated January 1 1995 Council Directive 73 23 EEC Approximation of the laws of the member states related to low voltage equipment January 1 1996 Council Directive 89 336 EEC 92 31 EEC approximation of the laws of the Member States related to electromagnetic compatibility March 9 1999 Council Directive 1999 5 EC on radio equipment and telecommunications terminal equipment and the...

Страница 13: ...e moulded plug Warning If you cut off the moulded plug get rid of it straight away You cannot rewire the plug and you may receive an electric shock if you plug it into a socket Important warning You must earth this machine The wires in the mains lead have the following color code Green and Yellow Earth Blue Neutral Brown Live If the wires in the mains lead do not match the colors marked in your pl...

Страница 14: ...xiii ...

Страница 15: ...xiv ...

Страница 16: ...TTING STARTED Thank you for purchasing this facsimile This chapter gives you step by step instructions for setting up your machine This chapter includes Setting Up Your Machine Setting Up the Machine System ...

Страница 17: ...pearance of the power cord and the telephone line cord may differ according to your country s specifications NOTE You should use the telephone line cord which is supplied with your machine If you are replacing it with another vendor s it should be AWG 26 or larger telephone line cord The power cord must be plugged into a grounded power socket Components may differ from one country to another Quick...

Страница 18: ...ow extra space for opening covers and trays The area should be well ventilated and away from direct sunlight or sources of heat cold and humidity Do not set the machine close to the edge of your desk or table Clearance Space Front 482 6 mm enough space so that the paper tray can be removed Back 250 mm enough space for ventilation Right 100 mm Left 100 mm enough space for ventilation ...

Страница 19: ...t Cover Paper Tray Front Output Tray Face down Document Input Support Automatic Document Feeder Toner Cartridge Paper Output Extension Manual Feeder Manual Feeder Guides Paper Level Indicator Document Guides Power Switch Line Jack Rear Cover Rear Output Slot Face up AC Power Cord Connector EXT Jack If your country has a different telephone connection system this socket may be blocked ...

Страница 20: ...n the original document Selects the number of copies 3 Displays the current status and prompts during an operation 4 Scrolls through the options available for the selected menu item Confirms the selection on the display Enters Menu mode and scrolls through the menus available Sends you back to the upper menu level Stops an operation at any time In Standby mode clears cancels the copy options such ...

Страница 21: ...to save on toner by using less toner to print a document Allows you to save on call costs by sending a fax at a preset toll saving time Using this feature you can take advantage of lower long distance rates at night for example 7 F A X Allows you to select the fax receiving mode Allows you to store frequently dialed fax numbers using a one or two digit speed dial or group number for automatic dial...

Страница 22: ...dle as shown attach the handset cradle to the machine Insert the two tabs of the cradle into the slots on the left side of the machine as shown Push the cradle toward the machine until it locks into place NOTE The cradle and handset must be installed for correct operation of the set To remove the cradle push it down pressing the latch on the bottom of the cradle ...

Страница 23: ... the maximum copies per cartridge NOTES To prevent damage to the toner cartridge do not expose it to light for more than a few minute Cover it with a piece of paper if necessary If the toner gets on your clothing wipe it off with a dry cloth and wash clothing in cold water Hot water sets the toner into fabric 3 Slide the toner cartridge into the machine until it locks into place completely 4 Close...

Страница 24: ...flat surface to even it up 4 Insert the paper stack into the paper tray with the side you want to print facing up NOTE If you want to load a different size of paper you need to adjust the paper guides For details see page 1 10 5 Pay attention to the paper limit mark on the left inside wall of the tray Paper overloading may cause paper jams 6 Insert and slide the paper tray back into the machine NO...

Страница 25: ...th guide out completely to extend the paper tray to its full length 2 After inserting paper into the tray slide in the guide until it lightly touches the end of the paper stack 3 Pinching the paper width guide as shown move it toward the stack of paper until it lightly touches the side of the stack NOTES Do not push the paper width guide far enough to cause the materials to warp If you do not adju...

Страница 26: ... and or answering machine to your machine plug the cord of your extension phone or answering machine into the EXT jack UK users should plug the cord of the extension phone into the supplied TAM lead and plug the cord of the TAM lead into the EXT jack on the back of your machine To the wall jack To an extension phone or answering machine TAM lead For UK users only ...

Страница 27: ...ephone or answering machines Turning the Machine On 1 Plug one end of the supplied three pronged electrical type cord into the AC socket on the machine and the other end into a properly grounded AC outlet 2 Press the power switch to turn the machine on Warming Up Please Wait appears on the display indicating that the machine is now on To view your display text in another language see the next page...

Страница 28: ... the Machine ID In some countries you are required by law to indicate your fax number on any fax you send The Machine ID containing your telephone number and name or company name will be printed at the top of each page sent from your machine 1 Press Menu until Machine Setup appears on the top line of the display The first available menu item Machine Id displays on the bottom line 2 Press Enter The...

Страница 29: ...r name or your company s name and telephone number When you store one or two digit speed dial or group dial numbers you may also enter the corresponding names To enter alphanumeric characters 1 When you are prompted to enter a letter locate the button labeled with the character you want Press the button until the correct letter appears on the display For example to enter the letter O press 6 label...

Страница 30: ...rresponding location Setting the Date and Time The current date and time are shown on the display when your machine is on and ready to work All of your faxes will have the date and time printed on them NOTE If power to the machine is cut off you need to reset the correct time and date once the power is restored 1 Press Menu until Machine Setup appears on the top line of the display 2 Press the scr...

Страница 31: ...n the top line of the display 2 Press the scroll button W or X until you see Clock Mode on the bottom line and press Enter The clock mode currently set for the machine displays 3 Press the scroll button W or X to select the other mode and then press Enter to save the selection 4 To return to Standby mode press Stop Clear Setting the Paper Type and Size After loading paper in the paper tray you nee...

Страница 32: ...t 3 Press the scroll button W or X to display the status or loudness you want for the option you have selected For the ringer volume you can select from Off Low Med and High Setting Off means that the ringer turns off The machine works normally even if the ringer is turned off 4 Press Enter to save the selection 5 If necessary repeat steps 2 through 4 6 To return to Standby mode press Stop Clear S...

Страница 33: ...along distance phone company To turn the toll save mode on 1 Press Toll Save The button backlight turns on 2 Press Enter when Start Time displays on the bottom line 3 Enter the time when your machine starts sending toll save faxes using the number keypad To select AM or PM for 12 hour format press the or button or any number button 4 Press Enter when the starting time on the display is correct 5 P...

Страница 34: ...ntil the time settings you want appears The available options are 5 10 15 30 and 45 minutes 5 Press Enter to save the selection 6 To return to Standby mode press Stop Clear Setting Up the Fax System Your machine has various user selectable fax setup options These options are preset at the factory but you may need to change them 1 Press Menu until Fax Setup appears on the top line of the display Th...

Страница 35: ...ze of the document to fit the size of paper loaded in the machine Select On if you want to automatically reduce an incoming page With this feature set to Off the machine cannot reduce the document to fit onto one page the document is divided and printed in actual size on two or more pages Discard Size When receiving a document as long as longer than the paper installed in your machine you can set ...

Страница 36: ...2 BASIC FUNCTIONS This chapter gives you basic information about using your machine as a fax machine and a copier This chapter includes Sending a Fax Receiving a Fax Making a Copy Automatic Dialing ...

Страница 37: ...on skin or thin paper wrinkled or creased paper curled or rolled paper torn paper Remove all staples and paper clips before loading documents Make sure any glue ink or correction fluid on the paper is completely dry before loading documents Do not load documents containing different sizes or weights of paper Do not load booklet pamphlet transparencies or documents having other unusual characterist...

Страница 38: ...tings are described in the following table below NOTES For the memory transmission Super Fine mode is not available The resolution setting is automatically changed to Fine When your machine is set to Super Fine resolution and the remote fax machine does not support the Super Fine resolution the machine transmits using the highest resolution mode supported by the remote fax machine Mode Recommended...

Страница 39: ... while sending the fax Sending a Fax Manually 1 Load the document s face down into the ADF For details about loading a document see page 2 2 2 Adjust the document resolution to suit your fax needs See page 2 3 If you need to change the darkness see page 1 20 3 Press On Hook Dial or lift the handset You hear a dial tone 4 Enter the remote fax machine s fax number using the number keypad You can use...

Страница 40: ... message press Stop Clear to clear the message and try to send the document again You can set your machine to print a confirmation report automatically each time sending a fax is completed For further details see the MSG Confirm item on page 1 20 Automatic Redialing When the number you have dialed is busy or there is no answer when you send a fax the machine automatically redials the number every ...

Страница 41: ...elephone company service which enables a user to use a single telephone line to answer several different telephone numbers For further details See page 2 8 The current receiving mode displays when the machine is in Standby mode When the memory is full the receiving mode automatically switches to Tel NOTES To use Ans Fax mode attach an answering machine to the EXT jack on the back of your machine S...

Страница 42: ...ift the external handset 2 Press Start Copy Fax then the 1 Sending 2 Receiving message appears on the display 3 Press 2 by using the numer keypad for receiving 4 Press Enter to start fax receiving The machine begins receiving a fax and returns to Standby Mode when the reception is completed Receiving Automatically in Ans Fax Mode For using this mode you must attach an answering machine to the EXT ...

Страница 43: ... to whatever you choose For details about changing the code see page 1 20 Receiving Faxes Using the DRPD Mode Distinctive Ring is a telephone company service which enables a user to use a single telephone line to answer several different telephone numbers The particular number someone uses to call you on is identified by different ringing patterns which consist of various combinations of long and ...

Страница 44: ...ode displays and retry from Step 3 6 To return to Standby Mode press Stop Clear When the DRPD feature is set up the DRPD option is available in the Receive Mode menu To receive faxes in the DRPD mode you need to set the menu to DRPD NOTES DRPD must be set up again if you re assign your fax number or connect the machine to another telephone line After DRPD has been set up call your fax number again...

Страница 45: ...rther details about print materials you can use see page A 5 To load paper in the manual feeder 1 Load a sheet of the print material with the print side face up and into the center of the tray For transparencies hold them by the edges and avoid touching the print side Oils from your finders can cause print quality problems 2 Adjust the guide to the width of the print material NOTE When printing on...

Страница 46: ...n to scroll to Paper Size and press Enter to access the menu item NOTE If you are using envelopes or card stocks you don t need to set the paper size 5 Use the scroll button W or X to display Manual Feed on the bottom line Press Enter to access the menu item 6 Use the scroll button W or X to find the paper size you are using and press Enter to save it 7 To return to Standby mode press Stop Clear M...

Страница 47: ... print Normal works well with standard typed or printed documents Dark works well with light print or faint pencil markings Original Type The Original Type setting is used to improve the copy quality by selecting the document for the current copy job To select the document type press Original Type Each time you press the button the LED labeled with the selected mode turns on You can choose from th...

Страница 48: ...ection NOTE When you make a reduced copy black lines may appear at the bottom of your copy Changing the Default Settings Copy options including darkness original type copy size and number of copies can be set to the most frequently used modes When you copy a document the default settings are used unless they are changed by using the corresponding buttons on the control panel To create your own def...

Страница 49: ...select from 15 30 60 and 180 seconds Selecting Off means that the machine does not restore the default settings until you press Start Copy Fax to start copying or Stop Clear to cancel 5 Press Enter to save the selection 6 To return to Standby mode press Stop Clear Collation Copying The Collation copying feature is available only when you load documents in the ADF 1 Press Menu on the control panel ...

Страница 50: ...he display If you make a mistake while entering a number press the W button and re enter the correct number 3 To assign a name to the number enter the name you want For details about entering characters see page 1 14 If you do not want to assign a name skip this step 4 Press Enter when the name appears correctly or without entering a name 5 To store more numbers press a one touch button and repeat...

Страница 51: ...se between numbers press Redial Pause A appears on the display 6 To assign a name to the number enter the name you want For details about entering characters see page 1 14 If you do not want to assign a name skip this step 7 Press Enter when the name appears correctly or without entering a name 8 To store more fax numbers repeat steps 4 through 7 To return to Standby mode press Stop Clear Sending ...

Страница 52: ...showing the first available number 5 Enter a group number between 0 and 79 using the number keypad or scroll button W or X and press Enter 6 Press a one touch dial button or enter a one or two digit speed number you want to include in the group and press Enter 7 When the display confirms the number to be added to the number press Enter 8 Repeat steps 6 and 7 to enter other one touch or speed dial ...

Страница 53: ...splay shows Add 8 Press Enter to add or delete the number 9 Change the name if necessary and press Upper Level 10 If you want to edit another group press Enter and repeat from step 5 OR To return to Standby mode press Stop Clear Sending a Fax Using Group Dialing Multi address Transmission You can use group dialing for Broadcasting or Delayed transmissions Follow the procedure of the operation Broa...

Страница 54: ...or group dial number These letters tell you how the number is stored 4 When the name and or the number you want displays press Start Copy Fax or Enter to dial Searching with a Particular First Letter 1 Press Phone Book 2 Press Enter when Search Dial appears on the display 3 Press the button labeled with the letter you want to search for A name beginning with the letter displays For example if you ...

Страница 55: ...BASIC FUNCTIONS 2 20 MEMO ...

Страница 56: ...ADVANCED FAX FUNCTIONS This chapter includes Sending Broadcasting Faxes Sending a Delayed Fax Sending a Priority Fax Polling a Remote Machine Adding Documents to a Scheduled Fax Canceling a Scheduled Fax ...

Страница 57: ...display asks you to enter another fax number to send the document NOTE The Another No prompt does not appear if you have added numbers for another broadcasting or delayed fax job You must wait until the job is completed 6 To enter more fax numbers press 1 to select Yes and repeat steps 4 and 5 You can add up to 10 destinations Note that you cannot use group dial numbers for another fax number 7 Wh...

Страница 58: ...sh entering fax numbers press 2 to select No at a Another No prompt The display asks you to enter a name 9 To assign a name to the transmission enter the name If not skip this step For details on how to enter the name using the number keypad see page 1 14 10 Press Enter The display shows the current time and asks you to enter the starting time when the fax is to be sent 11 Enter the time using the...

Страница 59: ...eed dial or group dial numbers For details see page 2 15 6 Press Enter to confirm the number The display asks you to enter a name 7 To assign a name to the transmission enter the name If not skip this step For details on how to enter a name using the number keypad see page 1 14 8 Press Enter The document is scanned into the memory before transmission The display shows the memory capacity and the n...

Страница 60: ...ore fax numbers press 1 to select Yes and repeat steps 4 and 5 You can add up to 10 destinations Note that you cannot use group dial numbers for another fax number 6 When you finish entering fax numbers press 2 to select No at a Another No prompt 7 Enter the time using the number keypad To select AM or PM for 12 hour format press the or button or any number button If you set a time earlier than th...

Страница 61: ...ntil you see the fax job to which you want to add documents and press Enter The machine automatically stores the documents in the memory and the display shows the memory capacity and the number of pages After storing the machine displays the numbers of total pages and added pages and then returns to Standby mode Canceling a Scheduled Fax 1 Press Menu until Fax Feature appears on the top line of th...

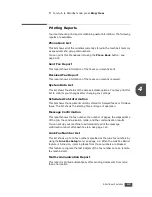
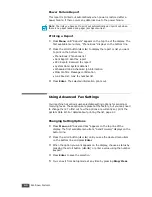
Страница 62: ...4 ADDITIONAL FEATURES This chapter includes Using Secure Receiving Mode Printing Reports Using Advanced Fax Settings ...

Страница 63: ...passcode to confirm it and press Enter 6 To return to Standby mode press Stop Clear When a fax is received in Secure Receiving mode your machine stores it into the memory and displays Secure Receive to let you know that there is a fax stored To print received documents 1 Press Menu until Advanced Fax appears on the top line of the display 2 Press the scroll button W or X until Secure Receive appea...

Страница 64: ...g any settings Scheduled Job Information This list shows the document currently stored for Delayed faxes or Toll Save faxes The list shows the starting time and type of operation Message Confirmation This report shows the fax number the number of pages the elapsed time of the job the communication mode and the communication results You can set up your machine to automatically print the message con...

Страница 65: ...irm Message confirmation Junk Fax List Junk fax number list 3 Press Enter The selected information prints out Using Advanced Fax Settings Your machine has various user selectable setting options for sending or receiving faxes These options are preset at the factory but you may need to change them To find out how the options are currently set print the System Data list For details about printing th...

Страница 66: ...rn this feature off Select On to turn this feature on You can set the starting time and or the ending time for Toll Save mode Junk Fax Setup Using the Junk Fax Barrier feature the system will not accept faxes sent from remote stations of which their numbers are stored in the memory as junk fax numbers This feature is useful for blocking any unwanted faxes Select Off to turn the feature off Anybody...

Страница 67: ...ith poor line quality and makes sure any fax you send are sent smoothly to any other ECM equipped fax machine If the line quality is poor it takes more time to send a fax when you are using the ECM Select Off to turn this feature off Select On to turn this feature on Option Description ...

Страница 68: ...formation for maintaining your machine and the toner cartridge This chapter includes Clearing the Memory Adjusting Shading Cleaning Your Machine Maintaining the Toner Cartridge Consumables and Replacement Parts Replacing the ADF Rubber Pad ...

Страница 69: ...ptions to the factory default Fax Setup Restores all of the Fax Setup options to the factory default Fax Feature Cancels all of the scheduled fax jobs in the machine s memory Advanced Fax Restores all of the Advanced Fax setting options to the factory default Sound Volume Resets the sound and volume settings to the factory default Machine Setup Resets all of the system settings such as the machine...

Страница 70: ...ine be careful not to touch the transfer roller located underneath the toner cartridge Oil from your fingers can cause print quality problems CAUTIONS Cleaning the cabinet of the machine with surfactants containing large amounts of alcohol solvent or other strong substances can discolor or crack the cabinet Cleaning the Outside Clean the cabinet of the machine with a soft lint free cloth You can d...

Страница 71: ...essary Do not touch the black transfer roller inside the machine 4 Reinsert the toner cartridge and close the cover 5 Plug in the power cord and turn the machine on Cleaning the Scan Unit Keeping the scan unit clean helps ensure the best possible copies We suggest that you clean the scan unit at the start of each day and during the day as needed 1 Slightly dampen a soft lint free cloth or paper to...

Страница 72: ...urface with a soft cloth dampened with water 5 Carefully wipe the scanning glass with a soft dry cloth If the glass is very dirty first wipe it with a slightly dampened cloth and then with a dry cloth Be very careful not to scratch the glass surface 6 Replace the roller by inserting the left end first followed by the right end then rotating the bushing until it locks into place 7 Reconnect the sup...

Страница 73: ...t it also reduces the print quality Expected Cartridge Life The life of the toner cartridge depends on the amount of toner that print jobs require The actual number may be different depending on the print density of the page you print If you print a lot of graphics you may need to change the cartridge more often Redistributing Toner When the toner cartridge is near the end of its life white streak...

Страница 74: ...r machine automatically sends a fax to your service company or the dealer to notify them that your machine requires a new toner cartridge when the toner cartridge needs to be replaced The fax number is preset by your dealer when you bought your machine 1 Press Menu on the control panel until Maintenance appears on the top line of the display The first available menu item Clean Drum displays on the...

Страница 75: ...essage Select Off to stop printing when the message appears This is the default setting 4 Press Enter to save the selection Consumables and Replacement Parts From time to time you needs to replace the toner cartridge roller and fuser unit to maintain top performance and to avoid print quality problems and paper feed problems resulting from worn parts The following items should be replaced after yo...

Страница 76: ...inge on the right NOTE Be careful no to disconnect the connector on the control panel from the machine as it turns the LCD off 4 Using a screw driver press the slots on the ADF rubber plate to unlatch the plate and the ADF rubber 5 Align the holes on the new ADF rubber and the plate and inset the tabs on the plate into the slots on the machine Press them until they are latched 6 Replace the contro...

Страница 77: ...MAINTENANCE 5 10 MEMO ...

Страница 78: ...ROUBLESHOOTING This chapter gives helpful information for what to do if you encounter an error This chapter includes Clearing Document Jams Clearing Paper Jams Clearing LCD Error Messages Solving Problems ...

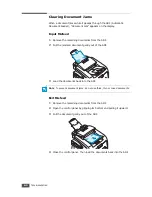
Страница 79: ...om the ADF 2 Pull the jammed document gently out of the ADF 3 Load the documents back into the ADF NOTE To prevent document jams do not use thick thin or mixed documents Exit Misfeed 1 Remove the remaining documents from the ADF 2 Open the control panel by gripping its bottom and pulling it upward 3 Pull the document gently out of the ADF 4 Close the control panel Then load the documents back into...

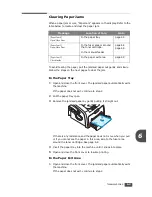
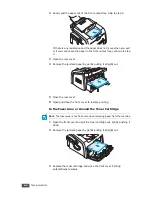
Страница 80: ...ht out If there is any resistance and the paper does not move when you pull or if you cannot see the paper in this area skip to the fuser area around the toner cartridge See page 6 4 4 Insert the paper tray into the machine until it snaps into place 5 Open and close the front cover to resume printing In the Paper Exit Area 1 Open and close the front cover The jammed paper automatically exits the m...

Страница 81: ...ammed paper by gently pulling it straight out 5 Close the rear cover 6 Open and close the front cover to resume printing In the Fuser Area or Around the Toner Cartridge NOTE The fuser area is hot Take care when removing paper from the machine 1 Open the front cover and pull the toner cartridge out lightly pushing it down 2 Remove the jammed paper by gently pulling it straight out 3 Replace the ton...

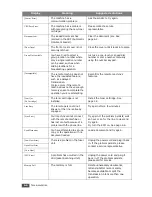
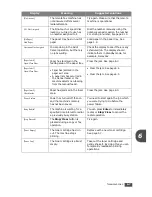
Страница 82: ...le your machine is printing Flex fan and straighten the paper before loading Do not use creased damp or highly curled paper Do not mix paper types in the paper tray Use only recommended print materials See Paper Specifications on page A 5 Ensure that the print side of print materials is facing down in the paper tray and facing up in the manual feeder Clearing LCD Error Messages Messages appears on...

Страница 83: ...he remote machine s features Jam 1 or No Cartridge The toner cartridge is not installed Install the toner cartridge See page 1 8 Line Busy The remote person did not answer or the line is already engaged Try again after a few minutes Line Error Your machine cannot connect with the remote machine or has lost contact because of a problem with the phone line Try again If the problem persists wait an h...

Страница 84: ...med in the paper exit area A paper jam has occurred in the manual feeder or the machine detects non feeding from the manual feeder Clear the jam See page 6 4 Clear the jam See page 6 5 Paper Jam 2 Check Inside Paper has jammed in the fuser area Clear the jam See page 6 3 Power Failure Power has turned off then on and the machine s memory has not been saved You need to start again the job which you...

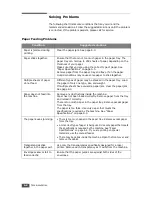
Страница 85: ... caused a paper jam clear the paper jam See page 6 3 Paper does not feed into the machine Remove any obstructions inside the machine Paper has not been loaded correctly Remove paper from the tray and reload it correctly There is too much paper in the paper tray Remove excess paper from the tray The paper is too thick Use only paper that meets the specifications required by the machine See Paper Sp...

Страница 86: ... necessary Ensure that the paper is the proper paper weight 75g m2 20 lb bond paper is recommended Check for copy paper or pieces of copy paper remaining in the machine after a paper jam has been cleared Fewer copies from the toner cartridge than expected prints out Your original documents may contain pictures solids or heavy lines For example they may be forms newsletters books or other documents...

Страница 87: ...ncoming fax are stretched The fax machine sending you the fax had a temporary document jam There are lines on the documents you send Check your scan unit for marks and clean it See page 5 4 The machine dials a number but a connection with another fax machine fails The other fax machine may be turned off out of paper or cannot answer incoming calls Speak with the other machine operator and ask her ...

Страница 88: ...A SPECIFICATIONS This chapter includes General Specifications Copier Specifications Facsimile Specifications Paper Specifications ...

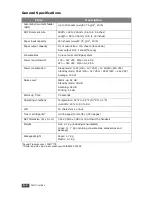
Страница 89: ...er consumption Sleep mode 10 W 100 127 VAC 12 W 220 240 VAC Standby mode 85 W 100 127 VAC 95 W 220 240 VAC Average 300 W Noise Level Sound Pressure Level ISO 7779 Warm up 52 dB Standby mode 39 dB Scanning 52 dB Printing 52 dB Warm up Time 35 seconds Operating conditions Temperature 50 o F to 89 o F 10 o C to 32 o C Humidity 20 to 80 RH LCD 16 characters x 2 lines Toner cartridge life Declared yiel...

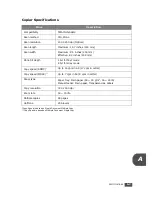
Страница 90: ...ono bit depth 1 bit for Text mode 8 bit for Gray mode Copy speed SDMC Copy Speed is based on Single Document Multiple Copy Up to 16 cpm in A4 17 cpm in Letter Copy speed MDSC Copy Speed is based on Multiple Document Single Copy Up to 7 cpm in A4 8 cpm in Letter Paper type Paper tray Plain paper 60 90 g m2 16 24 lb Manual feeder Plain paper Transparencies Labels Copy resolution 300 x 300 dpi Zoom r...

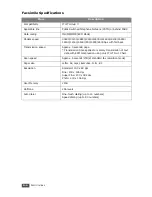
Страница 91: ...with fall back Transmission speed Approx 3 seconds page Transmission time applies to memory transmission of text data with ECM compression using only ITU T No 1 Chart Scan speed Approx 6 seconds LTR at standard fax resolution mode Paper size Letter A4 Legal Executive Folio B5 Resolution Standard 203 x 98 dpi Fine 203 x 196 dpi Super Fine 203 x 392 dpi Photo 203 x 196 dpi User Memory 2 MB Halftone ...

Страница 92: ...paper that does not meet these specifications may cause problems requiring repairs These repairs are not covered by the Samsung warranty or service agreements Supported Sizes of Paper NOTE You may experience jams when using print materials with a length of less than 127 mm 5 in For optimum performance ensure that you are storing and handling the paper correctly Please refer to Paper Storage Enviro...

Страница 93: ... to the paper Insure that any colored paper or preprinted forms use inks that are compatible with this fusing temperature 200 C or 392 F for 0 1 second Symptom Problem with Paper Solution Poor print quality or toner adhesion problems with feeding Too moist too rough too smooth or embossed faulty paper lot Try another kind of paper between 100 400 Sheffied 4 5 moisture content Dropout jamming curl ...

Страница 94: ... important to prevent damage to large supplies of paper Unopened paper in sealed reams can remain stable for several months before use Opened packages of paper have more potential for environment damage especially if they are not wrapped with a moisture proof barrier The paper storage environment should be properly maintained to ensure optimum performance The required condition is 20 to 24 C 68 to...

Страница 95: ...SPECIFICATIONS A 8 ...

Страница 96: ... 1 15 delay receive polling 3 4 delayed fax 3 2 display language change control panel 1 13 document loading 2 2 preparing 2 2 document jam clear 6 2 drum clean 5 7 E error messages 6 5 extension phone connect 1 11 F fax system set advanced settings 4 4 basic settings 1 19 G group dial dialing 2 18 editing 2 18 setting 2 17 H handset attach 1 7 J jam clear document 6 2 paper 6 3 M machine ID set 1 ...

Страница 97: ...last number 3 2 reduced enlarged copy 2 13 reports print 4 3 resolution set 2 3 S searching Phonebook 2 19 sending a fax automatically 2 4 manually 2 4 shading adjust 5 3 sounds set 1 17 specifications facsimile A 4 general A 2 paper A 5 scanner and copier A 3 speed dial dialing 2 16 storing 2 16 T tel line connect 1 11 toll save mode use 1 18 toner cartridge install 1 8 life 5 6 redistribute 5 6 ...

Страница 98: ...Rev 1 00 ...
Отзывы: