background image

1-3

G

Ge

ettttiin

ng

g  S

Stta

arrtte

ed

d

Descriptions

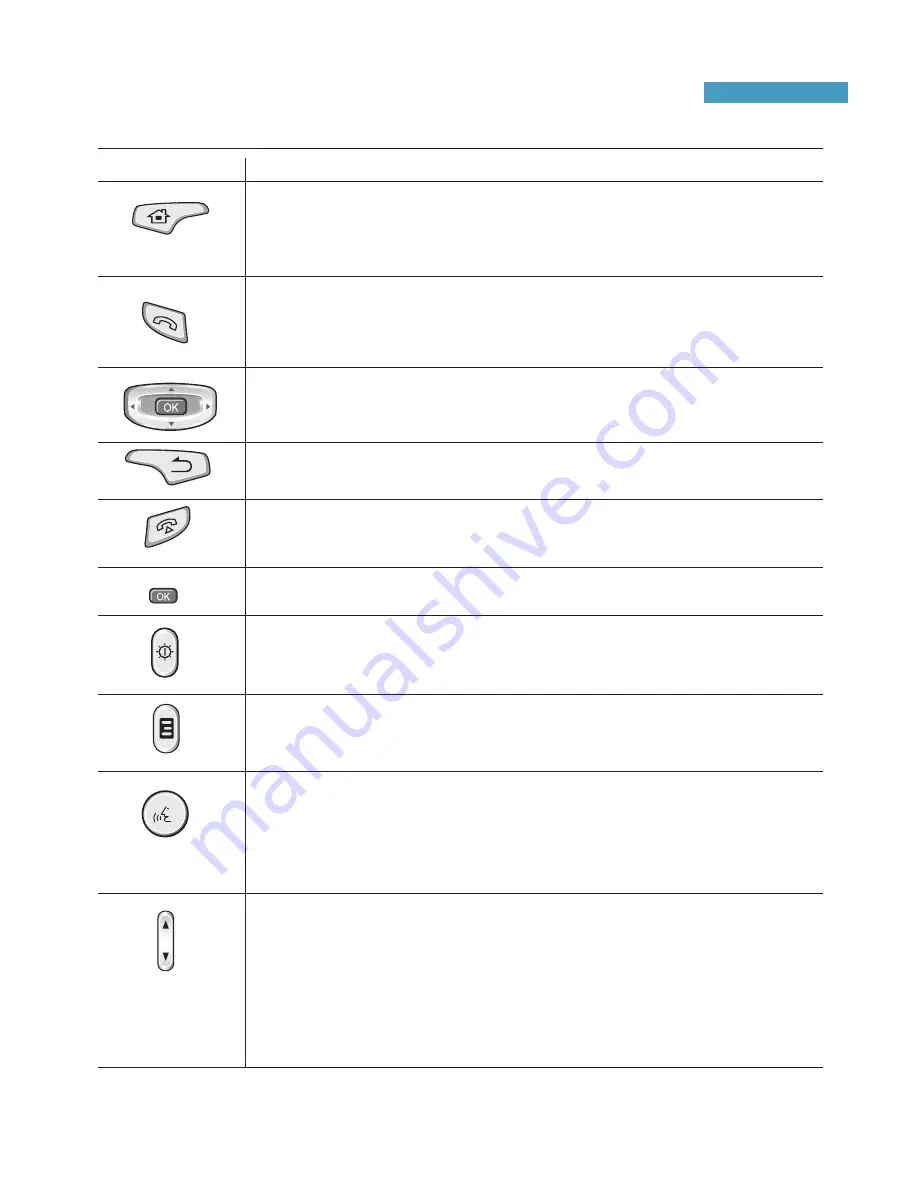
Button(s)

Accesses the Phone screen in PDA mode.
Dials a phone number and answers an incoming call. 
In the phone idle mode, it shows the call log.
When pressed and held, it dials the last number.

When pressed repeatedly in the Launcher mode, goes through all
of the Launcher tabs in order. 
Launches directly the Home screen when you use an application.
When pressed and held, it launches the Task Bar.

Accesses the optional Voice Recognition program supplied with
an optional CD. If you do not install the optional program, access
the Recorder application to record a voice memo.
When pressed and held, access the Recorder application to
record a voice memo.

Turns the backlight on or off. 
When pressed and held, it turns your PDA phone sleep mode on
or off to save the power.

Works as a camera shutter in Camera mode. 
When pressed and held, it launches the Camera.

Cancels the operation or goes back to the previous status or
application.

Ends a call or exits to Idle mode in Phone mode. 
Ends a call in PDA mode.
When pressed and held, the phone mode turns off or on. 

Confirms your selection or executes the selected application.

Moves up/down and left /right through any of the applications,
menus, or options.

Adjusts the voice volume during a call.
Adjusts the media volume when listening to Media Player.
Adjusts the system volume in Phone mode.
Scrolls pages when editing or entering text. 
In the Launcher mode, it expands beyond the area of the PDA
phone.

Содержание SCH-I519

Страница 1: ...User s Guide SCH i519 www samsungmobile com ...

Страница 2: ...ing the Battery 1 6 Removing the Battery 1 7 Installing the R UIM Card 1 8 Inserting the R UIM Card 1 8 Removing the R UIM Card 1 9 Charging Your Phone 1 9 Using the Travel Charger 1 9 Using the Desktop Holder 1 10 Low Battery Indicator 1 13 Installing Sync Program 1 14 Installing an Optional Memory Card 1 15 Chapter 2 The Basics Home Screen 2 1 Adjusting Brightness of the Screen and the Backlight...

Страница 3: ...pter 3 Navigating Applications Application Launcher Screen 3 1 Command Bar 3 2 Status Bar 3 3 Opening an Application 3 5 Closing an Application 3 5 Actions Common to All Applications 3 6 Creating a New Item in an Application 3 6 Opening an Item for Viewing 3 6 Editing an Item 3 6 Deleting an Item 3 6 Making Records Private 3 7 Categorising Records 3 9 Searching for Items 3 12 Chapter 4 Call Functi...

Страница 4: ...Calling Features 4 9 Making a Call from Addressbook 4 9 Making a Call from Quick Dial List 4 9 Making an Emergency Call 4 10 Making an International Call 4 10 Pause Dialling 4 11 Accessing Message Box 4 11 Using the Call Logs 4 12 Using Silent Mode 4 14 Setting General Phone Options 4 15 Answering Options 4 16 Dialling Options 4 16 Call Forwarding 4 17 Call Waiting 4 19 Setting the Ringer Options ...

Страница 5: ...tting the R UIM Card s Security 4 28 PIN Check 4 29 Change PIN 4 29 R UIM Lock 4 30 My Phone 4 30 Clear Memory 4 30 Chapter 5 Using Addressbook Creating a New Entry 5 1 Viewing the Addressbook Entries 5 7 Making a Call from the Address Screen 5 9 Editing an Addressbook Entry 5 10 Copying Entries between the R UIM Card and Addressbook 5 11 Deleting Addressbook Entries 5 12 Chapter 6 Messaging Messa...

Страница 6: ...reset Messages 6 25 Saving Instant Messages 6 26 Chapter 7 Application Camera 7 1 Taking Pictures 7 1 Photo Album 7 7 Viewing Pictures 7 7 Media Player 7 10 Playing Media Files 7 10 Using the Play List Options 7 13 Removing Medial Files from the Play List 7 13 Schedule 7 14 Creating an Appointment 7 14 Viewing Your Schedule 7 17 Editing an Appointment 7 21 Deleting an Appointment 7 21 Sending an A...

Страница 7: ... Creating a New Word Document 7 35 Viewing and Editing a Document 7 37 MiniSheet 7 38 Creating a Workbook 7 38 Viewing and Editing a Workbook 7 40 Office Viewer 7 42 Viewing a Presentation 7 42 Using the Navigation Tools 7 44 Additional Office Viewer Options 7 45 Text Reader 7 46 Reading a Text File 7 46 Using the Control Bar 7 48 Using Text Reader Options 7 48 Chapter 8 Miscellaneous Alarm 8 1 Cl...

Страница 8: ... 16 Recorder 8 17 Making a Voice Recording 8 17 Playing a Voice Recording 8 18 Editing Information about the Recording 8 19 Deleting a Voice Recording 8 20 Creating a Copy of the Voice Recording 8 20 Sending a Voice Recording 8 20 Java 8 21 Installing a Java Program 8 21 Opening a Java Program 8 23 Using Folder 8 24 Fruits Cocktail 8 24 Chapter 9 Setup Customising Your PDA Phone 9 1 Chapter 10 Doc...

Страница 9: ... nt ts s Chapter 11 Health and Safety Information Battery Safety 11 1 Road Safety 11 3 Operating Environment 11 4 Electronic Devices 11 4 Potentially Explosive Atmospheres 11 6 Emergency Calls 11 6 Care and Maintenance 11 8 ...

Страница 10: ...icals Switching Off in Aircraft Wireless phones can cause interference Using them in aircraft is both illegal and dangerous Switching Off in Hospitals Switch off your phone near medical equipment Follow any regulations or rules in force Interference All wireless phones may be subject to interference which could affect their performance Special Regulations Meet any special regulations in force in a...

Страница 11: ... before you can make an emergency call Give all the necessary information as accurately as possible Do not cut off the call until given permission to do so Water Resistance Your phone is not water resistant Keep it dry Accessories and Batteries Use only Samsung approved accessories and batteries Use of any unauthorised accessaries could damage your phone and may be dangerous Qualified Service Only...

Страница 12: ... PDA phone and charge the battery What s in the Box Your package contains the following items PDA phone Desktop holder Travel charger Ear microphone Quick guide Sync installation CD Batteries and Stylus pens In addition you can obtain the following accessories for your phone from your local Samsung dealer PC data link cable Car charger kit Waterproof case Leather case Screen cleaner ...

Страница 13: ...rpiece Microphone Lamp Flashes to indicate an incoming call or a message IrDA port Volume buttons Voice memo button Touch screen for handwriting drawing or to make a selection with the stylus Ear microphone Jack Camera module Launcher button 4 way navigation buttons OK button Camera button Power button Backlight button Send button End button Back button Antenna ...

Страница 14: ...d held access the Recorder application to record a voice memo Turns the backlight on or off When pressed and held it turns your PDA phone sleep mode on or off to save the power Works as a camera shutter in Camera mode When pressed and held it launches the Camera Cancels the operation or goes back to the previous status or application Ends a call or exits to Idle mode in Phone mode Ends a call in P...

Страница 15: ...h this button with the stylus to reboot the PDA phone Battery Battery lock Stylus holder for inserting the stylus Expansion slot for an optional memory card Battery charge indicator Stylus holder Charging compartment for the phone with battery attached Phone indicator Charging compartment for battery alone on the back ...

Страница 16: ...e the stylus to Tap Softly touch the screen once with the stylus to select or execute a file or command A tap works like a mouse click on a computer Drag Hold the stylus on the screen and drag it across the screen to move text Tap and hold Tap and hold the stylus on an item to see a list of actions available for that item Tap the action you want to perform on the pop up menu that appears Note To p...

Страница 17: ... batteries and chargers Ask your local Samsung dealer for further details Note You must fully charge the battery before using your phone for the first time A discharged standard battery is fully recharged in approximately 2 5 hours Installing the Battery 1 Put the battery on the back of the phone lining it up with corresponding slots on the phone ...

Страница 18: ...ore switching the phone on Removing the Battery 1 Turn the power off 2 To remove the battery with the back of the phone facing you press the battery lock button to release the battery and slide the battery off the phone as shown Battery lock button 2 Slide the battery up until it clicks into place ...

Страница 19: ...l R UIM cards out of the reach of small children The R UIM card and its contacts can easily be damaged by scratches or bending so be careful when handling inserting or removing the card When installing the R UIM card always make sure that the phone is turned off before you remove the battery Inserting the R UIM Card 1 Remove the battery 2 Insert and slide the R UIM card under the two tabs ensuring...

Страница 20: ...g the R UIM Card To remove the R UIM card slide the card out of the holder as shown Charging Your Phone Using the Travel Charger 1 Plug the connector of the Travel charger into the bottom of the phone Check that the arrow on the connector is facing upwards ...

Страница 21: ...m the AC wall outlet and unplug the adapter from the phone by pressing the push buttons on the connector and pulling the connector out Using the Desktop Holder 1 Connect the travel charger to the adapter jack on the back of the Desktop holder Check that the arrow in the connector is facing upwards 2 Plug the travel charger into a standard AC outlet ...

Страница 22: ...p holder so that the connector on the charger is properly inserted into the jack at the bottom of the PDA phone and then press the PDA phone until it latches on both sides of the desktop holder as shown Slide the battery alone not attached to the phone into the rear compartment of the desktop holder You can charge the phone and single battery together Battery charge indicator Phone charge indicato...

Страница 23: ...ght turns green remove the PDA phone or battery from the charger To remove your PDA phone from the holder pull your PDA phone towards you to unlatch the PDA phone and then pull it out as shown Do not pull it straight up or damage to the power connector at the bottom of the desktop holder may occur Once the battery is charged you can use your PDA phone in the desktop holder or out of the charger fo...

Страница 24: ...ay When the remaining amount of the battery power is low a warning message indicating the phone mode will be turned off appears and then the phone mode is automatically turned off If you continue to use your PDA phone without charging your PDA phone is automatically turned off If you want to view the remaining amount of battery power tap Power To conserve power you can adjust the Backlight setting...

Страница 25: ... Sync driver USB driver for PC which allows you connect your computer using the USB cable to send and receive data Before you can begin synchronising with your computer you must install the program on your computer from the supplied CD ROM To install the program 1 Insert the CD ROM into the CD ROM drive of your desktop computer 2 The execution file will auto run 3 Follow the instructions on the sc...

Страница 26: ... music files voice memos and more These can be transferred between your PDA phone and your computer Use the SD card when it is inconvenient to perform a PopSync operation To insert an SD card 1 Hold your PDA phone securely and make sure that the card is facing the correct direction Carefully push the card into the slot until it clicks into place 2 If your PDA phone does not recognize the card chec...

Страница 27: ... follow the instructions that come with the SD card or contact your SD card manufacturer for more information Some SD cards consume large amounts of power To avoid draining the battery completely when using an SD card connect your PDA phone to an AC power outlet whenever possible If the battery is very low do not save data to an SD card This may result in the loss of data First connect to an AC po...

Страница 28: ...on the bottom of the screen in Launcher mode In Home you can see important information for the day at a glance Tap to open the owner s information Tap to change the date and time For details see page 8 2 New messages today s schedule and to do tasks Tap on each item to open it Tap to launch Home Phone Application Misc Setup or Documents Tap to open the Task Bar ...

Страница 29: ...e You can tap a specific item to open the corresponding application and view or edit the item in detail Adjusting Brightness of the Screen and the Backlight You can control the screen s brightness and the backlight usage The backlight drains the battery so you can conserve power by reducing the brightness of the screen To adjust the brightness of the screen 1 In the Launcher mode tap at the bottom...

Страница 30: ... 6 3 In both the Battery and External tabs when Turn off device if not used for is checked the backlight turns off automatically if the device is not used for the specified period of time The backlight turns off to conserve power You can change the time the backlight stays on from the pull down list When the Turn on backlight when a button is pressed or the screen is tapped box is checked the back...

Страница 31: ...he FSIM GridIM and Numpad modes When you select a field that requires you to enter text or numbers in an application such as Address Memo To do or Message the text entry screen opens Text Entry icon Tap it to hide or display the Text Entry screen To change the entry mode tap the arrow next to the Text Entry icon and select the mode from the list The currently selected Text Entry mode is indicated ...

Страница 32: ... icon Tap it to display or hide the Text Entry screen Shifts between English and Chinese Character Selection Field You can select the Chinese characters you want to use Entering English Characters 1 Tap on the keys with your stylus just as you would type with your fingers on your desktop keyboard 2 Use to write capital letters only or use to change the character case 3 The selected character displ...

Страница 33: ...fied Chinese or Traditional Chinese 3 The keyboard for entering the Chinese words appears 3 Tap keys corresponding to the phonetic spelling referring to the Roman letters printed on the keys Notice that the choices in the Character Selection Field change with each letter you enter For example to enter in Pinyin mode tap l and select i from the highlighted keys Characters available in Chinese Pinyi...

Страница 34: ...yping appears in the Character Selection Field you may select it without completing the Pinyin spelling for the character Simply tap it to add it to your text Tap to enter the selected character in the text area 6 The selected character displays in the text area 7 Repeat steps 1 through 5 to enter more characters To insert a space tap the space key To delete the letter in the Character Selection F...

Страница 35: ...ter Chinese characters Allows you to enter English characters Allows you to enter numbers Allows you to enter special characters Allows you to switch between the Simplified Chinese and Traditional Chinese Moves the cursor to the right within the text field Tap to use the pop up menu The following menus are available Color allows you to change the text color Select the color in the color field Mult...

Страница 36: ...har the letters resembling your writing appear in the Character Selection Field Tap one of the choices to enter it into your text Character Selection Field OR If you selected Multi chars the letters resembling your writing appear in the Character Selection Field Tap on the character you want to add it to the Multichar Entry Field Continue writing and choosing characters until the completed word di...

Страница 37: ...tion Field tap Entering English Characters 1 Tap 2 Tap to select Multi chars or Single char 3 Write a letter anywhere on screen To enter upper or lowercase letters only tap and select Upper chars only or Lower chars only from the pop up menu 4 The selected letter or words display in the text area 5 Repeat steps 1 through 3 to enter more characters To insert a space press To delete the letter in th...

Страница 38: ...the Text Entry icon appears tap the arrow next to it and then select GridIM The GridIM screen displays Character Selection Field Allows you to enter Chinese characters Allows you to enter English characters Allows you to enter numbers and special characters Allows you to switch between Simplified Chinese and Traditional Chinese Moves the cursor to the right within the text field Moves the cursor t...

Страница 39: ...ime in either input panel 4 Notice that the choices in the Character Selection Field change with each character you enter 5 Tap one of the choices to enter it into your text 6 The selected character displays in the text area 7 Repeat steps 1 through 5 to enter more characters To insert a space press To delete the letter in the Character Selection Field tap Character Selection Field ...

Страница 40: ...eld If you want to enter a lowercase letter write a letter in the Lowercase Letter Field 3 Notice that the choices in the Character Selection Field change with each letter you enter 4 Tap one of the choices to enter it into your text 5 The selected letter displays in the text area 6 Repeat steps 1 through 5 to enter more characters To insert a space press To delete the letter in the Character Sele...

Страница 41: ...xt Entry icon appears tap the arrow next to it and then select Numpad The Numpad screen displays 2 Tap the number you want to enter To insert a pause tap the P button To delete a number tap 3 The selected number displays in the text area 4 Repeat steps 1 and 2 to enter more numbers Tap to insert a pause Tap to delete a number you entered Tap to move the cursor to the next line in text field ...

Страница 42: ...pping the screen you need to perform a reset to get your phone running again To reset your PDA phone 1 Pull out the stylus and unscrew it as shown 2 Press and hold the RESET button inside the hole on the back of the PDA phone The lamp turns red and then orange Your phone is now reset RESET button inside a hole ...

Страница 43: ...You can also use the Mobile Desk program to synchronise Address Schedule To do Memo and Money You can use an IrDA or USB to connect your PDA phone and desktop computer Note Before synchronising information make sure that your PDA phone is turned on To synchronise information 1 Place your PDA phone in the Desktop Holder 2 Connect one end of the travel adapter to the adapter jack on the back of the ...

Страница 44: ...an also synchronise from File menu 7 After synchronisation is complete click the Log tab to open a log file showing the synchronisation status and how many schedule or addressbook entries have been added replaced deleted or discarded not synchronised in the PDA phone or on the server 8 You can also synchronise Address Schedule To do Memo and Money using the Mobile Desk program Note For details abo...

Страница 45: ...an send or receive the following information between your PDA phone and another device The record currently displayed in Address Schedule To do Memo or File Manager The file such as media file image file and text file To beam a record or a file to another device 1 Tap the IrDA port icon at the top of the PDA phone to activate the IrDA Service mode Tap to send the data to another device 2 18 T Th h...

Страница 46: ...4 Tap and hold the record and select Send Via Beaming from the pop up menu Or select the record and tap Tool and then Send Via Beaming 5 The Infrared send dialogue box appears Wait for the Infrared send dialogue box to indicate that the transfer is complete before you continue working on your phone Note It may take longer than usual to transfer date when you beam data of large capacity Indicates t...

Страница 47: ...ess Schedule or To do tap the Save button to save the record To remove the information you receive tap the Discard button If you receive a file such as image media and text file from another device tap the Save button to save the file to the Documents folder To show the file in the corresponding application tap Open If you want to remove the information tap Discard To receive beamed information 1 ...

Страница 48: ... Application Launcher screen opens You can change the view method to either Icon View or List View by tapping Tool at the bottom of the screen You can also save the battery of your PDA phone by tapping Tool and Sleep To wake up your PDA phone press and hold on the right side of your PDA phone Slide the scroll bar to move between screens Status bar Tap on the Command bar to open the Application Lau...

Страница 49: ...ch as Phone Address and Message Box Tap to change the various settings of your PDA phone For details see page 9 1 Tap to access the document folders you want to use For details see page 10 1 Tap Tool to display the pop up menu for the current mode Command Bar On the Launcher screen you can access the following modes by tapping an icon on the Command bar at the bottom of the screen Home Application...

Страница 50: ...de a service area When it appears you cannot make or receive calls New Message Appears when a new message is received in Inbox in Message Box Tap to view the received message in Message Box quickly Missed Call Appears when you are unable to answer a call Tap to view the missed call when you are using other application Alarm Appears when you set an alarm to ring at a specified time Roaming Appears ...

Страница 51: ...rs when the bluetooth card is installed into the expansion slot on your PDA phone Storage Appears when the SD memory is installed into the expansion slot on your PDA phone Vibration Appears when you set the ringer volume for calls to Vibrate or Vibrate then ring or when the phone is in the silent mode Battery Status Shows the level of your battery The more bars you see the more power you have left...

Страница 52: ...ur PDA phone has one or more program buttons located on the front or side of the phone to quickly access the applications Closing an Application Tap at the top right corner of the screen The application closes and your settings if any are saved automatically You can also select Tool and then Quit You can return to the previous screen Press on the front of your PDA phone to close the current applic...

Страница 53: ...em then select View from the pop up menu Or select an item and tap Tool and View Editing an Item To open an item for editing you usually need to first open it for viewing and then select Tool and then Edit if you want to change its contents Tip For information on how to enter or change text on your PDA phone see Entering Text on page 2 4 Deleting an Item Select the item you want to delete and then...

Страница 54: ...nce you make records Private your PDA phone hides the records You must enter a password to display them on the screen To make a record private 1 When you create a new record or edit a record tap the General or Details tab depending on the application in which you are in 2 Check the Private box Select the check box 3 The record that you mark as private is not shown in the list For example The Sched...

Страница 55: ...er the password by tapping numeric buttons The password is preset to 0000 at the factory If you have assigned a different password enter your password For details about changing a password see page 9 3 4 Tap the PIMS security tab 5 Select Show in the PIMS private record option field You can view all of the private records in any application To hide the records again select Hide Select this to view...

Страница 56: ...lication categories 1 In the Address Schedule To do Memo and Money applications choose from the following options Tap the category field at the top right of the screen and select Edit from the drop down list When you create or edit a record in each application tap the Category field and select the Edit tab on the Category screen 2 Tap the New button Enter a new category name Text Entry screen Text...

Страница 57: ...a category 1 In each application tap at the bottom of the screen or tap Tool and then New to create a new record 2 In the new record screen tap the Category field 3 In the Select tab of the Category screen select a category from the list 4 Tap at the top right corner of the screen to save the selection and to exit the screen To edit a category 1 In the Address Schedule To do Memo and Money applica...

Страница 58: ...er of the screen to save the change To delete a category 1 In the Address Schedule To do Memo and Money applications choose from the following options Tap the category field at the top right of the screen and select Edit Category from the drop down list When you create or edit a record in each application tap the Category field and select the Edit tab on the category screen 2 On the Category scree...

Страница 59: ...cher mode tap to open the Application Launcher 2 Select Search Tap to select the application type 3 In the Search tab enter the keyword in the Keyword field For details about entering information see page 2 4 If you already have a keyword entered tap the arrow next to the Keyword field and select the keyword you want Enter the keyword 3 12 N Na av vi ig ga at ti in ng g A Ap pp pl li ic ca at ti i...

Страница 60: ...tton The PDA phone immediately starts to search for matches and moves to the Result tab 6 You can view the item that best matches the letters in the Result tab 7 To make the search more accurate key in more letters and the selection moves to the item that best matches the letters 8 You can clear the result or history by tapping Clear Result or Clear History from Tool ...

Страница 61: ...ve phone call information about the call appears on the screen You can send or receive messages or e mails remotely or search the Web You can use all of the PDA applications while making a phone call If you are using an application when the phone rings you can answer the call and continue with your work When the phone is turned off The PHONE OFF indicator appears at the top left corner of the scre...

Страница 62: ...e 5 1 To turn the phone on or off To turn the phone on press and hold on the front of your PDA phone until the PHONE OFF indicator disappears If your PDA phone asks for a PIN enter the password and tap SEND on the Phone screen or press on the front of your PDA phone The address list and SMS information in R UIM card initialize To turn the phone off press and hold again until the PHONE OFF indicato...

Страница 63: ...ur PDA phone to dial the number You can also dial the number by tapping Tool and then Call 3 While the number dials if the number is already in your Addressbook the corresponding name displays 4 When a call is connected the call duration time displays During a call you can use several call options For details see page 4 6 5 When you finish your call tap END on the Phone screen or press on the fron...

Страница 64: ...ding on the ringer type you have set To change the ringer type see page 4 20 When the caller can be identified the caller s phone number name and image if stored in Addressbook displays If a call comes in when your PDA phone is sleeping in the PDA mode or you are working with another application the incoming call alert screen displays ...

Страница 65: ...silence the ringer press on the front of your PDA phone tap Silence on the incoming call alert screen tap END on the Phone screen tap Tool and then Silence on the Phone screen Ringer Silenced displays briefly and the lamp blinks without ringing or vibrating 2 To end the call press on the front of your PDA phone tap END on the Phone screen Quickly Changing the Ring Melody You can change the ring me...

Страница 66: ... put the call in the Speakerphone mode you can talk without holding your PAD phone To activate the Speakerphone mode tap the Speakerphone icon The Speakerphone icon displays at the top left of the screen To deactivate it tap the icon again You can also activate or deactivae the Speakerphone mode by pressing and holding on the front of your PDA phone Indicates that the call is in Speakerphone mode ...

Страница 67: ...or details about the Call logs see page 4 12 Message Box allows you to access the Message Box application For details about Message Box see page 6 1 Speakerphone On Speakerphone Off allows you to activate or deactivate the Speakerphone mode Mute Off Mute On allows you to turn the microphone off or back on for an active call When you select Mute On the other person can not hear anything you say but...

Страница 68: ...wer a call you can find out who was calling you if the caller ID is transmitted from the network You can call the person back if necessary The number of missed calls the last caller s number and name if stored in your Addressbook and the date and time are also displayed on the Phone screen after the call is missed Also appears on the status bar If you are working with another application tap this ...

Страница 69: ...tact and select Phone call from the pop up menu For details see page 5 9 Making a Call from the Quick Dial List When you assign phone numbers to one of the speed dialling keys you can dial them easily on the Phone screen For details about storing a quick dial number see page 5 4 When the Phone screen displays you can use the following ways to call the quick dial number If the quick dial number is ...

Страница 70: ...r information about storing emergency numbers see page 4 27 You can also make an emergency call when the R UIM card is not installed in your PDA phone On the Phone screen tap at the bottom of the screen Your phone dials 120 Making an International Call Before making an international call you must store an international call service provider s number For storing see page 4 17 After storing the inte...

Страница 71: ...r A P displays meaning that a pause will occur at that point in the dialling sequence The number after a pause is sent by pressing SEND or press on the front of the PDA phone after dialling the first number Accessing Message Box When you receive a message during a call Message icon flashes at the top of the screen You can access Message Box from the Phone screen 1 On the Phone screen tap the MBox ...

Страница 72: ...st calls are automatically deleted from the list to make room for the newest calls 1 In Idle mode of the Phone screen tap SEND or press on the front of your PDA phone You can also use Tool and then Call Log The list of recent calls displays 2 Scan through the list until you find the number you want by using the scroll bar Dialled number icon Received number icon Missed number icon Scroll bar ...

Страница 73: ...lled or missed numbers 4 When you find a number you want tap the entry You can view detailed information about the call the call duration and the date and time you received or made it the caller s name if available the caller s number and the caller s image Tap to delete the entry Use to view the next or the previous entry Opens the option menus ...

Страница 74: ...digits such as an area code or network feature activation code to the phone number tap Tool and then Prepend Using Silent Mode Silent mode disables all sounds on your PDA phone This feature is best used in situations where the phone might disturb others such as in a meeting at a library or in a theatre To enter Silent mode using the Phone screen tap and hold until Entering Silent Mode displays The...

Страница 75: ...the general phone options 1 On the Phone screen tap Setting at the bottom of the screen and select General You can also access this mode from the Launcher mode by tapping Phone Setup General 2 Tap the tab at the bottom of the screen to access the option you want to set Use the arrow tabs to scroll through the command bar Phone setup category Tap this field to select a category from the list Tap th...

Страница 76: ...n your call is connected Otherwise the LCD turn on or off depending on the option you set at the backlight option For further details see page 2 3 Dialling Options On the General screen tap the Dialing tab Put a checkmark in front of the option you want to use The following options are available Auto retry Your phone automatically makes two attempts to redial the number when a connection fails in ...

Страница 77: ...ish On the General screen tap the Call Forward tab This option sets your phone to forward incoming calls to a number you specify For example you may wish to forward your incoming calls to a colleague while you are on holiday You can selectively enable the call forwarding feature for different conditions and you can specify an individual number for each for condition Call forwarding can be set up f...

Страница 78: ...the screen to return to the Call Forwarding screen 3 Repeat steps 1 through 3 to set up call forwarding for another condition such as No Answer and Uncondition until you are finished To deactivate the call forwarding 1 Tap the arrow field in each condition and select Disable Then tap the Select button 2 The Phone screen appears and your PDA phone dials centre and then sends the information to the ...

Страница 79: ...ervice centre The call waiting is activated 3 Tap at the top right corner of the screen to return to the Call Waiting screen To deactivate the call forwarding 1 Tap the arrow field in each condition and select Disable Then tap the Select button 2 The Phone screen appears and your PDA phone dials centre and then sends the information to the service centre 3 Tap at the top right corner of the screen...

Страница 80: ...rom the Launcher mode by tapping Phone Setup Ringer 2 Tap either Ringer setting or Category bell at the bottom of the screen to access the option you want to set Tap to change the ring melody Move the scroll bar to adjust the volume Tap to change the ring type 3 In the Ringer setting tab the following options are available Ringer type allows you to choose how your phone rings Ring Increasing Ring ...

Страница 81: ...the volume Voice volume allows you to adjust the speaker volume Tap and drag the volume control bar to increase or decrease the volume 4 Tap the Category bell tab at the bottom of the Ringer screen to assign a different ring for each Address category If you have already created a specific category for a phone number in Addressbook the category displays on the category list Select the category you ...

Страница 82: ...his mode from the Launcher mode by tapping Phone Setup Sound 2 Tap either the Key tone or Alert tab at the bottom of the screen to access the option you want to set 3 In the Key tone tab you can select the sound type for the key tone It sounds when you tap a key on the Phone screen 4 In the Alert tab check the alert type box you want The available alerts are Connect When this option is checked the...

Страница 83: ...llowing options In the Animation tab Status allows you to set when to show the image You can select either Opening or Closing Image allows you to select a background image to be displayed on the phone screen when you turn the phone on or off If you select Opening in the Status option the image you select displays when you turn the phone on In the Banner tab You can enter a banner message to displa...

Страница 84: ...to set Roam Option This option enables you to choose how your phone roams Roaming is a feature which is only relevant in areas where there are usually at least two cellular service providers that have valid roaming agreements Your service provider can provide you with information about this service or the best roaming method for you The following options are available Home Only You cannot roam Whe...

Страница 85: ... the number keys on the phone keypad DTMF tones allow you to communicate with computerized telephone systems used by banks and other institutions In the DTMF tab you can select the tone length and register the DTMF tone numbers If the service you are connected to is digital as most are short DTMF tones will almost always work To register the DTMF tone numbers tap the New button enter the number yo...

Страница 86: ... 3 3 You can access the phone s security options in the Lock Restriction Emergency and Reset tabs Tap the tab where the option you want to set is located Locking the Phone In the Lock tab of the Security screen you can lock the phone When the phone is locked you cannot operate it until you enter the lock password You can select the lock type from Never The phone lock is disabled Phone Being On The...

Страница 87: ...our phone is locked or all of the outgoing calls are restricted Select a field and enter the emergency number from the Text Entry screen and save the number by tapping at the top right corner of the screen Resetting the Phone In the Reset tab of the Security screen you can selectively reset your phone Resetting the phone cancels all of your settings and returns them to the factory default settings...

Страница 88: ...o the Launcher mode Setting the R UIM Card s Security A PIN Personal Identification Number is usually supplied with your R UIM card and it protects your R UIM card against unauthorized use You can change the PIN lock the R UIM card and reset the information in the R UIM card To set up the R UIM Card options 1 On the Phone screen tap Setting at the bottom of the screen and select R UIM You can also...

Страница 89: ...y any person who does not have your PIN cannot use your phone without your approval But emergency calls are available without the PIN code If you select Disable the phone connects directly to the network when you turn the phone on Change PIN The Change PIN tab allows you to change your current PIN of the R UIM card to a new one provided that the PIN Check feature is enabled You must enter the curr...

Страница 90: ...d then tap the Change button Disable appears in the Current status field My Phone In the My Phone tab you can change the default number registered on the current R UIM card to the actual subscriber number Once you enter the phone number your phone number is displayed when you call somebody or send a message to somebody Enter the actual subscriber number in the Edit My Phone field and tap the Save ...

Страница 91: ...r a thumbnail image to an Addressbook entry Creating a New Entry You can create a new entry either in the Address application or on the Phone screen and save it selectively in your PDA phone s Addressbook or the R UIM card Creating a new entry in the Address application 1 In the Launcher mode tap to open the Phone Launcher 2 Select Address You can view a list of the entries you ve stored 3 Tap at ...

Страница 92: ...he image area and select the source The following options are available File allows you to import an image file currently stored in the Documents folder Camera allows you to take a picture using the Camera on your PDA phone For details about taking a picture see page 7 1 After taking and saving a picture the Recent Window appears Tap to display the picture in the image area Or tap to delete the pi...

Страница 93: ...u can also edit or delete categories For details see page 3 9 7 When you are finished entering information in the General tab of the New Address screen tap the Detail tab at the bottom of the screen 8 In the Detail tab you can enter additional information such as a birthday date If you want to prevent other people from viewing the entry on the Address screen check the Private box When the Private ...

Страница 94: ...e melody For details about ringer setting see page 4 20 12 To attach a note to the entry tap the Note tab Enter the information 13 When you are finished tap at the top right corner of the screen or tap Tool and then Close 14 When the confirming message appears select Yes to save the information or No to cancel The new entry displays on your Addressbook list Select the check box to register the num...

Страница 95: ... The New R UIM screen displays 3 At the Name and Phone number field enter the information on the Text entry screen For details about entering information see page 2 4 Select the memory location number 4 When you are finished tap at the top right corner or tap Tool and then Close When the confirming message appears select Yes to save the information or No to cancel Tap to select the location number...

Страница 96: ...elect the phone number type from Home R UIM Work and Mobile Then tap the OK button 4 The New Address screen appears Enter additional information about the entry by following the instructions described in Creating a new entry in the Address application on page 5 1 If you selected R UIM at step 3 follow the instructions described in Creating a new entry in the Address application to be stored in you...

Страница 97: ...d To search for an entry tap this field enter a name After searching tap to return to the previous list of the entries Category Tap this field to see additional information if any are stored Tap an entry to display the information about the selected entry OR Tap and hold to display a pop up menu of actions Tap to change English or Chinese Search icon Select All icon Trash icon 3 If you want to vie...

Страница 98: ...ext or the previous entry Tap to delete the displayed entry 6 While viewing an entry you can use the following options by accessing the Tool menu Edit allows you to change information for the contact For details see page 5 10 Delete removes the selected entry from the Addressbook list Phone call calls the selected entry You can choose which number to dial if the entry has more than one Send Via Be...

Страница 99: ...Addressbook list tap and hold the entry you want to call and then tap Phone call from the pop up menu Or while you are viewing a selected entry s information tap Tool and then Phone call Or press on the front of your PDA phone 2 You can choose which number to dial if the entry has more than one 3 To dial the number displayed tap the Call button Tap to select a number to dial ...

Страница 100: ...the selected entry appears make the changes in the same way as you would when creating a new entry You can use the standard editing tools such as Cut Copy Paste or Undo Highlight the information you want to edit by dragging the stylus over it Then tap and hold the highlighted area to display the pop up menu with the editing options 3 When you are finished tap at the top right corner of the screen ...

Страница 101: ...p the category field at the top right of the Address screen and select the category you want If you want to copy all of the entries in the current category of the Addressbook list tap to highlight the list select Tool and then Copy to R UIM 2 On the Copy to R UIM screen select Copy You can view the entry in the R UIM card category To copy from the R UIM card to Addressbook 1 On the Addressbook lis...

Страница 102: ...en or tap Tool and then Delete Or tap and hold an entry and select Delete from the pop up menu 3 When the confirming message displays tap Yes to delete the selected entry or tap No to cancel To delete more than one entry 1 On the Addressbook list tap to select all of the entries on the screen If you want to delete all of the entries assigned to a specific category select a category first and then ...

Страница 103: ... can also create e mail messages online or offline and then send the messages Sending a SMS Message 1 On the Message Box screen tap at the bottom of the screen You can also use Tool and then New Enter a recipient s number If you select the number from the Addressbook tap the To button Tap to send the message Enter text Text Entry icon Tap it to hide or display the Text Entry screen To change the t...

Страница 104: ...ffline In the offline mode you cannot send an e mail message directly from your PDA phone but can create and send them later when you synchronise the PDA phone to your PC Note Before sending an e mail in the offline mode you must install the Sync program For details refer to the Sync User s guide supplied with the CD To create an e mail message 1 On the Message Box home screen tap the message type...

Страница 105: ... choose sender s information 4 When you are finished writing a mail tap the Send button The e mail message is automatically saved in the Draft folder on your PDA phone To synchronise e mail messages 1 Connect your PDA phone to the PC using the USB cable For details see page 2 17 Make sure that the PDA phone is turned on 2 The PopSync program automatically runs In the PopSync window check the Mail ...

Страница 106: ...ve been deleted on the e mail server are removed from the device s Inbox folder 1 On the Message Box screen tap the message type area at the top right of the screen and select your e mail account 2 Tap at the bottom of the screen You can also use Tool and then New 3 In the Contents or Details tab enter information using the Text Entry screen You must tap the field where you want to enter text to p...

Страница 107: ... a given amount of messages If it is full another messages saved in PDA memory If a message comes in when your PDA phone is sleeping in the PDA mode or you are working with another application the incoming message notice screen displays 1 On the Message Box home screen select SMS at the top right of the screen Or if you are working with another application tap on the status bar to open the Message...

Страница 108: ...copy the SMS message to the R UIM card If the message is saved in the R UIM card this options is disabled Save allows you to save the sender s information in Addressbook Tap Tool and select Save When the Select phone number type dialogue box appears select the phone number type you want and then tap the OK button The New Address screen appears Enter additional information about the entry by follow...

Страница 109: ...e message you can use the following options by tapping Tool at the bottom of the screen Reply allows you to reply to sender Reply All allows you to reply to all of the recipients Forward allows you to forward the received message to other persons Delete allows you to delete the received message Viewing E mail Message Online You can also receive the e mail messages through your mail server on your ...

Страница 110: ...on Delete allows you to delete the received message Managing Message Folders SMS Message Folders By default the messages display in one of four folders Inbox Sent Draft and Voice The messages can be saved to the Draft folder before they are sent After a message has been sent you can find a copy of the message in the Sent folder Inbox stores all of the received messages Sent stores all of the sent ...

Страница 111: ...ted automatically when the device is synchronised with a PC Online Message Folders Messages display in one of folders for each service you have created Inbox Sent and Draft If you want to organize messages into additional folders on the Message Box screen tap Tool and then Management To make a new folder Set the location of new folder by tapping and tap New Then enter the folder name and Tap OK To...

Страница 112: ...t message types Setting Your E mail Account and Service 1 On the Message Box home screen tap Tool and select Configuration 2 The Configuration screen displays In the Service tab tap the New button to set up an e mail account 3 In the Personal tab enter Name and E mail address using the Text Entry screen For details about entering information see page 2 4 4 In the Incoming tab and Outgoing tab ente...

Страница 113: ... Options On the Configuration screen tap the Email tab Enter the host name Select the host type choosing POP3 or IMAP4 Enter the Login iD Enter the password Check to use same host name for outgoing Tap to save it Tap to display the Text Entry screen ...

Страница 114: ...he size limit of your e mail messages Your device does not accept a message from the mail server if it exceeds the limit you have set Tap the upper part to increase the number and the lower part to decrease the number Tap and hold to quickly change the number Language You can select the language you use Tap the arrow field next to the Language field and select the language you want from the drop d...

Страница 115: ...he drop down list select the melody by tapping the or button You can play the selected melody by tapping the Play button To stop it tap the Stop button Priority allows you to set a priority of the message Tap the Priority field and select the importance rate from Normal Interactive Urgent and Emergency Note When you send or receive an Urgent or Emergency message the message will be shown with a re...

Страница 116: ...fo application for wireless access to Internet WAP sites Each time you start the U Info the phone connects to the Wireless Web and the service indicator icon appears on the display to inform you that you are connected to the Wireless Web To access U Info 1 In the Launcher mode tap to open the Phone Launcher 2 Select U Info The U Info screen displays ...

Страница 117: ...n ng g You can use the following menu at the bottom of the screen Goes back to the home page Returns to the previous screen Displays the Browser menu Goes to the web page you want by entering URL Goes to the Web Alert Inbox page ...

Страница 118: ...r mode tap to open the Phone Launcher 2 Select Web Browser Goes to backward or forward Refreshes the connection Returns to the startup homepage Stop this operation URL Bar Text Entry icon Tap it to display or hide the Text Entry screen To change the text input mode tap the arrow next to the icon Tap to show the URL address list you open You can quickly go to the URL address ...

Страница 119: ...f the Web Browser application Preferences allows you to configure the browsing setting For details see page 6 19 Show URL Bar selects whether or not to hide or view the URL bar on the top of the screen Text Only views only text Fit to Screen fits the web page to screen Encoding allows you to select the encoding type from the list Font Size chooses text size in the browser from small and large Edit...

Страница 120: ...Bookmarks The Bookmark window displays 2 Tap 3 Open the Text Entry screen by tapping the Text Entry icon and enter the title and location of the bookmark and then tap the OK button Note While browsing the web page if you add the current web page tap Menu and select Add bookmark The current web page is saved in Bookmark To change the name and URL address of the bookmark tap To delete a bookmark tap...

Страница 121: ...rent homepage is saved After you are finished tap the OK button to save the changed setting To go back to default tap the Defaults button To cancel the setting tap the Cancel button Network configuration Note If you want to use the Proxy Server or Proxy Port check the Use Proxcy box Proxy Server Enter the IP address of the HTTP proxy server Proxy Port Enter the port number of the HTTP proxy server...

Страница 122: ...sily by reducing the downloading time Size enters the maximum size of the cache folder Expired Days sets the expiry date stored in the cache folder Delete Cookies deletes all of the cookies and files A cookie is a piece user s information that is entered when you use a web site Delete Files deletes all of the temporary files in the Temporary folder After you are finished tap the OK button to save ...

Страница 123: ...age is received the message icon blinks and you can also hear an alert having an instant message conversation with a group of contacts telling contacts you are unavailable blocking contacts from seeing your online status To use Instant Messenger you must have a passport to use the MSN Messenger or ICQ Messenger service Signing In to Instant Messenger 1 In the Launcher mode tap to open the Phone La...

Страница 124: ... your account If you use MSN Messenger check the box next to MSN ID and enter the mail address If you use ICQ Messenger check the box next to ICQ and enter the ICQ number 5 Enter the password in the Password field 6 Select the Save Password check box to save the password 7 Sign in to the Instant Messenger by tapping the Connect button ...

Страница 125: ...ame and then select Send IM from the pop up menu Tap to select a preset message Tap to save the messages Tap to invite another contact Sends your message Your message appears in this field while you enter it on the Text Entry screen Chatting history Text Entry screen 3 Enter your message using the Text Entry screen Your message appears in the Text entry field at the bottom of the chatting screen F...

Страница 126: ...e returned to the Instant Messenger home screen To exit tap at the top right corner of the screen Note If you do not sign out of the Messenger you ll remain on a data connection This may result in additional charges from your service provider Configuring the Messenger Settings 1 On the Instant Messenger home screen or the Messenger Buddy List screen tap Tool and then Setup 2 In the Messenger tab c...

Страница 127: ...ion selects whether or not your PDA phone keeps connection to the Instant Messenger when you don t use the messenger for a specific period 4 To save your settings tap the OK button Creating Preset Messages You can preset up to five messages that you use most frequently 1 On the Instant Messenger home screen or the Messenger Buddy List screen tap Tool and then Idiom 2 Tap an empty entry and enter t...

Страница 128: ... chat 1 While you are in the conversation mode tap at the bottom of the screen 2 The message is automatically saved as a text file To view the saved chat 1 In Messenger tap Tool and then History 2 Select the file you want to view and tap the View button Sorts the file by ID Displays the selected file Closes the selected file Sorts the file by date Select the file ...

Страница 129: ...nts while on the move The pictures are automatically saved in the Photo folder in Documents The camera produces JPEG pictures Taking Pictures 1 In the Launcher mode tap to open the Application Launcher 2 Tap Camera to open the Camera application If you press and hold on the right side of your PDA phone you can directly access the Camera application On the Camera screen you can view the image to be...

Страница 130: ...u want using the camera module 4 When you are taking a picture you can use the several options such as using a timer and adjusting the image size See Options Available When Taking a Picture below Use these buttons to rotate the image Tap to set the action shot Tap to use a timer Tap to view the last picture ...

Страница 131: ... the viewfinder resolution Resolution is a measure for the sharpness and clarity of an image Resolution is usually measured in pixels for example 640x480 300 kilopixels The more pixels there are the more detailed the picture is To adjust the image size tap the resolution field to select an image size from 320x240 or 640x480 Each time you change the resolution you can also see the image counter nex...

Страница 132: ...o the Photo Album Taking Action Still You can take a sequence of three pictures of a moving subject To take action shots tap once then you will get three pictures When you are ready to take a picture tap The camera takes the action shots To deactivate tap to change to the single shot button Note When the Adaptive Sens option is active you can not take action still Adjusting the Camera Settings You...

Страница 133: ...t light behind the main object is unavoidable the camera will take all of the incoming lights average it and decide the exposure index The taken picture may be too dark to see This feature is used to solve this problem To activate check Adaptive Sens Viewing Pictures Viewing and Deleting the Last Picture Taken Tap or tap Tool and then View Recent to view the last picture taken You can see the stil...

Страница 134: ...the number Tap and hold to quickly change the number When the view finder is turned off tap the view finder screen to turn the view finder on Configuring Your Camera Application On the Camera screen tap Tool at the bottom of the screen and then select Configuration In the File tab if you want select the save location and press the Reset button to reset the file name If you want to view the picture...

Страница 135: ...ures 1 On the Launcher screen tap to open the Application Launcher 2 Select Photo Album You can view the photos you ve taken in the thumbnail images 3 If you want to find an image located in another folder such as MultiMedia tap the folder image at the left top of the screen Tap the picture you want to open Tap to find an image located in another folder Tap to open a picture to view one by one ...

Страница 136: ...creen views a slide show 5 To view the next or previous image in the selected folder tap or or the left or right navigation key on the front of the PDA phone 6 For the options available when you are viewing an image see below 7 To exit tap at the top right corner of the screen or tap Tool and then Quit Zooming To zoom in tap or tap to zoom out You can also use the up or down navigation key on the ...

Страница 137: ...ing the upper or lower arrow Deleting an Image Tap at the bottom of the screen or tap Tool and then Delete to delete the current image When the confirming message appears tap Yes To cancel the deletion tap No Rotating an Image Tap or press the up volume key to rotate the image 90 degrees clockwise Press the down volume key to rotate the image 90 degrees counterclockwise If you want to flip the ima...

Страница 138: ...List on the Media Player screen 1 In the Launcher mode tap to open the Application Launcher 2 Select Media Player The Media Player screen displays Stops the playback Opens the Play List screen Plays the previous or next file Plays the currently selected file If you want to pause tap this button again Adjusts the volume Indicates the progress of the current track You can move this to any position y...

Страница 139: ...Select the media file you want to play 4 You can add a new media file to the Play List Tap the Media Files tab at the bottom and select the file you want to add If you want to add files in the external memory card insert the card and then select SD in the Documents at the top left in the Media Files tab 5 After selecting media files tap the Add button at the top right of the screen or tap Tool and...

Страница 140: ...ist Prev Track plays the previous track on the play list Repeat selects the repeat type Repeat This repeats the current file Repeat All repeats all of the files in the selected folder in order of the play list If you don t want to repeat a file select No Repeat Full Screen displays the file in full screen This option is only available when you play a multimedia file Button Mapping assigns the medi...

Страница 141: ...Removing Media Files from the Play List You can remove the media files from the Play List screen To remove a specific file On the Play List screen select the file you want to remove and tap Tool and then Remove To access the Play List screen see page 7 11 To remove more than one file On the Play List screen tap Tool and then Clear List to remove all of the play file lists on the screen If you want...

Страница 142: ... screen tap at the bottom of the screen or tap Tool and then New Tap the date field to open the calendar to select a date Tap this field to select a category Each tab contains fields for additional information Text Entry icon Tap it to hide or display the Text Entry screen To change the Text input mode tap the arrow next to the icon Tap to select a time Check this box to last the schedule all day ...

Страница 143: ...appointment to a category tap the Category field and select a category from the list You can display your schedule by category on the Schedule screen You can create a new category by tapping the Edit button on the Category screen You can also edit or delete categories For details see page 3 9 4 Select the type of event Tap the Type field to choose Appointment Meeting Telephone Etc or Memorial Day ...

Страница 144: ...y Only a person who enters the password can view the entry s information For details about making private see page 3 7 9 In the Repeat tab you can schedule events that recur at regular intervals or extend over a period of consecutive days Tap this field to select the repeat interval to set how often the event repeats Tap one of the end date style and setting the value 10 To attach a note to the ap...

Страница 145: ... the appointment in the date field at the top of the screen 3 Select the calendar view using the Day Week and Month tabs at the bottom Each event type is assigned a different color to help you find them easily 4 To find the appointment you may need to scroll down Tap the appointment you want to view or tap and hold it and select View from the pop up menu Tap the right arrow to see the next day or ...

Страница 146: ... times An all day appointment displays at the top of the Day view The alarm indicator and the repeating event indicator are shown next to the appointment if they are set To view your schedule for a specific date 1 On the Day view screen tap the date field at the top of the screen 2 When the calendar appears tap the date you want to view The day view of the selected date displays Search icon Tap to...

Страница 147: ...edule for the week 1 On the Schedule screen tap the Week tab at the bottom All day appointments display as a black dot below the corresponding date 2 Tap the appointment you want to open All day appointment Category Tap the appointment to view the details Tap the right arrow to see the next week or the left arrow to see the previous week Tap in the middle to open the calendar to select a specific ...

Страница 148: ...assigned a square icon with a different color All day appointments are shown as a red square To view your schedule for the month 1 On the Schedule screen tap the Month tab at the bottom 2 Tap the date which has the appointment you want to view Your PDA phone moves directly to the Day View screen for that date To view the details on the Day View screen see page 7 18 Tap the right arrow to see the n...

Страница 149: ...op right corner of the screen or tap Tool and then Close to save the changes and close the screen Deleting an Appointment 1 Select the appointment you want to delete When the View Schedule screen for the selected appointment appears tap at the bottom of the screen or tap Tool and then Delete Or on the Day or Week view screen tap and hold the appointment you want to delete When the pop up menu disp...

Страница 150: ...cur once or repeatedly according to your progress To access To do 1 In the Launcher mode tap to open the Application Launcher 2 Select To do You can view the list of tasks that you need to do For details about viewing the To do list see page 7 24 Tap this field to select a category Tap to select the percentage of the progress on the task Tap to select a due date Tap to select a priority Check not ...

Страница 151: ... tap the Priority field and select the importance rate of your task from 1 High 2 Normal and 3 Low 6 Tap the Progress field and select the percentage of the progress on your task from the list 7 If you want to make the task private select the Private check box When the Private box is checked your PDA phone hides the entry Only a person who enters the password can view the entry s information For d...

Страница 152: ...x in front of the task to display a check mark Tap the check box again to unmark the check box To view the task details tap the task on the list When the due date of the item has passed the color of the task changes to red Select the sort order of the list Category Select the category of tasks to be displayed on the list Tap a task to display or edit the details OR Tap and hold a task to display t...

Страница 153: ...op right corner of the screen or tap Tool and then Close When the confirming message displays tap Yes to save the changes and close the screen or No to cancel Deleting a Task When a To do task is completed it can be deleted from the To do list To delete a specific task 1 Tap the task you want to delete on the To do list 2 When the View To do screen for the selected task displays tap at the bottom ...

Страница 154: ...If you want to delete more than one entry but not all tap and drag the stylus to select the tasks The selected tasks are highlighted 3 Tap at the bottom of the screen or tap Tool and then Delete Or tap and hold the tasks and then select Delete from the pop up menu When the confirming message displays tap Yes to delete them Sending a Task You can beam the current task to another PDA phone using the...

Страница 155: ...ication Launcher 2 Select Memo You can view a list of the memos you ve stored if any 3 On the Memo screen tap at the bottom of the screen or tap Tool and then New 4 In the Text tab enter the text you want For details about entering information see page 2 4 5 To assign the memo to a category tap the category field at the top right of the screen and select a category from the list You can display me...

Страница 156: ...ly a person who enters the password can view the information For details about making private see page 3 7 8 When you are finished tap at the top right corner of the screen or tap Tool and then Close When the confirming message appears tap Yes to save the memo The newly created memo displays on the Memo screen You can sort the memos by name and date You can also select the category to be displayed...

Страница 157: ...rtain category tap the Category field and select the category from the list Select how the list is sorted by name or date Select the category of the memos to be displayed on the list Drawing icon Indicates that the memo includes a picture Tap to view and edit the memo details OR Tap and hold to display the pop up menu Deletes the selected memo Selects all memos Searches for a memo See page 3 12 Te...

Страница 158: ...op right corner of the screen or tap Tool and then Close When the confirming message displays tap Yes to save the changes and close the screen or No to cancel Deleting a Memo To delete a specific memo 1 Tap the memo you want to delete on the Memo list 2 When the Edit Memo screen for the selected memo displays tap at the bottom of the screen When the confirming message appears select Yes to delete ...

Страница 159: ...lect a category first and then tap If you want to delete more than one memo but not all tap and drag the stylus to select the memos The selected memos are highlighted 3 Tap at the bottom of the screen or tap Tool and then Delete When the confirming message displays tap Yes to delete them Sending a Memo You can beam the current memo to another PDA phone using the IrDA port Tap Tool and then Send Vi...

Страница 160: ...you spend You can assign your expenses to categories to organize and view them in logical groups 1 In the Launcher mode tap to open the Application Launcher 2 Select Money Select the category of the account to be displayed on the list Select the type of expense item Tap to create a new expense item Tap to select all of the items on the list Tap to delete the currently selected expense item Balance...

Страница 161: ... fill in to position the cursor and then enter information on the Text Entry screen For details about entering information see page 2 4 Tap to save the account Tap to display or hide the Text Entry screen To change the Text input mode tap the arrow next to the icon Tap to delete the account Tap to select a category from the drop down list You can create edit or delete a category For details see pa...

Страница 162: ...s 1 On the Money screen select Edit Field Item in the Tool menu Or on the New Account screen you can select Edit Item in each field s drop down arrow 2 The Edit Item screen displays 3 Select the field name you want to edit from the Field Name drop down list 4 If you want to add a new item select New and enter the item name using the Text Entry icon For details see page 3 9 If you want to change th...

Страница 163: ...se the documents between your computer and your phone to insure you have the most up to date content in both locations Creating a New Word Document 1 In the Launcher mode tap to open the Application Launcher 2 Select MiniWord Your document folders and the list of documents if you have created one already display 3 Tap at the bottom of the screen A blank document appears You can start writing immed...

Страница 164: ... to display or hide Toolbars If you are opening a word document created on a PC select Wrap to Window so that you can see the entire document Use the Insert menu options to insert an object such as a symbol an image or a text box Use the Table menu options to create and edit a table 6 When you are finished tap at the top right corner of the screen to save the document and exit the screen Text Entr...

Страница 165: ...t to view or edit Note If you stored the document in your optional memory card insert the card and select SD in the Documents 2 Tap and hold the item and then select an option you want from the pop up list Select how the list is sorted Tap to select the default settings Tap to create a new document Tap to open a document OR Tap and hold to display the pop up menu for the selected item By Name By D...

Страница 166: ...es of your workbooks You can create new workbooks or copy workbooks from your computer to your PDA phone Synchronise the workbooks between your computer and your PDA phone to insure you have the most up to date content in both locations MiniSheet also provides fundamental spreadsheet tools such as formulas functions sorting and filtering Creating a Workbook 1 In the Launcher mode tap to open the A...

Страница 167: ...enter data using the Text Entry screen For details about entering data see page 2 4 4 Use the Edit menu options to edit data Use the View menu options to change the viewer preferences display or hide toolbar header and grid line You can also use Refresh Calculation in the View menu Use the Insert menu options to insert cells rows columns and other objects If you insert Page Breaks the page break i...

Страница 168: ...nished tap at the top right corner of the screen to save the document and exit the screen The workbook is automatically saved as a MiniSheet workbook named Book1 Viewing and Editing a Workbook On the MiniSheet list screen you can create a copy delete beam rename or move the selected workbook 1 On the list select the workbook you want to view or edit Note If you stored the workbook in your optional...

Страница 169: ... Tap to open a workbook OR Tap and hold to display the pop up menu for the selected item Tap to create a new workbook 4 Change information 5 When you are finished tap at the top right corner of the screen to save the document and exit the screen By Name By Date By Size ...

Страница 170: ...r in the folder you select when synchronising your device with the computer You can also send and receive these presentation files as mail or via IrDA port Viewing a Presentation 1 In the Launcher mode tap to open the Application Launcher 2 Select Office Viewer The list of the folders and files display Tap to find the presentation file located in another folder Select how the list is sorted Tap to...

Страница 171: ...ou stored a presentation file in your optional memory card insert the card and select SD in the Documents 4 The top of the first slide displays Move the slide around using the stylus Moves to the previous or next page of the slide Tap to use the Smart stylus Tap to move the slide you want using the Control bar ...

Страница 172: ...art stylus you can use the following functions Tap the screen in the direction you want to move the slide Your PDA phone automatically scrolls through the slides in that direction If you want to scroll the page fast press the up down left right buttons in the smart stylus button When a document is larger than the screen you can fit the slide to screen Tap the centre of the Smart stylus button When...

Страница 173: ...ically gives you several options When you view a Microsoft PowerPoint file some options are not available 1 Tap View at the bottom of the screen and select the option you want The following options are available First Page views the first slide Prior views the previous slide Next views the next slide Last Page views the last slide 2 Tap Tool at the bottom of the screen and select the option you wa...

Страница 174: ...sing your device with the computer You can also send and receive these text files as mail or via IrDA port Reading a Text File 1 In the Launcher mode tap to open the Application Launcher 2 Select Text Reader The list of the files you ve stored displays Tap to find the text file located in another folder Select how the list is sorted Tap to open a text file OR Tap and hold to display the pop up men...

Страница 175: ... the file to a bookmark Tap the center of the screen to view the file in the full screen Tap the screen again to go back to the initial view Tap to use the tool options such as Auto Scroll Full Screen and Go To Tap to scroll the page automatically Tap to move to the location you want using the control bar Tap this area to scroll up by half page Tap this area to scroll down by half page Tap this ar...

Страница 176: ...the screen and select the option you want The following options are available Auto Scroll automatically scrolls the page You can set the speed and how far down it scrolls in the Configuration menu Full Screen view the text file in the full screen To go back to the initial view tap the center of the screen Go To moves to the location you want to view using the control bar Configuration customizes t...

Страница 177: ...laneous Application Launcher 2 Select Alarm 3 The Alarm screen displays Tap the arrow to change the time Select the alarm to ring once or everyday Select the sound type either Melody or My Bell If you have a registered melody in the My Bell option you can select My Bell from the drop down list For details about registering my bell see page 4 21 Tap to activate the alarm setting or remove a check m...

Страница 178: ...y Bell option you can select My Bell from the drop down list For details about registering my bell see page 4 21 You can select the duration of the alarm Tap Tool and select Configuration On the Alarm Configuration screen select the time by tapping the upper or lower arrow If you want to maximise the system volume when the alarm rings check the Maximize System volume when raise Alarm box Clock Usi...

Страница 179: ... them If you prefer change the date and time manually 1 In the Launcher mode tap to open the Miscellaneous Application Launcher 2 Tap Clock The current date and time display 3 To change the date and time tap Tool and then Date Time Tap the arrows to change the year month and day Tap the arrows to change the current time 4 When you are finished tap the OK button to save the changes ...

Страница 180: ...where the image file you want to use and then select the file s in the folder 4 Tap at the top right corner of the screen The image file displays on the List manager screen Tap to select all image files Tap to select an image file Tap to delete the image file you select Tap to move the select file up or down Note If you want to return to a default background image remove all of the image files fro...

Страница 181: ...background image rotates orderly every minute on the minute 6 You can change the background image into other image from the List manager list Tap Tool and Previous or Next To view the world time You can check the current time for the major cities around the world 1 On the Clock screen tap the World Clock tab Using the stylus tap or drag the line to select the time zone Tap to enlarge or reduce the...

Страница 182: ...e stylus select the time zone on the screen 3 The local date and time display You can also see the selected country and city at the top left of the screen To set the time of a special city as the PDA phone s current time tap Tool and then Configuration Select the city you want and tap at the top right corner of the screen Another cities s time will change according to this setting The selected cit...

Страница 183: ...mathematical operations such as addition subtraction multiplication division and many advanced operations You can use the following options on the screen Backspace Clears the number you enter CE and C Clears the entire calculation and enables you to begin a new calculation MC Clears any value that is stored in the calculator s memory MR Recalls the stored value from memory and inserts it into the ...

Страница 184: ...ase 10 of the number currently displayed In Computes the natural logarithm logarithm to base e of the number currently displayed Pi Enters the value of pi the ratio of the circumference of a circle to it s diameter on the display Select the unit to measure angles Tap to use the trigonometric functions or inverse trigonometric functions Tap to use logical operations Skin in the Tool menu allows you...

Страница 185: ...Calculator Tip Calculator quickly calculates the tip total bill and bill per person for a meal or other purchase You can select the country and the satisfaction rate for the service enter in the cost of the entire meal the tip percentage you wish to pay and the number of people paying Select the calculator you want to use Text Entry icon Select the country Set the tip percentage you wish to pay Se...

Страница 186: ...ion You can work out how much you can afford to borrow It also tells you what your repayments will be over set time scales at varying interest rates The method of repayment Text Entry icon Tap to hide or display the Text Entry screen Enter the amount of loans Enter the term of the loan Enter the rate of the loan Shows the money you have to repay per month ...

Страница 187: ...In the Launcher mode tap to open the Miscellaneous Application Launcher 2 Select Converter Select the type of unit You can select the following types Angle Area Computer Force Length Pressure Radioactivity Speed Angular Speed Linear Temperature Volume Weight Select the unit Text Entry icon Tap to hide or display the Text Entry screen To change the Text input mode tap the arrow next to the icon Ent...

Страница 188: ... to convert on the Text Entry screen For details about entering text see page 2 4 5 Select the unit you want to convert from the drop down arrow below the Input field 6 Select the unit you want to convert to from the drop down arrow below the Output field 7 The Output field changes automatically to show you the converted value 8 Tap at the top right corner of the screen or tap Tool and then Quit t...

Страница 189: ...ith only one remote control With the Remocon application you can control and operate infrared supported office entertainment and home automation equipment set up favorite channels share the remote with others create unique personal settings Adding a Device 1 In the Launcher mode tap tap to open the Miscellaneous Application Launcher 2 Select Remocon 3 Tap Tool and then Learn The list of devices yo...

Страница 190: ...message Setup is completed appears in the Status field If it fails Setup is failed appears 8 When you success the setting tap the OK button to save the setting in the Learn Screen Otherwise tap the Cancel button or tap at the top right corner of the screen to exit this screen Text Entry icon Tap to hide or display the Text Entry screen To change the Text input mode tap the arrow next to the icon S...

Страница 191: ...want your phone to learn Power tap it first 4 Press the corresponding button on the remote control of the device you add For example if you tapped Power on your PDA phone press the power button on your remote control If the learning is completed a successful confirming message appears 5 If you want to continue the learning for additional buttons on your remote control repeat steps 2 through 4 The ...

Страница 192: ...your PDA phone 4 Tap at the top right corner of the screen or tap Tool and then Quit to exit this screen 6 When you are finished programming tap at the top right corner of the screen or tap Tool and then Quit to exit this screen Using the Device 1 On the Remocon screen tap Tool and then Select Device The Select Device screen displays ...

Страница 193: ...eous Application Launcher Select Recorder and then tap at the bottom of the screen or tap Tool and then New 2 The title is preset by default You can also change the title Tap the arrow field of the Save location field and select the memory location Select External to save the SD Record folder in Documents 3 Tap and make a voice recording by speaking into the microphone Begins recording Text Entry ...

Страница 194: ... Record folder in the Documents folder When you select External as Save location it is saved in the SD Record folder in Documents Playing a Voice Recording On the Recorder screen tap the recording you want to listen to The recording plays automatically Indicates the progress of the current track Plays the recording Stops the recording Fast forwards to the location 2 seconds after Rewinds to the lo...

Страница 195: ...e entering text you must tap the field where you want to enter information to position the cursor The Text Entry screen displays automatically For details about entering text see page 2 4 4 If you want to move the recorded file to another folder select the folder you want The file moves to the folder you select 5 Tap to save the editing and return to the previous screen Text Entry icon Tap it to d...

Страница 196: ...ming message appears tap OK Yes to delete the recording s or Cancel Noto cancel it Creating a Copy of the Voice Recording 1 After accessing the Recorder application open the Record or SD Record folder from the Documents 2 When the recordings list displays tap and hold the recording you want to copy and then select Create Copy from the pop up menu 3 You can view the copied recording on the list Sen...

Страница 197: ...e this function You can only install Java software installation files with the extension JAR 1 In the Launcher mode tap to open the Miscellaneous Application Launcher 2 Select Java A list of Java applications that have been installed to your phone displays 3 To select the download mode tap Menu and then Setting On the Setting screen tap Download Mode If you want to view the memory status tap About...

Страница 198: ...s 1 through 5 on page 8 21 The URL address you enter appears Tap the Connect button 2 Your PDA phone is connected to the selected website 3 Select the program you want to install To install a program using the infrared mode 1 Follow steps 1 through 5 on page 8 21 Wait for the downloading program If you want to cancel or stop the downloading tap Cancel 2 Align the IrDA port on the PDA phone with th...

Страница 199: ... On the PopSync screen of your computer click on the Toolbar or click Tools at the top of the screen and then select KJava to start the Java PopSync program 4 On the KjavaSync screen click Setting and select USB mode and OK 5 Select the file you want to install and click Send 6 During installation you are given options to continue or cancel the installation To return to the Java home screen tap Re...

Страница 200: ...Menu and select Install Program Follow steps on page 8 21 to complete the installation Once you create a folder you can rename or remove the folder you want by using Menu Fruits Cocktail Your PDA phone provides Fruits Cocktail game You can also download and install other game using the Java Application or synchronising your PDA phone with your computer where the program file is downloaded The goal...

Страница 201: ... on the red bar or tap Tool and then New Game If necessary tap either arrow to display START GAME on the red bar 4 While playing the game if you want to pause tap Tool and select Pause To resume the paused game tap the paused screen or tap Tool and select Restart While playing the game you can view a hint of the game by tapping the HINT button only when the button is available But it decrease the ...

Страница 202: ...your PDA phone according to the way you work For example you can change the sounds or use your own sounds for ring tones notifications and reminders configure the phone display change the language and more To access the Setup screen 1 In the Launcher mode tap at the bottom of the screen Select to access the setting options ...

Страница 203: ...lish Simplified Chinese or Traditional Chinese and tap the Apply button After you have changed the display text language you must restart the phone Note Changing the settings for Language affects every application in your PDA phone and the change remains effective until you change these settings again When you use simplified Chinese and traditional Chinese by turns use file names in English Otherw...

Страница 204: ...ssword is preset to 0000 at the factory In the System Lock tab you can activate or deactivate the system lock and change the password When the PDA phone is locked the password is required to access the PDA phone Each time you wake up your PDA phone or reboot the system the System Locked screen displays Tap the Password button and enter your password You can also enter the password to access the Pa...

Страница 205: ...various options to customise your phone settings For details see page 4 15 Power The amount of remaining battery power displays on the progress bar When you are charging the battery the progress bar moves across the screen to show that the battery is charging Under On battery power you can check the Turn off device if not used for box to turn your PDA phone off automatically if the phone is not us...

Страница 206: ...er of the current location 1x Only Your PDA phone only receives the data call in the CDMA 2000 1x mode 95A Only Your PDA phone only receives the data call in the IS 95A mode Sync Setup This option allows you to choose the connection port for synchronisation with your desktop computer from USB mode You can use the following options PDA If selected you can synchronise your Schedule or Addressbook wi...

Страница 207: ...on select the application and tap the End Task button at the bottom of the screen If you want to end all of the applications tap and then the End Task button You can also use Task Manager when you access other applications For details see page 2 3 Tap to end the selected application Tap to select all of the applications The operating applications ...

Страница 208: ...to select a color The Theme Demo screen shows the effect caused by your selections Tap to apply your selection To change the background image of the Launcher mode 1 In the Background tab tap the arrow field at the top of the screen and select the image type you want to use If you select Default Image you can use various default images Tap or to select the image you want to use If you select User I...

Страница 209: ...ume If you select the Mute check box the appears on the status bar and the system volume is turned off You can also adjust the volume easily on the status bar at the top of the screen Voice Volume adjusts the incoming caller s voice volume Record Volume adjusts your voice memo volume You can also enable the effects sounds like Screen Taps Hardware Buttons In the Effect tab tap each check box to en...

Страница 210: ...nts stored in your PDA phone When you tap a file you want to open the corresponding program which was used to create the file runs In the Launcher mode tap at the bottom of the screen to open the Documents Launcher You can change the view to either Icon View or List View by tapping Tool at the bottom ...

Страница 211: ...ge delete or edit any files on your PDA phone You can also copy an existing file on your PDA phone to a new folder that you create 1 In the Launcher mode tap at the bottom of the screen to open the Application Launcher 2 Select File Manager The list of the folders and files displays Tap to open the selected file OR Tap and hold the file to open the menu options Tap to select all of the files ...

Страница 212: ...r PDA phone using the IrDA port Information shows the detailed information of selected item s Cut cuts the selected item s You can also cut by tapping Edit and then Cut Copy copies the selected item s You can also copy by tapping Edit and then Copy Paste pastes the cut or copied item s You can also paste by tapping Edit and then Paste Delete deletes the selected item s You can also delete by tappi...

Страница 213: ...or folder Information shows the detailed information of selected item s Sort sorts the items by Name Size or Date You can sort ascending or not using the Ascending option Quit exits the File Manager Creating a New Folder Tap Edit at the bottom of the screen and then New Folder Enter the Name of the new folder and tap the location of the folder Tap at the top right corner of the screen to make a ne...

Страница 214: ...ur phone such as writing and storing messages playing games connecting to the Internet and so on If you are frequently out of the service area If you are out of the service area for a long period of time If you use the phone out of the network s local service area If you use the talk mode repeatedly Talk time Standby time Standard Battery 1050 mAh Time up to 140 minutes 60 to 100 hours fully charg...

Страница 215: ...e parameters set by the network operator Battery charging time depends on the remaining battery charge and the type of battery and charger used The battery can be charged and discharged hundreds of times but it will gradually wear out When the operation time talk time and standby time is noticeably shorter than normal it is time to buy a new battery If left unused a fully charged battery will disc...

Страница 216: ...when a metallic object coin clip or pen causes a direct connection between the and terminals of the battery metal strips on the battery for example when you carry a spare battery in a pocket or bag Short circuiting the terminals may damage the battery or the object causing the short circuiting Dispose of used batteries in accordance with local regulations Always recycle Do not dispose of batteries...

Страница 217: ...uipment and for the safety of personnel it is recommended that the equipment should only be used in the normal operating position held to your ear with the antenna pointing over your shoulder Electronic Devices Most modern electronic equipment is shielded from radio frequency RF signals However certain electronic equipment may not be shielded against the RF signals from your wireless phone Consult...

Страница 218: ...ing aid manufacturer to discuss alternatives Other Medical Devices If you use any other personal medical devices consult the manufacturer of your device to determine if it is adequately shielded from external RF energy Your physician may be able to assist you in obtaining this information Switch off your phone in health care facilities when any regulations posted in these areas instruct you to do ...

Страница 219: ...rs are reminded of the need to observe restrictions on the use of radio equipment in fuel depots fuel storage and distribution areas chemical plants or where blasting operations are in progress Areas with a potentially explosive atmosphere are often but not always clearly marked They include below deck on boats chemical transfer or storage facilities vehicles using liquefied petroleum gas such as ...

Страница 220: ... on 2 Key in the emergency number for your present location for example 120 or any other official emergency number Emergency numbers vary by location 3 Press the key If certain features are in use call barring for example you may first need to deactivate those features before you can make an emergency call Consult this document and your local cellular service provider When making an emergency call...

Страница 221: ...he air bag deployment area If wireless equipment is improperly installed and the air bag inflates serious injury could result Switch off your phone before boarding an aircraft The use of wireless phones in aircraft may be dangerous to the operation of the aircraft and is illegal Failure to observe these instructions may lead to the suspension or denial of telephone services to the offender or lega...

Страница 222: ...en the phone warms up to its normal operating temperature moisture can form inside the phone which may damage the phone s electronic circuit boards Do not drop knock or shake the phone Rough handling can break internal circuit boards Do not use harsh chemicals cleaning solvents or strong detergents to clean the phone Wipe it with a soft cloth slightly dampened in a mild soap and water solution Do ...

Страница 223: ...af fe et ty y I In nf fo or rm ma at ti io on n If the phone battery charger or any accessory is not working properly take it to your nearest qualified service facility The personnel there will assist you and if necessary arrange for service ...

Отзывы: