background image

52

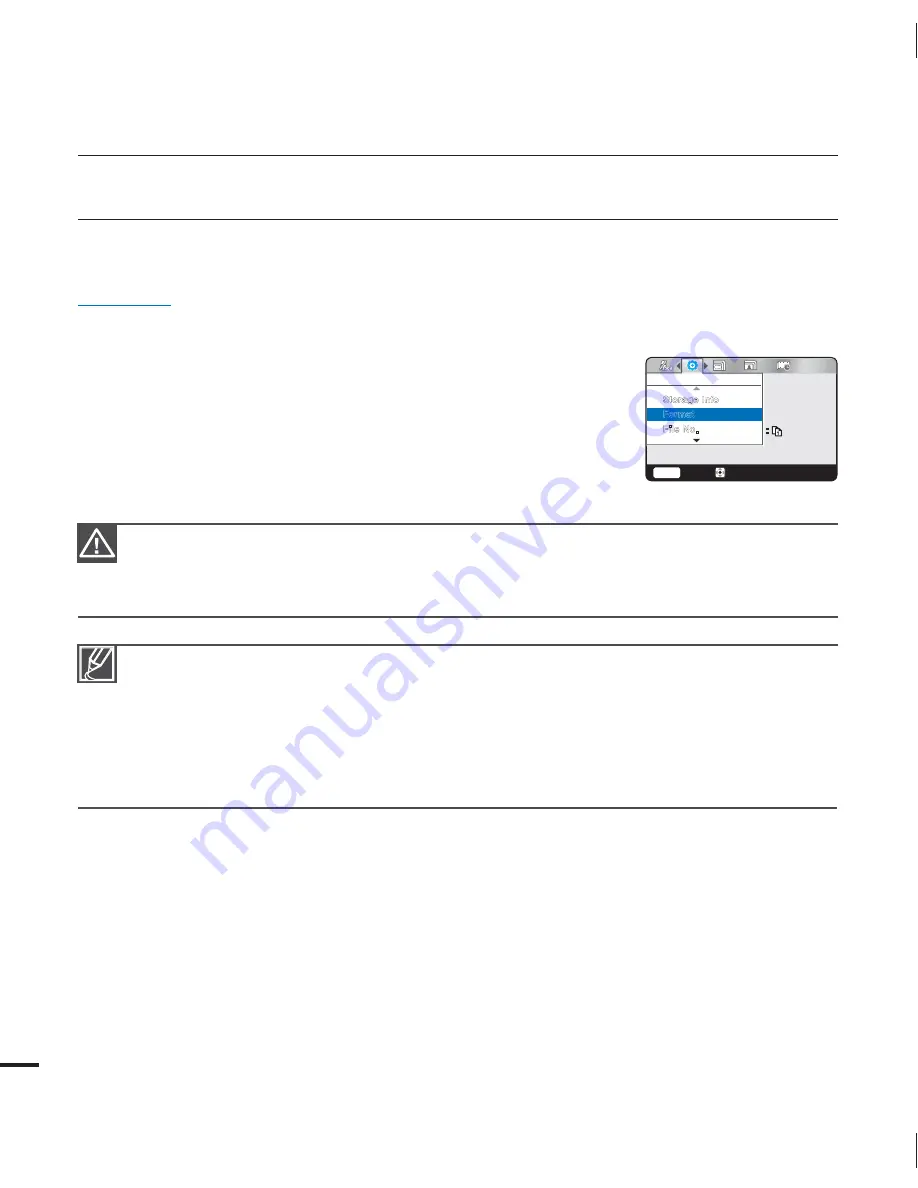
Format

The format function deletes all files (including protected files) and options on the storage media. 
You can also use this function if you want to correct problems with the storage media.

PRECHECK!

Insert a memory card. 

page 25

1. 

Press the 

MENU

 button 


/

 button 

 “

Settings

.”

2. 

Press the 

/

 button 

 “

Format

” 


OK

 button.

3. 

Select “

Yes

” with the 

/

/

OK

 button. 

Do not format the storage media on a PC or other device.  

Make sure to format the storage media on this camcorder.
You can not format a memory card with the protection tab set to lock. 

page 26

If there is no storage media inserted, it can not be selected and will be dimmed on the menu.
You must format storage media you used in other devices or newly purchased memory cards with 
this camcorder before using them. This enables stable speeds and operation when accessing the 
storage media. 
Be aware that formatting erases all files and data including protected files.


Do not remove the storage media or perform any other operation (such as turning off the power) 
during formatting. Also, be sure to use the provided AC power adapter, as the storage media may 
be corrupted if the battery becomes exhausted during formatting.
If the storage media becomes corrupted, format it again.

system setting

4FUUJOHT

'PSNBU

4UPSBHF*OGP

'JMF/P

4FMFDU

Menu

&YJU

Содержание HMX-U20BN

Страница 1: ...User Manual HMX U20BN HMX U20RN HMX U20LN HMX U20SN High Definition Digital Camcorder www samsung com register ...

Страница 2: ...g a function These warning signs are here to prevent injury to you and others Please follow them explicitly After reading this section keep it in a safe place for future reference PRECAUTIONS Warning When using the AC power adapter with your camcorder connect the adapter to an outlet with protective grounding Do not expose the camcorder battery to direct sunlight heaters radiators fire or any other...

Страница 3: ...rding The terms photo and still image are used interchangeably with the same meaning IMPORTANT INFORMATION ON USE Before using this camcorder This camcorder records video in H 264 MPEG4 part10 AVC format and in High Definition Video HD VIDEO or Standard Definition Video SD VIDEO Please note that this camcorder is not compatible with other digital video formats Before recording important video make a...

Страница 4: ...indows Vista and DirectX are either registered trademarks or trademarks of the Microsoft Corporation in the United States and or other countries Intel Core and Pentium are the registered trademarks or trademarks of the Intel Corporation in the United States and other countries Macintosh Mac OS are either registered trademarks or trademarks of Apple Inc in the United States and or other countries Y...

Страница 5: ...ent of the obsolete outlet 10 Protect the power cord from being walked on or pinched particularly at plugs convenience receptacles and the point where they exit from the apparatus 11 Only use attachment accessories specified by the manufacturer 12 Use only with the cart stand tripod bracket or table specified by the manufacturer or sold with the apparatus When a cart is used use caution when moving ...

Страница 6: ... items placed upon or against them paying particular attention to cords or plugs convenient receptacles and the point where they exit from the unit 20 OUTDOOR ANTENNA GROUNDING CAMCORDER be sure the antenna or cable system is grounded to provide some protection against voltage surges and built up static charges Section 810 of the National Electrical Code ANSI NFPA No 70 1984 provides information w...

Страница 7: ...ified technician to restore the CAMCORDER to its normal operation e If the CAMCORDER has been dropped or the cabinet has been damaged f When the CAMCORDER exhibits a distinct change in performance this indicates a need for service 27 REPLACEMENT PARTS When replacement parts are required be sure the service technician has used replacement parts specified by the manufacturer and having the same charac...

Страница 8: ...erference by one or more of the following measures Reorient or relocate the receiving antenna Increase the separation between the equipment and receiver Connect the equipment into an outlet on a circuit different from that to which the receiver is connected Consult the dealer or an experienced radio TV technician for help and for additional suggestions The user may find the following booklet prepar...

Страница 9: ...tering the camcorder or AC power adaptor could cause electric shock malfunctions or defects L I O Do not aim the camcorder directly into the sun Doing so could cause eye injuries as well as lead to malfunctioning of internal parts of the product Do not disconnect the AC adaptor by pulling on its power cord as this could damage the power cord Do not bend the powercord or damage the AC power adaptor...

Страница 10: ... not connect the AC adaptor unless the plug can be fully inserted with no part of the blades exposed If the camcorder makes an abnormal sound or smell or smokes unplug the power cord immediately and request service from a Samsung service center There is a risk of fire or personal injury When cleaning the AC adaptor unplug the power cord There is a risk of malfunction or electric shock Keep the powe...

Страница 11: ...lphide Doing so may corrode the external or internal terminals disabling normal operation Do not leave the camcorder in a closed vehicle for a long time where the temperature is very high Do not use the camcorder in direct sunlight or near heating equipment The heat may cause a malfunction or injury Do not use the camcorder on a tripod not supplied in a place where it is subject to severe vibratio...

Страница 12: ...sion electric shock or personal injuries caused by abnormal operation Place the camcorder on a stable surface that is well ventilated Only use the adaptor plug in a socket that is easily accessible If any problem occurs with the product you must pull the plug out of the socket to disconnect the power completely Turning off the power button on the product does not completely disconnect the power xi...

Страница 13: ...screen displays 15 Using the battery 17 Checking the battery state 20 Turning your camcorder on off 20 Setting the operating modes 21 Using the shortcut menu OK guide 22 Using the OK button 23 Turning the power on and setting the date and time 24 Selecting the OSD language 25 Inserting ejecting a memory card not supplied 26 Selecting a suitable memory card not supplied 28 Recordable time and capac...

Страница 14: ... 40 Changing the menu settings 40 Recording menu items 41 Video Resolution 42 Photo Resolution 42 Zoom Mute 43 Time Lapse REC 45 Playback menu items 45 Play Mode 46 Delete 47 Protect 48 Divide 49 Share Mark 50 Slide Show 50 File Info 51 Setting menu items 51 Storage Info 52 Format 53 File No 53 Date Time Set 54 LCD Brightness 54 Auto LCD Off 55 Beep Sound contents RECORDING 30 BASIC PLAYBACK 35 AD...

Страница 15: ...as a removable storage device 68 Connecting to a TV 70 TV and LCD monitor image displays 71 Recording dubbing images on a VCR or DVD HDD recorder 72 Warning indicators and messages 74 Symptoms and solutions 80 Maintenance 81 Using your camcorder abroad 82 Specifications USING WITH A WINDOWS COMPUTER 59 CONNECTING TO OTHER DEVICES 68 DUBBING VIDEOS 71 TROUBLESHOOTING MAINTENANCE ADDITIONAL INFORMATI...

Страница 16: ...ady quick start guide This quick start guide introduces the basic operation and features of your camcorder See the reference pages for more information You can record videos in H 264 format You can record videos in the H 264 format that are convenient to email and share with your friends and family You can also take photos with your camcorder STEP2 Record with your camcorder LCD screen Power butto...

Страница 17: ... Power button 2 Press the Photo button halfway down to check the target image 3 Press the Photo button fully when you are ready Recording videos with HD high definition image quality Recording photos Your camcorder is compatible with the H 264 recording format which achieves efficient coding of high quality video using less memory capacity The default setting is 720 60p You can also record with SD s...

Страница 18: ...eo or photo then press the OK button Viewing on a high definition TV You can enjoy HD High Definition videos on a connected HDTV page 68 Simple and fun Enjoy the various features of Intelli studio on your Windows computer Using the Intelli studio program built into your camcorder you can import videos photos into your computer and edit or share the videos photos with your friends pages 60 64 STEP4 S...

Страница 19: ...aceBook Share your contents with the world by uploading videos and photos directly to a web site with a single click Click the Share Upload tab on the browser page 63 STEP5 Delete videos or photos If the camcorder s storage media is full you cannot record new videos or photos Delete videos or photos you ve saved on your computer from the camcorder s storage media Then you can record new videos or ...

Страница 20: ...RDER Your new camcorder comes with the following accessories If any of these items is missing from your box call Samsung s Customer Care Center Model name Color Memory card slot LCD screen Lens HMX U20BN Black Yes Color Optical zoom x3 Photo only Intelli zoom x3 6 Video only HMX U20RN Pink Red HMX U20LN Blue HMX U20SN Silver The shape is the same for all models Only the color is different A U D IO...

Страница 21: ...side LOCATION OF CONTROLS LCD screen Photo button Zoom W T lever Recording start stop button Play button OK button Built in speaker Power button CHG Charging indicator Share button SMART AUTO button MENU button 11 ...

Страница 22: ...lens during recording Lens Internal microphone Jack cover AV HDMI DC IN AV jack HDMI jack DC IN jack OPEN lever Built in USB jack Battery slot Memory card slot Battery release switch Memory card Battery cover Wrist strap hook Tripod receptacle getting to know the camcorder 12 ...

Страница 23: ...cord mode only Select the record mode by pressing the Play button page 20 Record mode Settings of functions marked with are not retained when the camcorder is turned off The on screen indicators are based on an 8GB SDHC memory card The screen above is an example and may differ from the actual display For enhanced performance the display indications and the order are subject to change without prior...

Страница 24: ... SD mode only Select the play mode by pressing the Play button page 20 Video play mode PRECHECK This On Screen Display OSD is shown in photo play mode only Select the play mode by pressing the Play button page 20 Photo play mode 1 Photo play mode 2 Slide show 3 Image counter current image total number of recorded images 4 File name file number 5 Recorded date time display 6 Battery information rema...

Страница 25: ...cting the battery 1 Open the battery cover by sliding the OPEN lever as shown in the figure 2 Slide the Battery release switch and pull out the battery 3 Close the battery cover USING THE BATTERY Purchase extra batteries to allow continuous use of your camcorder Use only Samsung approved batteries If you use batteries from other manufacturers there is a danger of overheating fire or explosion Samsun...

Страница 26: ...rly and plug the AC Power adaptor in the wall outlet Using the built in USB jack Connect the built in USB jack of the camcorder to the USB jack of a PC Use the USB cable not supplied according to the environment the PC is used in Charging the battery Please make sure that there are no foreign substances in the plug and socket when you connect the AC power supply to the camcorder When charging if b...

Страница 27: ...y indicator blinking Low Battery CHECKING THE BATTERY STATE You can check the charging state and remaining battery capacity The color of the LED indicates the power or charging state Charging CHG indicator The color of the charging indicator shows the charging state Charging state Charging Fully charged Error LED color Orange Green Orange blink To check the charging state Battery level display Abo...

Страница 28: ...the battery near any heat source i e fire or a heater Do not disassemble apply pressure to or heat the battery Do not allow battery terminals to be short circuited This may cause leakage generate heat or cause a fire Maintaining the battery The recording time is affected by temperature and environmental conditions We recommend using only the battery type that came with your camcorder This battery ty...

Страница 29: ... the camcorder The recording and playback time will be shorter when you use your camcorder in low temperatures On the battery The charging CHG indicator blinks during charging or battery Info will not be correctly displayed under the following conditions The battery is not inserted correctly The battery is damaged The battery is worn out For the battery information only We recommend that you use t...

Страница 30: ...ng modes and setting on screen indicators TURNING YOUR CAMCORDER ON OFF You can turn the power on or off by pressing the Power button SETTING THE OPERATING MODES You can switch the operating mode in the following order each time you press the Play button Record mode Play mode When using this camcorder for the first time When you use your camcorder for the first time or reset it the date and time set...

Страница 31: ...Y mode The Shortcut menu appears 2 Press the button to select the Display mode The Display mode icon is highlighted 3 Each time you press the button the following on screen information display modes appear simple display full display display off Select the desired mode then press the OK button to confirm your selection Press the OK button to exit the shortcut menu The above is an example of how to ...

Страница 32: ...h time you press the button the following on screen information display modes appear simple display full display display off Search playback RPS Reverse Playback Search rate x2 x4 x8 x16 x32 Previous skip playback Frame by frame playback Previous image Moves to the previous menu Quick View You can view the most recently recorded video or photo right after you ve recorded Search playback FPS Forwar...

Страница 33: ... battery the built in battery fully discharges If this occurs charge the built in battery by connecting to the supplied AC adaptor for 24 hours TURNING THE POWER ON AND SETTING THE DATE AND TIME Set the date and time of your local area when you turn on the camcorder for the first time If you do not set date and time the date and time screen appears every time you turn on your camcorder 1 Press the ...

Страница 34: ... then press the OK button 4 Press the button to select the desired OSD language and then press the OK button 5 To exit press the MENU button The OSD language is refreshed in the selected language Language options may be changed without prior notice The camcorder retains the language you select even when not connected to the battery or AC power The date and time format may change depending on the s...

Страница 35: ...the figure 2 Gently push the memory card to eject it 3 Close the memory card cover INSERTING EJECTING A MEMORY CARD NOT SUPPLIED To avoid the data loss turn off the camcorder by pressing the Power button before inserting or ejecting the memory card Be careful not to push the memory card too hard The memory card may suddenly pop out Your camcorder supports only SD Secure Digital and SDHC Secure Digi...

Страница 36: ...f files recorded on the card To enable writing move the switch up in the direction of the terminals To set write protection move the switch down SDHC Secure Digital High Capacity cards SDHC Secure Digital High Capacity memory cards An SDHC card is a higher version Ver 2 00 of the SD card and supports capacities above 2GB SDHC cards cannot be used with current SD enabled host devices Common cautions...

Страница 37: ...of the reach of children who might swallow it Notes on use Samsung is not responsible for data loss due to misuse We recommend using a memory card case to avoid losing data from moving and static electricity After a period of use the memory card may get warm This is normal and is not a malfunction The camcorder supports SD and SDHC memory cards giving you a wider choice of cards The data storage s...

Страница 38: ... recording times may differ depending on the recording conditions and the subject The higher the resolution settings the more memory is used High resolution images occupy more memory space than low resolution images If the higher resolution is selected there is less space to record videos in the memory When recording complex videos with a lot of action and color the file size will be larger Memory ...

Страница 39: ... the lens and the internal microphone with your fingers and pressing any buttons accidently Aim the camcorder as shown in the illustration 1 Loop the wrist strap around your wrist 2 Make sure your footing is stable and there is no danger of colliding with another person or object 3 Aim and focus as shown in the illustration We recommend you keep the sun behind you while shooting Adjusting the shoot...

Страница 40: ... page 25 Check the subject on the LCD screen 1 Press the Recording start stop button The recording indicator appears and recording starts 2 To stop recording press the Recording start stop button again 1 Press the Photo button halfway down half press Check the target image 2 Press the Photo button down fully full press The camera produces a shutter sound When the capturing indicator disappears the...

Страница 41: ... function is enabled Photo files recorded by your camcorder conform to the DCF Design rule for Camera File system universal standard established by the JEITA Japan Electronics and Information Technology Industries Association DCF is an integrated image file format for digital cameras Image files can be used on all digital devices conforming to DCF You can switch from the play mode to the record mode ...

Страница 42: ...rtrait 3 To record the video or photo press the Recording start stop or Photo button 4 To cancel Smart Auto mode press the SMART AUTO button again When the camcorder fails to recognize the recording situations it records in the basic setting The camcorder may not select the correct scene depending on the external conditions such as camcorder shake lighting and distance to the subject The camcorder...

Страница 43: ...he scene you want and then press the button When the indicator disappears the photo image is recorded without a shutter sound Video keeps recording even while photos are taken To stop recording press the Recording start stop button again You cannot capture photos under the following conditions When you are making a time lapse recording The resolution of the captured photos depends on the resolutio...

Страница 44: ...ding This camcorder allows you to record using optical power zoom and Intelli zoom with the Zoom lever To zoom in Slide the Zoom lever towards T telephoto The distant subject is gradually magnified This camcorder provides the zoom magnification as follows Optical zoom x3 Photo only Intelli zoom x3 6 Video only To zoom out Slide the Zoom lever towards W wide angle The subject appears smaller and furt...

Страница 45: ...lects the thumbnail display options based on the standby mode you used the last time You can select a thumbnail display of HD Videos SD Videos or Photos using the Play Mode menu page 45 Understanding how to change the operation modes You can easily change the operation modes by pressing the buttons as shown in the figures below 35 MENU button Play Mode HD Video SD Video Photo 1MBZ PWF Menu 1MBZ PEF...

Страница 46: ...the Zoom lever The following video files may not play back on the camcorder Video files with formats that are not supported by the camcorder The built in speaker and LCD screen automatically turn off when you connect the Audio Video cable to the camcorder When you connect the camcorder to external devices you should make volume adjustments on the connected external device You can playback recorded v...

Страница 47: ... the reverse direction Press the button within 3 seconds of the start point of the current file to skip back to the previous file Frame by frame playback During pause press and hold the button to make the video go backwards or forwards one frame at a time To resume normal playback press the OK button Slow motion playback During pause press and hold the button to make the video go forwards slowly Dur...

Страница 48: ...rs and the camcorder displays the photo you selected in full screen view To view the previous next file press the button To return to the thumbnail index view use the Zoom lever Your camcorder may not play back the following photo files normally A photo with a file format not supported by this camcorder it does not conform to DCF standards Loading time may vary depending on the resolution of the phot...

Страница 49: ...g from the center of the image You can zoom in from x2 0 to x5 0 by pressing the OK button While you use the playback zoom you can not select other images 3 Press the button to put the part of the picture you want in the center of the screen 4 To cancel use the Zoom lever You cannot apply the playback zoom function to images that are recorded on other devices The playback zoom function is availabl...

Страница 50: ...the screen You can check the selected mode indicator only when the on screen information mode is set to full display page 21 There are some functions you cannot activate simultaneously in the menu You cannot select the grayed menu items Refer to troubleshooting for examples of unworkable combinations of functions and menu items page 79 RECORDING MENU ITEMS The menu items you can access depend on t...

Страница 51: ...SD 720x480 60p format 60p 30p indicates the camcorder will record in progressive scan mode at 60 30 frames per second Recorded files are encoded using Variable Bit Rate VBR VBR is an encoding system that automatically adjusts the bit rate according to the recording image High resolution images occupy more memory space than low resolution images If you select the higher resolution there is less spac...

Страница 52: ...number of recordable images varies depending on the recording environment High resolution images occupy more memory space than low resolution images If you select a higher resolution there is less space to store photos in the memory For detailed information on image capacity see page 28 The camcorder takes photos at 8 mega pixels When you set the resolution to 10M the camcorder up scales the photo...

Страница 53: ... Hr hours 3 Set the desired recording interval Sec with the button 4 Press the button and set the desired total recording time Hr in the same way The approximate time lapse recording time is displayed on the menu screen 5 Press the OK button to finish the setting and then press the MENU button to exit the menu 6 After setting the Time Lapse REC mode press the Recording start stop button Time Lapse ...

Страница 54: ...to 30 Sec total recording time should be set to at least 15 minutes to record a minimum video length of 1 second 30 images Once the Time Lapse REC finishes recording for its total recording time the camcorder switches to standby mode Press the Recording start stop button if you want to stop the Time Lapse REC Audio is not recorded during Time Lapse Recording If a video recording fills up 3 8GB of st...

Страница 55: ...e operation mode first page 20 Play Mode When you select Play your camcorder lets you select whether to display HD videos SD videos or photos in the thumbnail index view Select one of these Playback modes before playback PRECHECK Select the play mode by pressing the Play button page 20 1 Press the MENU button Play Mode 2 Select the desired submenu item with the button OK button 3 Press the MENU but...

Страница 56: ...eos or photos you want to delete by pressing the OK button and then pressing the MENU button The indicator is displayed on the videos or photos you select Pressing the OK button toggles between selecting the videos or photos for deletion or not 2 Select Yes and then press the OK button to delete All Files Deletes all videos or photos Delete PRECHECK Insert a memory card page 25 Select the play mod...

Страница 57: ...rm All On Protects all videos or photos All Off Cancels the protection for all videos or photos Protect You can protect important saved videos or photos from accidental deletion You can not delete protected images unless you release the protection or format the memory PRECHECK Insert a memory card page 25 Select the play mode by pressing the Play button page 20 Set the Playback mode to HD Video SD...

Страница 58: ...h the OK button The selected video is divided into two videos An image from the second part of the divided video will be displayed at the end of the thumbnail index You can not divide files that are protected and display the protected indicator Cancel the protect function first page 47 The divided video may drift before or after the division point by approx 0 5 seconds The Divide function is not ava...

Страница 59: ...arking procedure for a video longer than 10 minutes When uploading a video file to a website such as YouTube the one time upload capacity is a maximum of 100MB or 10 minutes To upload a video over 10 minutes long follow the procedure below to automatically divide it into 10 minute segments with a share mark added 1 Move to the desired file by pressing the button and press the OK button 2 Press the S...

Страница 60: ...ds each To stop the slide show press the OK or MENU button File Info You can see the image information for all images PRECHECK Insert a memory card page 25 Select the play mode by pressing the Play button page 20 Set the Playback mode to HD Video SD Video or Photo page 45 1 Press the MENU button button File Info OK button 2 Select the desired video or photo with the OK button The following informa...

Страница 61: ...e the corresponding page Items Default values Page Storage Info 51 Format 52 File No Series 53 Date Time Set JAN 01 2010 12 00 AM 53 LCD Brightness Bright 54 Auto LCD Off On 54 Beep Sound On 55 Shutter Sound On 55 Auto Power Off 5 Min 56 PC Software On 56 TV Connect Guide 57 TV Display On 57 Default Set 58 Language English 58 Anynet HDMI CEC On 58 Items marked with are available only when you supp...

Страница 62: ...here is no storage media inserted it can not be selected and will be dimmed on the menu You must format storage media you used in other devices or newly purchased memory cards with this camcorder before using them This enables stable speeds and operation when accessing the storage media Be aware that formatting erases all files and data including protected files Do not remove the storage media or pe...

Страница 63: ...card or delete all files The file number is reset when a new folder is created Reset Resets the file number to 0001 even after you format the memory card delete all files or insert a new memory card When you set File No to Series each file is assigned a different number to avoid duplicating file names This is convenient when you want to manage your files on a PC Date Time Set Set the current date and tim...

Страница 64: ...s you can press any button on the camcorder to return the LCD screen s brightness to normal Auto LCD Off is disabled in the following cases If you have connected the AC power adaptor and are using it to power the camcorder If you have connected the built in USB plug of the camcorder to a PC Submenu items Normal Standard brightness Bright Brightens the LCD screen LCD Brightness You can adjust the b...

Страница 65: ...utton Shutter Sound OK button 3 Select the desired submenu item with the button OK button 4 Press the MENU button to exit the menu Submenu items Off The beep sound is off On A beep will sound every time you press a button The Beep sound function is canceled in the following cases During recording and playing When the camcorder has a cable connection Audio Video cable Submenu items Off The shutter ...

Страница 66: ... in USB plug of the camcorder to a PC During recording playing pause excluded or a slideshow Press the Power button to restart the camcorder PC Software Your camcorder contains built in PC software If you set PC Software on you can use this PC software to download and edit videos and photos by connecting the built in USB plug of the camcorder to your PC 1 Press the MENU button button Settings 2 Pr...

Страница 67: ...OK button 3 Select the desired submenu item with the button OK button 4 Press the MENU button to exit the menu Submenu items Off The camcorder s OSD does not appear on the screen of the connected TV On The camcorder s OSD appears on the screen of the connected TV The TV Display function only lets you display or not display the camcorder s screen indicators on the TV screen Setting it to Off does n...

Страница 68: ...HDMI CEC This camcorder supports Anynet It is an AV network system that enables you to control all connected Samsung AV devices with an Anynet supported Samsung TV remote control 1 Press the MENU button button Settings 2 Press the button Anynet HDMI CEC OK button 3 Select the desired submenu item with the button OK button 4 Press the MENU button to exit the menu Submenu items Off Disables the func...

Страница 69: ...l Core 2 2 GHz or higher is recommended Notebook Intel Core2 Duo 2 2GHz or AMD Athlon X2 Dual Core 2 6GHz or higher is recommended RAM 1GB or higher is recommended Video Card nVIDIA Geforce 7600GT or higher Ati X1600 series or higher Display 1024 x 768 16 bit color or higher 1280 x 1024 32 bit color recommended USB USB 2 0 Direct X DirectX 9 0c or higher System requirements System requirements lis...

Страница 70: ...udio exe USING THE Intelli studio PROGRAM Using the Intelli studio program built into your camcorder you can transfer video and photo files to your PC and edit them on your PC screen Intelli studio offers the most convenient way for you to manage your video and photo files Step 1 Connecting the USB cable 1 Set PC Software On page 56 This is the default setting 2 Connect the built in USB plug of the ...

Страница 71: ...ls Smart Album Arranges multiple videos and photos by various classifications Global Map Displays the location of shooting place with a map 9 Selects the connected device 10 Shows directories of Contents Manager and My Computer Contents Manager You can classify and manage videos and photos on your computer My Computer You can view videos and photos saved in the selected directory of your computer 1...

Страница 72: ...l once the video plays back inside the thumbnail frame allowing you to search for a desired video with ease 4 Once you select the desired video or photo double click to play back Playback starts and playback controls appear Step 4 Editing videos or photos With Intelli studio you can edit videos or photos in various ways For example Change Size Fine Tune apply Image Effect Insert Frame etc Before e...

Страница 73: ...ss environment Flickr is an image hosting website web services suite and online community platform In addition to being a popular website for users to share personal photographs the service is widely used by bloggers as a photo repository http www flickr com Facebook is a global social networking website that is operated and privately owned by Facebook Inc Users can add friends and send them messag...

Страница 74: ...s you directly upload and share your videos on YouTube Just press the Share button while your camcorder is connected to a Windows computer using the built in USB plug Direct uploading your videos onto YouTube As part of the uploading process the videos you marked are converted into a format playable by YouTube before actually uploading Time spent uploading may vary depending on such conditions as ...

Страница 75: ...aster if you install it on your Windows computer Also if you install it on your computer it can be updated automatically Follow these directions to install Intelli studio onto your Windows computer Click Tool Install Intelli studio on PC on the Intelli studio screen then follow the steps below ...

Страница 76: ...edia appear Different file types are stored in different folders 5 Select the desired folder or files to copy then drag and drop them into the destination folder The folder or files are copied from the storage media to the PC If the Removable Disk window does not appear confirm the connection page 60 or perform Steps 1 through 4 again If the removable disk does not appear automatically open the remova...

Страница 77: ...e photos have an SAM_ JPG format The folder names increase in this order 100PHOTO 101PHOTO etc Up to 9 999 files can be stored in one folder A new folder is created when more than 9 999 files have been created Image format Video files Videos are compressed in H 264 format The file extension is MP4 Refer to page 41 for video resolution Photo files Photos are compressed in JPEG Joint Photographic Experts...

Страница 78: ...der to the HDMI In jack on your TV 2 Turn on your TV and set the TV s input selector to the Input your camcorder is connected to Refer to the TV s instruction manual to see how to select the TV input 3 Select the playback mode on your camcorder and start to play back videos page 36 You can use only a C to A type mini HDMI cable with this camcorder The HDMI jack on the camcorder provides output onl...

Страница 79: ... SD quality videos 480 60p 1 Connect the provided Audio Video cable from the camcorder to the composite video jack and the left and right audio jacks on you TV See the diagrams above and below 2 Turn on your TV and set the TV s input selector to the Input your camcorder is connected to Refer to the TV s instruction manual to see how to select the TV input 3 Select the playback mode on your camcord...

Страница 80: ...ource for the camcorder When TV Display is set to Off the OSD On Screen Display does not appear on the TV screen page 57 Image appearance depends on LCD or TV screen ratio Recording ratio Video Photo LCD TV 16 9 4 3 Images recorded in a 16 9 ratio 80Min JAN 01 2010 12 00AM 1627 STBY 80Min JAN 01 2010 12 00 AM 1627 STBY 80Min JAN 01 2010 12 00AM 1627 STBY Images recorded in a 4 3 ratio JAN 01 2010 ...

Страница 81: ...uch as VCRs or DVD HDD recorders PRECHECK Insert a memory card page 25 Select the play mode by pressing the Play button page 20 1 Connect your camcorder to the recording device VCR or DVD HDD recorder with the supplied Audio Video cable composite connection 2 Turn on your recording device and set the recording device s input selector if any to the Input your camcorder is connected to 3 Start the p...

Страница 82: ... your PC or another storage media and delete files Change to another memory card which has enough free space Card Error The memory card has a problem and the camcorder can t recognize it Format the memory card or replace it with a new one Card Locked The write protection tab on an SDHC SD card has been set to lock Release the write protection tab Not Supported Card The memory card is not supported ...

Страница 83: ...storage media to your PC and then format the storage media using the camcorder Set File No to Reset The Number of photo files is full Cannot take photo Folder and files have reached their capacity and you cannot take a picture Back up important files on the storage media to your PC and then format the storage media using the camcorder Set File No to Reset Playback Message Icon Informs that Action Rea...

Страница 84: ... adaptor Power cannot be turned off Unplug the AC power adaptor and then reconnect the power supply to the camcorder before turning it on The battery discharges quickly The temperature is too low The battery is not fully charged Recharge the battery The battery reached the end of its lifespan and cannot be recharged Contact your nearest Samsung authorized service center Display Symptom Explanation...

Страница 85: ...y The file may be corrupted The file format is not supported by your camcorder The camcorder only displays the file name if the directory structure does not comply with the international standard Recording Symptom Explanation Solution Pressing the Recording start stop button does not start recording There is not enough free space to record on the storage media Make sure the memory card is inserted an...

Страница 86: ... camcorder with the LCD screen exposed to direct sunlight The beep sound is not heard Set the Beep Sound to On page 55 The beep sound is temporally off while recording videos When the Audio Video cable is connected to the camcorder the beep sound automatically turns off There is a time difference between the point where you press Recording start stop button and the point where the recorded video s...

Страница 87: ...es not work properly If the temperature inside the camcorder is too high it cannot function properly Turn the camcorder off wait for a few moments and turn it on again Playback is interrupted unexpectedly Check if the AC power adaptor is properly connected and stable You cannot hear sound when playing a Time Lapse recording The Time Lapse REC function does not support sound Playback on other devic...

Страница 88: ...on and restart the Windows computer Intelli studio is not Macintosh compliant Set PC Software to On in the Settings menu The Intelli studio program may not run automatically If this occurs access My Computer or Windows Explorer open the drive that corresponds to your camcorder find Intelli studio and then run IStudio exe The image or sound on your camcorder is not played on your computer properly V...

Страница 89: ...d for dubbing images from your camcorder page 71 General operations Symptom Explanation Solution The date and time are incorrect Has the camcorder been left unused for a long period of time The backup built in rechargeable battery may be discharged page 16 Menu Symptom Explanation Solution Menu items are grayed out You cannot select grayed items in the current recording playback mode If there is n...

Страница 90: ...en the temperature of the lens is similar to the ambient temperature the frost will disappear When there is dew condensation put the camcorder aside for a while before using What is dew condensation Dew condensation happens when a camcorder is moved to a location where there is a significant temperature difference from the previous location The dew condenses on the external or internal parts of the...

Страница 91: ...m based TV or external device and have the appropriate Audio Video jacks Otherwise you may need to use a separate video format transcoder NTSC PAL format converter NTSC compatible countries regions Bahamas Canada Central America Japan Korea Mexico Philippines Taiwan United States of America etc PAL compatible countries regions Australia Austria Belgium Bulgaria China CIS Czech Republic Denmark Egy...

Страница 92: ... USB output 1Vp p 75 Ω terminated C type connector 7 5 dBs 600 Ω terminated Built in USB General Power source Power source type Power consumption Recording Operating temperature Operating humidity Storage temperature Dimensions WxHxD Weight Internal MIC Storage media 5 0V using AC power adaptor 3 7V using built in lithium Ion battery Lithium Ion battery Power supply 100 V 240 V 50 60 Hz 2 4W 32 F ...

Страница 93: ...sented to the authorized service center EXCLUSIONS WHAT IS NOT COVERED This warranty does not cover damage due to accident fire flood and or other acts of God misuse incorrect line voltage improper installation improper or unauthorized repairs commercial use or damage that occurs in shipping Exterior and interior finish lamps and glass are not covered under this warranty Customer adjustments which ar...

Страница 94: ...e the 6 hazardous materials Cadmium Cd Lead Pb Mercury Hg Hexavalent Chromium Cr 6 Poly Brominated Biphenyls PBBs Poly Brominated Diphenyl Ethers PBDEs in our products If you have any questions or comments relating to Samsung products please contact the SAMSUNG customer care center Samsung Electronics America inc 1 800 SAMSUNG 726 7864 www samsung com us ...

Отзывы: