background image

Getting Started       8

Note: 

Your phone has been tested to support up to a 32GB memory card.

For more information on Memory Cards, see 

“Memory Card”

 on 

page 39.

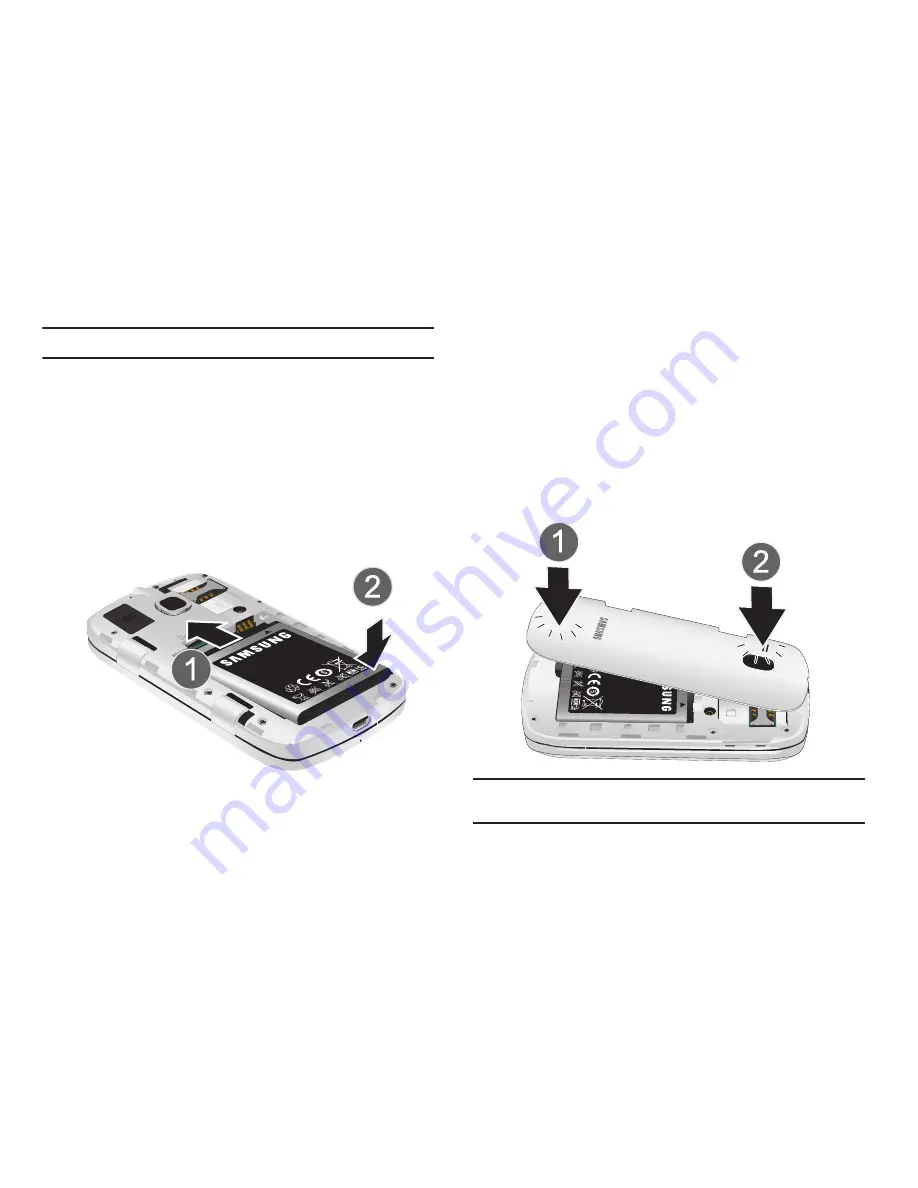
Installing the Battery

To install the battery:

1.

Insert the battery into the opening on the back of the 

phone, making sure the connectors align (1).

2.

Gently press down to secure the battery (2).

Replacing the Battery Cover

To replace the battery cover:

1.

Place the battery cover onto the back of the phone (1) and 

press down (2).

2.

Press down firmly along the edges of the cover to ensure 

that the cover is flush with the phone. You should hear a 

light click as the cover locks in place.

Note: 

Make sure the battery is properly installed before switching on the 

phone.

Содержание DoubleTime SGH-I857

Страница 1: ...M O B I L E P H O N E User Manual Please read this manual before operating your phone and keep it for future reference ...

Страница 2: ...tellectual Property Moreover you agree that you will not and will not attempt to modify prepare derivative works of reverse engineer decompile disassemble or otherwise attempt to create source code from the software No title to or ownership in the Intellectual Property is transferred to you All applicable rights of the Intellectual Property shall remain with SAMSUNG and its suppliers Samsung Telec...

Страница 3: ... Some devices or plans may require you to subscribe to a data plan Your phone is designed to make it easy for you to access a wide variety of content For your protection AT T wants you to be aware that some applications that you enable may involve the location of your phone being shared For applications available through AT T AT T offers privacy controls that let you decide how an application may ...

Страница 4: ...olates your voice conversation and removes background noise from both ends of a call It also automatically equalizes and adjusts voice volume so you can hear and talk naturally even in the noisiest places With earSmart technology you can talk where you want and have clear conversations for mobile calls video chats even speakerphone calls without worrying about surrounding noise Open Source Softwar...

Страница 5: ...PRODUCT WITH THE REQUIREMENTS OF ANY LAW RULE SPECIFICATION OR CONTRACT PERTAINING THERETO NOTHING CONTAINED IN THE INSTRUCTION MANUAL SHALL BE CONSTRUED TO CREATE AN EXPRESS OR IMPLIED WARRANTY OF ANY KIND WHATSOEVER WITH RESPECT TO THE PRODUCT IN ADDITION SAMSUNG SHALL NOT BE LIABLE FOR ANY DAMAGES OF ANY KIND RESULTING FROM THE PURCHASE OR USE OF THE PRODUCT OR ARISING FROM THE BREACH OF THE EX...

Страница 6: ... View of Your Phone 19 Back Top and Bottom Views of Your Phone 19 Home Screen 20 Navigating Your Device 21 Notification Panel 22 Display Layout 23 Status Bar 24 Customizing Your Home Screen 26 Primary Shortcuts 26 Widgets 27 Shortcuts 28 Folders 30 Wallpapers 30 Applications 31 Menu Navigation 35 Memory Card 39 Section 3 Entering Text 42 Virtual QWERTY Keyboard 42 Text Input Methods 42 Changing th...

Страница 7: ... Joining Contacts 68 Synchronizing Accounts 70 Address Book Options 71 Groups 72 History 74 Activities 74 Address Book Favorites 74 Managing Address Book Entries 75 Section 6 Multimedia 77 Music 77 Live TV 81 Camera 82 Camcorder 86 Gallery 88 My Files 93 Section 7 Messaging 96 Types of Messages 96 Creating and Sending Messages 96 Message Options 97 Viewing New Received Messages 99 Deleting Message...

Страница 8: ...tooth 148 Section 10 Applications 153 GPS Applications 153 AT T Code Scanner 154 AT T FamilyMap 154 AT T Navigator 155 Books 156 Calculator 158 Calendar 158 Camera 160 Clock 160 Contacts 163 Dual Clock 163 Email 163 Facebook 163 Gallery 164 Gmail 164 Google Search 164 Latitude 165 Live TV 166 Maps 167 Market 169 Memo 170 Messaging 170 Music 170 My Files 171 myAT T 171 Navigation 171 News Weather 1...

Страница 9: ...fied Travel Charger 194 Display Touch Screen 194 GPS AGPS 195 Emergency Calls 196 Care and Maintenance 196 Responsible Listening 197 Operating Environment 199 FCC Hearing Aid Compatibility HAC Regulations for Wireless Devices 201 Restricting Children s Access to Your Mobile Device 202 FCC Notice and Cautions 203 Other Important Safety Information 203 Section 12 Warranty Information 204 Standard Li...

Страница 10: ...re based on default settings and may vary from your device depending on the software version on your device and any changes to the device s settings Note Unless stated otherwise instructions in this user manual start with the device unlocked at the main Home screen Note All screen images in this manual are simulated Actual displays may vary depending on the software version of your device and any ...

Страница 11: ...internal area Removing the Back Cover To remove the battery cover 1 Place your thumbnail into the slot on the bottom of the phone 1 or use a pointed object 2 Lift the cover up 2 and away from the phone Warning A graphite sheet is attached to the battery cover to help ensure your device does not over heat Be careful not to damage it when using a pointed object or your fingernail Arrows are used to ...

Страница 12: ...ce Make sure that the card s gold contacts face into the phone and that the angled corner of the card is positioned as shown Note If the card is not inserted correctly the phone does not detect the SIM card Re orient the card back into the slot if the SIM is not detected Installing a Memory Card Your device lets you use a microSDTM SD or microSDHCTM card to expand available memory space This secur...

Страница 13: ...he phone making sure the connectors align 1 2 Gently press down to secure the battery 2 Replacing the Battery Cover To replace the battery cover 1 Place the battery cover onto the back of the phone 1 and press down 2 2 Press down firmly along the edges of the cover to ensure that the cover is flush with the phone You should hear a light click as the cover locks in place Note Make sure the battery ...

Страница 14: ...device sounds a warning tone at regular intervals In this condition your phone conserves its remaining battery power not by turning off the backlight but by entering the dimming mode For a quick check of your battery level glance at the battery charge indicator located in the upper right corner of your device s display Solid color indicates a full charge When the battery level becomes too low the ...

Страница 15: ...options screen displays 4 Touch Power off to switch off the phone Setting Up Your Phone When you first turn on your phone you need to set up a few things 1 An informational screen displays describing the on screen keyboard settings Touch one of the following options Previous Takes you to the previous step Emergency call Skips the steps listed below and displays the dialer so you can make an emerge...

Страница 16: ...ntinue You can set up accounts later if you prefer Facebook SetupaFacebook account For more information refer to Facebook on page 163 Twitter Set up a Twitter account For more information refer to Adding an Account on page 129 MySpace allows you to set up a MySpace account For more information refer to Adding an Account on page 129 7 The Learn more screen displays with a web link to learn more abo...

Страница 17: ... the URL loads click on the Can t access your account link 3 From the Forgot your password page enter your email address in the Email address field 4 Type the characters you see in the picture in the field provided and click Continue 5 Choose how to get back into your account and click Continue 6 Follow the password recovery procedure which varies depending on your choice in Step 5 Using Google Ma...

Страница 18: ...aneously and some applications run in the background Use Task Manager to see which applications are running on your device and to end running applications to extend battery life You can also uninstall applications from your device and see how much memory is used by applications Task Manager provides information about applications including Active applications Package RAM Summary and Help To access...

Страница 19: ...use a personal screen unlock pattern For more information about creating and enabling a Screen unlock pattern see Set Screen Lock on page 124 For other settings related to securing your device see Location and Security on page 123 Note Unless stated otherwise instructions in this User Manual start with the device unlocked at the main Home screen Locking the Phone Manually 䊳 Press the Power Lock Ke...

Страница 20: ...d System Recovery mode follow these steps 1 With the phone turned off open the phone and press the Power key and the T key at the same time until the phone switches on 2 Once the AT T logo appears release the Power key while continuing to press the T key 3 Continue to press the T key for at least 8 seconds until Recovery mode is launched and the Android System Recovery screen is displayed on the o...

Страница 21: ...ing problems with the device Safe mode only loads basic system software 1 Make sure your phone is turned off 2 Press and hold the Power Lock Key to boot up your device 3 After the animation starts to display repeatedly press the Menu Key When the Home screen is displayed Safe mode is displayed in the lower left corner of the screen ...

Страница 22: ... plus pre loaded applications Ready access to the Internet Built in Bluetooth 3 0 Wireless technology For more information refer to Bluetooth Settings on page 114 Built in Wi Fi technology 802 11 b g n Dual screen design with 3 2 inch HVGA multi touch screens 3 2 Megapixel camera and camcorder Four row keyboard with ideally spaced keys and dedicated android keys Messaging Features Gmail Email corp...

Страница 23: ...ng point for using your device For more information refer to Home Screen on page 20 3 Menu Key Press to display options for the current screen 4 Home Key Press to display the main Home screen Press and hold to display recent applications or to launch Task Manager 5 Back Key Press to return to the previous screen or option 6 Search Key Press the Search Key to search the web and your device 5 4 1 2 ...

Страница 24: ...5mm Headset jack Plug in optional headphones 2 Power Lock key Press and hold to turn the device on Press and hold this key to access Silent mode Flight mode and Power off Press to lock the device or to wake the screen for unlocking 3 External speaker Allows you to hear the Speakerphone music or video playback notification tones and other sounds 4 Camera lens Used to take photos and record videos 5...

Страница 25: ... connection details For a list of icons see Status Bar on page 24 2 Home screen indicator Indicates which Home screen is presently displayed 3 Widgets Applications that run on the Home screen These widgets are found on the Home screen by default For more information refer to Widgets on page 27 4 Shortcuts Shortcuts to common applications These shortcuts are found on the Home screen by default For ...

Страница 26: ...or more information refer to Shortcuts on page 28 Folders For more information refer to Folders on page 30 Wallpapers For more information refer to Wallpapers on page 30 Display Settings You can customize display settings to your preferences For more information refer to Display on page 123 Navigating Your Device Use command keys and the touch screen to navigate Command Keys Menu Key Press the Men...

Страница 27: ...ly across the screen For example Unlocking the screen Scrolling the Home screens or a menu Pinch Use two fingers such as your index finger and thumb to make an inward pinch motion on the screen as if you are picking something up or an outward motion by sweeping your fingers out For example Pinch a Home screen to show customization options Pinch a photo in Gallery to zoom in Notification Panel The ...

Страница 28: ... screen rotation When enabled the screen orientation changes when you rotate the device When disabled the screen locks in the current orientation horizontal or vertical and the orientation does not change when you rotate the device Clearing Notifications 1 Sweep your finger downward from the top of the screen to display the Notifications Panel 2 Touch a notification to clear it or Touch Clear to c...

Страница 29: ... USB Connected Phone is connected to a computer using a USB cable 100 USB Debugging Device is connected to a computer in debugging mode For more information refer to USB Debugging on page 129 Updates Available Updates to the applications you have downloaded are available Upload in Progress Data is being uploaded to another device Download in Progress An application is being downloaded to the devic...

Страница 30: ... is active 3G Network Communicating Displays when your phone is communicating with the 3G network New Gmail Message Displays when you have new Gmail New Email Message Displays when Email is received New Message Displays when a new text or multimedia message is received New Voice Mail Message Displays when a new voice mail is received Google Talk Invitation Someone has invited you to chat using Goo...

Страница 31: ...ed active and communicating with a Wireless Access Point WAP Wi Fi Action Needed Action needed to connect to Wireless Access Point WAP Acquiring GPS Signal Displays when GPS is acquiring a signal GPS Active Displays when GPS is active Navigation Active The Navigation app is active For more information refer to Navigation on page 171 TTY Active Displays when a TTY device has been inserted TTY Phone...

Страница 32: ...red Home screen then touch and hold on the screen to display the Add to Home screen menu 2 Touch Widgets then touch a widget to add it to the Home screen Removing Widgets 1 Touch and hold the Widget until Remove appears at the bottom of the screen 2 Drag the Widget to the Remove icon When the Widget turns red release it Note This action deletes the icon used to access the Widget not the Widget app...

Страница 33: ...ion and brightness settings For more information refer to Power Control on page 174 aksdj akljlad pekajr didlfajfij jd djfifnfn jeuifhe jle liekz ldak eaji alfipald fhak a aksdj akljlad pekajr didlfajfij jd djfifnfn jeuifhe jle liekz ldak eaji alfipald fhak a aksdj akljlad pekajr aksdj akljlad pekajr didlfajfij jd djfifnfn jeuifhe jle liekz ldak eaji alfipald fhak a aksdj akljlad pekajr didlfajfij...

Страница 34: ...list see Applications List on page 31 Bookmark Launch a bookmarked web page Contact Call or email a contact or access the contact s information For more information refer to Contacts and Your Address Book on page 64 Direct dial Call a contact Direct message Send a contact a message Directions Navigation Get directions and navigation from Google Maps Android Email Access an Email account Appears on...

Страница 35: ... until Remove appears at the bottom of the screen 2 Drag the Folder to the Remove icon When the Folder turns red release it Wallpapers You can choose a photo to display in the background of the Home screen Choose from preloaded wallpaper images or select a photo you have downloaded or taken with the Camera 1 From a Home screen touch and hold on the screen to display the Add to Home screen menu the...

Страница 36: ... 1 From a Home screen touch Applications 2 Slide your finger across the screen left or right to scroll through the Applications screens 3 Touch an icon to launch the application 4 Follow the on screen instructions 5 To return to the Home screen press For information on navigating through the Applications icons see Navigating Through the Application Menus on page 36 Applications List The following ...

Страница 37: ...information refer to Calendar on page 158 Camera Use your 3 2 megapixel camera feature to produce photos in a JPEG format For more information refer to Camera on page 82 Clock The Clock application allows you to access alarms view the World Clock set a stopwatch and use a timer For more information refer to Clock on page 160 Contacts You can manage your daily contacts by storing their name and num...

Страница 38: ...on page 165 Live TV Live TV is a subscription service that allows you to watch your favorite TV shows using your handset For more information refer to Live TV on page 166 Maps Depending on your location you can view basic custom and satellite maps and local business information including locations contact information and driving directions You can also post public messages about a location and tra...

Страница 39: ...nfn jeuifhe jle liekz ldak eaji alfipald fhak a aksdj akljlad pekajr didlfajfij jd djfifnfn jeuifhe jle liekz ldak eaji alfipald fhak a aksdj akljlad pekajr didlfajfij jd djfifnfn jeuifhe jle liekz ldak eaji alfipald fhak a aksdj akljlad pekajr didlfajfij jd djfifnfn jeuifhe jle liekz ldak eaji alfipald fhak a Places Places is an application that uses Google Maps and your location to help you find...

Страница 40: ...you to tell the phone what to search for and then the phone activates a Google search based on what you said For more information refer to Voice Search on page 177 Web Open this app to start surfing the web The Web browser is fully optimized and comes with advanced functionality to enhance the Internet browsing feature on your phone By default a shortcut to Web appears on the main Home screen as a...

Страница 41: ... Your phone originally has five home screens If you like you can place different applications on each of the home screens 䊳 From the main Home screen sweep the screen with your finger in either direction The main Home screen is located in the middle with two Home screens on each side Navigating Through the Application Menus There are three Application Menus available Follow these steps to navigate...

Страница 42: ... Removing Primary Shortcuts You can change any of your primary shortcuts with the exception of the Applications and Home shortcuts 1 Press the Home Key to activate the Home screen 2 Touch Applications to display your current applications 3 Press the Menu Key and touch View type 4 Touch Customizable grid A green circle appears next to the option 5 Press the Menu Key and touch Edit 6 Scroll through ...

Страница 43: ...want to move 7 Touch and drag the icon to the position that you want To move to a different page drag the icon to the edge of the page until the page scrolls to the desired page 8 Press the Menu Key and touch Save 9 Press the Home Key to return to the Home screen Moving Adding and Removing Home Screen Panels Your device comes with five Home screen panels You can customize the Home screen by removi...

Страница 44: ...s of your device s SD functionality The device has a USB SD card mode Note This device comes with a 2GB microSD card installed Using the SD Card There are several methods for using the SD card 1 Connecting to your PC to store files such as music videos or other types of files and media 2 To activate the camera video music player and other dependant media or applications Important The Camera Music ...

Страница 45: ...nformation on it Unmounting the SD card Unmounting the SD card prevents corruption and damage to the SD card while removing it from the slot 1 From a Home screen touch Applications Settings SD card and phone storage 2 Touch Unmount SD card 3 When the SD card safe to remove message displays at the top of your display open the phone and remove the SD card For more information refer to Installing a M...

Страница 46: ...ved to the microSD card Move to SD card is dark and cannot be selected Erasing Files from the SD Card You can erase files from the SD card using the phone 1 Ensure the SD card is mounted For more information refer to Mounting the SD Card on page 40 2 From a Home screen touch Applications Settings SD card and phone storage 3 Touch Unmount SD card 4 Touch Format SD card 5 At the Format SD card confi...

Страница 47: ...eyboard for text entry Use the keyboard to enter letters punctuation numbers and other characters into text entry fields or applications Access the keyboard by touching any text entry field The virtual QWERTY keyboard displays at the bottom of the screen By default when you rotate the device the screen orientation updates to display the keyboard at the bottom of the screen Text Input Methods There...

Страница 48: ...stead of touching each key use your finger to trace over each letter of a word For each word place your finger on the first letter and glide to the subsequent letters lifting on the last letter This example shows how to enter the word this Put your finger down on the t and without lifting glide it to the h then to the i then over to the s Swype Text Entry Tips Here are a few tips to get you starte...

Страница 49: ...xt touch Swype Options Swype Help While entering text you can get tips and help about using Swype Touch Swype to show Tips Touch More on This to see more Touch Swype Tutorial for an interactive tutorial Entering Symbols and Numbers Using the Swype Keyboard Touch and hold on a key to enter the symbol or number at the top of the key Touch and hold on a key until a menu of all characters available on...

Страница 50: ...clockwise to a landscape orientation The on screen Android keyboard displays Note The Android keyboard examples in this section are shown in the landscape orientation Configuring the Android Keyboard To configure the Android keyboard to your preferences 1 While entering text touch and hold the Symbols Numeric key 2 Touch Android keyboard settings on the Android keyboard pop up The Android keyboard...

Страница 51: ... input field 2 Touch the desired alphabetic characters The screen initially opens in Alphabetic uppercase mode After typing the first letter the Shift Key changes to and the following letters typed are lowercase 3 Touch to input another uppercase letter or Touch and hold to lock the keypad in uppercase mode and the shift key changes to All following letters typed are uppercase until you touch the ...

Страница 52: ...e you want appears in the center of the small window above the Space key 3 Lift your finger If you have many languages available you may have to repeat these steps to find the language you want Using Suggested Words To show suggested words in a strip above the Android keyboard as you type 1 From a Home screen touch Applications Settings Locale and text Android keyboard 2 Touch Show suggestions A g...

Страница 53: ...ne there is a second screen and four row QWERTY keyboard with dedicated Android keys Using the QWERTY keypad to type letters numbers punctuation and other special characters into text entry fields or other applications should be simple and fast This QWERTY keyboard works very similar to the on screen Samsung keypad For example by default the first letter of an entry is capitalized and all consecut...

Страница 54: ... 1 2 Press twice to type multiple characters CAP LOCK Press again to deactivate this function 4 Symbols Emoticons Press to display a screen of symbols Press and then press to display Emoticons To choose an Emoticon use the Navigation keys to highlight it and the OK key to type it 5 Voice to Text Press to use your voice to enter text using the Voice to Text feature 6 Space Press to insert an empty ...

Страница 55: ...tion marks and symbols 3 Press the OK key to make your selection Using Emoticon Mode Emoticons are a group of characters that represent your mood or facial expression Several Emoticons are available on your phone s keyboard and can be entered into your text To enter an Emoticon 1 Press 2 Press the Left Right Up and Down navigation keys to scroll through the possible Emoticons 3 Press the OK key to...

Страница 56: ...d if you were using the on screen keypad In other words the keyboard can be used for all typing functions or it can be used with the touch screen features Using the Android Keys on the Keyboard The Menu Home Back and Search keys at the top of the keyboard work like the keys on the front of the phone Menu Key Press to display options for the current screen or feature Use the navigation keys and the...

Страница 57: ...ch then touch and hold The character appears 2 Use the on screen keypad to enter the country code area code and phone number Tip If you make a mistake touch until the desired numbers have been deleted 3 Touch to make the call Manual Pause Dialing To manually call a number with pause s without storing it in your Contacts list 1 From a Home screen touch and use the on screen keypad to enter the phon...

Страница 58: ... Logs A list of recent calls is displayed 3 Touch a recent number to display the details page and then touch to dial the number or Swipe the number you want to call to the right Using Speed Dial You can assign a short cut number to a phone number in your Contacts List for speed dialing Display the Speed Dial Screen 1 From a Home screen touch Contacts to display your Contacts List 2 Press the Menu ...

Страница 59: ...ng a Call from the Address Book You can store phone numbers that you use regularly on the SIM card or in the phone s memory These entries are collectively called the Address Book For further details about the Address Book feature see Finding an Address Book Entry on page 68 Answering a Call When a call is received the phone rings and displays the caller s phone number The caller s name is displaye...

Страница 60: ...s Favorites Displays contacts that you have marked as Favorites Also displays frequently called numbers including your Voicemail number Contacts Launches your Address Book so you can select a contact to call After you begin to enter numbers with the keypad the Add to Contacts option appears so you can save the number you are about to dial as a Contact Call Log The Call log displays the details of ...

Страница 61: ...call back a missed call number 1 From a Home screen touch Logs A list of recent calls is displayed If the number or caller is listed in your Address Book the associated name is displayed 2 Touch the desired missed call and then touch or Swipe the number of the missed call to the right Saving a Recent Call to your Address Book 1 From a Home screen touch Logs A list of recent calls is displayed 2 To...

Страница 62: ...ur contacts are saved see Address Book Settings on page 71 For further details about the Address Book feature see Adding a New Contact on page 65 Sending a Message to a Recent Caller 1 From a Home screen touch Logs A list of recent calls is displayed 2 From the Logs screen Touch the call to which you want to send a message The call detail page is displayed Touch Send message or Touch and hold the ...

Страница 63: ...splayed 2 Press the Menu Key Delete 3 Touch the check mark beside each entry that you want to delete from the Call log The check mark turns green 4 Touch Delete and then touch OK The entries are deleted from the Call log Tip To delete one entry touch and hold the entry and then touch Delete Call Duration 1 From a Home screen touch 2 Touch Logs 3 Press the Menu Key Call duration The following times...

Страница 64: ...iece Use the Volume key to adjust the speaker volume Touch Speaker to route the audio through the speaker A green line appears under the Speaker button Touch Speaker again to use the phone s earpiece see Using the Speakerphone During an Active Call on page 61 The green line turns grey when Speaker is not activated Mute Turn the onboard microphone either on or off Touch Mute during a call to mute t...

Страница 65: ... the middle of the screen and the call on hold appears in the background under the words On hold Switching Between Calls When you have an active call and a call on hold you may switch between the two calls changing the one on hold to active and placing the other on hold 1 Touch Swap The current call caller 2 is placed on hold and the call on hold caller 1 is reactivated You can then continue conve...

Страница 66: ...h your phone s microphone off so that the other person cannot hear you Example You want to say something to a person in the room but do not want the person on the phone to hear you To Mute your Phone During a Call 1 Touch Mute The Mute button now appears as and Mute is activated 2 Touch Mute to deactivate the Mute function and reactivate the microphone Bluetooth Headset 1 Touch Headset 2 The phone...

Страница 67: ...ll settings Additional settings 2 Touch Call waiting A green check mark appears when Call waiting is enabled You are notified of an incoming call by a call waiting tone Answering a Second Call To answer a call while you have a call in progress 1 Touch and slide to the right to answer another call 2 Touch Hold to put the first call on hold 3 To switch between the two calls touch Swap which places t...

Страница 68: ...s you have established with your phone both active and on hold into a multi party call 1 Touch and slide to the right to answer the call 2 Touch and slide to the right to answer the next call 3 Touch Hold to put the first call on hold 4 Touch Merge calls to join the first two callers into a single multi party call Conference Call appears in the middle of the screen and the number of people in the ...

Страница 69: ...ice contacts are automatically synchronized between your phone and online address book The changes you make are automatically saved and if you ever upgrade damage or lose your phone you can easily restore your contacts onto your new phone To activate the AT T Address Book follow these steps you only have to do this once 1 From the main Home screen touch Contacts Note The main Home screen initially...

Страница 70: ...Pictures folder and assign it to this entry Touch an image to assign the image to the contact then touch Save Takephototousethecameratotakeanewpictureandassignitto this entry Remove icon although not an option with a new entry deletes any previously assigned image on an existing contact 3 Touch the First name then enter a first name for the contact 4 Touch Last name then enter a last name for the ...

Страница 71: ...Name is not displayed when calls are made to or received fromthe contact Website Adds a field for the contact s website URL Birthday Adds a field for the contact s birthday Anniversary Adds a field for the contact s anniversary 9 Touch Save to save the new contact Note By default your contacts are automatically saved to your phone To change where your contacts are saved see Address Book Settings o...

Страница 72: ...tact that you want to edit and touch Edit 3 Continue entering contact information For more information refer to Adding a New Contact on page 65 Deleting Contacts To delete multiple contacts 1 From the main Home screen touch Contacts 2 Press the Menu Key Delete 3 Touch Select all or touch the contacts you want to delete 4 Touch Delete To delete one contact 1 From the main Home screen touch Contacts...

Страница 73: ...number you want to call or message 5 Touch Call to make a phone call or Send message to send a message For more information refer to Creating and Sending Messages on page 96 Tip From the Contact list sweep over a contact entry to the right to make a call Sweep over a contact entry to the left to send a message Joining Contacts Joining Contact Information Many people now maintain multiple email acc...

Страница 74: ...oin contact 4 Touch the second contact you want to join to the first contact The second contact is now joined with the first and the account information is merged into one screen Note The information is still maintained in both entries but displays in one record for easier viewing when you join the contacts 5 Touch Joined contacts to view the contact information you joined 6 Touch Join another con...

Страница 75: ...ouch Save Synchronizing Accounts From the Accounts menu you decide if you want applications to synchronize send and receive data at any given time or if you want the applications to synchronize automatically After determining how you want the accounts to synchronize indicate which account to synchronize with your Contacts list 1 From the main Home screen touch Contacts 2 Press the Menu Key then to...

Страница 76: ...d Speed dial allows you to set up speed dialing For more information refer to Using Speed Dial on page 53 Send email allows you to send an email using your Google account Send message allows you to send a text or picture message SIMManagement allows you to copy contacts from your phone to your SIMcard or fromyour SIMcard to your phone Display options You can choose to only display contacts that ha...

Страница 77: ...h as Family Friends or Work For more information refer to Adding an Entry to a Group on page 73 Note Add to favorites and Add to group only display when you press and hold the contact as described in Step 2 Markasdefault When you have multiple contacts linked together you can mark one of them as default only displays when contact is saved to the phone For more information refer to Marking a Contac...

Страница 78: ... green check mark appears next to each name selected 5 Touch Add The contacts are now added to the group Removing an Entry From a Group 1 From the main Home screen touch Contacts Groups 2 Touch a group entry 3 Press the Menu Key Remove member 4 Touch Select all or touch each contact you want to remove from this group A green check mark appears next to each name selected 5 Touch Remove The contacts...

Страница 79: ...what type of calls messages or emails that are displayed You can choose Select all Call Message Email IM Facebook MySpace or Twitter Touch the items you want to see displayed then touch Done Activities The Activities option allows you to view updated contact information synchronized with Facebook MySpace or Twitter 1 From the main Home screen touch Contacts Activities Note You must log in to an SN...

Страница 80: ...ote When storing an Address Book entry into the SIM card note that only the name phone number group and slot location are initially offered as fields some SIM cards may allow an address as well To save additional information for a particular contact such as other phone numbers or e mail it is important to add new fields to that Contact information It is also important to note that if you move the ...

Страница 81: ...entries from your phone s memory 1 From the main Home screen touch Contacts 2 Within the Contacts list touch and hold a contact that you want to delete 3 Touch Delete on the displayed list 4 At the This contact will be deleted prompt touch OK to delete the contact or Cancel to exit Using the Service Dialing Numbers You can view the list of Service Dialing Numbers SDN assigned by your service provi...

Страница 82: ...sic that you copy from your CD collection and so on To copy music files onto your phone s microSD card 1 Connect the phone to your computer with a USB cable and mount the microSD card 2 Create a folder called Music at the top level of the SD card 3 Copy music and other audio files from your computer into the folder that you created on the microSD card 4 If you have created any playlists create a s...

Страница 83: ...t Shuffle Touch to enable Shuffle When enabled songs play in random order When disabled songs play in the order they appear in the playlist Repeat Touch to repeat the current song repeat all songs or disable repeat mode Playback controls Progress Bar Touch and drag the end of the progress bar to scan forward or backward through the current song Some Soundtrack Shuffle Repeat Playback Equalizer Con...

Страница 84: ...lete Delete the song that is playing Music Player Settings 1 From a Home screen touch Applications Music then touch a song or playlist to begin playback 2 Press the Menu Key Settings for these options 5 1 channel Plug in your earphones and touch to enable stereo sound Equalizer Choose from several sound settings including Normal Rock Jazz Classic Dance Pop andLive Youcanalsopluginyour earphones an...

Страница 85: ...he playlist to which you want to add the song A 1 song added to playlist message displays Adding a Song to a Playlist During Playback 1 From a Home screen touch Applications Music 2 Touch a song to play it 3 Press the Menu Key Add to playlist 4 Choose one of these options Touch a playlist to add the selected song to that playlist Touch Current playlist to add the selected song to the current playl...

Страница 86: ... are displayed in the list below the search box that match your request 4 Touch a song to play it or touch an album or artist to view a list of songs Tip From the Music Player screen touch the artist album or song title to search for the title in your music library the Web or YouTube Live TV Live TV is a subscription service that allows you to watch your favorite TV shows using your handset Instal...

Страница 87: ...ial to start your free trial or touch Exit to start your trial at a later time The Live TV main page displays 4 Follow the on screen instructions to watch TV Note Live TV uses a large amount of data and you are responsible for all data charges It is strongly recommended that you upgrade to a large data plan in addition to this purchase Camera This section explains how to use the camera on your pho...

Страница 88: ...nd Down Volume keys to zoom in or out You can magnify the photo up to x3 300 percent 4 You can also touch the screen to move the focus to the area you touch 5 Touch the Camera Key until the shutter sounds The photo is automatically stored within your designated storage location If no microSD is installed all photos are stored on the phone For more information refer to Camera Options on page 83 Imp...

Страница 89: ...e Use a slider to set the brightness level of the photo SCN SCN Settings Touch for the following options Focus mode Set this option to Auto focus or Macro Use Macro mode to take close up photos Use Auto focus for all others Timer Set a 2 5 or 10 second timer Resolution Set a size for the image Options are 3 2M 2048x1536 2M 1600x1200 1 3M 1280x960 or 0 1M 320x240 White balance Set the light source ...

Страница 90: ... as Assign the photo as Contact icon Home screen wallpaper or Lock screen Wallpaper More Send to Online Locker Send your photo to Online Locker Delete To erase the photo touch OK Note Photos are stored in the mnt sdcard DCIM Camera folder as jpg files 6 Press the Back Key to return to the Camera to take more photos Settings Touch for the following options Guidelines Used to enable or disable the g...

Страница 91: ...ing the light source behind you 1 From the main Home screen touch Camera or From a Home screen touch Applications Camera 2 Touch the Mode icon to switch from the Camera to the Camcorder 3 Using the phone s main display screen as a viewfinder compose your shot by aiming the lens at the subject To configure settings see Camcorder Options on page 87 4 To start recording touch Record During recording ...

Страница 92: ... mode This option is not available for the camcorder Exposure value Use a slider to set the brightness level of the video SCN SCN Settings Touch for the following options Timer Set a timer for how long to wait before recording a video Options include Off or 2 5 or 10 seconds Resolution Set the video size to either 320x240 or 176x144 White balance Set the light source Options are Auto Daylight Clou...

Страница 93: ...eo touch OK Note Videos are stored in the mnt sdcard DCIM Camera folder as mp4 files 5 To play a video touch Play Touch Pause to pause the video and touch Resume to resume playing the video 6 Touch and drag the white dot on the progress bar to fast forward or rewind the video Touch the left end of the progress bar to restart the video Touch the right end of the progress bar to end the video playba...

Страница 94: ... of the screen Check marks also display on each folder of photos or videos 3 Touch Select all or touch the folders you want to select the check mark turns white when a folder is selected then touch one of these options Share Send each selected folder and its contents by Bluetooth Email Gmail Messaging Picasa photos or YouTube videos Delete Touch Confirmdeletions to delete the selected folders More...

Страница 95: ...l to stop without cropping the photo Rotate left Rotate each selected photo counterclockwise 90 degrees Rotate right Rotate each selected photo clockwise 90 degrees Access the Camera from Gallery To access the Camera from the Gallery 1 From a Home screen touch Applications Gallery 2 Touch at the top of the screen For more information refer to Camera on page 82 Viewing Photos 1 From a Home screen t...

Страница 96: ... Rotate the photo clockwise 90 degrees Viewing Videos 1 From a Home screen touch Applications Gallery 2 Touch a folder then touch a video to play it Note Videos are marked with a Play button 3 While viewing a video touch the screen to display the following options Rewind Restart the video Pause Pause the video Resume Resume playing the video Fast Forward End the video 4 Touch and drag the white do...

Страница 97: ... as Home screen wallpaper or Touch Menu More Set as Lock screen Wallpaper 4 Touch and drag the edges of the crop box inward or outward to edit the photo then touch Save to set the edited photo as the Home screen or Lock screen Wallpaper Sharing Photos and Videos Share photos and videos with your friends 1 From a Home screen touch Applications Gallery 2 Touch a folder to display thumbnails then sel...

Страница 98: ...ontains Camera which is the default folder for photos and videos taken by the device For more information refer to Camera on page 82 Music Contains music files and album information For more information refer to Music on page 77 Tip Touch the screen and sweep upward to view additional folders such as the Music folder 2 Touch Home while viewing a subfolder to display the My Files home screen 3 Touc...

Страница 99: ...dditional options Move Move one or more folders to a different folder Copy Copy one or more folders to a different folder Rename Touch a folder enter a newname for the selected folder and touch OK Bluetooth visibility Make one or more folders visible to Bluetooth devices Settings Touch to set several general folder options Show hidden files Causes files and folders that would normally be hidden to...

Страница 100: ...ay the file name For additional options that are available while viewing a photo see Viewing Photos on page 90 6 Before you select a video to play press the Menu Key in the Camera folder to see the following options Share Send each selected item by Bluetooth Email Facebook Gmail Messaging or YouTube Delete Touch Confirmdeletions to delete the selected items More Details Displays details about the ...

Страница 101: ...rvice Important When creating a message adding an image a sound file or a video clip to a text message changes the message from a text message to a multimedia message Messaging icons are displayed at the top of the screen and indicate when messages are received and their type For more information refer to Status Bar on page 24 Creating and Sending Messages 1 From a Home screen touch Messaging New ...

Страница 102: ...matically saved as a draft Message Options Options Before Composing a Message 1 From a Home screen touch Messaging 2 Before composing a message press the Menu Key to reveal additional messaging options Compose Compose a new message Delete threads Delete any message thread Select the messages to delete and a green check mark appears next to the message Touch Delete Search Search through all of your...

Страница 103: ...ontact s name and telephone number to your message by touching OK Calendar Displays existing Calendar events so you can touch an event to attach it to your message Memo Displays your existing memos so you can touch one or more memos to attach them to your message by touching OK Add text Copy text from your contacts your calendar or a memo to add to your message This is a convenient feature for add...

Страница 104: ...h a namecard This places a check mark next to selected contacts 4 Touch OK A namecard is added to your message for each contact selected 5 Touch to remove attachments if needed Viewing New Received Messages 1 When you receive a new message the new message icon appears at the top of your screen 2 Open the Notification Panel and select the message For more information refer to Notification Panel on ...

Страница 105: ...message details Displays information about the message such as the type of message Text or Multimedia who the message if from or to when it was sent and so on Message Threads Sent and received text and multimedia messages are grouped into message threads Threaded messages allow you to see all the messages exchanged similar to a chat program and displays a contact on the screen Message threads are ...

Страница 106: ...ges to create a check mark if you also want to delete locked messages Touch OK to delete or Cancel to cancel Message Search You can search through your messages by using the Message Search feature 1 From a Home screen touch Messaging 2 Press the Menu Key Search or Press the Search Key 3 Use the on screen keypad to enter a search word or phrase then touch 4 All messages that contain the search stri...

Страница 107: ... belonging to the Core MM Content Domain Warning The phone warns you with a pop up message that you are creating a multimedia message that does not fit the Core MM Content Domain Free You may add any content to the message CB activation Enable to receive Cell Broadcast CB messages Channel configuration Set up the channel on which you receive CB messages Language Select the languages in which you w...

Страница 108: ...ount or add a Google account Go to labels View Gmail by label Search Enter keywords to search mail More Settings Configure settings For more information refer to Gmail account settings on page 104 Help Learn about using Gmail About View information about Gmail Composing and Sending Gmail 1 From a Home screen touch Applications Gmail 2 Press the Menu Key Compose 3 Touch the To field to enter recipi...

Страница 109: ...ute the conversation Email thread More Add star Remove star Flag the Email by adding a star Report spam Report the Email message as spam Settings Configure settings For more information refer to Gmail account settings on page 104 Help Displaythe Google com web pageso you cansearch theweb for help Select text Copy text to the clipboard Gmail account settings 1 From a Home screen touch Applications ...

Страница 110: ...il Your accounts screen displays with an Email setup screen displayed 2 At the Set up email screen enter an Email address and Password then touch Next 3 Your account s incoming server settings are different depending on the kind of email service for the account If the Add email account screen displays touch the type of account POP3 account IMAP account or Microsoft Exchange ActiveSync The Server s...

Страница 111: ...t any time 1 From the Home screen touch Email 2 Touch an account if you have more than one account set up 3 Press the Menu Key More Account settings For more information refer to Account Settings on page 107 Composing and Sending Email 1 From the Home screen touch Email 2 Touch an account if you have more than one account set up 3 Press the Menu Key Compose 4 Touch the To field to enter recipients...

Страница 112: ...lendar Touch a calendar event Memo Touch one or more memos then touch OK 10 Touch Send to send the message or Discard to cancel the email Managing Emails You can view emails you receive for all accounts in the Combined inbox screen or you can view email accounts individually 1 From the Home screen touch Email 2 Press the Menu Key Accounts 3 Touch one of the following Combined inbox View all emails...

Страница 113: ... 100 KB or All the message Notification settings Emailnotifications Whenenabled theNewEmailiconappearsin the Status Bar when a new email arrives Select ringtone Choose a ringtone for email notifications for this account Vibrate When enabled email notifications for this accounts are accompanied by vibration Server settings Exchange server settings Configure exchange server settings Incoming setting...

Страница 114: ...ays touch Next 3 Touch Create to create a new Google account or Touch Sign in and enter your Username email address and Password and touch Sign in if you have an existing Google account Once sign in is complete the Talk screen displays Note If you have already set up your Google account you are automatically logged in Invite a Friend to Chat You can invite anyone with a Google Account to become yo...

Страница 115: ... your status in Talk and other applications Options While Chatting There are several options that are available while you are chatting 䊳 Press the Menu Key to display the following options Chat off record Chat on record Set whether you want to stop saving your chat to the chat history Switch chats Switch to another active chat Friends list Display your friends list Add to chat Select another frien...

Страница 116: ...Blocked Displays a list of friends you have blocked Touch a blocked friend and then touch OKto unblock the friend 3 Touch a Friend s entry to display the Chat entries for that Friend Friend Options There are several options available for each friend 䊳 Touch and hold a Friend s entry to display the following options Start chat Initiate a chat session with this Friend Friendinfo Displayinformationab...

Страница 117: ...id next to your name in their Friends list when you are signed into Google Talk on a your phone Automatic away status Set status to away when the screen is turned off Clear search history Erases your search history No previous searches are shown until you search for new words Notification settings IM notifications Set whether to open a dialog display a notification in the System bar or neither whe...

Страница 118: ...annot send or receive any calls or access online information or applications 1 From a Home screen touch Applications Settings Wireless and networks 2 Touch the Flight mode check box to enable Flight mode A check mark displayed next to the feature indicates Flight mode is active Wi Fi Settings Your device supports Wi Fi b g n Use Wi Fi settings to manage your device s Wi Fi connections For more inf...

Страница 119: ...d for these settings Advanced Wi Fi sleep policy Specify when to switch from Wi Fi to mobile datafordatacommunications TouchtochoosefromWhenscreen turns off Never when plugged in or Never MAC address View your device s MAC address which is required when connecting to some secured networks This value cannot be configured Proxy Touch to enter a proxy number Port Touch to enter a port number IP setti...

Страница 120: ...default name appears on screen Touch to change the device name Available when Bluetooth is turned On Visible Control your device s visibility to other devices Bluetooth searches Touch to turn On or Off Available when Bluetooth is turnedOn The phone is activatedfor discovery for 119 seconds so you can pair with another device After 119 seconds the phone becomes invisible again Scandevices Touchtosc...

Страница 121: ...ions Network SSID This is the ID number that Identifies your wireless network Security Select Open or WPA2 PSK Connecting to Mobile AP from Other Devices To connect another device to your phone 1 Activate Wi Fi on the device that you want to connect 2 Find AndroidAPxxxx the Network SSID in the Wi Fi network list and connect to it The connected device can now use internet with Mobile AP VPN Setting...

Страница 122: ...2TP secret to make a check mark if desired 5 Touch Set L2TP secret and enter a password if desired then touch OK 6 Touch DNS search domains add a name for DNS search using the keypad then touch OK To establish a L2TP IPSec PSK Pre shared key based L2TP IPSec 1 Touch Add L2TP IPSec PSK VPN 2 Touch VPN name add a name for this connection using the keypad then touch OK 3 Touch Set VPN server add a na...

Страница 123: ...options display Touch an option to turn it On or off Usepacketdata Touchtoactivatethedatanetwork ItissetOnby default Data roaming Allows you to connect to your service provider s partner networks and access data services when you are out of your service providers area of coverage Access Point Names To use Wi Fi you need access to a wireless access point hotspot A list of the Access Point names dis...

Страница 124: ...Settings Call settings Fixed Dialing Numbers 2 Touch Change PIN2 3 At the prompt enter your old PIN2 code 4 At the prompt enter a new PIN2 code 5 Confirm your new PIN2 code and touch OK FDN List When this feature is enabled you can make calls only to phone numbers stored in the FDN list on the SIM card Note Before you can manage an FDN list a list must be created 1 From a Home screen touch Applica...

Страница 125: ...ing Touch one of the following options Always forward Incoming calls are re routed to a secondary number that you specify Type the number in the pop up field and touch Enable Forward when busy If you are on the phone incoming calls are re routed to your voicemail number If desired type a different number in the pop up field and touch Update Forward when unanswered If you miss a call re route it to...

Страница 126: ...wsyou to hear and be heard nearly anywhere Touch Noise suppression to activate Sound From this menu you can control the sounds on the phone Silent mode Silent mode is convenient when you want to stop the phone from making noise in a theater for example In Silent Mode the speaker is muted and the phone only vibrates to notify you of incoming calls or other functions that normally have a defined ton...

Страница 127: ...e is disabled Phone Ringtone This option allows you to set the ringtone 1 From a Home screen touch Applications Settings Sound 2 Touch Phone ringtone 3 Touch a ringtone and touch OK Notification Ringtone This option allows you to set the ringtone that sounds for notifications 1 From a Home screen touch Applications Settings Sound 2 Touch Notification ringtone 3 Touch a ringtone and touch OK Feedba...

Страница 128: ...e phone Animation Sets whether some or all of the window elements animate Options are No animation Some animations and All animations Screen timeout Adjusts the delay time before the screen automatically turns off Options are 15 seconds 30 seconds 1 minute 2 minutes 10 minutes or 30 minutes Horizontal calibration Lets you to horizontally calibrate your display using the accelerometer Place your de...

Страница 129: ...PIN number confirm it then touch OK Password Requires that you enter a password to unlock the screen Enter a password confirm it then touch OK Password must contain at least one letter Note Once you have set the screen lock option the Set screen lock option changes to Change screen lock Set Up SIM Card Lock Prevent another user from using your SIM card to make unauthorized calls or from accessing ...

Страница 130: ...Select Device Administrators The Device Administration feature allows you to select one or more administration applications that control your device for security purposes for example if your phone is lost of stolen These applications enforce remote or local device security policies Some of the features a device administration application might control are Setting the number of failed password atte...

Страница 131: ...memory of all contents and reset the credentials password Applications This device can be used for Android development You can write applications in the SDK and install them on this device then run the applications using the hardware system and network This feature allows you to configure the device for development Warning Android Dev Phone 1 devices are not intended for non developer end users Be...

Страница 132: ...talled applications You can view and control currently running services or use the device for application development Using the Samsung Apps option the device notifies you when you are using Wi Fi or Packet data for Samsung applications You can also view the amount of memory or resources used as well as the remaining memory and resources for each of the applications on your phone and clear the dat...

Страница 133: ...s Settings Applications Manage applications 2 Touch the application that you want to move to the microSD card 3 Touch Move to SD card Note If the application cannot be moved to the microSD card Move to SD card is dark and cannot be selected Running Services The Running services option allows you to view and control currently running services such as AT T Navigator SNS messaging Swype and more To s...

Страница 134: ...ounts and Sync Set up and manage accounts including your Google and Backup Assistant accounts 1 Sign in to your Google account 2 From a Home screen touch Applications Settings Accounts and sync 3 From the General sync settings section touch one of the following options Background data Allows your phone to use data in the background Auto sync Automatically synchronizes your data with the phone 4 Fr...

Страница 135: ...ack up my data to enable or disable backup of settings to the Google server Automatic Restore When enabled backed up settings are restored when you reinstall an application 1 From a Home screen touch Applications Settings Privacy 2 Touch Automatic restore to enable or disable automatic restoration of settings from the Google server Factory Data Reset Use Factory data reset to return your device to...

Страница 136: ...be configured 2 Under SD card Total space and Available space display memory usage on an installed memory card Touch Unmount SD card to prepare the memory card for safe removal or formatting For more information refer to Unmounting the SD card on page 40 TouchFormatSDcardtoerasethememorycardandprepareitfor use with your device For more information refer to Erasing Files from the SD Card on page 41...

Страница 137: ... the history for recently selected search results Locale and Text This setting allows you to configure the language used by your device You can also set on screen keyboard options 䊳 From a Home screen touch Applications Settings Locale and text Select Locale To set the language used by your device 1 From a Home screen touch Applications Settings Locale and text Select locale 2 Select a language fr...

Страница 138: ...e Defaultlanguage is US English Audio feedback Turns off sounds generated by the Swype application Enable tip indicator Turns on an on screen flashing indicator that provides helpful user information Swype Advanced Settings Word suggestion When enabled suggests possible matching words as you enter text Auto spacing Automatically inserts a space between words When you finish a word just lift your f...

Страница 139: ...gs Quick fixes Automatically correct some common misspellings as you type Show suggestions Show suggested words in a strip above the onscreen keyboard as you type Auto complete Automaticallyenterasuggestedword highlighted in orange in the strip above the keyboard when you enter a space or punctuation Device Keyboard The following settings are available for the built in keyboard 1 From a Home scree...

Страница 140: ...device Options are Very slow Slow Normal Fast and Very fast Language Assign the language used for verbal readout Choose from American English or Spanish Engines Pico TTS Used to modify settings for the Pico TTS default engine Accessibility This service is able to collect all the text you type including personal data credit card numbers except passwords It may also log your user interface interacti...

Страница 141: ...such as the model number firmware version baseband version kernal version and software build number To access phone information 䊳 From a Home screen touch Applications Settings About phone The following information displays Status Displays the battery status the level of the battery percentage the phone number for this device the network connection signal strength mobile network type service state...

Страница 142: ...oftware update 2 Touch Check for updates 3 At the Software update prompt touch OK to continue 4 The phone automatically updates the software if available Otherwise when the Current software is up to date message is displayed touch OK 5 When updating software once the delta file for FOTA update is downloaded you can delay the update on the start screen by postponing it for a certain period of time ...

Страница 143: ...d screen or Touch Emergency call to display the Emergency dialer screen Use the on screen keypad to make an emergency call or Touch Quit or press the Home Key to exit the Setup Wizard and return to the Home screen For more information see Wi Fi Settings on page 113 and see Adding an Account on page 129 Quit ...

Страница 144: ...ile view sweep the screen with your finger in an up or down motion 3 To scroll through a website in Desktop view sweep the screen with your finger in an up or down or left and right motion 4 Sweep the screen left to right to move laterally across a web page 5 To return to the previous page press 6 Touch to display Bookmarks Most visited and History 7 Press the Menu Key Forward to go forward to a r...

Страница 145: ...e options Open Open the linked page Open in newwindow Open a new window to display the linked page Bookmark link Create a bookmark to the page without loading it Save link Save the linked page to Download history Share link Send the link by way of Bluetooth Email Facebook Gmail or Messaging Copy link URL Save the link s URL to the clipboard Using Browser Windows You can have multiple windows open ...

Страница 146: ...t Copy information from a web page to the clipboard for pasting searching or sharing Selecting Text 1 From a Home screen touch Web 2 Browse to a web page 3 On the web page touch and hold on the text until the text viewer displays When you see the text you want highlighted stop touching the screen The text is highlighted 4 Touch and drag the text selector to the left or right to select more or less...

Страница 147: ... then touch OK to save the bookmark Accessing Bookmarks Most Visited and History Launch a bookmarked page or most visited page or reload recent pages 1 From a Home screen touch Web 2 Touch 3 On the Bookmarks tab use these options Touch a bookmark to load the page Touch and hold on a bookmark for these options Open Launch the bookmarked page Open in newwindow Open the linked page in a new window Ed...

Страница 148: ...Facebook Gmail or Messaging to send the link Copy link URL Save the link s URL to the clipboard Remove fromhistory Remove the record of this page Set as homepage Assign the bookmarked link as the home page Web Menu While viewing a web page 䊳 Press the Menu Key to display the following options New window Open a window Windows Viewthewindowsyouhaveopen Formoreinformation refer to Using Browser Windo...

Страница 149: ...gs Clear all cookie data 3 At the All cookies will be deleted prompt touch OK to delete the cookies or touch Cancel to exit Using your History The History list provides a list of the most recently visited websites These entries can be used to return to previously unmarked web pages 1 From a Home screen touch Web 2 Touch History A list of your most recently visited websites is displayed with Name a...

Страница 150: ...eb automatically runs JavaScript scripts on pages you visit Enableplug ins Whenenabled Webautomaticallyloadsandruns plug ins on pages you visit Open in background When enabled new windows open behind the current window Set home page View and set the default first page that displays when you launch Web Privacy settings Clear cache Delete content and databases stored on the device Clear history Dele...

Страница 151: ...thin most Hot Spots or Secured requiring knowledge of the Router name and password Turning Wi Fi On By default the Wi Fi feature is turned on When Wi Fi is on your device is able to discover and connect to compatible in range WAPs 1 From a Home screen touch Applications Settings Wireless and networks Wi Fi settings 2 Touch the Wi Fi field to activate the feature A green check mark indicates that W...

Страница 152: ...Note The next time your device connects to a previously accessed or secured wireless network you are not prompted to enter the WAP key again unless you reset your device back to its factory default settings Turning Wi Fi Off 1 From a Home screen touch Applications Settings Wireless and networks Wi Fi settings 2 Touch the Wi Fi field to deactivate the feature The green check mark is removed Note Us...

Страница 153: ...ions technology that allows you to connect wirelessly to a number of Bluetooth devices such as headsets and hands free car kits and Bluetooth enabled handhelds computers printers and wireless devices The Bluetooth communication range is usually up to approximately 30 feet Turning Bluetooth On and Off To turn Bluetooth on 1 From a Home screen touch Applications Settings Wireless and networks Blueto...

Страница 154: ...your Bluetooth is active 3 Touch the Device name Visible and Scan devices fields to set the options To change your Bluetooth name 1 Verify your Bluetooth is active 2 From the Bluetooth settings page touch Device name 3 Enter a new name 4 Touch OK to complete the rename process To make your device visible 1 Verify your Bluetooth is active 2 From the Bluetooth settings page touch Visible Making your...

Страница 155: ... the prompts on your device and the target device to complete the pairing Note Due to different specifications and features of other Bluetooth compatible devices display and operations may be different and functions such as transfer or exchange may not be possible with all Bluetooth compatible devices Note Pairing between two Bluetooth devices is a one time process Once a pairing has been created ...

Страница 156: ...active touch Yes to enable it 7 Select the paired device to which you want to send the contacts Note The external Bluetooth device must be visible and communicating for the pairing to be successful 8 A Bluetooth share notification appears in your notifications list Connecting to a Computer To connect your phone to a personal computer 1 On your phone from a Home screen touch Applications Settings A...

Страница 157: ...ry card reader Note The file directory of the memory card displays as a removable disk 1 To transfer files from or to a memory card insert it into your phone For more information refer to Installing a Memory Card on page 7 2 Connect your phone to your computer For more information refer to Connecting to a Computer on page 151 3 A pop up window displays on the PC when connected 4 Open the folder to...

Страница 158: ... Primary Shortcuts on page 37 GPS Applications GPS applications allow you to achieve real time GPS enabled turn by turn navigation and to access local searches based on a variety of category parameters To receive better GPS signals avoid using your device in the following conditions inside a building or between buildings in a tunnel or underground passage in poor weather around high voltage or ele...

Страница 159: ...the window as shown below Keep your phone steady for best results 5 The scanner automatically scans the barcode It may take several seconds 6 After the scan touch Yes to open the web page to view the information on the barcode that was scanned AT T FamilyMap AT T FamilyMap provides peace of mind by being able to conveniently locate a family member from your wireless phone or PC and know that your ...

Страница 160: ... Touch Submit when you have entered all information Once your home address is set up touch and hold Home to Edit or Delete the information My Favorites Displays your favorite marked GPS navigation sites Recent Places Displays your recently entered locations Address Displays manually entered locations Contacts Access a contact to get address information Places Search for nearby places such as ATMs ...

Страница 161: ...as you type Touch a possibility or continue typing Touch Done to complete 4 Touch Submit to begin the search process and receive driving directions from the GPS network 5 Follow both the on screen and audio directions Books Use the Books app to read eBooks from the web based Google Books service Google eBooks is a new way to discover buy and enjoy your favorite books online and offline You can rea...

Страница 162: ... book in original print format or flow the text for easier reading My ebooks Display the Books main screen Settings Set the Text size Typeface Line space justification Themes and the Brightness Help Displays various Book help information Touch Help Center to get additional Google Book information 4 To add more books to your library touch Get eBooks on the Books main screen Browse the selection of ...

Страница 163: ...epeat steps 3 through 5 as many times as required 7 To clear the calculator history press the Menu Key Clear history or Touch Delete 8 Sweep across the screen to the left to display additional mathematical functions or Press the Menu Key Advanced panel The advanced operators display Use sin ln cos log tan and so on just as you would on a pocket calculator 9 Touch and hold the Calculator s display ...

Страница 164: ...fer to Calendar Settings on page 159 Calendar Settings To configure the settings for the messages multimedia messages Voice mails and Push messages 1 From a Home screen touch Applications Calendar 2 Press the Menu Key More Settings The Calendar settings are Calendar viewsetting Hide declined events Do not display events you have received from others if you have declined them First day of week Set ...

Страница 165: ...es Delete event Delete the event Touch OK at the prompt Send via Send this event information by way of Bluetooth Email or Messaging Camera Use your 3 2 megapixel camera feature to produce photos in a JPEG format Your phone also functions as a Camcorder to take videos For more information refer to Camera on page 82 Clock The Clock application is used to set an alarm to ring at a specific time and t...

Страница 166: ... the full Clock screen Adding an Alarm To create a new alarm 1 From a Home screen touch Applications Clock 2 Press the Menu Key Add alarm The following options display Turnalarmon Touch the check mark A greencheck mark means the alarm is on Time Touch or to set the new time for the event at which time an alarm sounds Touch Set Repeat Set the repeating status for the alarm by touching one or more d...

Страница 167: ...e alarm s volume Snoozeduration Setasnoozedurationof 5 10 15 20 25 or 30 minutes Side key function Set the desired function of the Volume key when pressed during an alarm Choicesare None Snooze or Dismiss Turning Off an Alarm To stop an alarm when it sounds 䊳 Touch the button on the alarm pop up or Press the up or down volume key Activating the Snooze Feature 䊳 To activate the Snooze feature after...

Страница 168: ...ch widget displays the time and a city name 3 Touch either widget to choose a different city than the one currently displayed Email Email enables you to review and create email using AIM AOL Yahoo Mail Comcast Compuserve Earthlink Gmail HotPOP Juno Mac NetZero SBC Yahoo and several other email services You can also receive text message alerts when you receive an important email For more informatio...

Страница 169: ...t up your phone Depending on your synchronization settings Gmail can automatically synchronize with your Gmail account on the web For more information refer to Gmail on page 102 Google Search Google Search is an on screen Internet search engine powered by Google 1 From the Home screen touch the Google Search widget or From a Home screen touch Applications Google Search 2 Use the on screen keypad t...

Страница 170: ...lay the Home screen then touch Applications Latitude Your location is displayed on the map accurate to 30 meters Sharing your Location with Friends 1 From the Latitude map screen touch to display your Latitude list of friends At first only your name is displayed 2 Press the Menu Key Add friends 3 Touch Select from Contacts or Add via email address 4 Touch a contact or Enter an email address and to...

Страница 171: ... disable whether your location is updated automatically Set your location Set your location manually Do not detect your location Your friends cannot see your automatic location Location History settings Enable location history This history is only seen by you Check in settings Enable automatic check ins Checks you in to places that you have designated Enable check in notifications Enables notifica...

Страница 172: ...rom a Home screen touch Applications Settings Location and security 2 Touch the Use GPS satellites field A green check mark displays next to the field Note Selecting Use GPS satellites allows you to locate places of interest at the street level However this also requires a clear view of the sky and uses more battery power For more information refer to GPS Applications on page 153 Navigating the Ma...

Страница 173: ...atures that are not ready for primetime They may change break or disappear at any time Click on a Lab to enable or disable it Cache Settings Set options to pre fetch map tiles when not using Wi Fi and to clear the cache that holds the map tiles Help DisplaystheGoogleMobileHelpwebpagewhereyoucanreceive help on Google Maps Terms Privacy Notices DisplaystheTermsandConditions Privacy Policy and Legal ...

Страница 174: ...Android Market Terms of Service displays Touch Accept to continue or Decline to exit 4 Touch Apps Games Books or Movies to download or purchase applications games books or movies You can also download updates to existing applications 5 Follow on the on screen instructions Layers Enable or disable a map layer to display Choose from Traffic Satellite Terrain Buzz or Latitude Touch More Layers to cho...

Страница 175: ...by simply touching a color sample at the bottom of the display 9 From the Memo list press the Menu Key to display the following options Create allows you to create a new memo Maximize Minimize in the Memo list allows you to see the entire contents of your memos Otherwise only the first line displays for each memo in your list Delete allows you to delete one or all of your memos Search allows you t...

Страница 176: ...ccount the Android Market displays the myAT T application 3 Touch the application The myAT T description page displays 4 Touch Install and follow the on screen instructions Using myAT T When myAT T has been successfully downloaded the application is ready to use 1 From a Home screen touch Applications myAT T The myWireless Mobile page is displayed 2 Read the End User Software License Agreement and...

Страница 177: ...view of your start and destination points along with distance in miles and approximate driving time in minutes Layers are additional items that you can have displayed on your map They include Traffic view displays real time traffic conditions so you can plan the fastest route Satellite allows you to see you the map as a satellite image Parking allows you to see registered parking areas Gas Station...

Страница 178: ...ws Weather 2 Press the Menu Key for these options Refresh Update the application from the Google servers Settings Weather settings Choose location s and set the metric for temperature displays News settings Choose topics configure settings for fetching articles and images and view the terms of service for news service Refresh settings Choose options for updating content Application version Display...

Страница 179: ...eb and from Google users 5 From the Places main page touch Add to add your own business category Power Control Active applications Wi Fi Bluetooth GPS Synchronization or the LCD Brightness functionality all act to drain your battery The Power Control widget is designed to quickly activate turn on or deactivate turn off those functions or applications that use the most battery power The following i...

Страница 180: ...mory and any extra settings associated with your phone For more information refer to Settings on page 113 Talk Google Talk is a free Windows and web based application for instant messaging offered by Google Conversation logs are automatically saved to a Chats area in your Gmail account This allows you to search a chat log and store them in your Gmail accounts For more information refer to Google T...

Страница 181: ... Record 3 During the recording process you can either touch Stop to stop and save the recording or Pause to temporarily halt the recording After pausing touch Record to resume recording Touch Cancel to cancel the recording Otherwise once the audio recording stops the message is automatically saved 4 Touch List to display a list of all your voice recordings Press the Menu Key to display the followi...

Страница 182: ...ch Applications Voice Search 2 The Speak Now screen displays Speak clearly into the microphone 3 The Working screen displays as it searches for you 4 Results display on the screen Touch a link to view the information or The Did you mean screen displays if Voice Search was not able to find a match Touch one of the listed suggestions Help or Cancel Web Open Web to start surfing the web The browser i...

Страница 183: ...f the stocksyouhaveadded Touch a stock entry to display the full stock information screen Press the Menu Key to display these additional options Add Add more stocks Delete Select one or more stocks or all stocks and touch Delete Change order Displays your stocks list Touch and drag stocks to change the order in which they are displayed Settings Displays the following options Auto scrolling If you ...

Страница 184: ...inal videos Note YouTube is a data intensive feature It is recommended that you upgrade to an large data plan to avoid additional data charges 1 From a Home screen touch Applications YouTube The Terms of Service displays 2 Touch Accept to continue The YouTube home screen displays 3 Touch to open the phone s camcorder Record a video and touch Save The YouTube Upload video screen displays Enter a ti...

Страница 185: ...llery Settings Configure display and search settings and view information about the application Options While Viewing a Video While viewing a video rotate the phone to portrait mode to display additional options 1 Touch to indicate that you like the video 2 Touch to indicate that you do not like the video 3 Touch More to display the following options Flag Flag the video for YouTube review Save to ...

Страница 186: ...displays 3 Read the Permissions and touch Accept download then wait for YPmobile to be download and installed Accessing YPmobile Once installed you can access and use YPmobile 1 From a Home screen touch Applications YPmobile 2 Read the End User License Agreement EULA and touch Accept to continue The YPmobile home screen displays with your present location in the Near field at the top of the screen...

Страница 187: ...ts touch the Edit button to set the categories used Touch the ON OFF button to enable or disable the search items Touch the Delete button to remove previous search items Touch Done to return to the YPmobile Home screen and save your updates 6 Press the Menu Key or touch the appropriate icon at the bottom of the screen to display additional options For more information refer to YPmobile Menu Option...

Страница 188: ...ing options Home Displays the YPmobile Home screen Businesses Displays the last business search list Touch the Search Businesses field to enter new search parameters Deals List deals near your location Sweep the categories All Auto Dining and so on and touch a category to list deals for that category Touch and hold an entry to call see the location on a map display more information or save the ite...

Страница 189: ...ajority of studies published have failed to show an association between exposure to radio frequency from a cell phone and health problems The low levels of RF cell phones emit while in use are in the microwave frequency range They also emit RF at substantially reduced time intervals when in the stand by mode Whereas high levels of RF can produce health effects by heating tissue exposure to low lev...

Страница 190: ...ore than 5 000 people with brain tumors glioma and meningioma and a similar number of healthy controls Results of this study did NOT show that cell phones caused brain cancer In this study most people had no increased risk of brain cancer from using cell phones For people with the heaviest use of cell phones an average of more than hour per day every day for over 10 years the study suggested a sli...

Страница 191: ...information about SEER can be found at http seer cancer gov Cell Phone Industry Actions Although the existing scientific data do not justify FDA regulatory actions the FDA has urged the cell phone industry to take a number of steps including the following Support needed research on possible biological effects of RF for the type of signal emitted by cell phones Design cell phones in a way that mini...

Страница 192: ...that accessories which claim to shield the head from those emissions reduce risks Some products that claim to shield the user from RF absorption use special phone cases while others involve nothing more than a metallic accessory attached to the phone Studies have shown that these products generally do not work as advertised Unlike hands free kits these so called shields may interfere with proper o...

Страница 193: ...rtification Information Your wireless phone is a radio transmitter and receiver It is designed and manufactured not to exceed the exposure limits for Radio Frequency RF energy set by the Federal Communications Commission FCC of the U S Government These FCC exposure limits are derived from the recommendations of two expert organizations the National Council on Radiation Protection and Measurement N...

Страница 194: ...erformed in positions and locations e g at the ear and worn on the body as required by the FCC For body worn operation this phone has been tested and meets FCC RF exposure guidelines when used with an accessory that contains no metal and that positions the mobile device a minimum of 1 5 cm from the body Use of other accessories may not ensure compliance with FCC RF exposure guidelines The FCC has ...

Страница 195: ...ot interfere with their primary responsibility Do not engage in any activity while driving a moving vehicle which may cause you to take your eyes off the road or become so absorbed in the activity that your ability to concentrate on the act of driving becomes impaired Samsung is committed to promoting responsible driving and giving drivers the tools they need to understand and address distractions...

Страница 196: ...from improper handling of batteries and particularly from the continued use of damaged batteries Do not disassemble crush puncture shred or otherwise attempt to change the form of your battery Do not put a high degree of pressure on the battery This can cause leakage or an internal short circuit resulting in overheating Do not let the phone or battery come in contact with liquids Liquids can get i...

Страница 197: ...eakage or other hazard Samsung s warranty does not cover damage to the phone caused by non Samsung approved batteries and or chargers Do not use incompatible cell phone batteries and chargers Some websites and second hand dealers not associated with reputable manufacturers and carriers might be selling incompatible or even counterfeit batteries and chargers Consumers should purchase manufacturer o...

Страница 198: ...tp www call2recycle org Mail It In The Samsung Mobile Take Back Program will provide Samsung customers with a free recycling mailing label Just go to http www samsung com us mobiletakeback and follow the instructions to print out a free pre paid postage label and then send your old mobile device or battery to the address listed via U S Mail for recycling Dispose of unwanted electronics through an ...

Страница 199: ...ORIENTED IN A VERTICAL OR HORIZONTAL OR FLOOR MOUNT POSITION Display Touch Screen Please note the following information when using your mobile device WARNING REGARDING DISPLAY The display on your mobile device is made of glass or acrylic and could break if your mobile device is dropped or if it receives significant impact Do not use if screen is broken or cracked as this could cause injury to you ...

Страница 200: ...ou use applications that require location based information e g driving directions such applications transmit location based information The location based information may be shared with third parties including your wireless service provider applications providers Samsung and other third parties providing services Use of AGPS in Emergency Calls When you make an emergency call the cellular network ...

Страница 201: ...ency number Emergency numbers vary by location 4 Touch the key If certain features are in use call blocking for example you may first need to deactivate those features before you can make an emergency call Consult your User Manual and your local cellular service provider When making an emergency call remember to give all the necessary information as accurately as possible Remember that your mobile...

Страница 202: ...ouder and for longer durations Prolonged exposure to loud sounds including music is the most common cause of preventable hearing loss Some scientific research suggests that using portable audio devices such as portable music players and cell phones at high volume settings for long durations may lead to permanent noise induced hearing loss This includes the use of headphones including headsets earb...

Страница 203: ...han when using earbuds Limit the amount of time you listen As the volume increases less time is required before you hearing could be affected Avoid using headphones after exposure to extremely loud noises such as rock concerts that might cause temporary hearing loss Temporary hearing loss might cause unsafe volumes to sound normal Do not listen at any volume that causes you discomfort If you exper...

Страница 204: ...ned between a handheld wireless mobile device and an implantable medical device such as a pacemaker or implantable cardioverter defibrillator to avoid potential interference with the device Persons who have such devices Should ALWAYS keep the mobile device more than six 6 inches from their implantable medical device when the mobile device is turned ON Should not carry the mobile device in a breast...

Страница 205: ...before using your mobile device in a motor vehicle You should also consult the manufacturer of any equipment that has been added to your vehicle Posted Facilities Switch your mobile device off in any facility where posted notices require you to do so Potentially Explosive Environments Switch your mobile device off when in any area with a potentially explosive atmosphere and obey all signs and inst...

Страница 206: ...vices that are rated have the rating on their box or a label located on the box The ratings are not guarantees Results will vary depending on the user s hearing device and hearing loss If your hearing device happens to be vulnerable to interference you may not be able to use a rated mobile device successfully Trying out the mobile device with your hearing device is the best way to evaluate it for ...

Страница 207: ...ard HAC Wi Fi for Newer Technologies This phone has been tested and rated for use with hearing aids for some of the wireless technologies that it uses However there may be some newer wireless technologies used in this phone that have not been tested yet for use with hearing aids It is important to try the different features of this phone thoroughly and in different locations using your hearing aid...

Страница 208: ...uld service the mobile device or install the mobile device in a vehicle Faulty installation or service may be dangerous and may invalidate any warranty applicable to the device Ensure that any mobile devices or related equipment installed in your vehicle are securely mounted Check regularly that all wireless mobile device equipment in your vehicle is mounted and operating properly Do not store or ...

Страница 209: ...de removed defaced damaged altered or made illegible e ordinary wear and tear f defects or damage resulting from the use of Product in conjunction or connection with accessories products or ancillary peripheral equipment not furnished or approved by SAMSUNG g defects or damage resulting from improper testing operation maintenance installation service or adjustment not furnished or approved by SAMS...

Страница 210: ...cility in an adequate container for shipping accompanied by the sales receipt or comparable proof of sale showing the original date of purchase the serial number of the Product and the seller s name and address To obtain assistance on where to deliver the Product please call SAMSUNG Customer Care at 1 888 987 4357 If SAMSUNG determines that any Product is not covered by this Limited Warranty you m...

Страница 211: ...entations or otherwise on behalf of SAMSUNG regarding the Products or this Limited Warranty This Limited Warranty gives you specific legal rights and you may also have other rights that vary from state to state What is the procedure for resolving disputes ALL DISPUTES WITH SAMSUNG ARISING IN ANY WAY FROM THIS LIMITED WARRANTY OR THE SALE CONDITION OR PERFORMANCE OF THE PRODUCTS SHALL BE RESOLVED E...

Страница 212: ...filiates if any such claim arises from the Product s sale condition or performance You may opt out of this dispute resolution procedure by providing notice to SAMSUNG no later than 30 calendar days from the date of the first consumer purchaser s purchase of the Product To opt out you must send notice by e mail to optout sta samsung com with the subject line Arbitration Opt Out You must include in ...

Страница 213: ...r Transfer and Disposal If data stored on this device is deleted or reformatted using the standard methods the data only appears to be removed on a superficial level and it may be possible for someone to retrieve and reuse the data by means of special software To avoid unintended information leaks and other problems of this sort it is recommended that the device be returned to Samsung s Customer C...

Страница 214: ...same time You may make one copy of the Software in machine readable form for backup purposes only provided that the backup copy must include all copyright or other proprietary notices contained on the original 2 RESERVATION OF RIGHTS AND OWNERSHIP Samsung reserves all rights not expressly granted to you in this EULA The Software is protected by copyright and other intellectual property laws and tr...

Страница 215: ...well as end user end use and destination restrictions issued by U S and other governments 8 TERMINATION This EULA is effective until terminated Your rights under this License will terminate automatically without notice from Samsung if you fail to comply with any of the terms and conditions of this EULA Upon termination of this EULA you must cease all use of the Software and destroy all copies full...

Страница 216: ...ON IS INCLUDED WITH THE PRODUCT DISTRIBUTED BY SAMSUNG IS DOWNLOADED OR OTHERWISE OBTAINED USE OF ANY THIRD PARTY APPLICATION IS DONE AT PURCHASER S OWN DISCRETION AND RISK AND PURCHASER IS SOLELY RESPONSIBLE FOR ANY DAMAGE TO YOUR MOBILE DEVICE OR LOSS OF DATA THAT RESULTS FROM THE DOWNLOADING OR USE OF SUCH THIRD PARTY APPLICATIONS SAMSUNG EXPRESSLY DISCLAIMS ANY WARRANTY REGARDING WHETHER PURCH...

Страница 217: ...TAL EXEMPLARY OR CONSEQUENTIAL DAMAGES EVEN IF SAMSUNG HAS BEEN ADVISED OF THE POSSIBILITY OF SUCH DAMAGES SOME JURISDICTIONS DO NOT ALLOW THE EXCLUSION OR LIMITATION OF INCIDENTAL OR CONSEQUENTIAL DAMAGES SO THE ABOVE LIMITATION OR EXCLUSION MAY NOT APPLY TO YOU NOTWITHSTANDING THE FOREGOING SAMSUNG S TOTAL LIABILITY TO PURCHASER FOR ALL LOSSES DAMAGES CAUSES OF ACTION INCLUDING BUT NOT LIMITED T...

Страница 218: ...cordance with the Arbitration Rules of the Korean Commercial Arbitration Board The award of arbitration shall be final and binding upon the parties 14 ENTIRE AGREEMENT SEVERABILITY This EULA is the entire agreement between you and Samsung relating to the Software and supersedes all prior or contemporaneous oral or written communications proposals and representations with respect to the Software or...

Страница 219: ...fo on promotions events and special offers on related products Review Samsung products and share your opinion Great deals on downloads Sign Up Now Customize your Samsung phone experience Activate product warranty Access to a personalized My Samsung Mobile account No monthly fees Scan this code to go directly to the registration page ...

Страница 220: ...id Market 33 169 Android System Recovery 15 Applications Camera 82 Using the Camcorder 86 AT T Code Scanner 154 AT T GPS Navigator 155 AT T Navigator 155 B Back key 21 Backspace key 50 Battery Charging 9 Installing 8 Low Battery Indicator 9 Replacing cover 8 Battery Use Safety 191 Bluetooth Sending contacts 151 C Calculator 32 158 Calendar 158 Call Functions 52 3 Way Calling Multi Party Calling 63...

Страница 221: ...een 194 Do cell phones pose a health hazard 184 E Email 32 105 Composing and sending 106 Emergency Calls 196 Emoticons 49 Enter key 49 Entering Text 42 Changing the Text Entry Mode 46 Emoticon mode 50 Numbers 50 Punctuation marks 50 Symbols 50 Using 123Sym Mode 46 Using Abc Mode 46 Using Swype 43 Using Symbol Numeric Mode 46 Exposure to Radio Frequency RF Signals 184 F Facebook 28 FCC Hearing Aid ...

Страница 222: ...ackspace 50 Enter 49 Function 49 Shift 49 Space 49 Symbol 49 Voice to Text 49 L Landscape 45 Latitude 165 Locking and Unlocking Unlocking the keypad 14 M Maps 167 Market 169 Memo 33 170 Memory Card 39 Memory Card Installation 7 Menu Context sensitive 22 Key 21 Message Options 97 Message Search 101 Messaging Creating and Sending Text Messages 96 Deleting a message 101 Gmail 102 Options 97 Settings ...

Страница 223: ...laces 174 Playlists Creating 79 Power control 28 Powering Off 10 On 10 Program Monitor 28 Q QWERTY Keypad 48 R Rate Places 28 Reducing Exposure Hands Free Kits and Other Accessories 186 Replacing the Battery Cover 8 Responsible Listening 197 Restricting Children s Access to Your Mobile device 202 S Safe Mode 16 Samsung Mobile Products and Recycling 192 SAR Values 189 SD Card 39 Securing your devic...

Страница 224: ...tanding Your Phone 17 Features of Your Phone 17 Front View 18 Rear View 19 Side View 19 USB connections As a mass storage device 152 USB settings As a mass storage device 152 Mass storage device 152 Use wireless networks 123 V Videos Sharing 92 Voice Mail Accessing 13 From Another Phone 13 Setup 13 Voice Recorder 35 176 Voice Search 35 Voice to Text key 49 Volume 122 Volume Key 19 W Wallpaper Gall...

Страница 225: ...220 Wi Fi Turning on or off 113 Y Yahoo finance 28 Yellowpages 181 YouTube 35 179 YPmobile 181 ...

Отзывы: