


178
2. Using a Network-Connected Machine
Wired network setup
4
Printing a network configuration report
You can print
Network Configuration Report
from the machine’s control panel
that will show the current machine’s network settings. This will help you to set
up a network.
•
Accessing menus may differ from model to model (see "Accessing the
menu" on page 33).
•
It may be necessary to press
OK
to navigate to lower-level menus for
some models.
•
The machine has the display screen:
Press the
(
Menu
) button on the
control panel and select
Network
>
Network Configuration
.
•
The machine has the touch screen:
Press
Setup
from the
Main
screen >
Machine Setup
>
Next
>
Reports
>
Network Configuration
.
Using this
Network Configuration Report
, you can find your machine’s MAC
address and IP address.
For example:
•
MAC Address: 00:15:99:41:A2:78
•
IP Address: 169.254.192.192
5
Setting IP address
•
The machine that does not support the network interface, it will not be
able to use this feature (see "Rear view" on page 23).
•
TCP/IPv6 is not supported by this program.
First, you have to set up an IP address for network printing and managements.
In most cases a new IP address will be automatically assigned by a DHCP
(Dynamic Host Configuration Protocol) server located on the network.
IPv4 configuration using SetIP (Windows)
Before using the SetIP program, disable the computer firewall from
Control
Panel
>
Security Center
>
Windows Firewall
.
1
Install this program from the supplied CD-ROM by double-click
Application
>
SetIP
>
Setup.exe
.
2
Follow the instructions in the installation window.
3
Connect your machine to the network with a network cable.
4
Turn on the machine.
5
From the Windows
Start
menu, select
All Programs
>
Samsung
Printers
>
SetIP
>
SetIP
.
Содержание CLX-6260ND
Страница 96: ...Redistributing toner 96 3 Maintenance...
Страница 98: ...Replacing the toner cartridge 98 3 Maintenance CLX 419xN CLX 419xFN CLX 419xFW Series 5 6...
Страница 99: ...Replacing the toner cartridge 99 3 Maintenance CLX 626xND CLX 626xFD CLX 626xFR CLX 626xFW Series...
Страница 101: ...Replacing the waste toner container 101 3 Maintenance 1 2 1 2 1 2...
Страница 105: ...Installing accessories 105 3 Maintenance 1 2 1 2...
Страница 110: ...Cleaning the machine 110 3 Maintenance...
Страница 123: ...Clearing paper jams 123 4 Troubleshooting 6 In optional tray CLX 626xND CLX 626xFD CLX 626xFR CLX 626xFW Series only...
Страница 124: ...Clearing paper jams 124 4 Troubleshooting If you do not see the paper in this area stop and go to next step...
Страница 126: ...Clearing paper jams 126 4 Troubleshooting CLX 626xND CLX 626xFD CLX 626xFR CLX 626xFW Series...
Страница 127: ...Clearing paper jams 127 4 Troubleshooting If you do not see the paper in this area stop and go to next step 1 2 3...
Страница 130: ...Clearing paper jams 130 4 Troubleshooting If you do not see the paper in this area stop and go to next step...
Страница 132: ...Clearing paper jams 132 4 Troubleshooting If you do not see the paper in this area stop and go to next step...
Страница 155: ...Specifications 155 5 Appendix Free HDD space Up to 100 MB Items Requirements...
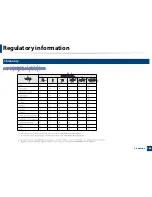
Страница 168: ...Regulatory information 168 5 Appendix 26 China only...


