background image


Operating manual 


Rear disc mowers with central suspension 

- with hydro-pneumatic or spring suspension 


- 4 9 -  


11.


WARRANTY CONDITIONS 

11.1.


Warranty claims procedures 

1.


The  manufacturer  guarantees  the  quality  and  proper  function  of  the  mower  covered  by  this 
warranty. 


2.


Faults  or  malfunctions  of  the  mower  which  become  apparent  within  a  24  month  period  of 
the date of purchase will be corrected free of charge at the buyer's residence. 


3.


Any  faults  or  malfunctions  should  be  reported  in  person,  by  letter  or  phone.  Repairs  will  be 
performed  within  14  days.  Warranty  repairs  are  done  by  the  manufacturer  or  at  authorized 
service points. 


4.


Claims  for  product  replacement  or  returns  are  accepted  and  processed  by  the  manufacturer 
within 14 days. 


5.


Following conditions do not qualify for warranty repair: 
a)


natural  wear  of  parts  such  as:  cutting  plates,  sliding  skids,  sidle  bushings  Pcw, 
intersecting  axis  gears  and  parts  inside  the  gearboxes,  bushings  and  sliding  elements, 
joints,  knife  holder,  cutting  knives,  V-belts,  sprockets,  conditioner’s  tines  and  rollers, 
roller  conditioner’s  rubbers,  bearings,  rubber  -  metal  fenders,  safety  curtains,  tyres, 
conveyor’s belts, swath guides rubbers, connective elements, etc.  
Such repairs can be performed at the cost of the buyer. 

b)


operating the mower not according to the operating manual or its intended use, 

c)


operating the mower on stony fields and any resulting conditions, 

d)


running into an obstacle, 

e)


lowering the cutterbar to the ground too fast, 

f)


random events or others for which the guarantor is not responsible. 


6.


The  buyer  will  be  charged  a  service  fee  if  the  manufacturer  assesses  that  the  product  being 
claimed under warranty has no faults or malfunctions confirmed by independent expert. 


7.


Guarantor has the right to void the product's warranty in the event of: 
a)


interference with internal parts of the mower, changing its construction or unintended 

damages, bending of mower elements, etc., 

b)


operating the mower with just one blade on the cutting disc, 

c)


extensive  damage  to  the  mower  caused  by  random  event,  running  into  an  obstacle  or 

other for which the guarantor is not responsible, 

d)


missing required signatures or an attempt to forge them on the warranty card, 

e)


operating the mower not according with its intended use or operating manual. 


8.


Executor can cancel a service contract immediately in the event when the User does not fulfill 
payment requirements of this contract on time, and the delays of payment exceed 30 days from 
required  payment  date.  Canceling  of  the  Service  Contract  by  the  executor  resulting  from  the 
fault of the User automatically causes voiding of the product warranty. 


9.


The  executor  bears  no  financial  responsibility  to  the  User  for  losses  caused  by  machine 
malfunction or breakdown. 


ATTENTION: 

During  your  purchase  please  make  sure  that  the  seller  carefully  fills  out 
the warranty  card  including  the  place  and  date  of  purchase  and  the  seal  and 
signature of the seller. Missing information can cause loss of warranty. 

Содержание KT 260

Страница 1: ...UAL REAR DISC MOWER WITH CENTRAL SUSPENSION Standard On special order KT 261 H 2 6 m Wide swath KT 260 H 2 6 m Narrow swath KT 301 H 3 0 m KT 300 H 3 0 m KT 341 H 3 4 m KT 340 H 3 4 m KT 261 S H 2 6 m...

Страница 2: ...ORE THE CUTTING DISCS COME TO A COMPLETE STOP IT IS FORBIDDEN TO OPERATE THE MOWER IF THERE ARE PEOPLE PRESENT WITHIN 50 M OF THE MOWER Tilting the mower in the direction of travel by app 0 5 is recom...

Страница 3: ...ation 29 5 5 2 Mower positioning during directional changes 30 5 5 3 Mower clogging 30 5 6 Preparing the mower for transport 30 5 7 Preparing the mower for transport on public roads 32 5 8 Changing th...

Страница 4: ...When the mower is turned over to a different user it should be in working condition and accompanied by this instruction manual and all other basic equipment it should posses Before operating this mowe...

Страница 5: ...with the crop scarifier rollers is equipped with the Perfect Cut cutterbar or the optional Heavy Duty cutterbar The rear mounted disc mower with crop scarifier rollers is intended to mow green fodder...

Страница 6: ...eter from 1 m distance from the machine in motion in final test area 4 The technical specifications of the groups mentioned above are presented below Tab 2a Technical data Rear disk mower with support...

Страница 7: ...th 950 kg 1040 kg 1110 kg Articulated telescopic shaft with unidirectional clutch 540 Nm Line cutting speed 8 2 m s Disc rotational speed 3078 rpm Tab 3b Technical data Rear disk mower with hydro pneu...

Страница 8: ...rating width 540 Nm Articulated telescopic shaft with unidirectional clutch 86 2 m s Line cutting speed 3078 rpm minimum weight of the tractor 5 t Tab 4b Technical data Rear disk mower with hydro pneu...

Страница 9: ...kg Operating width 540 Nm Articulated telescopic shaft with unidirectional clutch 86 2 m s Line cutting speed 3078 rpm minimum weight of the tractor 5 t Tab 5b Technical data Rear disk mower with hydr...

Страница 10: ...shaft the miter gear 3 to the drive shaft 7 which through the miter gear 8 powers the cutterbar 4 On the cutterbar 4 there are discs with two cutting blades each Hydraulic lifting cylinder 2 fed from...

Страница 11: ...the drive shaft 7 which through the miter gear 8 powers the cutterbar 4 On the cutterbar 4 there are discs with two cutting blades each The hydraulic lifting actuator 2 powered by the external hydraul...

Страница 12: ...ive from the tractor rpm is transmitted onto crop scarifier 3 through intersecting axis gear 9 PTO shaft 7 intersecting axis gear 9 and chain drive 13 On the cutterbar 4 there are discs with two cutti...

Страница 13: ...om the PTO of the tractor is transferred through the miter gear 7 the drive shaft 9 miter gear 8 and the chain drive 13 to the crop scarifier 3 On the cutterbar 4 there are discs with two cutting blad...

Страница 14: ...he tractor is transferred through the miter gear 7 the drive shaft 9 miter gear 8 and the chain drive 13 to the crop rollers 3 On the cutterbar 4 there are discs with two cutting blades each The hydra...

Страница 15: ...dro pneumatic suspension fed from the tractor external hydraulics and hydraulic accumulators 3 are used to adjust the mower to working position 3 point linkage frame onto which cutterbar is set featur...

Страница 16: ...installed 540 rpm 74 810 1117 520 7G5T081FX007007PTA Bondioli Pavesi Shaft installed 1000 rpm Tab 6 Articulated telescoping shaft to connect the mower to the tractor Mower Power Length Moment Symbol...

Страница 17: ...only be started after the power take off reaches a nominal speed of 1000 rpm The power take off cannot exceed speeds of 1050 rpm There should be a safe distance between the mower and people a minimum...

Страница 18: ...en the tractor and the mower before the equipment has been secured through the engagement of the parking brake of the tractor All inspections of the condition of the mower and any adjustments should b...

Страница 19: ...ment and parts must be secured during transport The following rules should be observed when placing a mower onto a transport vehicle the mower can be lifted only in places designated for this purpose...

Страница 20: ...h sharp edges During all repairs and maintenance always wear protective gloves 3 The dangers of spurting hydraulic oil During hydraulic hose connection and disconnection to and from the tractor make c...

Страница 21: ...ofessional risk resulting from exposure to noise is not possible through use of mass safety device or work organization the employer farmer 1 makes available personal hearing safety devices if the lev...

Страница 22: ...13 N 49 Do not get too close to the hoist of the tractor during operation of the hoist 14 N 50 N 51 Do not get under the mower 15 N 52 Use protective gloves 16 N 117 Avoid fluid escaping under pressur...

Страница 23: ...sc mowers with central suspension with hydro pneumatic or spring suspension 2 1 21 N 35 Cutterbar Perfect Cut 20 N 31 22 N 35 Cutterbar Heavy Duty 23 N 53 24 N 55 25 N 63 26 N 74 27 N 71 28 N 75 29 N...

Страница 24: ...o pneumatic or spring suspension 2 2 Labels for hydraulic hoses 1 Lifting the mower backwards 2 Unfolding the mower to the side 3 Folding and unfolding of the mower into transport or operating positio...

Страница 25: ...ual Rear disc mowers with central suspension with hydro pneumatic or spring suspension 2 3 Fig 6b Locations of warning signs mowers with wide conditioner Fig 6c Locations of warning signs mowers with...

Страница 26: ...g onto low obstacles If an obstacle is encountered the cutting assembly tilts backwards by about 30 while simultaneously lifting to a height of maximum 70 cm After the obstacle is cleared the assembly...

Страница 27: ...gs With hydro pneumatic support Mower s type KT 260 KT 300 KT 340 KT 260 H KT 300 H KT 340 H Tractor power 70 KM 80 KM 90 KM 70 KM 80 KM 90 KM Tractor class 2 0 2 0 2 0 2 0 2 0 2 0 Standard Wide condi...

Страница 28: ...Fig 9 The mower connected to the tractor 5 2 Connecting the articulated telescopic shaft ATS The shaft should be connected with the unidirectional clutch side toward the mower The cover should be secu...

Страница 29: ...ractor s hydraulics charging of hydro accumulators Increasing pressure lower impact on the ground Reducing pressure bigger impact on the ground Support pressure value on manometers F shall be adjusted...

Страница 30: ...end onto the PTO of the tractor if one end was disconnected or connect both ends of the shaft make sure that the space where the mower will be opened is unobstructed and free of people the line enoug...

Страница 31: ...Basic mowing information Optimum operating parameters A forward tilt of 0 5 degrees means approximately 4 5 7 cm of mowing height operating V 10 km hr Power take off revolutions 950 1000 rpm Revolutio...

Страница 32: ...nditions on field which may influence the mower clogging such as terrain unevenness height and density of grass as well as other objects in the grass In order to avoid clogging mowing speed should be...

Страница 33: ...3b Rest positon Fig 13c Transport position using the rotational actuator tilt the main frame backwards ATTENTION During longer periods of disuse rest periods system pressure should be reduced to zero...

Страница 34: ...light and direction of travel as well as a red reflector oriented to the rear and a white reflector oriented to the front WARNING Transporting the mower in the transport position shown in the above p...

Страница 35: ...lead to serious injuries or even death For any service and repair works of the shaft and the mower the tractor engine and its drive must be disconnected while ignition key off Prior to the operation c...

Страница 36: ...ower in relation to the tractor 6 ASSEMBLY AND SETTINGS 6 1 Installing the cutting blades The cutting blades should be installed The blades should be installed according to the schematic shown in Fig...

Страница 37: ...the disc discs is operating with only one blade Long term mowing in this state will result in permanent damage to the cutterbar This is not covered by the warranty Take breaks while mowing and check...

Страница 38: ...arm 7 shield In order to set swath width adjustment of swath guides 1 should be performed Fig 20 for KT 261 S H KT 301 S H KT 260 S H and KT 300 S H loosen eye screw 2 of the swath guide set the swath...

Страница 39: ...t swath width adjustment of swath guides 1 should be performed Fig 21 for KT 260 W H and KT 300 W H loosen eye screw 2 of the swath guide set the swath guide 1 as needed tighten screw 2 Fig 21 Adjustm...

Страница 40: ...ring suspension 3 8 KT 301 i KT 301 H wide swath KT 300 i KT 300 H narrow swath KT 341 i KT 341 H wide swath KT 340 i KT 340 H narrow swath Fig 22 The operator can set the width of the windfall by rep...

Страница 41: ...wing height The desired mowing height is obtained through changing the length of the upper regulated tie S Fig 9 of the suspension Extending the tie increases and shortening it decreases mowing height...

Страница 42: ...rifier guard is shown on Fig 25 Fig 25a Adjustment of the scarifier guard for mowers KT 260 S H KT 300 S H Fig 25b Adjustment of conditioner plate for mowers KT 261 S H KT 301 S H 6 7 Replacement of t...

Страница 43: ...KT 260 W H KT 300 W H The factory setting of the pressure between rollers should be adequate If it appeared that it is too loose or too tight it can be corrected through changing the tautness of the s...

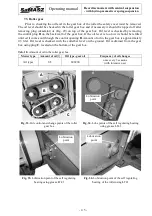
Страница 44: ...e especially between the cutterbar and discs because dried mud with grass can cause premature wearing out of the bearings in the disc assembly or block proper rotation of the assembly clean any remain...

Страница 45: ...immediately change the oil as it could cause corrosion of internal mechanisms such as gear wheels bearings or shafts and in effect be the cause of breakdowns periodically inspect the mower and lubric...

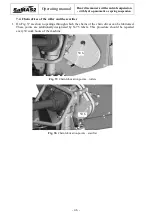
Страница 46: ...out through the control opening B The amount of oil in the gear box is approximately 1 liter Oil level is checked with the cutterbar level on the ground Fig 32 Amount of oil in the miter gears Tab 9...

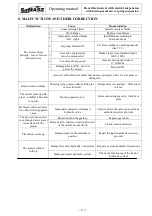
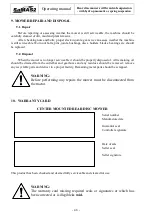
Страница 47: ...the control opening B Amount of oil in the gear box is approximately 0 5 liter Oil level is checked with the cutterbar level on the ground Oil is drained from the gear box using plug C located on the...

Страница 48: ...er and the scarifier 1 On Fig 37 are shown openings through which the chains of the chain drives can be lubricated These points are additionally designated by N 75 labels This procedure should be repe...

Страница 49: ...during rain Grass winds on drums Mowing lying grasses without tilting the mower forward Always mow low and fast tilt forward to 4 cm The mower jams up with grass windfall is blocked or uneven Mowing...

Страница 50: ...mower is no longer serviceable it should be properly disposed of All remaining oil should be drained from the cutterbar and gearboxes and any residues should be removed remove any recyclable parts and...

Страница 51: ...tions d running into an obstacle e lowering the cutterbar to the ground too fast f random events or others for which the guarantor is not responsible 6 The buyer will be charged a service fee if the m...

Страница 52: ...e distributor ATTENTION The SaMASZ Company is continually working on improvement and development of all types and models of mowers For this reason the form accessories and technology of delivered prod...

Отзывы: