background image

WLAN SIP IP Phone


SWSIP-1000 User Manual


                                                     www.safecom.cn                                                       

50


                           Copyright © 2006 Safecom Technologies Limited


LABEL


DESCRIPTION 


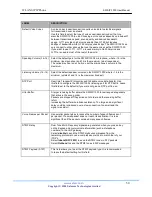
Default Voice Codec


A voice codec (coder/decoder) converts voice data to electrical signals 
for transmission over a network. 
Use this field to select the type of voice coder/decoder (codec) that you 
want the SWSIP-1000 to use. Choosing a voice codec depends on a tradeoff 
between transmission speed, sound quality and desired bandwidth 
usage. G.711 provides higher voice quality than G.729 but requires 
64kbps of bandwidth while G.729 only requires 8kbps. The SWSIP-1000 can 
only connect to other phones that use the same codec as the SWSIP-1000. 
If you want to use G.711, G.711u is used mainly in North America and 
G.711a is used in most of the rest of the world.


Speaking Volume(-14~14)


Select the default gain for the SWSIP-1000’s microphone, where –14 is the 
minimum (least sensitive) and 14 is the maximum (most responsive). 
The callee may hear an echo if you set the microphone’s volume to the 
maximum.


Listening Volume(-14~14)


Select the default speaker volume on the SWSIP-1000, where –14 is the 
minimum (quietest) and 14 is the maximum (loudest).


RTP Port


Real time Transport Protocol is used to handle voice data transfer. Use 
this field to configure the SWSIP-1000’s listening port for RTP traffic. Leave 
this field set to the defaults if you were not given a RTP port to use.


Jitter Buffer


A larger receiving buffer allows the SWSIP-1000 to rearrange data packets 
that arrive in the wrong order. 
Packets are dropped if they arrive out of order and the receiving buffer 
is full. 
Increasing the buffer size introduces latency. Too large and a significant 
delay could be introduced over a slow connection, too small and the 
signal may distort.


Voice Frames per Packet


Use smaller packet sizes to reduce the number of speech frames sent 
per packet. If a small packet does not reach its destination it is  less 
significant than if the packet contained many speech frames.


DTMF Relay


Dual Tone Multi-Frequency signals are generated when you press a key 
on the Keypad and communicate information (such as telephone 
numbers) to the VoIP gateway. 
Select 

disable 

to send the DTMF digits uncompressed from the 

remaining protocols to use a compression method to match that of your 
ITSP’s. 
Select 

Inband(RFC 2833) 

to send the DTMF tones in RTP packets. 

Select 

Outband 

to send the DTMF tones in SIP messages.


DTMF Payload (0-127)


This field allows you to set the DTMF payload type. It is recommended 
to leave the default setting for this field.


Содержание SWSIP-1000

Страница 1: ...pyright 2006 Safecom Technologies Limited SWSIP 1000 User Manual SIP 3000 WiFi SIP IP Phone All brand and product names mentioned in this manual are trademarks and or registered trademarks of their re...

Страница 2: ...2 8 Getting to Know the SWSIP 1000 Hardware 8 3 LCD Main Screen 3 1 Navigating the LCD Screen Menus 11 3 2 Text Input 11 3 3 Erasing the Character 11 3 4 Configuring Network Environment 12 3 4 1 Netwo...

Страница 3: ...3 Adjusting the Ring Volume 35 3 9 4 Setting the Time 35 3 9 5 Setting the Date 36 3 9 6 Setting the Banner 36 3 9 7 Setting the Key Lock 37 3 9 8 Don t Disturb 37 4 Web Configuration 4 1 Login 38 4...

Страница 4: ...www safecom cn Copyright 2006 Safecom Technologies Limited 6 Display Messages a Error Messages 53 b Warning Messages 54...

Страница 5: ...ser customization based on changing needs Wireless SIP IP Phone SWSIP 1000 is an advanced wireless IEEE 802 11b IP phone that allows users to achieve perfect voice communication over an IEEE 802 11b w...

Страница 6: ...on type is an IP cellular or landline based service Your SWSIP 1000 can call any landline or mobile telephone that a traditional PSTN telephone can connect to as well the IP telephone network Calls re...

Страница 7: ...ntercom Ad hoc mode does not require an AP or a wired network Two or more wireless clients communicate directly with each other There is no intermediate SIP proxy server Use the phone book to directly...

Страница 8: ...rative mode Before using SWSIP 1000 some setup processes are required to make the phone work properly You should at least setup the IP address of SWSIP 1000 and router when DHCP is disabled When DHCP...

Страница 9: ...down on the silver button and slide the battery cover with your other hand as shown Insert battery as shown Insert the bottom of the battery first and push the top of the battery into the phone Place...

Страница 10: ...ss and hold the key for about 2 seconds to load the default IP address SWSIP 1000 will reset to the default IP address 192 168 0 6 Figure 2 2 Load default IP 2 5 Enter Administrative Mode 1 Turn of th...

Страница 11: ...in Figure 2 4 Figure 2 4 Keypad Locked 2 To release press and hold the key for approximately 2 seconds and the message will appear prompting you to confirm the procedure like Figure 2 5 Figure 2 5 Ke...

Страница 12: ...ited 2 7 Adjusting the Speaker Volume During conversation press the key to increase the volume To decrease the volume during conversation press the key See Figure 2 7 Figure 2 7 Adjusting the Speaker...

Страница 13: ...the cursor Use the left arrow key to clear text in an editable field 5 OK Key Use this key to select menu options from the LCD screen 6 Call Key Use the Call key to make and receive calls 7 Power End...

Страница 14: ...t charge SWSIP 1000 This field is a banner that you can configure Not Registered This the SWSIP 1000 s current connection status Not registered displays when the SWSIP 1000 can access the wireless net...

Страница 15: ...Input When you need to enter text or numbers in a screen use the Off key or the left arrow to clear the default text or backspace The bottom center of the screen shows the keypad mode Aa1 with the A m...

Страница 16: ...ack IP Address 192 168 0 6 Ok Aa1 Back Subnet Mask 255 255 0 0 Ok Aa1 Back Select Gateway 172 16 0 1 Ok Aa1 Back Select Back Back Back 4 Net Setting 5 SIP Setting 6 Settings Select Back Back 1 Fixed I...

Страница 17: ...t Protocol over Ethernet PPPoE provides more than just IP address assignment which is the primary purpose of DHCP assigning a unique and available IP address based upon a unique network adapter addres...

Страница 18: ...ed IP 2 DHCP Select Back 3 PPPoE Pwd 1 Network Mode 2 PPPoE Name Select Back 2 PPPoE Name 3 PPPoE Pwd 1 Network Mode Select Back Input the name Input the password Back Back 3 PPPoE 1 Fix IP 2 DHCP Sel...

Страница 19: ...gth The higher the number the better the signal A W next to an AP s name means that the AP uses WEP encryption Select an AP to use 3 5 1 2 SSID Service Set ID The SSID identifies the Service Set with...

Страница 20: ...an access point AP An Infrastructure network is that which allows wireless clients to connect to the wired network Do the following to select the network mode that the SWSIP 1000 is to use 1 Select W...

Страница 21: ...the up or down arrow to highlight it and then press the Left key 7 Wireless 2 Select Channel 3 The SWSIP 1000 displays the channel that it is currently using 3 5 4 Rate Do the following to set the tra...

Страница 22: ...ess the Left key Wireless 2 Use the up or down arrow and the Left key to select 3 Select the same length of WEP keys as the AP 64 bit or 128 bit 1 None 4 Select a WEP key to configure 5 Select a keypa...

Страница 23: ...on Many networks use an open system where you would only use WEP for encryption not for authentication 1 Select Wireless in the first menu screen use the up or down arrow to highlight it and then pres...

Страница 24: ...ft key 7 Wireless 2 Use the up or down arrow and the Left key to select Profiles 3 Select Create to make a new profile Select Activate to use an existing profile Select Remove to delete a profile 4 Wh...

Страница 25: ...om your SIP ISP Account 84424833 Password secret Domain server voiptalk org Proxy Server nat voiptalk org 5065 Outbound Proxy Server nat voiptalk org 5065 3 6 1 Registrar IP Settings 12 00 SWSIP 1000...

Страница 26: ...n view them here Note Different SIP servers supports different ports here we use port 5065 which is provided by voiptalk org Back Select 12 00 SWSIP 1000 Not Registered Menu Names Menu 5 SIP Setting 6...

Страница 27: ...vider s SIP server Back Select 12 00 SWSIP 1000 Not Registered Menu Names Menu 5 SIP Setting 6 Settings 7 Wireless Select Back Proxy IP nat voiptalk org Ok Aa1 Back Select Ok Select Port 5065 Ok Aa1 B...

Страница 28: ...SWSIP 1000 Not Registered Menu Names Menu 5 SIP Setting 6 Settings 7 Wireless Select Back Input the number Input the name Input the password Phone Number 84424833 Ok Aa1 Back Select Ok Select Back Use...

Страница 29: ...Menu Names Menu Select Back Display Name David Ok Aa1 3 Phonebook 4 Net Setting 5 SIP Setting Select Back 1 Search 2 Add Entry 3 Erase Select Back Select Back David Mark Ken Select Back 1 Edit 2 Eras...

Страница 30: ...d Entry 3 Erase Select Back Back 12 00 SWSIP 1000 Not Registered Menu Names Menu Select Back Select 3 Phonebook 4 Net Setting 5 SIP Setting Select Back 1 Search 2 Add Entry 3 Erase Select Back Select...

Страница 31: ...P 1000 Not Registered Menu Names Display Name David Ok Aa1 Back User Info 123456 Ok Aa1 Back 3 Phonebook 4 Net Setting 5 SIP Setting Select Back 2 Add Entry 3 Erase 1 Search Select Back Host IP 123 12...

Страница 32: ...g entry from your Phonebook 1 One By One 2 Erase All Select Back Back Are you sure Ok Back Select 1 One By One 2 Erase All Select Back Ok 3 Erase 1 Search 2 Add Entry Select Back Select 12 00 SWSIP 10...

Страница 33: ...ns how to erase all entries from your Phonebook Are you sure Ok Back Ok Are you sure OK Back OK 2 Erase All 1 One By One Select Back Back 2 Erase All 1 One By One Select Back 3 Erase 1 Search 2 Add En...

Страница 34: ...2 Call History 3 Phonebook 4 Net Setting Select Back 1 Missed Call 2 Received Call 3 Dialed Call Select Back Select Back David Select Back Select Back Select Back 2 Edit Missed 3 Erase Miss 1 Time of...

Страница 35: ...led Call 4 Erase Call Select Back Select Back David Select Back Select Back Select Back 2 Edit Receive 3 Erase Receive 1 Time of Call Select Back Time of Call 20 03 10 20 Ok Back User Info 808 Ok Aa1...

Страница 36: ...g Select Back 3 Dialed Call 4 Erase Call 1 Missed Call Select Back Select Back David Select Back Select Back Select Back 2 Edit Dialed 3 Erase Dial 1 Time of Call Select Back Time of Call 20 03 10 20...

Страница 37: ...Select Back 3 Erase Receive 4 Erase Dial 1 Erase All Select Back Select Back Are you sure Ok Back OK Are you sure Ok Back OK Are you sure Ok Back OK Select Select Select 1 Erase All 2 Erase Miss 3 Er...

Страница 38: ...WSIP 1000 s vibration mode on or off 12 00 SWSIP 1000 Not Registered Menu Names Menu Select Back 6 Settings 7 Wireless 8 Restart Select Back 1 Melody 2 Vibrator 3 Ring Volume Select Back Default Melod...

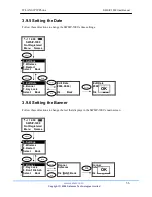
Страница 39: ...IP 1000 s time settings 12 00 SWSIP 1000 Not Registered Menu Names Menu Select Back 6 Settings 7 Wireless 8 Restart Select Back 3 Ring Volume 4 Edit Time 5 Edit Date Select Back Select Back Select Rin...

Страница 40: ...e SWSIP 1000 s main screen 12 00 SWSIP 1000 Not Registered Menu Names Menu Select Back 6 Settings 7 Wireless 8 Restart Select Back 6 Banner 7 Key Lock 8 Don t Disturb Select Back Select Back Ok Banner...

Страница 41: ...t disturb function to not receive any incoming calls Anyone calling the SWSIP 1000 gets a busy signal when you enable the don t disturb function Follow these directions to enable or disable the don t...

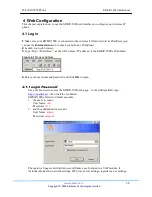
Страница 42: ...IP address as the URL where IP address is the SWSIP 1000 s IP address Figure 4 1 Browser Address 4 Enter your user name and password and click OK to login 4 1 1 Login Password Use your browser to acc...

Страница 43: ...ttings 4 2 Device Information Use this screen to view read only information about your SWSIP 1000 Figure 4 2 Device Information LABEL DESCRIPTION Software Version This is the firmware version that the...

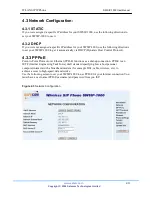
Страница 44: ...t your SWSIP 1000 to get it automatically via DHCP Dynamic Host Control Protocol 4 3 3 PPPoE Point to Point Protocol over Ethernet PPPoE functions as a dial up connection PPPoE is an IETF Internet Eng...

Страница 45: ...by your network administrator Default Gateway Type the gateway IP address of the device to which you want to connect your SWSIP 1000 MAC Address Every Ethernet device has a unique MAC Media Access Con...

Страница 46: ...ou can obtain the User name and Password from the VOIP ISP We have tested the SWSIP 1000 SIP Phone with many of the VoIP ISP s here is an example of voiptalk org you can obtained your User name and Pa...

Страница 47: ...red OPTIONS Interval Timer The OPTIONS Interval Timer periodically sends a signal to the SIP Proxy Server to maintain the connection Type a time in minutes to send a KeepAlive signal to the SIP Proxy...

Страница 48: ...ersal Configuration Click NAT Traversal to open the following screen where you can configure your SWSIP 1000 to operate through a NAT router that is not SIP friendly The following screen displays the...

Страница 49: ...splays the IP address or domain name of your outbound proxy server Outbound Proxy Server Port This field displays the port number to access proxy services STUN Server IP Type the IP address or domain...

Страница 50: ...ount to have the SIP server make the connection You do not have to configure the host IP address and port Select P2P to make calls directly to the callee s VoIP phone IP to IP or peer to peer or using...

Страница 51: ...ew entry into the SWSIP 1000 s phone book 4 7 Wireless Introduction A wireless LAN can be as simple as two wireless devices communicating in a peer to peer network or as complex as a number of wireles...

Страница 52: ...devices Channels available depend on the AP you are connected to The channel is determined automatically using the site survey feature Rate The closer you are to an AP the stronger the signal and the...

Страница 53: ...fault key as Key 1 APPLY Click APPLY to save your changes without restarting the SWSIP 1000 Your wireless LAN Internet and SIP settings changes do not take affect until you use RESTART in the navigati...

Страница 54: ...Real time Transport Protocol is used to handle voice data transfer Use this field to configure the SWSIP 1000 s listening port for RTP traffic Leave this field set to the defaults if you were not give...

Страница 55: ...second byte in an IPv4 packet is the Type of Service ToS byte The first three bits by themselves of the ToS byte are referred to as the IP Precedence bits and refer to a priority from 0 to 7 The next...

Страница 56: ...y using the numerical keys 2 If you have entered an incorrect number press the key to delete it 3 Press the key to connect your call b Redialing a Phone Number 1 In idle state press the key The list o...

Страница 57: ...Service Set Identifiers SSIDs of the AP in the network Error 2 Net Fail DHCP The phone failed to obtain the IP address from the DHCP server or failed to authenticate due to a Wep Key error Error 3 Net...

Страница 58: ...arger and turn off the power Keep the phone in the charger for approximately 30 seconds Then remove it from the charger briefly for approximately 2 seconds Place the phone back in the charger and it w...

Отзывы: