background image

12

www.philips.com/support

Instructions
Istruzioni

MEMO

ME

STOP

OK

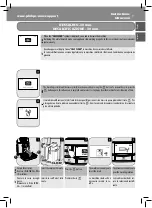
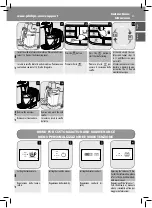
FIRST ESPRESSO - PRIMO ESPRESSO

MY ESPRESSO - IL MIO ESPRESSO

EN

Adjust the dispensing spout. Press the 

 button to 

brew an espresso, or...

...press the 

 button to 

brew a coff ee.

At the end of the process, re-
move the cup.

IT

Regolare l’erogatore.

Premere il tasto 

 per 

erogare un espresso o...

...premere il tasto 

 per 

erogare un caff è.

Al termine del processo, ri-
muovere la tazzina.

EN

Select the desired aroma by 
pressing the 

 button.

Press and hold the 

 but-

ton for more than 3 seconds.

The machine is in program-
ming mode.

Wait until the desired quan-
tity is reached...

... press 

 to stop the pro-

cess. Stored!

IT

Selezionare l’aroma deside-
rato premendo il tasto 

.

Tenere premuto il tasto 

 per più di 3 secondi.

La macchina è in fase di pro-
grammazione.

Attendere fi no al raggiun-
gimento della quantità de-
siderata...

.... premere 

 per inter-

rompere il processo.
Memorizzato!

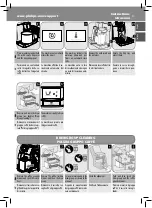
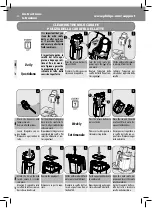
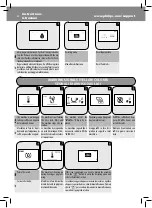
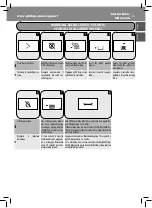
ADJUSTING THE CERAMIC COFFEE GRINDER
REGOLAZIONE MACINACAFFÈ IN CERAMICA

EN

Press and turn the grinder 
adjustment knob one notch 
at a time. 

Select ( ). Lighter taste, for 
dark roasted coff ee blends.

Select ( ). Bolder taste, for 
light roasted coff ee blends.

Brew 2-3 products to taste 
the diff erence. If the coff ee 
is watery, adjust the coff ee 
grinder again.

IT

Premere e ruotare di uno 
scatto alla volta la mano-
pola di regolazione della 
macinatura. 

Selezionare ( ). Gusto più 
leggero, per miscele con to-
statura scura.

Selezionare ( ). Gusto più 
forte, per miscele con tosta-
tura chiara.

Erogare 2-3 prodotti per 
gustare la diff erenza. Se il 
caff è è acquoso, regolare 
nuovamente il macinacaff è.

The grinder adjustment 
knob inside the coff ee 
bean hopper MUST be 
turned only when the 
ceramic coff ee grinder is 
working. 

La manopola di regola-
zione della macinatura, 
posta all’interno del con-
tenitore caff è in grani, 
DEVE essere ruotata solo 
quando il macinacaff è in 
ceramica è in funzione. 

1

2

Содержание Intelia HD8753

Страница 1: ... Type HD8753 INSTRUCTIONS READ THESE INSTRUCTIONS CAREFULLY BEFORE USING THE MACHINE CHECK ON WWW PHILIPS COM SUPPORT TO DOWNLOAD THE LATEST USER MANUAL DTP number B001 by Philips Saeco ESPRESSO CAPPUCCINO PERFETTO English Italiano Deutsch Français Español Português ...

Страница 2: ...ructionscomplètes téléchargerlemoded emploidepuislesiteWWW PHILIPS COM SUPPORT DE HerzlichWillkommen in derWelt von Philips Saeco Registrieren Sie sich auf der InternetseiteWWW PHILIPS COM WELCOME und erhalten Sie Hinweise und Aktualisierungen zur Wartung In diesem HeftwerdendieHinweisefürdenkorrektenBetriebdesGerätsinKurzformdargestellt DiekompletteBedienungsanleitungkönnenSieaufWWW PHILIPS COM S...

Страница 3: ...configuraciones específicas de su nueva máquina consulte la página www philips com saeco PT Parabéns por ter escolhido o expresso e o cappuccino perfeitos Esta máquina de café será o seu barista pessoal a sua porta de acesso para um mundo de autênticas especialidades de cafés italianos preparados de forma profissional Prepare os seus sentidos para saborear todo o prazer do expresso e do cappuccino...

Страница 4: ...PRESSO 12 MYESPRESSO 12 ADJUSTINGTHECERAMICCOFFEEGRINDER 12 FIRSTCAPPUCCINO 13 MYCAPPUCCINO 14 FIRSTHOTMILK 14 MYHOTMILK 15 HOTWATER 16 DESCALING 17 BREWGROUPCLEANING 19 CLEANINGTHEMILKCARAFE 20 MENUFORCUSTOMIZATIONANDMAINTENANCE 23 WARNINGSIGNALS YELLOWCOLOUR 24 WARNINGSIGNALS REDCOLOUR 25 MAINTENANCEPRODUCTS 66 DE INHALT SICHERHEITSHINWEISE 26 ERSTEINBETRIEBNAHME 30 MANUELLERSPÜLZYKLUS 31 ERSTER...

Страница 5: ...1 PRIMEIROEXPRESSO 52 OMEUEXPRESSO 52 AJUSTEDOMOINHODECAFÉDECERÂMICA 52 PRIMEIROCAPPUCCINO 53 OMEUCAPPUCCINO 54 PRIMEIROLEITEQUENTE 54 OMEULEITEQUENTE 55 ÁGUAQUENTE 56 DESCALCIFICAÇÃO 57 LIMPEZADOGRUPOCAFÉ 59 LIMPEZADAJARRADELEITE 60 MENUDEPERSONALIZAÇÃOEMANUTENÇÃO 63 SINAISDEAVISO AMARELO 64 SINAISDEALARME VERMELHO 65 PRODUTOSPARAAMANUTENÇÃO 67 ES ÍNDICE NORMASDESEGURIDAD 46 PRIMERAINSTALACIÓN 50...

Страница 6: ...ger than 8 years old Themachinecanbeusedbychildrenof8ye arsandupwardsiftheyhavepreviouslybeen instructed on the correct use of the machine andmadeawareoftheassociateddangersor iftheyaresupervisedbyanadult Cleaning and maintenance should not be carried out by children unless they are more than8yearsoldandsupervisedbyanadult Keep the machine and its power cord out of reach of children under 8 years ...

Страница 7: ...public waste disposal faci lity In compliance with art 13 of the Italian Le gislative Decree dated 25 July 2005 no 151 Implementation of the directives 2005 95 EC 2002 96 EC and 2003 108 EC on the restriction of the use of certain hazardous substances in electrical and electronic equipment as well as waste disposal This product complies with EU Directive 2002 96 EC The symbol on the product or on ...

Страница 8: ...no essere eseguite da un centro assistenza autorizzato da Philips per evitare qualsiasi pericolo Lamacchinanonèdestinataall usodaparte di bambini con età inferiore a 8 anni Lamacchinapuòessereutilizzatadabambini di 8 anni di età e superiore se precedente menteistruitiriguardoadunutilizzocorretto dellamacchinaecoscientideirelativipericoli osottolasupervisionediunadulto Pulizia e manutenzione non de...

Страница 9: ... materiali d imballaggio possono essere ri ciclati Apparecchio staccare la spina dalla presa e tagliare il cavo di alimentazione Consegnare l apparecchio e il cavo di ali mentazione a un centro assistenza o a una struttura pubblica per lo smaltimento dei rifiuti Ai sensi dell art 13 del Decreto Legislativo 25 luglio 2005 n 151 Attuazione delle Direttive 2005 95 CE 2002 96 CE e 2003 108 CE relati v...

Страница 10: ...button to primethecircuit IT Inserire la spina nella presa Portare l interruttore su I Premere il tasto per accen dere Posizionare un contenitore sotto l erogatore acqua cal da e sotto l erogatore caffè Premere il tasto per caricare il circuito EN Check that the water dispensing spout is correctly installed Press withintensecondstoconfirm Themachineprimes thecircuit The machine is in warm up phase...

Страница 11: ...e Ripetereleoperazionidalpunto1alpunto4perduevolte quindi passare al punto 5 EN Pressthe button Placealargecontainer 1 5 l under the water dis pensingspout Press the button to se lect the hot water dispens ing Press the button again to start dispensing hot wa ter Dispense water until the no watericonisdisplayed IT Premere il tasto Posizionare un contenitore capiente 1 5 l sotto l ero gatore dell a...

Страница 12: ...e siderata premere per inter rompere il processo Memorizzato ADJUSTING THE CERAMIC COFFEE GRINDER REGOLAZIONE MACINACAFFÈ IN CERAMICA EN Press and turn the grinder adjustment knob one notch atatime Select Lighter taste for darkroastedcoffeeblends Select Bolder taste for lightroastedcoffeeblends Brew 2 3 products to taste the difference If the coffee is watery adjust the coffee grinderagain IT Prem...

Страница 13: ...lly inserted Place the cup under the dis pensingspout Press the button to brewacappuccino The machine is in warm up phase Once the warm up is complete the machine brews the cappuccino according to thefactorypresetquantities IT Assicurarsi che la caraffa sia ben inserita Inserire la tazza sotto l ero gatore Premere il tasto per erogare un cappuccino La macchina è in fase di riscaldamento Terminato ...

Страница 14: ...ngmilkfrothintothecup IT Assicurarsi che la caraffa sia ben inserita Inserire la tazza sotto l ero gatore Tenere premuto il tasto perpiùdi3secondi La macchina è in fase di ri scaldamento La macchina inizia ad ero gare il latte emulsionato nella tazza EN Wait until the desired quan tityofmilkisreached press to stop the process MilkStored The machine starts brewing coffeeintothecup Wait until the de...

Страница 15: ...mento EN Place the cup under the dis pensingspout Pressthe button Pressthe button The machine is in warm up phase Once the warm up is complete the machine dispenses the hot milk according to thepresetquantities IT Inserire la tazza sotto l ero gatore Premere il tasto Premere il tasto La macchina è in fase di riscaldamento Terminato il riscal damento la macchina provvede ad erogare il latte caldo s...

Страница 16: ...utton to stop Note It is not possible to program the quantity of water dispensed IT Premere il tasto entro dieci secondi per confer mare La macchina si prepara Attendere l erogazione de siderata Premere il tasto per terminare Nota Laquantitàdiacqua erogata non è program mabile EN The machine starts dispens ingmilkfrothintothecup Wait until the desired quan tityofmilkisreached press to stop the pro...

Страница 17: ...ton The machine reminds you to insertthecarafe The machine reminds you to pourthedescalingsolution IT Vuotare la vasca raccogli gocce Rimuovere il filtro INTEN ZA se installato Inserire la caraffa del latte vuota Premere il tasto La macchina ricorda che è necessario inserire la ca raffa La macchina ricorda di ver sare la soluzione decalcifi cante OK ESC OK START 1 1 2 CLICK EN Thedescalingcycle A ...

Страница 18: ...withstep19 Rinse the water tank and fill it with fresh water up to the MAX level then place itback Press the button to quit thedescalingcycle IT Premere il tasto per avviare il primo ciclo di ri sciacquo circa 4 min La macchina ha terminato la prima fase di risciacquo Ripetere le operazioni dal punto 12 al punto 16 per il secondo ciclo di risciacquo quindi passare al punto 19 Risciacquare il serba...

Страница 19: ...gocce e reinserirla in posi zione 1 1 2 EN Remove and rinse the brew group see chapter Brew GroupCleaning Themachineisreadytobrew coffee IT Rimuovere e risciacquare il gruppo caffè vedere capi tolo Pulizia gruppo caffè La macchina è pronta per l erogazione di caffè BREW GROUP CLEANING PULIZIA GRUPPO CAFFÈ EN Remove the coffee grounds drawer and open the service door Remove the coffee residues draw...

Страница 20: ...themilkcarafewithfresh wateruptotheMAXlevel Puttheupperpartbackonto themilkcarafe Open the milk carafe dis penser and insert the carafe intothemachine IT Montare il coperchio sulla caraffa del latte assicuran dosi che sia ben fissato Rimuovere la parte supe riore Riempire la caraffa del lat te con acqua fresca fino al livello MAX Riposizionarelapartesupe riore sulla caraffa del latte Aprire l erog...

Страница 21: ...rimuovere e svuotare la ca raffa del latte Premere i tasti di sgancio e rimuovere il coperchio Ruotare l erogatore della caraffa del latte fino al con trassegno Sollevare l erogatore per estrarlo dal coperchio della caraffa Rimuovere l anello A dall erogatore della caraffa del latte 1 1 2 1 2 A EN Pressthebuttonindicatedby thearrowtounlockthelid Detach the lid B from the milk carafe dispenser by p...

Страница 22: ...one pulente Al termine vuotare il conte nitore e ripetere le opera zioni da 4 a 5 fino ad esau rimento soluzione Rimuoverelacaraffadellatteeilcontenitoredallamacchi na Lavareafondolacaraffadellatteeriempirlaconacqua fresca fino al livello MAX 4 5 EN Monthly PourtheSaecoMilkCircuitCleanerbagintothemilkcarafe Fill the milk carafe with water up to the MAX level and then lettheproductdissolvecompletel...

Страница 23: ...lla caraffa Al termine vuotare il con tenitore e ripetere le ope razioni da 10 a 11 fino ad esaurimento acqua EN Removethecontainer Remove and wash the milk carafe IT Rimuovere il contenitore Smontare e lavare la caraffa del latte MENU FOR CUSTOMIZATION AND MAINTENANCE MENU PERSONALIZZAZIONE E MANUTENZIONE EN Settingthetemperature Settingthestand bymodus Settingthedisplaycontrast Adjustingthe Inte...

Страница 24: ...ewgroupisbeingreset duetomachinereset Refill the coffee bean hop per with coffee beans and restartthecycle IT Macchina in fase di riscal damento per l erogazione di caffè acqua calda e vapore La macchina sta eseguendo unciclodirisciacquo Atten dere che la macchina termi ni l operazione La macchina segnala che è necessario sostituire il filtro INTENZA Gruppo caffè in fase di ri pristino in seguito ...

Страница 25: ...eilcassettoraccogli caffè EN Fillthewatertank The coffee grounds drawer has been removed during brewing or rinsing Replace it within 30 seconds to com pletebrewing Turnoffthemachine After30seconds turnitonagain Re peattheprocedure2or3times If the machine does not start contact the Philips SAECO ho tlineinyourcountry thecontactdetailsareindicatedinthe warrantybooklet IT Riempire il serbatoio dell a...

Страница 26: ...s modifiziert werden Alle Reparaturen müssen durch ein von Philips autorisiertes Kundendienstzentrum ausgeführt werden um jede Gefahr zu vermeiden Das Gerät darf nicht von Kindern unter 8 Jahren benutzt werden Das Gerät darf von Kindern ab 8 Jahren be nutzt werden wenn diese zuvor in den kor rekten Betrieb des Geräts eingewiesen wur den und sich der entsprechenden Gefahren bewusst sind oder durch ...

Страница 27: ...ird Das Wasser könnte verun reinigt werden Bei jeder Verwendung des Geräts ist frischesWasser zu benutzen Entsorgung Die Verpackungsmaterialien können recy celt werden Gerät Den Stecker von der Steckdose abzie hen und das Netzkabel zerschneiden Das Gerät und das Netzkabel bei einem Kun dendienstzentrumodereineröffentlichenEin richtungfürdieAbfallentsorgungabgeben Gemäß Art 13 der italienischen Ges...

Страница 28: ...rations doivent être effectuées par uncentred assistanceagrééparPhilipspour éviter tout danger Lamachinen estpasconçuespourêtreutili sée par les enfants de moins de 8 ans La machine peut être utilisée par les enfants à partir de 8 ans pourvu qu ils aient été pré alablement instruits à utiliser correctement la machine et qu ils soient conscients des risques potentiels ou bien qu ils soient sous las...

Страница 29: ...eaupourraitêtrecontami née Utiliser de l eau fraîche à chaque utili sation de la machine Élimination Les matériaux d emballage peuvent être recyclés Appareil ôter la fiche de la prise de courant et couper le câble d alimentation Livrer l appareil et le câble d alimentation à un centre d assistance ou à une structure publique d élimination des déchets Auxtermesdel art 13duDécretLégislatifItalien n ...

Страница 30: ...prise Mettre l interrupteur sur I Appuyer sur la touche pour allumer Placer un récipient sous la buse de distribution de l eau chaude et sous la buse de distribution du café Appuyer sur la touche pour amorcer le circuit DE Überprüfen ob die Wasserdüse korrekt positioniert wurde Zur Bestätigung die Taste innerhalb von zehn Sekunden drücken DasGerätführtdieEntlüftungdesSystemsdurch DasGerätbefindets...

Страница 31: ...slesopérationsdupoint1aupoint4 pas ser ensuite au point 5 DE DieTaste drücken EinengroßenBehälter 1 5 l unter die Wasserdüse stellen Die Taste drücken um die Heißwasserausgabe an zuwählen Erneut die Taste drü cken um die Heißwasser ausgabezustarten Wasser ausgeben bis das Symbol Wasser fehlt ange zeigtwird FR Appuyer sur la touche Placer un récipient suffisamment grand 1 5 l sous la buse de distri...

Страница 32: ...errompre le processus Mémorisé EINSTELLUNG KERAMIKMAHLWERK RÉGLAGE DU MOULIN À CAFÉ EN CÉRAMIQUE DE Den Drehknopf für die Mahl gradeinstellung drücken und um jeweils eine Position drehen Anwahl vornehmen Leichteres Aroma für Mi schungen mit dunkler Rös tung Anwahl vornehmen Stärkeres Aroma für Mi schungen mit heller Rös tung 2 3 Produkte ausgeben um den Unterschied wahrzu nehmen IstderKaffeewäss r...

Страница 33: ...nter den Auslauf stellen Die Taste für die Ausgabe eines Cappuccino drücken DasGerätbefindetsichinderAufheizphase NachAbschluss der Aufheizphase bereitet das Gerät den Cappuccino gemäß denwerkseitigeingestelltenMengenzu FR Veilleràcequelacarafesoit bien insérée Mettre la tasse sous la buse de distribution Appuyer sur la touche pour distribuer un cappuccino La machine est en phase de chauffage Une ...

Страница 34: ... bien insérée Mettre la tasse sous la buse de distribution Garder la touche enfoncée pendant plus de 3 secondes La machine est en phase de chauffage La machine commence à distribuerlelaitémulsionné dans la tasse DE Abwarten bis die ge wünschte Menge an Milch erreichtist die Taste drücken um den Vorgang abzubre chen DieMilchistgespeichert Das Gerät beginnt die Aus gabedesKaffeesindieTasse Abwarten ...

Страница 35: ...nter den Auslauf stellen DieTaste drücken DieTaste drücken DasGerätbefindetsichinderAufheizphase NachAbschluss der Aufheizphase gibt das Gerät die heiße Milch gemäß den voreingestelltenMengenaus FR Mettre la tasse sous la buse de distribution Appuyer sur la touche Appuyer sur la touche La machine est en phase de chauffage Une fois le chauf fage terminé la machine procède à la distribution du lait ...

Страница 36: ...Die Menge des ausgegebenen Wassers kann nicht programmiert werden FR Appuyer sur la touche dans un délai de dix se condes pour confirmer La machine se prépare Attendre la distribution souhaitée Appuyer sur la touche pour terminer Remarque La quantité d eau distribuée n est pas programmable DE Das Gerät beginnt die Aus gabe der aufgeschäumten MilchindieTasse Abwarten bis die ge wünschte Menge an Mi...

Страница 37: ... die Karaffe eingesetzt werdenmuss Das Gerät weist darauf hin dass das Entkalkungsmittel eingefülltwerdenmuss FR Vider le bac d égouttement Enlever le filtre INTENZA si présent Insérer la carafe à lait vide Appuyer sur la touche La machine rappelle qu il est nécessaire d insérer la carafe La machine rappelle de ver ser la solution détartrante DE DerEntkalkungszyklus A undderSpülzyklus B könnendurc...

Страница 38: ...en Tank ausspülen und bis zumFüllstandMAXmitfri schem Wasser füllen Dann denTankwiedereinsetzen Die Taste drücken um den Entkalkungszyklus zu verlassen FR Appuyer sur la touche pour démarrer le premier cycle de rinçage environ 4 min La machine a terminé la première phase de rinçage Répéter les opérations du point 12 au point 16 pour le deuxième cycle de rinçage passer ensuite au point 19 Rincer le...

Страница 39: ... sa posi tion DE Die Brühgruppe heraus nehmen und spülen siehe Kapitel Reinigung Brüh gruppe Das Gerät ist bereit für die AusgabevonKaffee FR Enlever et rincer le groupe de distribution voir la sec tion Nettoyage du groupe de distribution La machine est prête à dis tribuer du café REINIGUNG BRÜHGRUPPE NETTOYAGE GROUPE DE DISTRIBUTION DE Den Kaffeesatzbehälter ent fernen und die Servicetür öffnen D...

Страница 40: ...e mit fri schem Wasser bis zum Füll standMAXfüllen Den oberen Teil wieder auf derMilchkaraffeanbringen Die Düse der Milchkaraffe öffnenunddieKaraffeindas Geräteinsetzen FR Monter le couvercle sur la carafe à lait en s assurant qu il est bien fixé Retirer la partie supérieure Remplir la carafe à lait avec de l eau fraîche jusqu au niveau MAX Replacer la partie supé rieure sur la carafe à lait Ouvri...

Страница 41: ...carafe à lait Appuyer sur les touches de décrochage et enlever le couvercle Tourner la buse de distri bution de la carafe à lait jusqu aupointderepère Soulever la buse de distri bution pour l extraire du couvercle de la carafe Enlever l anneau A de la buse de distribution de la carafe à lait DE Die mit dem Pfeil markierte Taste drücken um den De ckelfreizugeben Den Deckel B von der Düse der Milchk...

Страница 42: ...ion net toyante À la fin vider le récipient et répéterlesopérationsde4à 5 jusqu à épuisement de la solution Enlever de la machine la carafe à lait et le récipient Laver soigneusement la carafe à lait et la remplir avec de l eau fraîche jusqu au niveau MAX DE Monatlich Den Packungsinhalt des Saeco Milk Circuit Cleaner in den Milchbehälterschütten Die Karaffe bis zum höchsten Füllstand MAX mit Wasse...

Страница 43: ...e de la carafe À la fin vider le récipient et répéter les opérations 10 à 11 jusqu à épuisement de l eau DE DenBehälterentfernen Die Milchkaraffe demontie renundreinigen FR Enlever le récipient Démonter et laver la carafe à lait PERSONALISIERUNGS UND WARTUNGSMENÜ MENU PERSONNALISATION ET ENTRETIEN DE EinstellungderTemperatur EinstellungStandby EinstellungDisplaykontrast EinstellungFilter Intenza F...

Страница 44: ...Den Behälter mit Kaffeeboh nen füllen und den Zyklus erneutstarten FR Machineenphasedechauf fage pour la distribution de café d eau chaude et de vapeur Lamachineestentraind ef fectuer un cycle de rinçage Attendre que la machine termine l opération La machine signale que le filtre INTENZA doit être remplacé Groupe de distribution en phase de rétablissement suite à la remise à zéro de la machine Rem...

Страница 45: ...r wur de während einer Ausgabe oder der Spülung herausge nommen Innerhalb von 30 Sekunden wieder einsetzen um die Ausgabe abzuschlie ßen Das Gerät ausschalten Nach 30 Sekunden erneut einschal ten DenVorgang2oder3Malwiederholen KanndasGerätnichtgestartetwerden soistdieHotlinePhi lips SAECO im jeweiligen Land zu kontaktieren die Telefon nummernwerdenimGarantieheftaufgeführt FR Remplir le réservoir à...

Страница 46: ...das las reparaciones debe rán ser efectuadas por un centro de asisten cia técnica autorizado por Philips Lamáquinanoestádestinadaaserutilizada por niños de edad inferior a 8 años La máquina puede ser utilizada por niños de 8 años de edad y superior siempre que pre viamentehayansidoinstruidosenelcorrecto uso de la máquina y sean conscientes de los peligros asociados o la utilicen bajo la super visi...

Страница 47: ...ez que se utilice la máquina Eliminación Losmaterialesdeembalajepuedenreciclar se Aparato desconectar el enchufe de la toma de corriente y cortar el cable de alimenta ción Entregar el aparato y el cable de alimenta ción a un centro de asistencia o a un orga nismo público de eliminación de desechos De conformidad con el art 13 del Decreto Le gislativo italiano del 25 de julio de 2005 n 151 Aplicaci...

Страница 48: ... as reparações devem ser realizadas por um centro de as sistência autorizado pela Philips para evitar qualquer perigo A máquina não deverá ser utilizada por crianças com idade inferior a 8 anos A máquina pode ser utilizada por crianças de 8anosdeidade oumais sepreviamenteins truídos em relação a uma utilização correcta da máquina e se conscientes dos respectivos perigosousobasupervisãodeumadulto A...

Страница 49: ...mpre que utilizar a máquina use água fresca Eliminação Osmateriaisdaembalagempodemserreci clados Aparelho desligue a ficha da tomada e reti re o cabo de alimentação Entregue o aparelho e o cabo de alimenta ção a um centro de assistência a clientes ou a uma entidade pública para a eliminação dos resíduos Nos termos do art n º 13 do Decreto Legislativo italiano de 25 de Julho de 2005 n º 151 Apli ca...

Страница 50: ... Introduza a ficha na toma da Coloque o interruptor na posição I Pressione a tecla para ligar Coloque um recipiente de baixo do distribuidor de água quente e debaixo do distribuidor de café Pressione a tecla para carregar o circuito ES Comprobar que la salida de agua esté correctamente insta lada Pulsar antesdequepasendiezsegundosparacon firmar Lamáquinaprocedealacargadelcircuito La máquina está e...

Страница 51: ...to 4 durante duas vezes consecutivas e depois passe ao ponto 5 ES Pulsarelbotón Colocarunrecipiente grande 1 5 l bajo la salida deagua Pulsar el botón para seleccionar el suministro de aguacaliente Pulsardenuevoelbotón para dar inicio al suministro deaguacaliente Suministrar agua hasta que se muestre el aviso de falta deagua PT Pressione a tecla Coloque um recipiente com capacidade suficiente 1 5 ...

Страница 52: ...ocesso Memorizado REGULACIÓN DEL MOLINILLO DE CAFÉ DE CERÁMICA AJUSTE DO MOINHO DE CAFÉ DE CERÂMICA ES Presionarygirarelmandode regulación del grado de mo lidounpasocadavez Seleccionar Sabor más ligero para mezclas con to rrefacciónoscura Seleccionar Sabor más fuerte para mezclas con to rrefacciónclara Suministrar 2 3 productos para probar la diferencia Si el café está acuoso ajustar denuevoelmoli...

Страница 53: ...ulsar el botón para suministraruncapuchino La máquina está en fase de calentamiento Una vez calien te la máquina procede a suministrar el capuchino según las cantidadespreconfiguradasdefábrica PT Assegure se que a jarra es teja bem introduzida Introduza a chávena debai xo do distribuidor Pressione a tecla para distribuir um cappuc cino Amáquinaestánafasedeaquecimento Umaveztermina do o aquecimento...

Страница 54: ...da enlataza PT Assegure se que a jarra es teja bem introduzida Introduza a chávena debai xo do distribuidor Mantenhapressionadaate cla durante mais de 3 segundos A máquina está na fase de aquecimento A máquina começa a dis tribuir o leite batido na chávena ES Esperar a que se alcance la cantidaddelechedeseada pulsar para detener elproceso Lechememorizada La máquina comienza a su ministrarelcaféenl...

Страница 55: ... de aquecimento ES Colocar una taza bajo la bo quilla Pulsarelbotón Pulsarelbotón Lamáquinaestáenfasedecalentamiento Unavezcaliente la máquina procede a suministrar la leche caliente según la cantidadpreconfigurada PT Introduza a chávena debai xo do distribuidor Pressione a tecla Pressione a tecla Amáquinaestánafasedeaquecimento Umaveztermina do o aquecimento a máquina procede com a distribuição d...

Страница 56: ...eada Pulsar el botón para terminar Nota no puede progra marselacantidaddeagua suministrada PT Pressione a tecla até dez segundos para confir mar A máquina prepara se Aguarde a distribuição de sejada Pressione a tecla para terminar Obs A quantidade de água distribuída não é programável ES La máquina comienza a su ministrar la leche espumada enlataza Esperar a que se alcance la cantidaddelechedesead...

Страница 57: ...lbotón La máquina recuerda que es necesariointroducirlajarra La máquina recuerda que se debe verter la solución des calcificante PT Esvazie a bandeja de lim peza Remova o filtro INTENZA se instalado Introduza a jarra de leite vazia Pressione a tecla A máquina recorda que é necessário inserir a jarra A máquina recorda que de veráverterasoluçãodescal cificante ES Elciclodedescalcificación A yelciclo...

Страница 58: ...ito llenar lo con agua fresca hasta el nivel MAX y volver a intro ducirlo Pulsar el botón para salir del ciclo de descalcifi cación PT Pressione a tecla para iniciar o primeiro ciclo de enxaguamento cerca de 4 min A máquina terminou a primeira fase de enxagua mento Repitaasoperaçõesdopon to 12 ao ponto 16 para o segundo ciclo de enxagua mento e depois passe ao ponto 19 Enxagúe o reservatório e enc...

Страница 59: ...impe za e volte a introduzi la na devida posição ES Extraer y enjuagar el grupo decafé véasecapítulo Lim piezadelgrupodecafé Lamáquinaestálistaparael suministrodecafé PT Remova e enxagúe o grupo café veja o capítulo Lim peza do grupo café A máquina está pronta para a distribuição de café LIMPIEZA DEL GRUPO DE CAFÉ LIMPEZA DO GRUPO CAFÉ ES Sacar el cajón de recogida de posos y abrir la puerta de se...

Страница 60: ...ior Llenar la jarra de leche con agua fresca hasta el nivel MAX Volver a colocar la parte su periorenlajarradeleche Abrir la boquilla de la jarra de leche e introducir la jarra enlamáquina PT Monte a tampa na jarra de leite e assegure se que es teja bem fixada Remova a parte superior Encha a jarra de leite com água fresca até ao nível MAX Volte a posicionar a parte superior da jarra de leite Abra ...

Страница 61: ...che PT Nofinaldoprocesso retiree esvazie a jarra de leite Pressione as teclas de de sengate e remova a tampa Rode o distribuidor da jarra de leite até à marca de refe rência Levante o distribuidor para o extrair da tampa da jarra Remova o anel A do distri buidor da jarra de leite ES Presionar el pulsador indica do por la flecha para desblo quearlatapa Separar la tapa B de la boquilla de la jarra d...

Страница 62: ...para iniciar a distribuição da so lução de limpeza No fim esvazie o recipiente e repita os passos de 4 a 5 até que a solução se esgote Remova a jarra de leite e o recipiente da máquina Lave bem a jarra de leite e volte a enchê la com água fresca até ao nível MAX ES Mensual Verter el envase de Saeco Milk Circuit Cleaner en la jarra de leche Rellenarlajarraconaguahastaelnivelmáximo MAX yes peraraque...

Страница 63: ...e a tecla para iniciar o enxaguamento da jarra No fim esvazie o recipien te e repita as operações de 10 a 11 até que a água se esgote ES Retirarelrecipiente Desmontar y lavar la jarra deleche PT Remova o recipiente Desmonte e lave a jarra de leite MENÚ DE PERSONALIZACIÓN Y MANTENIMIENTO MENU DE PERSONALIZAÇÃO E MANUTENÇÃO ES Ajustedelatemperatura Ajustedelstand by Ajuste del contraste de la pantal...

Страница 64: ...n fase de res tablecimientotrasreiniciode lamáquina Llenarelcontenedorconcafé engranoyreiniciarelciclo PT Máquina em fase de aque cimento para a distribui ção de café água quente e vapor A máquina está a realizar um ciclo de enxaguamento Aguardequeamáquinater mine a operação A máquina assinala que é necessário substituir o filtro INTENZA O grupo café está em fase de restabelecimento após um reset ...

Страница 65: ...sitodeagua Sehaextraídoelcajóndere cogida de posos durante un suministro o enjuague Vol ver a introducirlo antes de que pasen 30 segundos para completarelsuministro Apagar la máquina Volver a encenderla tras 30 segundos Repetirelprocedimiento2o3veces Si la máquina no se pone en marcha contactar con la línea deatenciónalclientedePhilipsSAECOdelpaís losteléfonos decontactoseindicanenellibrodegarantí...

Страница 66: ...TENZA numeroprodotto CA6702 DE WasserfilterINTENZA Produktnummer CA6702 EN Decalcifier productnumber CA6700 IT Soluzionedecalcificante numeroprodotto CA6700 DE Entkalker Produktnummer CA6700 EN Coffeeoilremover productnumber CA6704 IT Pastigliesgrassanti numeroprodotto CA6704 DE Kaffeefettlöser Tabletten Produktnummer CA6704 EN Visit Philips onlineshop to check availability and purchasing opportun...

Страница 67: ...A6702 ES FiltrodeaguaINTENZA númerodeproducto CA6702 PT FiltrodeáguaINTENZA númerodoproduto CA6702 FR Solutiondétartrante numéroproduit CA6700 ES Solucióndescalcificante númerodeproducto CA6700 PT Soluçãodescalcificante númerodoproduto CA6700 FR Tablettesdedégraissage numéroproduit CA6704 ES Pastillasdesengrasantes númerodeproducto CA6704 PT Pastilhasdesengordurantes númerodoproduto CA6704 FR Visi...

Страница 68: ...ut prior notice Der Hersteller behält sich das Recht vor Änderungen am Produkt ohne Vorankündigung vorzunehmen Le producteur se réserve le droit d apporter des modifications au produit sans aucun préavis El fabricante se reserva el derecho a realizar modificaciones en el producto sin previo aviso O fabricante reserva se o direito de efectuar modificações ao produto sem aviso prévio ...

Отзывы: