15
INSTALLATION—PNEUMATIC REVERSING EDGE SWITCH ADJUSTMENT
Damage to the rubber reversing edge or
other bottom bar parts can occur if the
door seal is allowed to seal too tightly
against the floor.
PNEUMATIC REVERSING EDGE SWITCH
ADJUSTMENT
Do not stand under the door panel when
making check. If reversing edge switch is
not working properly, panel could strike
person performing check.
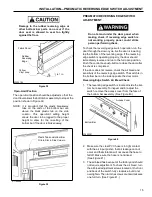
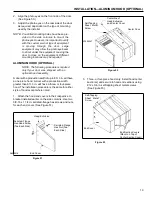
Fabric Panel
Rubber
Reversing
Edge
Yellow
Vinyl Loop
A7500195
Open-Limit Position
Figure 38
¹/₂
to 1 in.
To check the reversing edge switch operation, run the
door through the down cycle. As the door is lowering,
tap the bottom of the reversing edge. If the reversing
edge switch is operating properly, the door should
immediately reverse and run to the full open position.
Push the control box push-button to close the door after
the check is completed.
If the door does not reverse, check the air bleed and
sensitivity of the reversing edge switch. The switch is in
the bottom bar on the side opposite the door motor.
Reversing Edge Switch Air Bleed Check
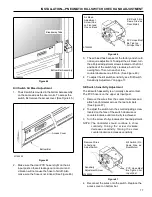
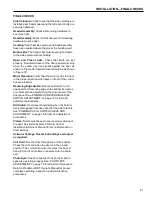
1. The reversing edge switch is located inside the bot-
tom bar assembly. To inspect and/or adjust the
switch, remove the access cover from the face of
the bottom bar assembly. (See Figure 40.)
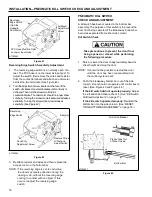
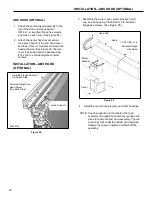
The open-limit position should be adjusted so that the
door travel allows the bottom bar assembly to stop at the
position shown in Figure 39.
NOTE: It is important that the plastic breakaway
tabs on the ends of the bottom bar are
above the black plastic tab on the side
column. This open-limit setting height
allows the door to be jogged to the proper
height to allow for the re-setting of the
bottom bar if the door is broken away.
Bottom Bar
Access Cover
Plastic Tabs on Bottom Bar
Fit into Slot in Side Column
A7500201
Figure 40
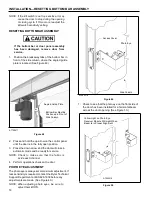
2. Make sure the clear PVC hose is in tight contact
with the air input post so that air leakage cannot
occur and that vibration will not cause the hose to
fall off. Make sure the hose is not kinked.
(See Figure 41.)
3. The air bleed has been set at the factory and should
not require adjustment. To check the air bleed, turn
the air bleed adjustment screws located on the front
and back of the switch fully clockwise, but do not
overtighten. Then turn the screws counterclockwise
one full turn. (See Figure 41.)
A7700006
Figure 39


