Ruckus Wireless ZoneFlex P300 Скачать руководство пользователя страница 44

Configuring Internet Settings

Obtaining and Assigning an IP Address

ZoneFlex P300 Wireless Bridge User Guide, 800-70956-001 Rev B

44

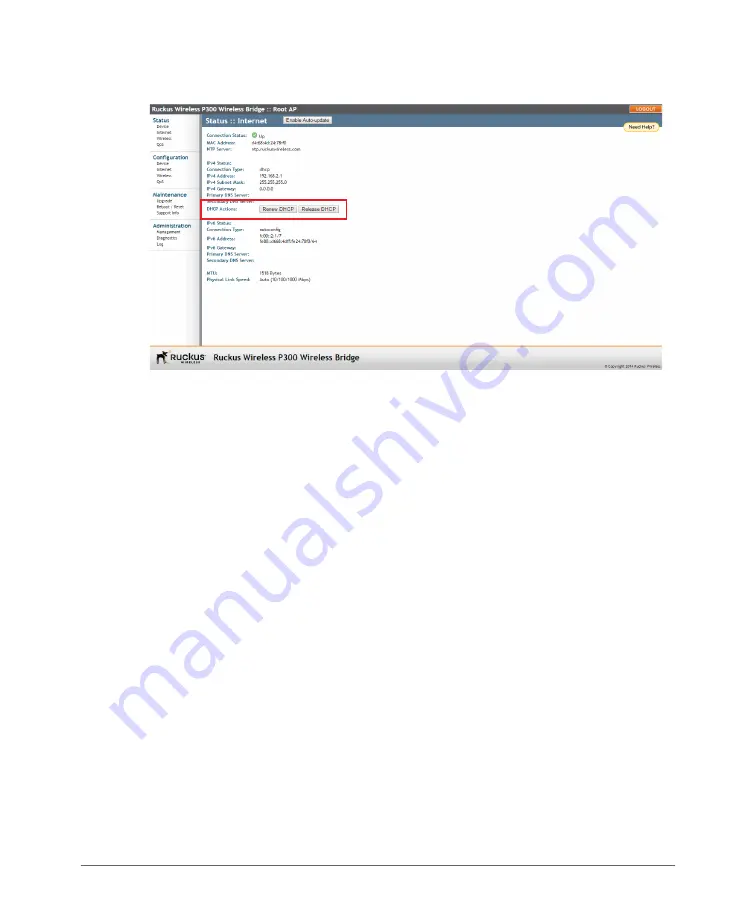
Figure 19.  Renew or release DHCP

2

If the current 

Connection Type 

is 

dhcp

, then you are able to see the currently-

assigned IP address and subnet mask listed below.

To force the ZoneFlex P300 to release its DHCP-assigned IP address, click 

Release DHCP

. This disconnects the user from Web interface as the system 

reverts to its default IP address. Log into the device using the default IP 
address (

192.168.2.1 

for a root bridge or 

192.168.2.254 

for a non-root 

bridge) and click 

Renew DHCP

 to request a new lease from the DHCP server. 

Click 

Renew DHCP

 to request a new IP address lease from the DHCP server. 

Note:

 The IP address may or may not change depending on the lease time 

offered to this device.

Configuring IPv4 DHCP with Auto or Manual DNS Configuration

If you leave the ZoneFlex P300 at its default configuration, it attempts to obtain an 
IPv4 address from a DHCP server on the network. 

1

Navigate to 

Configuration

 > 

Internet

. The ZoneFlex P300 Web GUI displays 

the 

Configuration > Internet 

page (

Figure 18

).

2

In 

IPv4 Connection Type

, select 

DHCP

3

In 

IPv4 DNS Mode

, select 

Auto

 or 

Manual

When you select 

Auto

, the ZoneFlex P300 automatically searches for an IPv4 

DNS server.

When you select 

Manual

, also make the following entries:

Содержание ZoneFlex P300

Страница 1: ...Ruckus Wireless ZoneFlex P300 Wireless Bridge User Guide Part Number 800 70956 001 Rev B Published November 2015 www ruckuswireless com ...

Страница 2: ...ALL INFORMATION CONTAINED HEREIN MATERIAL IS PROVIDED FOR GENERAL INFORMATION PURPOSES ONLY RUCKUS AND ITS LICENSORS MAKE NO WARRANTY OF ANY KIND EXPRESS OR IMPLIED WITH REGARD TO THE MATERIAL INCLUDING BUT NOT LIMITED TO THE IMPLIED WARRANTIES OF MERCHANTABILITY NON INFRINGEMENT AND FITNESS FOR A PARTICULAR PURPOSE OR THAT THE MATERIAL IS ERROR FREE ACCURATE OR RELIABLE RUCKUS RESERVES THE RIGHT ...

Страница 3: ...ectors 19 Installing the Access Point 20 Aiming Point to Point ZoneFlex P300s 20 Aiming Point to Multipoint ZoneFlex P300s 21 Verifying Association Between the ZoneFlex P300s 22 Setting the Distance Between Root Bridge and Non Root Bridges 23 Verifying the Connection 24 2 Navigating the Web Interface Before You Begin Preconfiguring the ZoneFlex P300 27 Logging Into the ZoneFlex P300 Web Interface ...

Страница 4: ...urrent Internet Status 56 Viewing Current Wireless Status 57 Viewing Current QoS Status 59 Viewing Global QoS 59 Viewing Ethernet QoS 60 Viewing Wireless QoS 60 Manually Upgrading the Firmware 61 Upgrading Manually using FTP or TFTP 62 Upgrading Manually using the Web 62 Upgrading Manually using a Local File 62 Scheduling Automatic Firmware Upgrades 63 Changing the Administrative Login Settings 64...

Страница 5: ...de 800 70956 001 Rev B 5 Resetting the ZoneFlex P300 to Factory Defaults 74 Running Diagnostics 75 Scanning for Interference 77 Moving Traffic to Another Channel 79 Where to Find More Information 80 Appendix A Customer Orderable Parts Index ...

Страница 6: ...ed and installed as described in the ZoneFlex P300 Getting Started Guide and ZoneFlex P300 Wireless Bridge Mounting Guide NOTE If the information in the release notes differs from the information in this guide follow the instructions in the release notes Most user guides and release notes are available in Adobe Acrobat Reader Portable Document Format PDF or HTML on the Ruckus Wireless Support Web ...

Страница 7: ...ss the device has been modified to be especially qualified for such use WARNING In order to comply with FCC radio frequency RF exposure limits antennas should be located at a minimum of 7 9 inches 20 cm or more from the body of all persons WARNING Ruckus Wireless strongly recommends that you wear eye protection before mounting the ZoneFlex P300 CAUTION Make sure that you form a 80mm 130mm 3 5 drip...

Страница 8: ...ssues NOTE For information on Ruckus Wireless access points supported by FlexMaster FM managers refer to their respective Release Notes and associated user documents Documentation Feedback Ruckus Wireless is interested in improving its documentation and welcomes your comments and suggestions You can email your comments to Ruckus Wireless at docs ruckuswireless com When contacting us please include...

Страница 9: ... information that you enter Device name set ipaddr 10 0 0 12 default font bold Keyboard keys software buttons and field names On the Start menu click All Programs italics Screen or page names Click Advanced Settings The Advanced Settings page appears Table 2 Notice conventions Notice Type Description NOTE Information that describes important features or instructions CAUTION Information that alerts...

Страница 10: ... Wireless Bridge User Guide 800 70956 001 Rev B 10 1 Introducing the ZoneFlex P300 In this chapter ZoneFlex P300 Overview Unpacking the ZoneFlex P300 Installing the Access Point Getting to Know the Hardware Features ...

Страница 11: ...idge connectivity range or to increase the number of non root bridges that a root bridge can communicate with Figure 1 ZoneFlex P300s deployed as root bridge and non root bridge NOTE When deployed in the root bridge non root bridge to root bridge non root bridge configuration the two wireless links must use different SSIDs NOTE When two ZoneFlex P300s are mounted closely together for instance on t...

Страница 12: ...of other factory orderable and customer supplied parts Before configuring or deploying your ZoneFlex P300 verify that all items listed below are included in the package If any item is damaged or missing notify your authorized Ruckus Wireless sales representative One or two ZoneFlex P300 kits depending on ordered part 901 P300 xx01 ZoneFlex P300 802 11ac 5GHz point to point wireless bridge includes...

Страница 13: ...2 Four sets stainless steel 8mm M4x0 7 pan head Phillips screws with split lock and flat washers J in Figure 2 Eight sets stainless steel 0 5 inch x 0 250 28 hex bolts with split lock and flat washers K in Figure 2 Service Level Agreement Limited Warranty Statement Regulatory Statement Declaration of Conformity if required ZoneFlex P300 Wireless Bridge Quick Setup Guide ZoneFlex P300 Wireless Brid...

Страница 14: ...Figure 3 ZoneFlex P300 hardware features Table 3 ZoneFlex P300 hardware feature descriptions No Feature Description 1 5 GHz external antenna ports 5GHz 50 ohm N type connectors Can be used with customer purchased external antennas for operator defined coverage areas and point to point deployments 2 Earth ground point Use the factory supplied ground wire and ground screw washer set connect a good e...

Страница 15: ... and off by the operator Refer to Table 4 for a description of these LEDs and their operating modes Figure 4 ZoneFlex P300 LEDs 4 M25 cable gland Aiming button and Reset button The ZoneFlex P300 uses one Ethernet cable for data and Power over Ethernet PoE Plug the Ethernet cable into the RJ 45 connector under the cable gland Use the cable gland to attach and seal the cable to the ZoneFlex P300 cha...

Страница 16: ...d Aiming Strength 3 Solid Min 24 RSSI 36 RSSI 30 Blinking Min 18 RSSI 30 RSSI 24 ROOT Off non root bridge Solid green root bridge Aiming Strength 2 Solid Min 12 RSSI 24 RSSI 18 Blinking Min 6 RSSI 18 RSSI 12 5G Off radio down Solid green radio up link up Flashing green radio up but no link Aiming Strength 1 Solid RSSI Configured Minimum 12 RSSI 6 Blinking RSSI Configured minimum Default 6 which is...

Страница 17: ...o the RJ 45 connector under the cable gland Figure 5 Loosen and move the cable gland aside to expose the Aiming Figure 6 and Reset Figure 7 buttons Figure 5 ZoneFlex P300 Ethernet connector Pressing and holding the Aiming button Figure 6 for four or more seconds puts the ZoneFlex P300 into aiming mode the P300 remains in aiming mode for 15 minutes after aiming is started All the LEDs turn green an...

Страница 18: ...s CAUTION Resetting the ZoneFlex P300 to its factory defaults causes the ZoneFlex P300 to lose all configuration settings including the provisioning or pairing of the root bridge and non root bridge pairs If you do need to reset a ZoneFlex P300 to factory defaults you will need to re provision the ZoneFlex P300 In factory default state the role of all ZoneFlex P300 units is root bridge Therefore r...

Страница 19: ...ations The ZoneFlex P300 is shipped from the factory with two metal caps protecting the external antenna connectors 1 in Figure 8 If you are not connecting external antennas to the ZoneFlex P300 then make sure that the metal caps remain installed and securely fastened to protect the connectors from elements such as water and dirt NOTE When two ZoneFlex P300s are mounted closely together for instan...

Страница 20: ...oneFlex P300 is equipped with an internal aiming function that is based on the received signal strength indicator RSSI power measurement Table 4 lists the signal strengths associated with each of the LEDs NOTE For point to multipoint installations refer to Aiming Point to Multipoint ZoneFlex P300s NOTE When two ZoneFlex P300s are mounted closely together for instance on the same pole make sure tha...

Страница 21: ...r for instance on the same pole make sure that the active antennas are mounted at least one meter 39 3 inches apart When there is more separation it is less likely that either ZoneFlex P300 will experience avoidable RF interference If possible the units should be on different channels but this separation should be maintained even when the ZoneFlex P300s are using different channels 1 Choose the op...

Страница 22: ...er 1 If not already done log into the root bridge Web interface as described in Logging Into the ZoneFlex P300 Web Interface 2 Navigate to Status Wireless The Web interface displays the Status Wireless page If no association has been established then the ZoneFlex P300 displays Figure 9 No association established 3 The ZoneFlex P300s automatically associate with one another usually within one to tw...

Страница 23: ...s for diagnosing the problem which can be found by navigating to Administration Diagnostics Tools include Ping Traceroute Show ARP Table and Show FDB Table as described in Running Diagnostics After the ZoneFlex P300s are associated with each other continue with Setting the Distance Between Root Bridge and Non Root Bridges Setting the Distance Between Root Bridge and Non Root Bridges 1 If not alrea...

Страница 24: ...ardware installation and aiming procedure for all ZoneFlex P300s verify the connection and signal integrity between a root bridge and non root bridge pair using the following procedure 1 If not already done log into the root bridge Web interface as described in Logging Into the ZoneFlex P300 Web Interface 2 Navigate to Status Wireless On the Status Wireless page make sure that the non root bridge ...

Страница 25: ...300 Wireless Bridge User Guide 800 70956 001 Rev B 25 Figure 12 SpeedFlex Performance Test succeeded Refer to Configuring the ZoneFlex P300 to fine tune the ZoneFlex P300 configura tion or refer to Managing the ZoneFlex P300 to monitor and operate the ZoneFlex P300 ...

Страница 26: ...reless Bridge User Guide 800 70956 001 Rev B 26 2 Navigating the Web Interface In this chapter Before You Begin Preconfiguring the ZoneFlex P300 Logging Into the ZoneFlex P300 Web Interface Navigating the Web Interface ...

Страница 27: ...00 Web Interface This section describes the steps you need to complete to set up the ZoneFlex P300 in standalone mode or to be managed by a Ruckus Wireless FlexMaster manager if you have one installed on the network 1 Collect the required materials before starting with the configuration task make sure that you have the following requirements ready An administrative computer notebook computer with ...

Страница 28: ...idge Quick Setup Guide for instructions on how to connect an administrative computer to the ZoneFlex P300 2 On the PC open a Web browser window 3 In the address or location bar type the IP address of the ZoneFlex P300 Default IP address for standalone ZoneFlex P300s 192 168 2 1 or 192 168 2 254 for non root bridges 4 Press Enter to connect to the Web interface 5 If a Windows security alert dialog ...

Страница 29: ...ed open the related workspace in the area to the right 2 Enable Auto update button Enable or disable automatic refresh of this interface page For example on the Status Wireless page you can enable auto update during Aiming so that you do not need to manually refresh the page as you adjust the orientation of the ZoneFlex P300 3 Tabs Contains additional options for the page 4 LOGOUT button Click thi...

Страница 30: ...nue with this section This chapter provides instructions for configuring ZoneFlex P300s in a standalone configuration or when the ZoneFlex P300 is to be managed by a FlexMaster manager System configuration settings are divided into wireless configuration settings bridge configuration settings and QoS settings The Configuration Wireless page allows you to set parameters that affect the wireless lin...

Страница 31: ...ttings Setting Description Radio Network Allows you to change the name of the 5GHz radios default Radio 5G Channel This option lets you select the channel used by the network You can choose Auto or choose a specific channel If you choose Auto then the ZoneFlex P300 automatically selects the best channel encountering the least interference to transmit the signal Available Channel This option lets y...

Страница 32: ...g is not configurable Advanced Settings Refer to Editing Advanced Settings Rate Limit Settings Refer to Rate Limiting External Antenna ZoneFlex P300s provide two external antenna ports in case you want to attach external antenna s to extend the range or coverage area of your wireless network To enable the ZoneFlex P300 to use the external antenna s select the Enabled option in this section This op...

Страница 33: ...tomatically assigns itself a static IP address to make it easier for you to preconfigure and deploy it on your network The default IP addresses for the root bridge and non root bridge if no DHCP server is available are as follows root bridge 192 168 2 1 non root bridge 192 168 2 254 Also refer to Reversing Root Bridge and Non Root Bridge Roles Export Configuration Only available from the root brid...

Страница 34: ...s unless absolutely necessary 1 Go to Configuration Wireless The Configuration Radio 5G page appears 2 On the Configuration Radio 5G page click Edit Advanced Settings The Configuration Radio 5G Advanced page Figure 15 appears Figure 15 The Configuration Radio 5G Advanced page 3 Configure the advanced settings listed in Table 7 as required Table 7 Advanced wireless common settings Option Descriptio...

Страница 35: ...ket sent by the ZoneFlex P300 to synchronize the wireless network The default value is 200 Data Beacon Rate DTIM The value indicates the interval of the delivery traffic indication message DTIM This is a countdown field that the device uses to inform its clients of the next window for listening to broadcast or multicast messages The default value is 1 Distance Manually setting a distance can help ...

Страница 36: ...ings next to Rate Limit Settings The Rate Limit List page appears 3 Set the maximum Downlink and Uplink rate per station The table below your selections updates to show the maximum transfer rate per station for each traffic type 4 Click Update Settings to have the ZoneFlex P300 save your changes You have completed configuring the rate limiting options To reopen the previous page click the Go back ...

Страница 37: ...figuring TACACS Remote Login Information Configuring the ZoneFlex P300 Name Location GPS Coordinates and LED Appearance 1 Navigate to Configuration Device The ZoneFlex P300 Web GUI displays the Configuration Device page Figure 17 Figure 17 The Configuration Device page 2 In Device Name type a new name for the device or leave as is to accept the default device name RuckusWB The device name identifi...

Страница 38: ...ord here New Password When you are changing the password enter the new password The password must consist of six to 32 alphanumeric characters Confirm New Password Retype the new password to confirm 3 Click Update Settings to have the ZoneFlex P300 save and apply your changes Configuring TACACS Remote Login Information 1 Navigate to Configuration Device The ZoneFlex P300 Web GUI displays the Confi...

Страница 39: ...ver state is enabled then configure the TACACS server parameters TACACS server IPv4 or IPv6 server address TACACS port 49 is the default but it can be set to any available TCP port TACACS Service Login name Share Key TACACS Password Confirm Share Key retype the TACACS Password 3 Click Update Settings to have the ZoneFlex P300 save and apply your changes ...

Страница 40: ...ng an IP Address Configuring the MTU Size VLAN Overview The ZoneFlex P300 is like a network switch in that it supports Wi Fi connections As such like many advanced switches ZoneFlex P300s conform to the IEEE 802 1Q standard the standard that defines virtual LANs In an 802 1Q switch the concept of VLANs is always present If a packet arrives without an 802 1Q header it is assigned to the native VLAN...

Страница 41: ... the correct time The default Ruckus Wireless NTP Server ntp ruckuswireless com can be used if you do not have an NTP server on your network 1 Navigate to Configuration Internet The ZoneFlex P300 Web GUI displays the Configuration Internet page Figure 18 Figure 18 The Configuration Internet page 2 Enter the host name in the NTP Server text box at the top of the page 3 Click Update Settings to have...

Страница 42: ...he computer you are using is not on the same VLAN Do not change the Management VLAN unless your admin PC is on the same VLAN or you are disconnected and unable to connect again without factory resetting the ZoneFlex P300 1 Navigate to Configuration Internet The ZoneFlex P300 Web GUI displays the Configuration Internet page Figure 18 2 Enter the VLAN ID in the Management VLAN text box 3 Click Updat...

Страница 43: ... Configuration Configuring a Static IP DHCP Auto Configuration When you leave the ZoneFlex P300 at its default configuration it automatically attempts to obtain an IPv4 address from a DHCP server on the network In an IPv6 network environment the ZoneFlex P300 attempts to obtain an IPv6 address from an IPv6 Auto Configuration server Refer to the following Renewing and Releasing DHCP Configuring IPv...

Страница 44: ... a non root bridge and click Renew DHCP to request a new lease from the DHCP server Click Renew DHCP to request a new IP address lease from the DHCP server Note The IP address may or may not change depending on the lease time offered to this device Configuring IPv4 DHCP with Auto or Manual DNS Configuration If you leave the ZoneFlex P300 at its default configuration it attempts to obtain an IPv4 a...

Страница 45: ...Click Update Settings to have the ZoneFlex P300 save your changes Configuring a Static IP There are at least two instances when you need to configure a static IP address for the ZoneFlex P300 If the current IP address that the ZoneFlex P300 is using consistently conflicts with that of another device on the network If you want to switch from DHCP to static IP addressing to manage and maintain the Z...

Страница 46: ...Mode select Auto or Manual When you select Auto the ZoneFlex P300 automatically searches for an IPv4 DNS server When you select Manual also make the following entries IPv4 Primary DNS Server The IP address of the primary DNS server IPv4 Secondary DNS Server The IP address of the secondary DNS server 5 Click Update Settings to have the ZoneFlex P300 save your changes Configuring the MTU Size You ca...

Страница 47: ...n IT support professional These settings should only be changed in rare circumstances in situations where the default settings need to be changed to match those of a non standard network configuration NOTE When Dot1p classification and ToS classification are both enabled Dot1p classification takes precedence Therefore if you want to use ToS classification Dot1p classification should be disabled De...

Страница 48: ...iority Video video traffic is given a higher priority than data or background traffic Data low priority traffic Background traffic that is less sensitive to latency and delays 3 Set the TOS Classification by entering hex values into the following text boxes The hex values are used to classify packets into the four WMM queues using ToS values Voice Default 0xE0 0xC0 0xB8 Video Default 0xA0 0x80 Dat...

Страница 49: ...following text boxes The numeric values are used to classify VLAN tagged packets into priority queues based on the VLAN ID In Dot1p Classification VLAN IDs enter the VLANs for which you want to enable Dot1p classification You can enter any combination of individual VLAN IDs separated by commas or enter a range for example 1 4094 Voice Default 6 7 Video Default 4 5 Data Default 2 3 Background Defau...

Страница 50: ...on Enabled or Disabled on the Ethernet port Default Dot1p Classification VLAN IDs you can enter any combination of individual VLAN IDs separated by commas or enter a range for example 1 4094 on the Ethernet port Default 1 4094 Dot1p Marking VLAN IDs entering numeric 0 7 values into this text box The numeric value is used to classify VLAN tagged packets based on priority queue values on the Etherne...

Страница 51: ...tion Enabled or Disabled on the wireless link Default Dot1p Classification VLAN IDs you can enter any combination of individual VLAN IDs separated by commas or enter a range for example 1 4094 on the wireless link Default 1 4094 Dot1p Marking VLAN IDs entering numeric 0 7 values into this text box The numeric value is used to classify VLAN tagged packets based on priority queue values on the wirel...

Страница 52: ...the remote ZoneFlex P300s first followed by the local ZoneFlex P300 to avoid loss of connectivity 1 Configure the admin computer connect it to the ZoneFlex P300 and log into the ZoneFlex P300 Web GUI as described in Logging Into the ZoneFlex P300 Web Interface 2 Navigate to Configuration Wireless The ZoneFlex P300 Web GUI displays the Configuration Radio 5G page Figure 23 Figure 23 Changing the ro...

Страница 53: ...n Root Bridge Roles Configuring Wireless QoS ZoneFlex P300 Wireless Bridge User Guide 800 70956 001 Rev B 53 6 Once the reboot is complete the role is reversed 7 Repeat this procedure for each device whose role you want to change ...

Страница 54: ...her Management Access Options Working with Event Logs and Syslog Servers Rebooting the ZoneFlex P300 Resetting the ZoneFlex P300 to Factory Defaults Running Diagnostics Scanning for Interference Moving Traffic to Another Channel Where to Find More Information This chapter provides instructions for managing standalone ZoneFlex P300s using the ZoneFlex P300 Web interface For information on managing ...

Страница 55: ...ide 800 70956 001 Rev B 55 Viewing Current Device Status The Status Device page displays a general overview of the ZoneFlex P300 s current status including device name MAC address serial number current soft ware image version and so on Figure 24 The Status Device page ...

Страница 56: ...s that is the settings that allow the ZoneFlex P300 to communicate with your local network and the Internet Information includes IP address gateway DNS server NTP server and connection type method of obtaining an IP address DHCP or static IP and so on The Status Internet page also allows you to perform renew and release DHCP actions as described in Renewing and Releasing DHCP Figure 25 The Status ...

Страница 57: ...less page Table 8 Common Wireless settings Setting Description Wireless Bridge Mode Shows the wireless mode that the ZoneFlex P300 is currently using Possible values include Root Bridge non Root Bridge Wireless Mode Lists the supported 802 11 devices and the spectrum used Channel Shows the wireless channel that the ZoneFlex P300 is currently using If you set the wireless channel to SmartSelect thi...

Страница 58: ...ice set identifier BSSID Factory defined basic service set identifier MAC address Wireless Status Whether the wireless network is Enabled and Up or Down Broadcast SSID Whether SSID broadcast is Enabled or Disabled Encryption Mode Always WPA Distance Operator entered distance between root bridge and non root bridge in km Aiming Action Current Aiming status Note The P300 remains in aiming mode for 1...

Страница 59: ...wing Current QoS Status View the quality of service QoS status as follows Viewing Global QoS Viewing Ethernet QoS Viewing Wireless QoS Viewing Global QoS Figure 27 shows the Status QOS Global page Refer to Configuring Global QoS for a description of the information on this page Figure 27 The Status QOS Global page ...

Страница 60: ...hows the Status QOS Ethernet page Refer to Configuring Ethernet QoS for a description of the information on this page Figure 28 The Status QOS Ethernet page Viewing Wireless QoS Figure 29 shows the Status QOS Wireless page Refer to Configuring Wireless QoS for a description of the information on this page Figure 29 The Status QOS Wireless page ...

Страница 61: ...heduling Automatic Firmware Upgrades Before starting decide which option you want to take Automate a regularly scheduled update Run a one time manual update right now By default the automatic upgrade option is disabled 1 To upgrade the firmware image go to Maintenance Upgrade The ZoneFlex P300 Web GUI displays the Maintenance Upgrade page Figure 30 Figure 30 The Maintenance Upgrade page 2 When the...

Страница 62: ...ted you must manually reboot the ZoneFlex P300 Upgrading Manually using the Web 1 In the Upgrade Method options click Web 2 If instructed to choose a different URL than the default value type the URL of the download Web site in Url Remember to start the URL with http 3 Click Perform Upgrade A status bar appears during the upgrade process 4 After the upgrade is completed you must manually reboot th...

Страница 63: ...ON Do not change any of the Image Control File Username or Password entries 4 Verify that the Auto Upgrade option is set to Enabled 5 Toggle the Interval to Check for Software Upgrade drop down list to select your preferred interval 6 Choose whether to reboot immediately after upgrading or schedule the reboot for a specific time of day using the Schedule Reboot Time After Upgrade list Choosing Any...

Страница 64: ...uration Device Figure 31 The Configuration Device page 3 Under Service Provider Login change the default administrator login settings In Username type a new user name that you will use to log in to the Web interface The default user name is super When you are changing a password type the existing password in Current Password In New Password type a new password to replace the existing password The ...

Страница 65: ...ice options If your Ruckus Wireless device is to be managed by FlexMaster then the FlexMaster information server URL and contact interval is preconfigured before you receive your Ruckus Wireless device NOTE If you are configuring the bridge to be managed by FlexMaster then remember to point it to the FlexMaster server after you configure the management access options For more information refer to ...

Страница 66: ...a security certificate a copy of which has been pre installed in the device HTTPS Port This field lists the default HTTPS port of 443 only if HTTPS has been activated You can manually change this port number if required Certificate Verification This notes whether the security certificate linked to the HTTPS settings has been verified PASSED or not StartRecovery SSID after ___ seconds of connectivi...

Страница 67: ... TCP ports 80 and 443 for HTTP HTTPS communications and TCP port 8082 for bridge wake up commands Refer to Release Notes for details FlexMaster only Only allow FlexMaster management FlexMaster Server URL URL of the FlexMaster server Digest Authentication Username and Digest Authentication Password This information is automatically generated by the bridge and used for authentication with FlexMaster...

Страница 68: ... provides Table 11 TR 069 status information Status Information Description Currently Using URL Shows the FlexMaster server IP address or URL with which the bridge is currently registered Last Attempted Contact Shows the date and time of the bridge s last attempt to contact FlexMaster Date and time are specified in GMT or UTC which are accurate if a Network Time Protocol NTP server is configured L...

Страница 69: ...server 4 Toggle the Periodic FlexMaster Inform Interval drop down list to select how frequently the device checks the FlexMaster server for any pending configuration changes available for that Ruckus Wireless unit On the FlexMaster side this field is referred to as the Periodic Inform Interval 5 Click Update Settings to save your changes After the bridge registers with FlexMaster this Administrati...

Страница 70: ...ver If you have a syslog server on the network you can configure the ZoneFlex P300 to send the device logs to the server Enable logging if disabled and configure the ZoneFlex P300 to send logs to the syslog server 1 Go to Administration Log The Administration Log page appears Figure 34 The Administration Log page 2 In Log Status click Enabled 3 After enabling logging configure the following option...

Страница 71: ...ter the FTP or TFTP server IP address 4 In Filename enter a name for the file that you are saving NOTE Remember to add a TXT file extension to the file name especially if you are using Internet Explorer as your Web Admin host 5 If you selected the FTP option then also enter a Username and Password 6 Click Upload Now Saving a Copy of the Log File to Your Computer You can save a copy of the current ...

Страница 72: ...r an ZoneFlex P300 being managed by FlexMaster 1 Go to Maintenance Support Info The Maintenance Support Info workspace appears 2 Click the Transfer Method Save to Local Computer option Up to two links appear next to Download supportinfo txt and or tr069info txt 3 Click the cmsupportinfo txt or tr069info txt link A new window or tab opens with the content of the support file displayed 4 Choose Save...

Страница 73: ...oneFlex P300 disrupts network communications in any currently active WLANs 1 Go to Maintenance Reboot Reset The Maintenance Reboot Reset page appears 2 To reboot the ZoneFlex P300 click Reboot P300 with current settings Reboot Now After a brief pause you are logged out of the ZoneFlex P300 Figure 35 The Maintenance Reboot Reset page After approximately one minute you should be able to log back int...

Страница 74: ...e to restore an inoperative ZoneFlex P300 to its factory default settings which completely erases the configuration currently active in the device Note that this disrupts all wireless network communications through this device 1 Go to Maintenance Reboot Reset The Maintenance Reboot Reset page appears Figure 35 2 Click Reset now next to Reset to factory settings 3 When the confirmation warning appe...

Страница 75: ...rom the Web interface ping traceroute show ARP table show FDB table 1 Go to Administration Diagnostics The Administration Diagnostics page appears 2 For ping and traceroute type the network address of a site you wish to connect to Then click Run test The results appear in the text field below each option see Figure 36 3 For show ARP table and show FDB table click Show The results appear in the tex...

Страница 76: ...Running Diagnostics Saving a Copy of a Support File to Your Computer ZoneFlex P300 Wireless Bridge User Guide 800 70956 001 Rev B 76 Figure 37 Showing ARP and FDB tables ...

Страница 77: ...includes a Site Survey tool that allows you to scan for other wireless networks nearby which may impact the ZoneFlex P300 link performance 1 go to the Status Wireless page The Status Wireless page appears Figure 38 The Status Wireless page 2 On the Status Wireless page click Site Survey Last Survey or ReScan The ZoneFlex P300 Web interface displays a list of nearby wireless devices ...

Страница 78: ...x P300 Wireless Bridge User Guide 800 70956 001 Rev B 78 Figure 39 Site Survey 3 If a large number of nearby devices is detected using the same channel as the ZoneFlex P300 you may want to move the wireless bridge traffic to another channel refer to Moving Traffic to Another Channel ...

Страница 79: ...owded channel from the Channel pull down menu NOTE The SmartSelect feature Auto selection always attempts to use the best channel available If you manually select a channel then SmartSelect will be unable to automatically switch channels to adjust to changes in the environment 2 Click Update Settings to have the ZoneFlex P300 save your changes 3 Run the SpeedFlex utility to test link performance a...

Страница 80: ...v B 80 Where to Find More Information If you have questions that this User Guide does not address visit the Ruckus Wireless Support Portal at http support ruckuswireless com The Support Portal hosts the latest versions of user documentation You can also find answers to frequently asked questions FAQs for each Ruckus Wireless product type ...

Страница 81: ...ed Notes Ruckus Wireless PoE injector optional 902 0162 XXYY where XXYY is the country code Optionally customer ordered Table 13 Ruckus Wireless customer orderable 5GHz antennas Part Ruckus Wireless P N Notes 5GHz 12 5dBi 2x2 Dual Polarized Sector Outdoor Antenna 911 1212 DP01 120 degree beamwidth 5GHz 21dBi Point to Point 2x2 Dual Polarized Directional Outdoor Antenna 911 2101 DP01 10 degree beam...

Страница 82: ...uide 800 70956 001 Rev B 82 5GHz 24dBi Point to Point 2x2 Dual Polarized Directional Outdoor Antenna 911 2401 DP01 7 to 9 degree beamwidth Table 13 Ruckus Wireless customer orderable 5GHz antennas Continued Part Ruckus Wireless P N Notes ...

Страница 83: ...and password 28 device location 37 name 37 settings 37 DHCP release 43 44 45 renew 43 44 45 DHCP auto connection type 43 diagnostics 75 distance 35 DTIM data beacon rate 35 E export configuration wireless 33 export wireless configuration 33 external antenna 32 external antenna cable loss 32 external antenna gain 32 F factory defaults resetting bridge 74 firmware upgrade 61 FlexMaster FM manager 6 ...

Страница 84: ...t bridge wireless bridge mode 33 RTS CTS threshold 35 S scanning for interference 77 separation antenna 11 service provider login 38 SSID wireless 32 static IP connection type 45 syslog 70 T tabs 29 TACACS server 38 temperature update 37 threshold RTS CTS 35 traceroute 75 transmit power 34 U URL FlexMaster server 67 user name 38 V VLAN overview 40 W width channel 32 wireless advanced settings 32 c...

Страница 85: ...Copyright 2006 2015 Ruckus Wireless Inc 350 West Java Dr Sunnyvale CA 94089 USA www ruckuswireless com ...

Отзывы: