


3
x
Installation
21
FA ROTEX Solaris RPS3 P2 - 06/2012
Installation
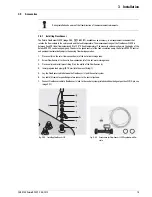
1. Installation of Solaris RPS3 P2 control and pump unit without attachment of the hood (see chapter 3.2).
2. Unscrew the cover cap of the solar return connection from the second storage tank.
3. Align Sanicube hot water storage tanks. The distance (centre tank) must be 830 mm. Note also the recommended wall
distance of 200 mm.
4. Preparing the storage tank connecting angle to the Solaris RPS3 P2 control and pump unit. Do so by removing the retaining
bracket on the expansion side and remove the ball cock or blanking plug, depending on previous installation.
5. Install the removed part on the return flow connection pre-installed by ROTEX on the 2nd storage tank connecting angle.
6. Insert the free press fitting (Ø 28) into the free outlet of the storage tank connection bracket on the completed return line
on the side.
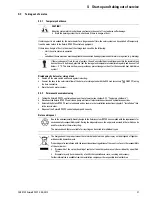
1
Sanicube Solaris
2
Non-pressurised area
3
Pressure area
4
Solar panel
5
Return flow connection pipe
(non-pressurised area)
6
Solar flow distribution pipe
7
Solar return pipe
8
Solar flow pipe
DH Level difference in non-pressurised
storage area
FLS20
FlowSensor
FLG FlowGuard
RDS1 Pressure station
RPWT1
Plate heat exchanger
RPS3 P2
Control and pump unit
SV
Safety pressure relief valve
Fig. 3-43 Principle of the storage tank connection
WARNING!
Risk of scalding
when removing the CON SX from the storage tank or when working on the hydraulics system
of the Solaris RPS3 P2 control and pump unit (e.g. when replacing a pump).
• Drain storage tank before work on the connection line or hydraulic system.
CAUTION!
Large volumes of water may be drained from the Sanicube during installation.
• Install the Solaris storage tank extension set before filling the Sanicubes (unpressurised area).
CAUTION!
After extended storage, dirt may have accumulated on the seal of the return connection. This may result in
water leaks, even with the check valve closed.
• Check the return connection for dirt and clean if necessary.
• Check connection again for leaks at start-up.


