


3
x
Installation
12
FA ROTEX Solaris RPS3 P2 - 06/2012
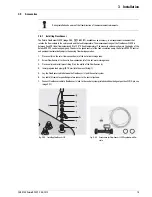
1. Remove the handle on the hot water storage tank and unscrew the sealing cap form the solar return connection.
2. Using the previously removed screws from the handle, screw the pump retainer bracket to the top holder of the handle
fastener.
3. Place the pump and the storage tank connection nut on the respective storage tank mounting bracket and secure with
retaining brackets.
4. If an optional combined filling and draining cock (KFE-cock
16 41 17
) should be installed in the cylinder connecting
bracket of the preassembled pump group (Image 3-5):
• Remove the retaining clip on the installation side (a).
• Withdraw the blanking plug on the installation side.
• Insert the combined filling and draining cock in the installation side and secure it with the retaining clip again.
5. Fit the preassembled pump unit on the storage tank mounting bracket using the seal provided and screw it to the solar return
connection on the hot water storage tank. To make it easier to fit, the retainer can be clicked into the retainer bracket.
6. Tighten the storage tank connecting nut.
7. Screw the retainer to the retaining bracket (necessary to absorb the forces).
8. Screw the fixing bracket for the control system in position.
9. Install press-fit elbow (Ø 22/Ø 18 mm).
10. Prepare feed line (VA 15 Solar) with sensor cable and return line (VA 18 Solar). Cut open the twin heat insulation in the
middle.
Fig. 3-3
Work step 1
Fig. 3-4
Work step 2
Fig. 3-5
Step 3, 4
Fig. 3-6
Work step 5
Fig. 3-7
Work step 6
Fig. 3-8
Work step 7


