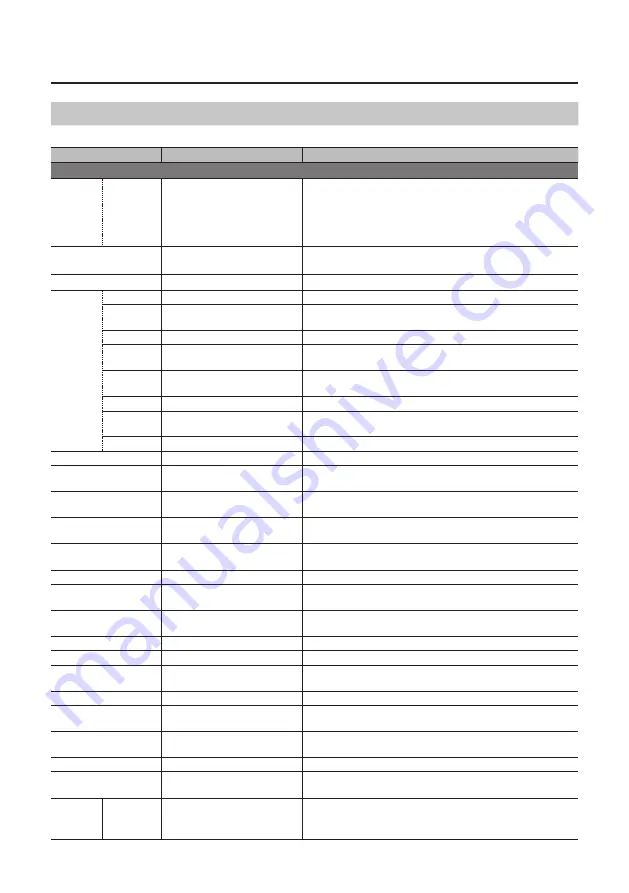
background image

32

Appendices

AUDIO Menu

([AUDIO] Button)

*  The default value is printed in bold characters.

Setting item

Value

Explanation

MEMORY1–MEMORY8

HDMI IN 1
  :
HDMI IN 4
AUDIO IN
MIC

LEVEL

0–

100

–127

This adjusts the volume level of the respective input audio streams.

*  100 = 0.0 dB, 127 = +6.0 dB

MASTER OUT LEVEL

0–

100

–127

This adjusts the volume level of output audio.

*  100 = 0.0 dB, 127 = +6.0 dB

AUDIO FOLLOW

ON, 

OFF

This sets the Audio Follow feature on or off.

HDMI IN 1
  :
HDMI IN 4
AUDIO IN
MIC

EQ Hi

-15 dB–

0 dB

–15 dB

This boosts or attenuates the high band.

EQ Hi FREQ

700 Hz–

8.00 KHz

–11.0 KHz

This adjusts the center frequency when changing the sound 

quality in the high band.

EQ Mid

-15 dB–

0 dB

–15 dB

This boosts or attenuates the middle band.

EQ Mid FREQ

20.0 Hz–

2.50 KHz

–10.0 KHz

This adjusts the center frequency when changing the sound 

quality in the middle band.

EQ Mid Q

0.5

–16.0

This adjusts the width of the frequency band when boosting or 

attenuating the middle band.

EQ Lo

-15 dB–

0 dB

–15 dB

This boosts or attenuates the low band.

EQ Lo FREQ

55 Hz–

110 Hz

–800 Hz 

This adjusts the center frequency when changing the sound 

quality in the low band.

DELAY

0.0 ms

–500.0 ms

This adjusts the delay time for audio.

MIC COMP

ON, 

OFF

This sets the compressor on or off.

MIC COMP-THRESHOLD

-50 dB– 

-16 dB

–0 dB

This sets the level used as the threshold when compressing audio. 

Compression is applied to audio that exceeds the level set here.

MIC COMP-RATIO

1.0:1–

INF:1

This specifies the degree of compression applied to the audio. The 

state in which no compression is applied is defined as “1.”

MIC COMP-ATTACK

0.2 ms–

50 ms

–100 ms

This sets the time until compression starts when audio exceeding 

the threshold is input.

MIC COMP-RELEASE

30 ms–

500 ms

–5000 ms

This adjusts the length of time until compression ends after audio 

falls below the threshold.

MIC GATE

ON

, OFF

This sets gate on or off.

MIC GATE-THRESHOLD

-50 dB– 

-36 dB

–0 dB

This sets the level used as the threshold for removing audio. Audio 

below the level set here is removed.

MIC GATE-RELEASE

30 ms–

800 ms

–5000 ms

This adjusts the length of time until the audio is fully attenuated 

after audio falls below the threshold.

MIC HPF

ON, 

OFF

This sets the high-pass filter on or off.

MAIN EQ Hi

-15 dB–

0 dB

–15 dB

This boosts or attenuates the high band.

MAIN EQ Hi FREQ

700 Hz–

8.00 KHz

–11.0 KHz

This adjusts the center frequency when changing the sound 

quality in the high band.

MAIN EQ Mid

-15 dB–

0 dB

–15 dB

This boosts or attenuates the middle band.

MAIN EQ Mid FREQ

20.0 Hz–

2.50 KHz

–10.0 KHz

This adjusts the center frequency when changing the sound 

quality in the middle band.

MAIN EQ Mid Q

0.5

–16.0

This adjusts the width of the frequency band when boosting or 

attenuating the middle band.

MAIN EQ Lo

-15 dB–

0 dB

–15 dB

This boosts or attenuates the low band.

MAIN EQ Lo FREQ

55 Hz–

110 Hz

–800 Hz

This adjusts the center frequency when changing the sound 

quality in the low band.

HDMI IN 1
   :
HDMI IN 4

REV SEND

0–

100

–127

This adjusts the send level of audio to Reverb.

Содержание VC-1HD

Страница 1: ... Enter the following URL in your computer http proav roland com I 2 Go to the V 1HD product page and click the Support tab Before using the V 1HD ensure that its system program is at the most recent version For information on available upgrades for the system program see the Roland website http proav roland com You can check the system program version by pressing and holding the TAP BPM button g V...

Страница 2: ...positing Using Luminance Key 22 Compositing Using Chroma Key 23 Compositing Using Picture in Picture 23 Compositing Using Split 24 Audio Operations 25 Adjusting the Volume Level 25 Applying Effects to Audio 26 Applying Effects to Input Audio 26 Applying Effects to Output Audio 27 Interlinking Audio Output to Video Switching Audio Follow 28 Other Features 29 Returning Settings to the Factory defaul...

Страница 3: ... make sure the line voltage at the installation matches the input voltage specified on the AC adaptor s body Other AC adaptors may use a different polarity or be designed for a different voltage so their use could result in damage malfunction or electric shock Use only the supplied power cord Use only the attached power cord Also the supplied power cord must not be used with any other device Do no...

Страница 4: ...ting it from this unit or from a power outlet Periodically clean the power plug An accumulation of dust or foreign objects between the power plug and the power outlet can lead to fire or electric shock At regular intervals be sure to pull out the power plug and using a dry cloth wipe away any dust or foreign objects that may have accumulated CAUTION Disconnect the power plug whenever the unit will...

Страница 5: ...or or mar the surface Do not place containers or anything else containing liquid on top of this unit Also whenever any liquid has been spilled on the surface of this unit be sure to promptly wipe it away using a soft dry cloth Maintenance Never use benzine thinners alcohol or solvents of any kind to avoid the possibility of discoloration and or deformation Repairs and Data Before requesting servic...

Страница 6: ...ough A 4 and B 1 through B 4 buttons function as memory selection buttons 1 through 8 5 5 Turning on the memory function displays the MEMORY menu on the monitor connected to the PREVIEW connector p 20 TAP BPM Button This sets the BPM tempo according to the timing with which you tap the TAP BPM button The indicator above the TAP BPM button flashes in sync with the current BPM setting 5 5 Pressing a...

Страница 7: ... Fader This functions as a T Bar video fader This performs switching between the bus A video and the bus B video 5 5 When a menu is displayed this changes setting values p 12 16 TRANSFORMER and Buttons These perform the operations assigned to the buttons such as switching between the bus A video and the bus B video without using the A B fader 5 5 When a menu is displayed these select menu items p ...

Страница 8: ...tor This outputs the video mixing result main output video Here you can connect a device such as an external display or projector HDMI input connector POWER Button This turns the power on and off FORMAT Switch This switches the input output format Before setting the input output format first be sure to turn off the power to the V 1HD To prevent the inadvertent disruption of power to your unit shou...

Страница 9: ...e V 1HD is designed to radiate heat from the entire rear panel Accordingly the rear panel might become hot during use but this is not a malfunction HDMI INPUT Connectors Here you input video signals from video cameras Blu ray Disc players or other video equipment and computers HDMI output connector PREVIEW Connector This outputs the incoming video on channels 1 through 4 as a four way split screen...

Страница 10: ...nformation Unsuitable places for connection 5 5 Water pipes may result in shock or electrocution 5 5 Gas pipes may result in fire or explosion 5 5 Telephone line ground or lightning rod may be dangerous in the event of lightning Side Panel for Equipment Connections MIC Jack Here is where you connect a microphone This accepts a miniature stereo phone plug You can also use plug in power microphones ...

Страница 11: ...cally Auto Off Auto Off is a feature that automatically turns off the power after no operation for a specific period of time This helps prevent wasting electrical power By factory default the Auto Off function is set on When the states described below persist for 240 minutes the Auto Off function acts to automatically turn off the power 5 5 No operation performed on the V 1HD 5 5 No audio or video...

Страница 12: ...the memory number containing the setting you want to change The currently selected button lights up in blue Selecting a memory number also recalls the saved settings 3 Press the MEMORY button to quit the menu AUDIO Menu 1 Press the AUDIO button to display the AUDIO menu 2 Press the AUDIO button to quit the menu Changing SettingValues 1 Use the and buttons to move the cursor and select a menu item ...

Страница 13: ... settings at a specified memory number at startup Press and hold the TAP BPM button g use POWER ON LOAD at the SETUP menu to specify the memory number you want to recall NOTE To update the state of the operation panel when recalling a memory By default the state of the operation panel is not updated when you recall a memory To update the state of the operation panel press and hold the TAP BPM butt...

Страница 14: ...frame rate press and hold the TAP BPM button g select FRAME RATE at the SETUP menu g select 59 94 or 50 g press the button Adjusting OutputVideo You can adjust the main output video or preview output video to match the equipment receiving output from the V 1HD MEMO 5 5 You can output a color bar useful for adjusting the image quality of a display Press and hold the TAP BPM button g set COLOR BAR O...

Страница 15: ... ray Disc player or the like you make the setting for enabling HDCP input The V 1HD must be connected to an HDCP compatible display for HDCP protected video to be connected What s HDCP HDCP is copyright protection technology that prevents unlawful copying of content by encoding the path when sending digital signals from a video playback device to a display monitor or other display equipment 1 Pres...

Страница 16: ...ideo is switched MEMO 5 5 You can change the color in which the A 1 through A 4 and B 1 through B 4 buttons light up Press and hold the TAP BPM button g at the SETUP menu use PGM LED buttons for current video output or PST LED buttons for next video output to make the setting 5 5 Directly selecting the video channel at the bus position of the video currently being output switches the video with a ...

Страница 17: ... 5 You can make the TRANSFORMER buttons dark Press and hold the TAP BPM button g set TRANSFORMER LED on the SETUP menu to OFF Changing the Operation of the TRANSFORMER Buttons 1 Press the MEMORY button to display the MEMORY menu 2 Use the and buttons to select TRANSFORMER A or TRANSFORMER B 3 Use the A B fader to specify the operation of the TRANSFORMER buttons Value Explanation NONE Button operat...

Страница 18: ...that is a multiple of the value set for BPM the TAP BPM button g use BPM SYNC at the SETUP menu to make the setting 5 5 When you use BPM sync to switch video the actual output might come to differ from the position of the A B fader Operating the A B fader while in this state yields no change in output until the position of the A B fader matches the actual output Setting BPM by theTiming of Pressin...

Страница 19: ... time the video transition takes within a range of 0 0 to 4 0 seconds These are effective when a mix or wipe is selected as the transition effect If the time the video transition takes is longer than the video display interval the next transition starts before the current transition is complete 4 Press the TAP BPM button to quit the menu Using a DifferentTransition Pattern A variety of transition ...

Страница 20: ...rts Freezing InputVideo Freeze This temporarily pauses the incoming video You can apply transition effects and other effects during a video freeze Setting the Freeze Mode Two operation modes are available for freezes the ALL mode and the SELECT mode By factory default this is set to ALL freeze all incoming video If you want to select the input video to freeze press and hold the TAP BPM button g se...

Страница 21: ...a specific color remaining POSTERIZE This changes the gradations in brightness SILHOUETTE This separates the video into light and dark areas and makes the dark areas black and adds a different color to the light areas MONOCOLOR This produces monochrome video FINDEDGE This extracts contours FLIP This flips the video 4 Press the MEMORY button to quit the menu MEMO 5 5 You can change the effect type ...

Страница 22: ...e video with its center section vertically cropped A B AB A B A B A B A B A B A B SPLIT HS This composites the video stretched horizontally A B AB A B A B A B A B A B A B SPLIT HC This composites the video with its center section horizontally cropped A B AB A B A B A B A B A B A B 4 Press the MEMORY button to quit the menu MEMO 5 5 You can change the effect type by holding down the EFFECTS A ON bu...

Страница 23: ...e in Picture This composites video in an inset screen onto a different background video Background video Inset screen 1 Follow the procedure in Selecting a Compositing Effect p 22 to select PinP 1 4 or PinP 1 2 2 Press the EFFECTS A or B ON button to turn on the effect lighted 3 Use the A 1 through A 4 and B 1 through B 4 buttons to separately select the video you want to use as the background and...

Страница 24: ...SPLIT HS or SPLIT HC 2 Press the EFFECTS A or B ON button to turn on the effect lighted 3 Press one of the A 1 through A 4 buttons to select the video you want to display above or on the left 4 Press one of the B 1 through B 4 buttons to select the video you want to display below or on the right 5 Turn the EFFECTS A and EFFECTS B knobs to adjust the center position You can adjust this when you sel...

Страница 25: ...t from the output connectors 4 Use the and buttons to select MASTER OUT LEVEL 5 Use the A B fader to adjust the volume level of output audio 6 Press the AUDIO button to quit the menu MEMO 5 5 When the AUDIO button is illuminated the A 1 through A 4 and B 1 through B 3 buttons function as shortcuts for AUDIO menu selection You can select audio whose volume level you want to adjust by pressing a sho...

Страница 26: ...is adjusts the center frequency when changing the sound quality in the low band Delay DELAY This outputs audio with a delay Delaying audio output lets you align the output timing of video and audio Menu item Explanation HDMI IN 1 HDMI IN 4 AUDIO IN MIC DELAY This adjusts the delay time for audio Compressor COMP This compresses audio that exceeds a specified level Menu item Explanation MIC COMP Thi...

Страница 27: ... Hi This suppresses high frequency distortion and adjusts the sound to have sustained tones MASTERING Mid This suppresses midrange distortion and adjusts the sound to have distinct tones MASTERING Lo This suppresses low frequency distortion and adjusts the sound to have stable tones Reverb REVERB This adds lingering reverberations to the audio You can apply reverb to audio input via AUDIO IN MIC a...

Страница 28: ... button to quit the menu 6 Switch the video When the video input channel is switched only the interlinked HDMI audio of the output video is output Other settings are required to use Audio Follow with audio input via AUDIO IN or MIC For details refer to Adding Audio Follow Associations on this page AddingAudioFollowAssociations You can use Audio Follow with audio input via AUDIO IN or MIC 1 Press t...

Страница 29: ... You can use V 1HD RCS or V 1HD Remote dedicated software to remotely control the following functions on the V 1HD from a computer or tablet connected via USB 5 5 V 1HD panel operations 5 5 Selecting transition effects 5 5 Audio mixer operation 5 5 Memory save load operations V 1HD V 1HD RCS Computer V 1HD Remote Tablet V 1HD RCS and V 1HD Remote can be downloaded from the following Roland website...

Страница 30: ...he color space setting on the V 1HD Go to the SETUP menu and make the setting for OUTPUT COLOR SPACE OUTPUT connector or PREVIEW COLOR SPACE PREVIEW connector Depending on the device the color space might be interlinked with the selection of DVI or HDMI or the selected format In such cases changing the color space on the output device might bring about improvement for the problem The edges of vide...

Страница 31: ...icated with s are soft edge transition patterns MIX MIX FAM NAM MOSAIC This specifies the transition pattern assigned to the MIX button 2 TRANSFORMER A NONE TRANSFORM WHITE BLACK BPM SYNC WIPE MIX CUT EFFECTS This specifies the Function assigned to the TRANSFORMER button TRANSFORMER B NONE TRANSFORM WHITE BLACK BPM SYNC WIPE MIX CUT EFFECTS This specifies the Function assigned to the TRANSFORMER b...

Страница 32: ...the level set here MIC COMP RATIO 1 0 1 INF 1 This specifies the degree of compression applied to the audio The state in which no compression is applied is defined as 1 MIC COMP ATTACK 0 2 ms 50 ms 100 ms This sets the time until compression starts when audio exceeding the threshold is input MIC COMP RELEASE 30 ms 500 ms 5000 ms This adjusts the length of time until compression ends after audio fa...

Страница 33: ...nction is turned on this sets the multiple of the BPM value to be used as the speed to switch is switched HDCP ON OFF When set to ON copyright protected HDCP video can be input HDCP is also added to the video that is output OUTPUT CONTRAST 64 0 63 This adjusts the contrast of the main output video OUTPUT SATURATION 64 0 63 This adjusts the color saturation of the main output video OUTPUT BRIGHTNES...

Страница 34: ...ifies the color used when the output video channel buttons A 1 A 4 B 1 B 4 light up PST LED RED GREEN YELLOW BLUE PURPLE L BLUE WHITE This specifies the color used when the buttons for the video channel to output next A 1 A 4 B 1 B 4 light up INPUT LED ON OFF When set to ON the A 1 A 4 and B 1 B 4 buttons light up flash and go dark as shown below Button Input video status Lighted in white Valid vi...

Страница 35: ...ix NAM The two video streams are compared and transitions are made with display during transition starting with levels of high luminance This is an abbreviation of non additive mix MOSAIC Transitions are made with mosaic pixelation WIPE The original video is broken into by the next video Normal H DOWN H UP V RIGHT V LEFT V IN V OUT H IN H OUT R DOWN L DOWN R UP L UP BLOCK V GRID H GRID Soft Edge H...

Страница 36: ...V FREEZE FORMAT HDMI INPUT 3 HDMI INPUT 4 HDMI INPUT 2 1 2 3 4 MULTI VIEWER EDID FS EDID FS EDID FS EDID FS 5 1080i 5 720p 5 1080p Audio Block AUDIO IN MIC HDMI 1 2 3 4 LEVEL FOLLOW DELAY GATE COMP HPF EQ PLUG IN POWER 3 3 V GAIN REVERB SEND LEVEL FOLLOW DELAY EQ REVERB SEND LEVEL FOLLOW DELAY EQ REVERB SEND ...

Страница 37: ...IEW MENU OSD HDMI OUTPUT OUTPUT FADE P I CONV P I CONV PGM PST 5 CUT 5 MIX 5 WIPE TRANSITION EFFECTS A 1 2 3 4 INPUT SELECT FORMAT 5 1080i 5 720p 5 1080p REVERB REVERB LEVEL REVERB L R PHONES AUDIO OUT MASTERING EQ MASTER LEVEL PHONES LEVEL HDMI OUTPUT HDMI PREVIEW ...

Страница 38: ...LORIZE COLORPASS POSTERIZE SILHOUETTE MONOCOLOR FINDEDGE FLIP WH LUMIKEY BK LUMIKEY GR CHROMAKEY BL CHROMAKEY PinP 1 4 PinP 1 2 SPLIT H STRETCH SPLIT H CENTER SPLIT V STRETCH SPLIT V CENTER marked Effects are effected common to A BUS and B BUS Audio Audio Processing Sampling rate 24 bits 48 kHz Input Connectors Digital HDMI INPUT 1 4 19 pins x 4 Analog AUDIO IN RCA pin type MIC Stereo mini type pl...

Страница 39: ...degrees Fahrenheit Dimensions 313 W x 102 D x 59 H mm 12 1 3 W x 4 D x 2 1 3 H inches Weight 1 2 kg excluding AC adaptor 2 lbs 10 2 5 oz Accessories Owner s Manual AC Adaptor Power Cord Cord Hook 0 dBu 0 775 Vrms In the interest of product improvement the specifications and or appearance of this unit are subject to change without prior notice ...

Страница 40: ...40 Appendices Dimensions Unit mm 313 102 3 35 59 38 ...

Страница 41: ...15 of the FCC Rules These limits are designed to provide reasonable protection against harmful interference in a residential installation This equipment generates uses and can radiate radio frequency energy and if not installed and used in accordance with the instructions may cause harmful interference to radio communications However there is no guarantee that interference will not occur in a part...

Страница 42: ...42 For China For EU Countries ...

Страница 43: ...rotection measures This is due to the fact that this product is intended to be used for the purpose of producing original music or video material and is therefore designed so that material that does not infringe copyrights belonging to others for example your own original works can be recorded or duplicated freely MMP Moore Microprocessor Portfolio refers to a patent portfolio concerned with micro...

Страница 44: ... 5 1 0 0 0 4 8 9 9 7 0 2 ...

Отзывы: