background image

10

Getting Ready

Using Headphones or Speakers

The R-07 has a built-in speaker. You can listen to the playback 

through this speaker, or you can connect headphones or speakers 

for listening. You can also connect Bluetooth headphones or 

speakers to the R-07 and listen wirelessly to the playback.
*  To prevent malfunction and equipment failure, always turn 

down the volume, and turn off all the units before making any 

connections.

Connecting External Speakers

*  Turn on power to your various devices in the order specified. 

By turning on devices in the wrong order, you risk causing 

malfunction and/or damage to external speakers and other 

devices.

1  

Switch off the R-07’s power.

2  

Minimize the volume of the external speakers you’ll 

be connecting, and turn off their power.

3  

Connect the external speakers.

You’ll need to use speakers that have a built-in amplifier.
Use an audio cable to connect the R-07’s PHONES jack to the line 

input jacks of your speaker system.

4  

Switch on the R-07’s power.

5  

Switch on power to the external speakers, and 

gradually increase the volume to an appropriate 

level.

Connecting 

Bluetooth

®

 Speakers or 

Headphones

Supported codecs: SBC, Qualcomm®aptX™ audio, 

Qualcomm®aptX™ Low Latency audio

Registering a Bluetooth device (Pairing)

“Pairing” is the procedure by which the mobile device that you 

want to use is registered on this unit (the two devices recognize 

each other).
Once a mobile device has been paired with this unit, there is no 

need to perform pairing again. After the R-07 starts, it searches for 

the previously-connected device, and connects automatically.

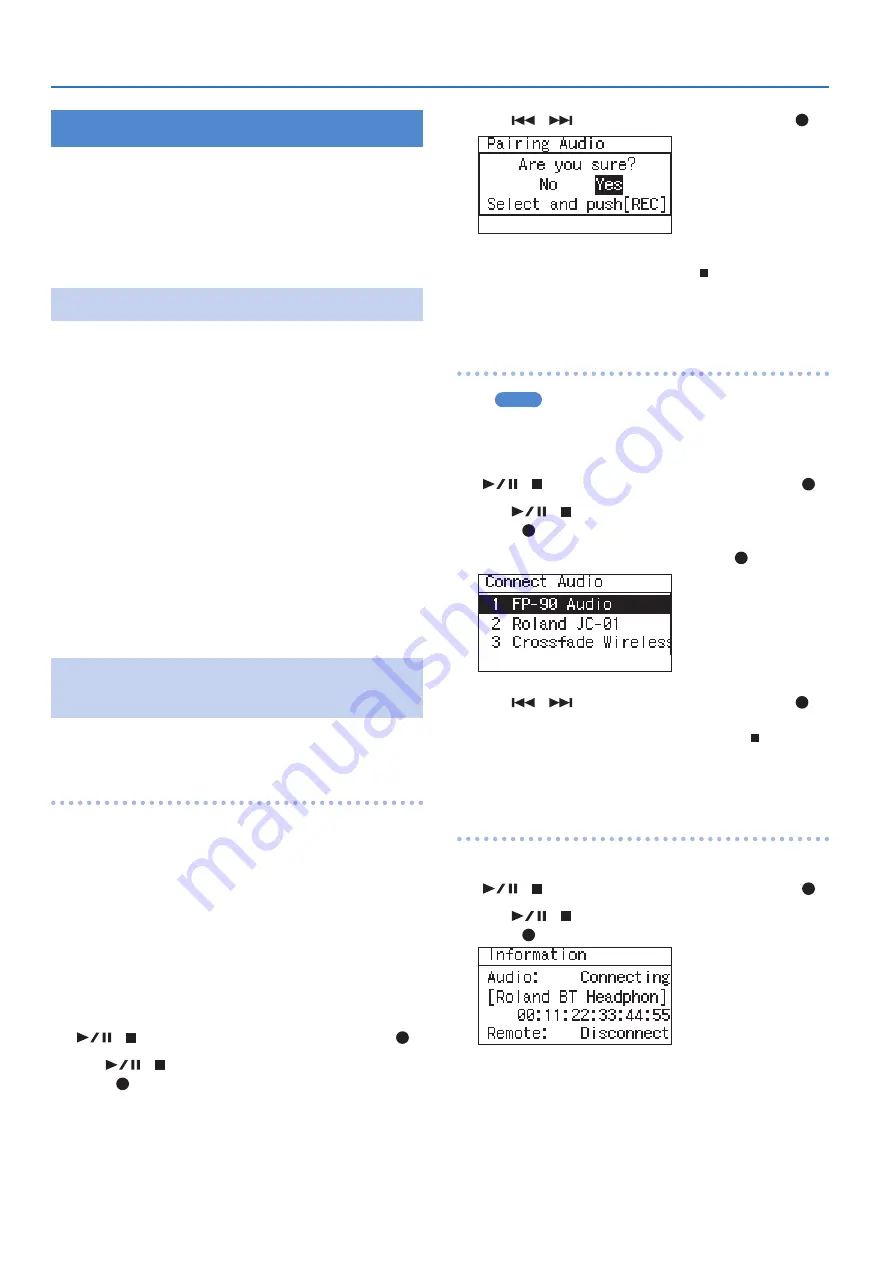
1  

Place the Bluetooth device that you want to 

connect near the R-07, power-on the device, and 

put it in pairing mode.

For details, refer to the owner’s manual of your Bluetooth device.

2  

Press [MENU] to access the “Menu” screen, use 

[

]/[ ] to select “Bluetooth,” and then press [ ].

3  

Use [

]/[ ] to select “Pairing Audio” and then 

press [ ].

4  

Use [

]/[

] to choose “Yes,” and then press [ ].

The display indicates “Pairing...,” and this unit waits for a response 

from the Bluetooth device. You can press [ ] to cancel the 

operation.
When pairing succeeds, the display indicates “Completed.” and 

sound can be output from the Bluetooth device.

Connecting an already-paired Bluetooth device

MEMO

If you initialize the settings (p. 40), the existing pairing 

information is erased. You’ll need to pair your device again.

1  

Press [MENU] to access the “Menu” screen, use 

[

]/[ ] to select “Bluetooth,” and then press [ ].

2  

Use [

]/[ ] to select “Connect Audio” and then 

press [ ].

3  

Select the playback device and press [ ].

4  

Use [

]/[

] to choose “Yes,” and then press [ ].

The display indicates “Connecting...,” and this unit waits for a 

response from the Bluetooth device. You can press [ ] to cancel 

the operation.
When pairing succeeds, the display indicates “Completed.” and 

sound can be output from the Bluetooth device.

Checking which Bluetooth device you’re connected to

1  

Press [MENU] to access the “Menu” screen, use 

[

]/[ ] to select “Bluetooth,” and then press [ ].

2  

Use [

]/[ ] to select “Information” and then 

press [ ].

3  

Press [MENU] three times to return to the main 

screen.

Содержание R-07

Страница 1: ...Reference Guide...

Страница 2: ...a File 23 Changing the Playback Speed 24 Using the INPUT Buttons to Change the Playback Speed 24 Applying Reverb to the Playback 24 Applying Reverb 24 Changing the Reverb Depth 25 Types of Files that...

Страница 3: ...contains marks this button advances to the next mark By holding down this button you can fast forward through the file You can do this during playback or while stopped This button also moves the curs...

Страница 4: ...SB cable that is designed only for charging a device Charge only cables cannot transmit data PHONES jack You can connect headphones here p 10 MIC AUX IN jack Use this if you want to connect an externa...

Страница 5: ...ling rate of the song being played Reverb status ON OFF Playback speed ON OFF Repeat status ON OFF Peak Current time Recording Song name Elapsed recording time Input level Record recording standby sta...

Страница 6: ...er Supply and press A screen like the following will appear in the display We ll call this the main screen 3 To turn the power off slide the POWER switch once again toward POWER for several seconds No...

Страница 7: ...type of battery that you re using Default in bold Battery ALKALINE Ni MH 3 Press MENU twice to return to the main screen Setting the Date andTime After you turn on the power for the first time you ll...

Страница 8: ...ver 5 Slide the POWER switch toward POWER for several seconds to turn on the power MEMO If an unformatted microSD card is inserted in the R 07 the screen will indicate SD Unformatted Removing an micro...

Страница 9: ...ure that the microSD card you want to format is inserted in the microSD card slot For details refer to Inserting a microSD Card p 8 2 Press Menu to access the Menu screen use to select SD Card and the...

Страница 10: ...ile device has been paired with this unit there is no need to perform pairing again After the R 07 starts it searches for the previously connected device and connects automatically 1 Place the Bluetoo...

Страница 11: ...you want to switch to a different Bluetooth device 1 Press MENU to access the Menu screen use to select Bluetooth and then press 2 Use to select Disconnect Audio and then press 3 Use to choose Yes an...

Страница 12: ...ected to the MIC AUX IN jack If you want to use the built in mics do not connect anything to the MIC AUX IN jack 5 5 The recording level will change if you operate the INPUT buttons in recording stand...

Страница 13: ...t Settings appropriate for recording a nearby instrument 44 1 kHz WAV 24 bit ON OFF 60 Vocal Settings appropriate for recording a nearby vocal 44 1 kHz WAV 24 bit ON 100 Hz 60 Voice Memo Settings appr...

Страница 14: ...an WAV allowing you to record for a longer length of time Higher settings for bit or bps will increase the file size shortening the available recording time WAV MP3 simultaneously creates both a WAV f...

Страница 15: ...70 2950 MP3 MP3 320 kbps 797 1540 3080 6450 12950 MP3 128 kbps 1993 3990 7980 16180 32350 WAV MP3 WAV 16 bit 48 kHz MP3 128 kbps 48 kHz 152 305 610 1240 2490 WAV 16 bit 44 1 kHz MP3 128 kbps 44 1 kHz...

Страница 16: ...the rehearsal function if Limiter is AGC Setting the Limiter 1 Press SCENE to access the Scene screen 2 Use to move the cursor to Limiter setting and use to change the setting Default in bold Limiter...

Страница 17: ...el cannot be set to a value of 1 41 The higher the level at which the sound is being captured the farther toward the right the level meter will move Use INPUT to adjust the level so that the sound is...

Страница 18: ...ure the two seconds of sound that preceded the moment you press Even for situations in which you re not sure when the desired sound will begin such as when recording outdoors this function ensures tha...

Страница 19: ...c jack can be used with the R 07 NOTE 5 5 To avoid acoustic feedback a whine or howling sound do not connect external speakers when you re recording via a mic 5 5 To prevent malfunction and or damage...

Страница 20: ...for recording lower level sounds such as acoustic instruments and conferences It requires power to be supplied from a battery or via plug in power Recording from a Cassette or CD In addition to record...

Страница 21: ...the point you press the button 3 Press to stop recording Splitting Automatically The R 07 can automatically split the file when the currently recorded file reaches a specified size or when the record...

Страница 22: ...ected file or play files in an automatically determined order shuffle play 1 Press MENU to access the Menu screen use to select Player and then press 2 Use to move the cursor to Play Mode setting and...

Страница 23: ...where a marker is assigned Repeatedly Playing a Portion of a File The AB Repeat function lets you repeatedly play a specified portion of a file You can use this to repeatedly hear a section of interes...

Страница 24: ...when playing back a file on the R 07 The reverb effect simulates the reverberation that is characteristic of a performance in a large hall or other space NOTE 5 5 You can t record the sound with reve...

Страница 25: ...th 1 10 3 Press MENU twice to return to the main screen Types of Files that Can be Played The R 07 can play back the following types of files Sampling rate kHz Sample size bits WAV 32 0 44 1 48 0 88 2...

Страница 26: ...le device MEMO The explanation here uses the iPhone as an example For details refer to the owner s manual of your mobile device Do not tap the R 07 that is shown in the Bluetooth settings of the mobil...

Страница 27: ...nizing the time with the mobile device When the R 07 Remote app is connected to the R 07 you can automatically synchronize the R 07 s time with the mobile device s time Date Time Adj OFF Don t synchro...

Страница 28: ...Press it again to stop If headphones are connected no sound will be output from the built in speaker 4 Use VOL to adjust the metronome s volume Sounding the Metronome During Recording You can listen t...

Страница 29: ...rence tone of the pitch you specified will be sounded from the built in speaker or in your headphones If you ve selected AUTO the A note will sound Press the once again to mute the reference tone Tune...

Страница 30: ...Hz 445 Hz 3 Facing the microphone play the note that you want to tune Adjust the pitch so that the graph value comes to the center 0 of the vertical axis When the pitch is correct the dashed line at...

Страница 31: ...ed 5 5 If your computer displays the message Insert a disk with this type of file click Cancel 6 Use to select Storage and press After a while the computer will detect the R 07 and the R 07 s display...

Страница 32: ...e Folder Press to enter a folder Press to leave a folder MEMO 5 5 You can rename a file or folder p 34 5 5 You can create a folder in a desired location p 37 Basic Operation Change the value Move the...

Страница 33: ...Use to turn the Protect setting on off When you turn the Write Protect setting ON the icon shown in the finder changes shape Write Protect ON OFF 3 Press MENU three times to return to the main screen...

Страница 34: ...nation and then press MEMO 5 5 If you select Root the file will be moved to the top level the root folder of the R 07 s card If you select a folder the file will be moved into that folder For details...

Страница 35: ...peration cannot be executed 5 Press MENU twice to return to the main screen Combining Files 1 In the Finder screen select a file 2 Choose Combine 3 Select the file that will be combined with the curre...

Страница 36: ...s a new file In this case the new file will have 1 automatically appended to its name The original file will remain unchanged If the original file is named R07_001 WAV the trimmed file will be created...

Страница 37: ...cel press MENU before you press 4 Press MENU twice to return to the main screen Creating a Folder 1 In the Finder screen select the location at which you want to create a folder To create a folder at...

Страница 38: ...change and use to change the value List of settings Category Finder Here you can copy or delete audio files that are on a microSD card inserted in the microSD card slot p 32 Category Input Menu item...

Страница 39: ...es whether Repeat will be enabled p 22 OFF ON Speed Specifies the playback speed p 24 50 60 70 80 90 100 110 120 130 140 150 Rev Type Specifies the type of reverb p 24 OFF HALL1 HALL2 ROOM PLATE Rev D...

Страница 40: ...bine or Trim OFF ON Category Date Time Specifies the date and time p 7 Category SD Card Menu item Effect Value default value bold Information Displays information about the microSD card Format Formats...

Страница 41: ...rd Cannot Change The file cannot be renamed because the file name contains double byte characters Over 2GB The file contains too much data SD Card Slow Writing to the microSD card could not be perform...

Страница 42: ...has not been formatted it will not be recognized and the display will indicate SD Unformatted Please format the microSD card p 9 The microSD card will not work properly unless it was formatted on the...

Страница 43: ...ave been disconnected causing the power to turn off If you re using batteries make sure that they are oriented correctly and not loose in the compartment If the batteries have run low install fresh ba...

Страница 44: ...ck up the sound from your headphones The R 07 s built in mics are able to detect even faint sound so keep your headphones away from the built in mics p 19 Internal clock is reset When a USB AC adaptor...

Страница 45: ...ty 2 GB 4 GB 8 GB 16 GB 32 GB WAV WAV 24 bit 96 kHz 55 110 220 450 900 WAV 24 bit 88 2 kHz 60 120 240 490 980 WAV 24 bit 48 kHz 110 220 440 900 1800 WAV 24 bit 44 1 kHz 120 240 480 980 1950 WAV 16 bit...

Страница 46: ...ile Support A2DP AVRCP CODEC Support SBC Qualcomm aptX Qualcomm aptX low latency Effects Playback only Excludes playback in 88 2 kHz or 96 kHz Reverb and Speed Change can t be used at the same time Re...

Отзывы: