background image

18

Rockwell Automation Publication 1492-QS003B-EN-P - October 2019

Chapter 3

   Load Material

Adjust the Label Sensor

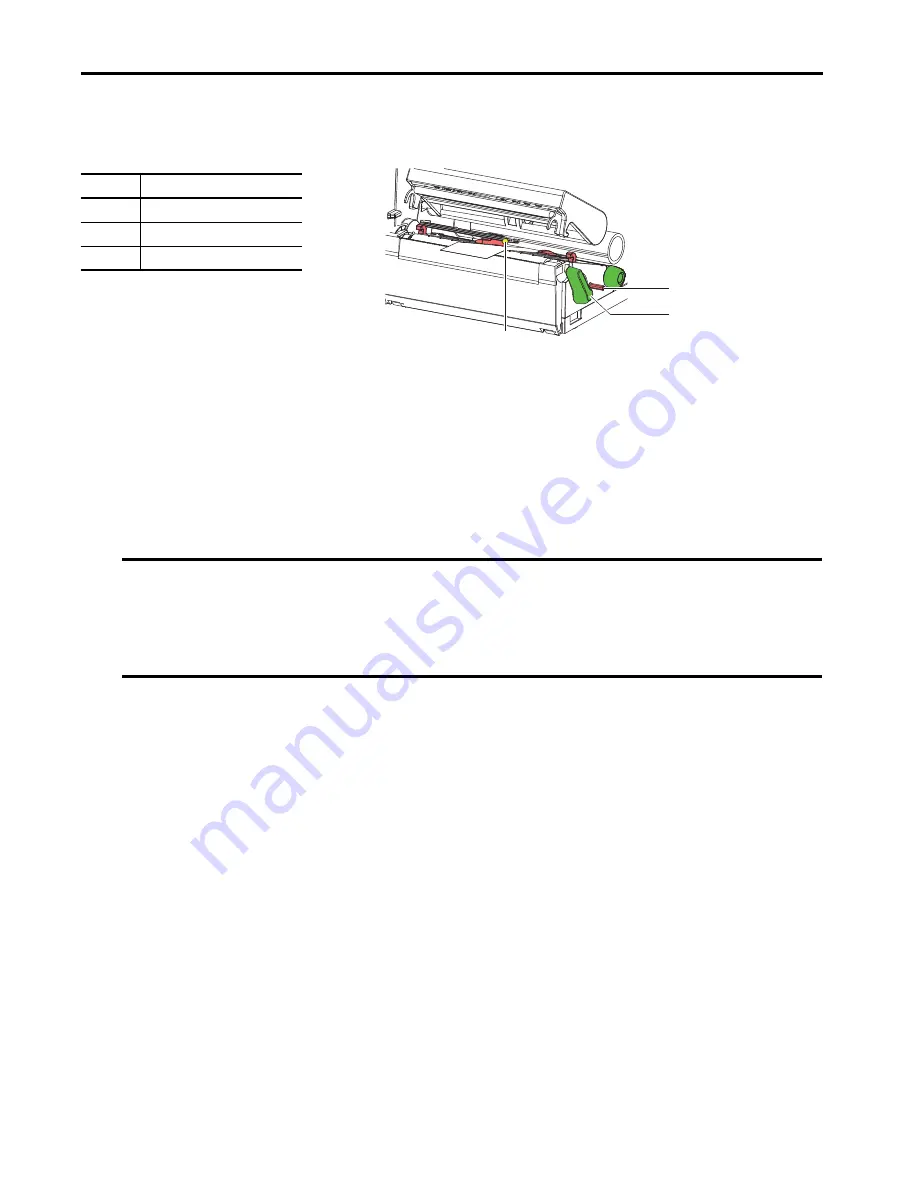
Table 9 - Adjust Label Sensor

The label sensor position is marked with a yellow Status Indicator in the sensor retainer.

1. Press the label sensor adjustment knob (1) using a pointed object, so that the knob pops out of the bore of the 

housing.

2. Position the label sensor (3) by turning the sensor adjustment knob (1) so that the sensor can detect the front edge 

of the label in the direction of paper flow or cut-out mark.

3. Push the sensor adjustment knob(1) back into the bore of the housing using a pointed object until it snaps into 

place.

Item

Description

1

Sensor adjustment knob

2

Print head lock lever

3

Label sensor

IMPORTANT

When the printer is delivered, the label sensor is positioned in the middle of the paper feed. The label sensor must only 
be adjusted if:

• Material with reflex /cut-out marks not in the middle.
• Multi-strip material with an even number of strips.
• Material with irregularly shaped labels are used.

1

3

2

Содержание Allen-Bradley ClearMultiprint 1492-PRINTCMP

Страница 1: ...ClearMultiprint Marking System Catalog Number 1492 PRINTCMP Quick Start OriginalInstructions...

Страница 2: ...on Inc with respect to use of information circuits equipment or software described in this manual Reproduction of the contents of this manual in whole or in part without written permission of Rockwell...

Страница 3: ...nect to a Computer or Computer Network 12 USB Installation 12 Network Installation 13 Chapter2 Control Panel Touch Screen Display 15 Operating the Touch Screen 15 Start Display Symbols 15 Chapter3 Loa...

Страница 4: ...2019 Table of Contents Chapter7 Maintenance Clean the Print Head 27 Clean Change or Replace the Print Roller 28 AppendixA Media and Transfer Ribbon Installation Media Installation 29 Outside 29 Insid...

Страница 5: ...se documents contain additional information concerning related products from Rockwell Automation You can view or download publications at http www rockwellautomation com global literature library over...

Страница 6: ...6 Rockwell Automation Publication1492 QS003B EN P October 2019 Preface Notes...

Страница 7: ...ge Familiarize yourself with the printer Table 1 Printer with Tear off Plate Table 2 Printer Mechanics Item Description 1 Cover 2 Margin stops 3 Roll retainer 4 Ribbon supply hub 5 Ribbon take up hub...

Страница 8: ...ounded socket Quantity Cat No Description 1 1492 PRINTCMP ClearMultiprint Marking System 2 Power Cables North American and European 1 25 mm 0 98 in Ink Ribbon forTerminal BlockTags Cat No 1492 PRIBTB...

Страница 9: ...be transmitted for a new print job the new print job starts when the previous one has finished Pause Pause The operator interrupts the printing process Correctable Error The ErrorType and number of l...

Страница 10: ...492 QS003B EN P October 2019 Chapter 1 Installation Install the ClearTools Software 1 Load the ClearTools Software DVD 2 Click Software 3 Click ClearTools Software Installation 4 Click Yes 5 Click Nex...

Страница 11: ...ion Chapter 1 7 Click Typical 8 Click OK 9 Click Install 10 Click Finish Install the Printer and Drivers Installation of the ClearMultiprint marking system is done by the ClearTools Software Connectin...

Страница 12: ...e Tools menu click Printer Administration Printer Explorer 3 Click Add to add the ClearMultiprint marking system The following dialog box appears 4 Click USB to start the printer search The search res...

Страница 13: ...s connected and accessible the following dialog box appears If the printer is not accessible for example it is turned off the following appears Network Installation 1 Start the ClearTools Software 2 F...

Страница 14: ...ayed if the printer is not found For example if the printer is turned off or if there is a network connectivity issue 7 Click Properties to change the printer name 8 Enter the printer name in the disp...

Страница 15: ...e display Start Display Symbols Table 8 Start Display Symbols Item Description 1 Touch Screen Display indicates the status of the printer and the print job It also indicates faults and shows the print...

Страница 16: ...16 Rockwell Automation Publication1492 QS003B EN P October 2019 Chapter 2 Control Panel Notes...

Страница 17: ...ix the margin stop 1 on the roll retainer 4 5 Turn lever 8 counterclockwise to open print head 6 Position guides 5 by turning the knob 7 so that they are several millimeters wider than the material 7...

Страница 18: ...knob 1 so that the sensor can detect the front edge of the label in the direction of paper flow or cut out mark 3 Push the sensor adjustment knob 1 back into the bore of the housing using a pointed o...

Страница 19: ...bon core 3 and push ribbon core on the take up hub 5 6 Guide transfer ribbon 4 though the printing unit as shown in Appendix A Refer to Transfer Ribbon Installation on page 30 7 Secure the end of the...

Страница 20: ...ead to print image errors Transfer ribbon deflection can be adjusted to help prevent wrinkles 1 Turn the ribbon adjustment screw 1 with a Torx wrench TX10 and observe the ribbon Turn clockwise to tigh...

Страница 21: ...Media from Product Catalog 1 From the product catalog under the ClearMultiprint Folder double click the desired marker or label catalog number 1492 MT6X12 from the variant list 2 Click Automatic The...

Страница 22: ...all tags 6 Click from the tool bar Map the Printer 1 From the File menu choose Print or CTRL P 2 From the Printer menu select the ClearMultiprint name or serial number 3 Click Map 4 Click Print ab IMP...

Страница 23: ...m number of capital Xs on each tag per the media that are selected for calibration example 1492 MT6X12 3 Place five capital Xs in size 8 pt font on five tags 4 Select all your tags by using CTRL A 5 C...

Страница 24: ...k the ellipsis 4 Visually check the printed tag and see where the Xs are in relationship to the tag If your Xs are shifted down on the tag see Figure A If your Xs are shifted up on the tag see Figure...

Страница 25: ...Solution Print image has smears or voids Print head is dirty Clean the print head Temperature too high Decrease the temperature using the driver Unsuitable combination of labels and transfer ribbon U...

Страница 26: ...26 Rockwell Automation Publication1492 QS003B EN P October 2019 Chapter 6 Fault Correction Notes...

Страница 27: ...oper handling can cause print head damage Do not touch the underside of the print head with the fingers or sharp objects Confirm that the labels are clean SHOCK HAZARD Disconnect the printer from the...

Страница 28: ...Conformity with the EEE Regulation Battery Notice This product contains Perchlorate material Special handling may apply For more information go to http www dtsc ca gov hazardouswaste perchlorate Item...

Страница 29: ...Rockwell Automation Publication1492 QS003B EN P October 2019 29 Appendix A Media andTransfer Ribbon Installation Media Installation Outside Inside...

Страница 30: ...A Media andTransfer Ribbon Installation Transfer Ribbon Installation Outside 60 mm 2 36 in ribbon for heat shrink Cat No 1492 PRIBHS Inside 25 mm 0 98 in ribbon for terminal block tags catalog number...

Страница 31: ...the code to route your call directly to a technical support engineer http www rockwellautomation com global support direct dial page Literature Library Installation Instructions Manuals Brochures and...

Отзывы: