background image

Page 9

VIS300C InSpec User Guide

Generic Optical Power Meter (OPM) Testing

First if you are not using the built in power meter use the device specific instructions above to 

connect your power meter. Next navigate to the OPM Page.

1

2

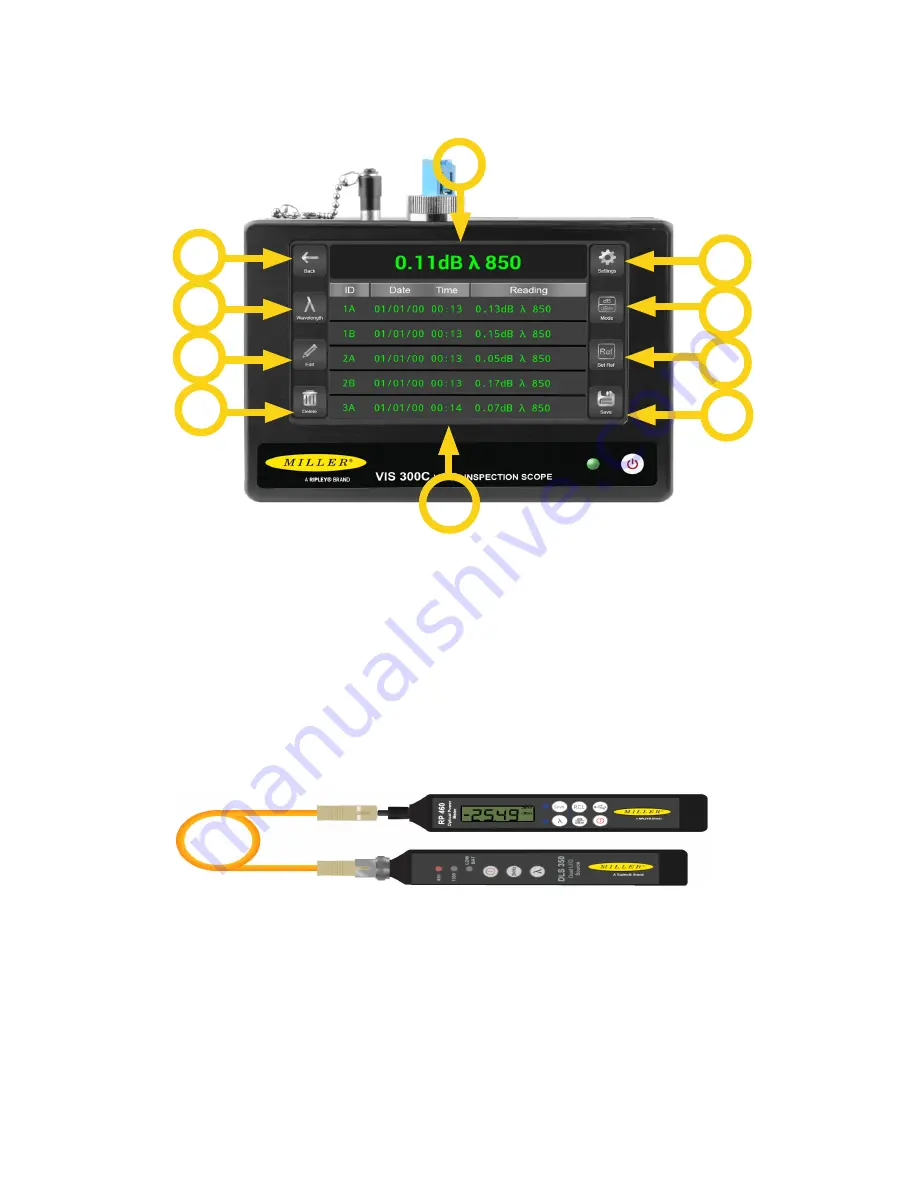
1). A live reading from the OPM will be displayed here.

2). The "Back" button will return you to the home page

3). Pressing the gear in the top left will bring you to the settings page where you can set Min/Max 

values and change the selected color code.

4). Pressing the "Wavelength" button will allow you to select which wavelength the OPM is streaming.

5). Pressing the "Mode" button will cycle through available modes.

6). Pressing the "Edit" button will allow you to rename a selected reading.

7). To set a reference first connect your OPM and a companion light source as shown below. Ensure 

the unit is in dBm and you are reading the correct output power for the laser/LED you are using 

Ripley Lasers are calibrated at -5 (or-8 with tone on) and LEDs are calibrated at -22 (or -25 with tone 

on). Next press the "Set Reference" button in the software and verify that the power meter now reads 

within .05 of 0 and is in dB mode.  This is only supported on some power meters.

8).Pressing the "Delete" key will delete the selected reading from the list. of saved readings.

9).Pressing the "Save" key will add a copy of the current reading to the list of saved readings.

10). In the middle of the screen all saved readings will be listed  as well as the time they were taken. 

selecting these will allow you to rename and delete them.

4

6

8

3

5

7

9

10

Offloading from a Power Meter

To offload from a supported power meter simply connect the OPM as shown in the device specific 

instructions above, then offload using the same instructions above while on the OPM Page. This will 

immediately add all saved readings on the device to your saved readings on the VIS300C. This will not 

affect the saved readings on the OPM.

Содержание MILLER VIS300C

Страница 1: ...VIS300C Standalone Fiber Inspection Kit User Guide...

Страница 2: ...60 Overview Generic OPM Testing Offloading from a Power Meter Generic Scope Single Fiber Testing Generic Scope MPO Testing Color Code Creation Updateing the Software Report Settings Project Management...

Страница 3: ...This guide will serve as a manual to outline the major features of the VIS300C and provide guidance in the use of those features to generate accurate and complete reports Read and understand all of th...

Страница 4: ...oward non reflective surfaces to prevent reflection of laser Electric Shock Hazard Pay attention to proper battery polarity Do not mix battery types or manufacturers Do not open the unit with the exce...

Страница 5: ...he VFL provides fault detection and continuity testing on fiber runs up to 5km VIS300C Variant Summary Part Number Functions Common Uses Adapters Accessories included Hardware Notes VIS300C Base Model...

Страница 6: ...IS300C to a compatible Windows PC 4 The full color touch senesitive LCD on the VIS300C provides the user interface for most of the units functions 5 The USB port on the side is used to plug in an insp...

Страница 7: ...dicate that it is turning off then the LED LCD and any scope power meter and the unit will be turned off fully Battery LED States Green 100 to 31 Battery Remaining Orange 30 to 11 Battery Remaining Re...

Страница 8: ...PM100 simply plug it into a USB Port and the OPM Page will become available if it was not before The UPM100 should not be used if there is a built in power meter RP560 Overview The RP560 allows for ei...

Страница 9: ...rrect output power for the laser LED you are using Ripley Lasers are calibrated at 5 or 8 with tone on and LEDs are calibrated at 22 or 25 with tone on Next press the Set Reference button in the softw...

Страница 10: ...2Hz and Off 4 Pressing the Projects button will bring you to the project management page where you can create select and closeout projects 5 Pressing the Save button will bring up the Save popup on t...

Страница 11: ...es and basic symbols 3 This is an optional comment entry This is limite to 255 characters and has the same naming restriction as the name entry above 4 Cancel will cancel the save and return to the ho...

Страница 12: ...ates etc 3 Pressing the VFL button will cycle through the VFL s power mode On 2Hz and Off 4 Pressing the Projects button will bring you to the project management page where you can create select and c...

Страница 13: ...symbols 3 This is an optional comment entry This is limite to 255 characters and has the same naming restriction as the name entry above 4 Previous core will select the previous core on the left 5 Nex...

Страница 14: ...tomizable entries for each color code 5 The Group entry is one of the 4 user customizable entries for each color code 6 The Fiber entry is one of the 4 user customizable entries for each color code 7...

Страница 15: ...ithout saving the changes Export Project will allow you to share your current project and import it on a windows PC Project Management First Press Projects from the home page From here pressing the Cr...

Страница 16: ...e in the name Offloading Reports Over Micro USB Offloading ReportsWith a Flash Drive Certifications and Contact Information Contact us with any questions pertaining to this or any other Ripley product...

Отзывы: