


8
For more information visit
1.
Double-click on the
Rimage System Manager
shortcut on your desktop.
2.
Click on the
Configure Bins
...
button
with
i
n the
Media
section of Rimage
System Manager.
3.
If only using one
Media Type
(CD/DVD/Blu-ray), choose that
Media Type
and configure the bin designations as desired.
4.
If using multiple media types, choose Combination as the
Media Type
and configure the bin designations as needed.
5.
Click on
OK
.
Bin Settings
, Loading, and Label Creation
Tip:
Changing the bins may change the picking configuration. For
example, if bin
2
is configured for input DVDs, a DVD job will pull
directly from bin
2
instead of the system default of bin
1
. The
competed DVD will then be deposited into the chosen output bin, or,
if not successfully completed, to the bin selected for rejects.
8.
3
: Refreshing Bin Levels
Selecting
Refresh Bins
resynchronizes
the quantities of media in each bin
so that it shows correctly on the control panel display
and in Rimage
System Manager
.
This
should be done after adding media to one or more
bins after startup. Because
the system
cannot register the
updated
quantities until the lift arm determines the new amount
, the display will
show
"
?? ?? ??
"
as the bin qualities until the
l
evels
have been
refreshed.
1.
To refresh bin levels, double-click on the
Rimage System Manager
shortcut on your desktop.
2.
Click the
Refresh
Bins...
button within the Media section of
Rimage System Manager.
3.
Click
OK
.
Important:
If, after following the
Refreshing Bin Level
instructions,
the
lift arm has not recounted the media, you will need to manually
rotate the disc carousel at least one quarter turn in either direction
and repeat steps 2 and 3 above.
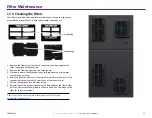
8.
2
: Loading Discs
You can load up to 50 discs in each input bin. Use the procedure below to
load discs in each bin.
1. Open the front door.
2.
3.
Press the rotate carousel button as needed to rotate the carousel to
the desired bin.
Add required type and number of discs, placing them so the
recording surface is face down.
4. Repeat steps 2 - 3 until the required bins are filled.
5. Close the front door.
8.4
: New Label Creation
1.
Double-click the
CD Designer
shortcut on your desktop.
2.
Click on
Start a new CD Designer document..
.
3.
Choose
Blank Template
and click on
Next
.
4.
Retain the
Default
printer setting and click
Next
.
5.
Choose
Full Surface
or
Standard
, depending on your needs and disc
type, and click
Next
.
6.
Select from the following
Background Features
:
•
Color
: This allows you to use a fill color as your background
•
Picture
: This allows you to use an image as your background
•
Template Image
: This allows you to use a set image of a
completed design and manipulate images and text
in the
foreground
to conform
to that set image.
8.
1
:
Changing the Bin Configuration
Through the Rimage Software Suite, you may
specify a media type for
each media bin and
designate bins
as I
nput,
O
utput,
Reject, Reserved,
Collate, or Unused.
2004849_A
Содержание Professional 2450
Страница 1: ...Rimage Professional 2450 User Guide...


