


1
7
Filter
Maint
e
n
a
nce
For more information visit
rimage.com/support
2004849_A
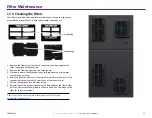
1.
Remove the filters
from the vents
by squeezing the long edges of the
filter
casings
and
pulling outward.
2.
Remove the
filter sponges from the
filter
casing
s
.
3.
Rinse both sides of each
sponge
under cold tap water until the water
runs
through it clearly.
4.
Gently ring out the water until no droplets are visible in the mesh of the
sponges
, being cautious not to stretch out or tear the material.
5.
Put the sponges back into the
filter
casing.
6.
Reinstall the filters by again squeezing the long edges of the filter holder
until the filters are securely fixed to the case vent
s
. See the image to the
right for correct placement.
1
7
.
1
: Cleaning the
Filters
Your filters should be cleaned with water
when you can see that they have
accumulated a layer of dust
. Please follow these steps to do so:
Filter Casing
Filter Sponge
Tip:
If your filters become worn or damaged, contact Rimage
Support for replacements.
Содержание Professional 2450
Страница 1: ...Rimage Professional 2450 User Guide...


