


6
For more information visit
rimage.com/support
Status
Light
and Control Panel
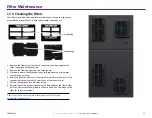
6.1: Status Light
The Professional 2450 is equipped with a built-in status light that indicates
various conditions. The table below illustrates status light states and
explains the conditions indicated by each state.
6.2: Control Panel
The control panel is located on the front of
the 2450. It includes the
operator panel,
the rotate carousel button (button 1), and the printer tray button
(button 2). The table below identifies the name and function of all parts of
the control panel.
Important:
You must open the front door of the autoloader to access
the control panel.
Light State
System Condition
Green light
on
The system is operating properly. No jobs are currently
processing.
Green light
blinking
The system is operating properly. Jobs are currently
processing.
Yellow
light on
The autoloader is waiting for the software to start. If
the control center is not started, power on the control
center. Check the cable connections on the autoloader
and control center.
Yellow
light
blinking
The front door
is
open. Close the front door to allow
jobs to process.
Red light
on
A
red
light could indicate several issues
. The most
common are as follows
:
•
The carousel is out of blank discs.
•
A system error requires operator intervention.
•
An
error with the printer or recorders
occurred
at initial startup
.
To help determine these and other red light system
conditions, check the client workstation or control
center for a message.
Name
Function
Operator
panel
The operator panel has a two-line display that informs
you of operations or conditions that require operator
intervention. This includes the consumable status.
Refer to the
Display Name and Beeper Settings
section
on page
1
0 to see other options
for configuration
.
Rotate carousel
button (button 1)
Press the rotate carousel button to
:
• Rotate the carousel and position a bin to load and
unload discs. Each time you press the rotate carousel
button, the carousel rotates to the next bin.
• Enter diagnostic test mode
.
Refer to the
Diagnostic Test
Instructions
on the documentation disc that shipped
with your system.
Printer tray button
(button 2)
Press the printer tray button to:
• Open and close the printer tray
• Reset after an error
Printer indicator
light (on the printer
tray button)
The printer indicator light illuminates when the printer
is powered on and has completed initialization.
The
printer indicator light
also
flashes when the Everest 400
printer is receiving data from the host.
Rotate carousel
indicator light (on
the rotate carousel
button)
The rotate carousel indicator light illuminates when
you rotate the carousel.
The rotate carousel indicator
light
also
flashes when the autoloader is receiving data
from the host.
2004849_A
Содержание Professional 2450
Страница 1: ...Rimage Professional 2450 User Guide...


