


CARTON CONTENTS
UNPACKING AND CHECKING CONTENTS
This 8” Buffer will require a minimal amount of
assembly.
1. Remove all of the parts from the carton and lay
them on a clean work surface.
2. Remove any protective materials and coatings
from all of the parts. The protective coatings can
be removed by spraying WD-40 on them and
wiping it off with a soft cloth. This may need to be
redone several times before all of the protective
coatings are removed completely.
CAUTION: DO NOT
use acetone, gasoline or
lacquer thinner to remove any protective coat
-
ings.
3. Compare the items to Figure C; verify that all
items are accounted for before discarding the
shipping box.
If any parts are missing,
do not attempt to plug in the power cord and
turn “ON” the machine. The Buffer must only
be turned “ON” after all the parts have been
obtained and installed correctly.
Page 8
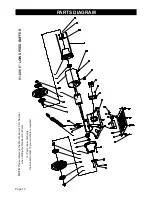
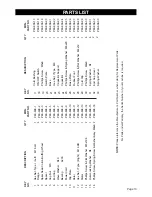
NOTE:
Full Parts Diagram and Parts List are listed on pages 12 and 13.
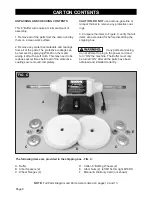
The following items are provided in the shipping box - FIG. C:
FIG. C
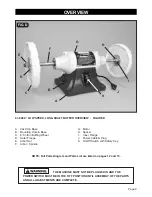
A. Buffer
B. Arbor Spacers (2)
C. Wheel Flanges (4)
D. Cotton 8” Buffing Wheels (2)
E. Arbor Nuts (2); left M16LH & right M16RH
F. Manual & Warranty Card (not shown)
A
E
C
C
D
B


