Rikon Power Tools 81-608 Скачать руководство пользователя страница 6

IMPROPER ELECTRICAL CONNECTION

 of the 

equipment grounding conductor can result in risk 

of electric shock. The conductor with the green 

insulation (with or without yellow stripes) is the 

equipment grounding conductor. 

DO NOT


connect the equipment grounding conductor 

to a live terminal if repair or replacement of the 

electric cord or plug is necessary.

CHECK

 with a qualified electrician or service 

personnel if you do not completely under-stand 

the grounding instructions, or if you are not sure 

the tool is properly grounded.

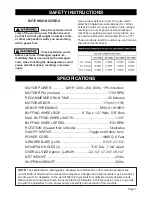
USE ONLY A 3-WIRE EXTENSION CORD 

THAT HAS A 3-PRONG GROUNDING PLUG 

AND A 3-POLE RECEPTACLE THAT 

ACCEPTS THE TOOL’S PLUG. REPLACE A 

DAMAGED OR WORN CORD IMMEDIATELY.

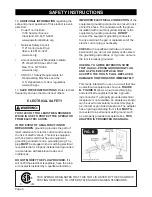
This tool is intended for use on a circuit that has 

an electrical receptacle as shown in 

FIGURE 

B.  FIGURE B

 shows a 3-wire electrical plug 

and electrical receptacle that has a ground

-

ing conductor. If a properly grounded electrical 

receptacle is not available, an adapter as shown,


can be used to temporarily connect this plug to 

a 2-contact ungrounded receptacle. The adapter 

has a rigid lug extending from it that 

MUST

 be 

connected to a permanent earth ground, such 

as a properly grounded receptacle box. 

THIS 

ADAPTER IS PROHIBITED IN CANADA.


16. 

ADDITIONAL INFORMATION

 regarding the 

safe and proper operation of this product is avail

-

able from:

• 

Power Tool Institute

         1300 Summer Avenue

         Cleveland, OH 44115-2851

         www.powertoolinstitute.org

• 

National Safety Council

         1121 Spring Lake Drive

         Itasca, IL 60143-3201

         www.nsc.org

• 

American National Standards Institute

         25 West 43rd Street, 4th Floor

         New York, NY 10036

         www.ansi.org

• 

ANSI 01.1 Safety Requirements for

         Woodworking Machines and the

         U.S. Department of Labor regulations

         www.osha.gov

17. 

SAVE THESE INSTRUCTIONS.

 Refer to them 

frequently and use them to instruct others.

ELECTRICAL SAFETY

THIS 120 VOLT TOOL MUST BE GROUNDED 

WHILE IN USE TO PROTECT THE OPERATOR 

FROM ELECTRIC SHOCK.

IN THE EVENT OF A MALFUNCTION OR 

BREAKDOWN

, grounding provides the path of 

least resistance for electric current and reduces 

the risk of electric shock. This tool is equipped 

with an electric cord that has an equipment 

grounding conductor and a grounding plug. The 

plug 

MUST

 be plugged into a matching electrical 

receptacle that is properly installed and grounded 

in accordance with 

ALL

 local codes and 

ordinances.

DO NOT MODIFY THE PLUG PROVIDED.

 If it 

will not fit the electrical receptacle, have the prop

-

er receptacle installed by a qualified electrician.

SAFETY INSTRUCTIONS

Page 6

FIG. B

THIS SYMBOL DESIGNATES THAT THIS TOOL IS LISTED BY THE CSA GROUP 

TESTING SERVICES,  TO UNITED STATES AND CANADIAN STANDARDS

Содержание 81-608

Страница 1: ...nual Record the serial number and date of purchase in your manual for future reference Serial Number ______________________ Date of purchase ______________________ For technical support or parts quest...

Страница 2: ...ngle most important consideration in the operation of this equipment The following instructions must be followed at all times Failure to follow all instructions listed below may result in electric sho...

Страница 3: ...is used to ground the tool and provide protection against accidental electric shock DO NOT remove the 3rd prong See Grounding Instructions on page 6 4 AVOID A DANGEROUS WORKING ENVIRONMENT DO NOT use...

Страница 4: ...s 24 STAY ALERT WATCH WHAT YOU ARE DOING AND USE COMMON SENSE WHEN OPERATING A POWER TOOL A moment of inattention while operating power tools may result in serious personal injury 25 ALWAYS WEAR A DUS...

Страница 5: ...and thrown by the wheel damage to your fingers may result 8 DO NOT STAND IN FRONT OF THE BUF FER WHEN STARTING IT Stand to one side of the Buffing and turn it ON Wait at the side for one minute until...

Страница 6: ...HIBITED IN CANADA 16 ADDITIONAL INFORMATION regarding the safe and proper operation of this product is avail able from Power Tool Institute 1300 Summer Avenue Cleveland OH 44115 2851 www powertoolinst...

Страница 7: ...TOR POWER 1 2HP 120V 2 5A 60Hz 1Ph Induction MOTOR RPM no load 1750 RPM RECOMMENDED RUN TIME 30 Minutes MOTOR ARBOR 17mm 11 16 ARBOR THREADING M16LH M16RH BUFFING WHEEL SIZE 8 Dia x 1 2 Wide 5 8 Bore...

Страница 8: ...T use acetone gasoline or lacquer thinner to remove any protective coat ings 3 Compare the items to Figure C verify that all items are accounted for before discarding the shipping box If any parts are...

Страница 9: ...nge J Power Cable Plug K On Off Switch with Safety Key 81 608 8 LOW SPEED LONG SHAFT BUFFER OVERVIEW FIGURE D Page 9 NOTE Full Parts Diagram and Parts List are listed on pages 12 and 13 THE MACHINE MU...

Страница 10: ...d by rotating it coun terclockwise onto the threaded shaft The right hand arbor hex nut is right hand threaded and is linstalled by rotating it clockwise onto the shaft 7 Install the second buffing wh...

Страница 11: ...y of surface shapes of your work piece Excessive pressure may slow down the rotating buffing wheel and motor This can cause uneven marks on the work piece and overheat the motor DO NOT buff using the...

Страница 12: ...TS DIAGRAM 81 608 8 LOW SPEED BUFFER Page 12 NOTE Please reference the Manufacturer s Part Number when calling for Replacement Parts For Parts under Warranty the Serial Number of your machine is requi...

Страница 13: ...608 15 P80 608 16 1 1 4 1 1 1 1 1 2 1 4 4 1 6 6 2 2 17 18 19 20 21 22 23 24 25 26 27 28 29 30 31 32 33 Cord Bushing ON OFF Switch Phillips Screw M5x8 Switch Plate Base Hex Nut I Type M8 Capacitor Sup...

Страница 14: ...plugged in 2 Power switch in OFF position 3 Power switch or cord is faulty 4 Fuse or circuit breaker are open 1 Plug power cord into electrical receptacle 2 Lift switch to ON position 3 Replace switch...

Страница 15: ...anty card that was included with your order and send it to RIKON Warranty 16 Progress Road Billerica MA 01821 The card must be entirely completed in order for it to be valid If you have any questions...

Страница 16: ...www rikontools com 81 608M1 81 608 For more information 16 Progress Road Billerica MA 01821 877 884 5167 978 528 5380 techsupport rikontools com...

Отзывы: