
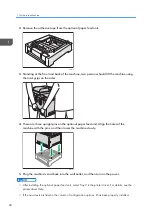

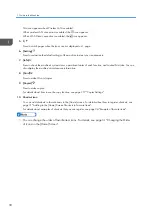


2.
Remove the adhesive tape from the optional paper feed unit.
DPP210
3.
Standing at the front and back of the machine, two persons should lift the machine using
the inset grips on the sides.
DUE287
4.
There are three upright pins on the optional paper feed unit. Align the holes of the
machine with the pins, and then lower the machine slowly.
ECC107
5.
Plug the machine's cord back into the wall outlet, and then turn on the power.
• After installing the optional paper feed unit, select Tray 2 in the printer driver. For details, see the
printer driver Help.
• If the new device is listed in the column of configuration options, it has been properly installed.
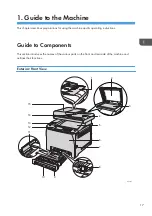
1. Guide to the Machine
26
Содержание M C251FW
Страница 2: ......
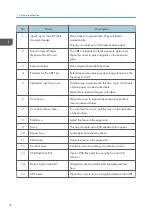
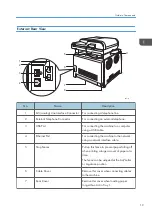
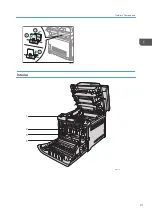
Страница 23: ...3 2 1 ECC105 Interior ECC106 4 3 2 1 Guide to Components 21 ...
Страница 45: ...Deleting characters 1 Press to delete characters Entering Characters 43 ...
Страница 48: ...1 Guide to the Machine 46 ...
Страница 82: ...2 Paper Specifications and Adding Paper 80 ...
Страница 100: ...3 Printing Documents 98 ...
Страница 124: ...4 Copying Originals 122 ...
Страница 170: ...5 Scanning Originals 168 ...
Страница 216: ...6 Sending and Receiving a Fax 214 ...
Страница 270: ...7 Configuring the Machine Using the Control Panel 268 ...
Страница 346: ...6 Close the ADF cover 9 Maintaining the Machine 344 ...
Страница 360: ...Main unit DUE292 1 3 2 1 DUE288 2 DUE289 10 Troubleshooting 358 ...
Страница 361: ...3 DUE290 Waste toner bottle ECC168 Paper feed unit DUE320 1 Removing Paper Jams 359 ...
Страница 440: ...12 Appendix 438 ...
Страница 445: ...MEMO 443 ...
Страница 446: ...MEMO 444 EN GB EN US EN AU M0EQ 8504A ...
Страница 447: ......
Страница 448: ...EN GB EN US EN AU M0EQ 8504A 2021 2022 Ricoh Co Ltd ...


