background image

5.

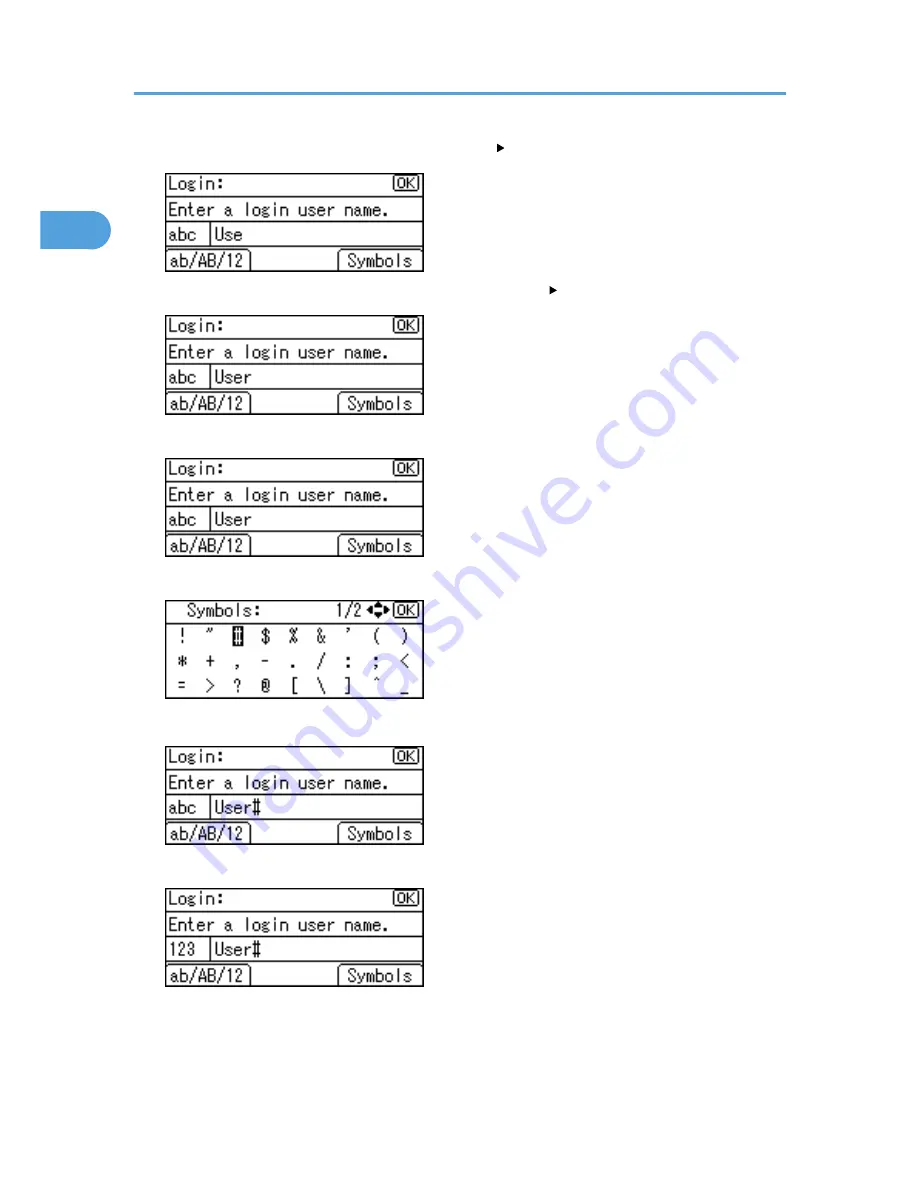
Press the [3 DEF] key twice, and then press the [  ] key. A letter "e" is entered.

6.

Press the [7 PQRS] key three times, and then press the [  ] key. A letter "r" is entered.

7.

Press [Symbols] to display a list of the symbols you can enter.

8.

Use the scroll keys to select "#", and then press the [OK] key.

The list of symbols disappears and a "#" symbol is entered.

9.

Press [ab/AB/12] two more times to change the input mode to numeric.

1. Guide to the Printer

28

1

Содержание Aficio SP 5200DN

Страница 1: ...a result of handling or operating the machine Notes Some illustrations in this manual might be slightly different from the machine Certain options might not be available in some countries For details...

Страница 2: ...CD ROM Type 1 SP 5200DN Aficio SP 5200DN Type 2 SP 5210DN Aficio SP 5210DN Certain types might not be available in some countries For details please contact your local dealer Two kinds of size notatio...

Страница 3: ...ity of copying or printing certain items consult with your legal advisor Laser Safety This machine complies with the requirements of IEC60825 1 2007 EN 60825 1 2007 for class 1 laser product This mach...

Страница 4: ...ns you ensure that this product is treated correctly and help to reduce potential impacts on the environment and human health which could otherwise result from inappropriate handling Recycling of prod...

Страница 5: ...on batteries and accumulators This symbol means that in the European Union used batteries and accumula tors should be disposed of separately from your household waste In the EU there are separate col...

Страница 6: ...ssential requirements and provisions of Direc tive 1999 5 EC of the European Parliament and of the Council of 9 March 1999 on radio equipment and telecommunications terminal equipment and the mutual r...

Страница 7: ...be followed when using this machine Environments where the machine can be used This section explains safety precautions about environments where the ma chine can be used WARNING R Do not use flammable...

Страница 8: ...d is necessary Machine sound levels exceeding Sound Power Level Black and White 63 dB A are not suitable for desk work environment so place the machine in another place The printer might topple over a...

Страница 9: ...t in fire electric shock or injury It is dangerous to handle the power cord plug with wet hands Doing so could result in electric shock CAUTION R Be sure to push the plug of the power cord fully into...

Страница 10: ...ctric shock If the machine topples or if a cover or other part gets broken you must turn off its power immediately After turning off the power be sure to disconnect the power cord plug from the wall o...

Страница 11: ...n that exposure to the laser com ponents inside this machine risks blindness CAUTION R Some of this machine s internal components get very hot For this reason take care when removing misfed paper Not...

Страница 12: ...r nose CAUTION R Do not crush or squeeze toner containers Doing so can cause toner spill age possibly resulting in dirtying of skin clothing and floor and accidental ingestion Store toner new or used...

Страница 13: ...ontact with your skin wash the affected area thoroughly with soap and water Do not attempt to print on stapled sheets aluminum foil carbon paper or any kind of conductive paper Doing so risks fire Ris...

Страница 14: ...cinerate spilled toner or used toner Toner dust is flammable and might ignite when exposed to an open flame Disposal should take place at an authorized dealer or an appropriate collection site If you...

Страница 15: ...label indicating a hot surface CEC248 The printer weighs approximately 23kg 51 lb When moving the printer use the inset grips on both sides and lift slowly in pairs Power Switch Symbols The meanings...

Страница 16: ...dB A Less than 76 dB A Sound Pressure level Main unit only Type 1 Type 2 Stand by Less than 40 5 dB A Less than 42 dB A Printing Less than 65 8 dB A Less than 66 dB A Complete system Type 1 Type 2 St...

Страница 17: ...17 MEMO...

Страница 18: ...18 MEMO...

Страница 19: ...19 MEMO...

Страница 20: ...20 MEMO 2010 Printed in France EN GB M020 8510...

Страница 21: ...re to read Safety Information before using the machine 1 Guide to the Printer 2 Setting Up the Printer 3 Installing Options 4 Connecting the Printer 5 Configuration 6 Loading Paper 7 Maintaining the P...

Страница 22: ...cy If you have any questions concerning the legality of copying or printing certain items consult with your legal advisor Important Contents of this manual are subject to change without prior notice I...

Страница 23: ...Guide to the Printer Exterior Front View 17 Exterior Rear View 19 Interior 21 Control Panel 23 Display Panel 25 Entering Characters 26 How to Enter Characters 27 2 Setting Up the Printer Printer Setup...

Страница 24: ...n 72 Parallel Cable Connection 74 5 Configuration Ethernet Configuration 75 Specifying an IP Address No DHCP 76 Receiving an IP Address Automatically DHCP 78 Configuring Network Settings When Using Ne...

Страница 25: ...encies 110 Envelopes 110 Storing Paper 113 Non Recommended Paper Types 114 Print Area 115 Loading Paper in Trays 117 Loading Paper into a Standard or Optional Paper Feed Tray 117 Loading Paper onto By...

Страница 26: ...Alert Messages in alphabetical order 172 Panel Tones 177 Printer Does Not Print 178 Checking the Port Connection 179 Other Printing Problems 181 When You Cannot Print Properly 181 Paper Misfeeds Occur...

Страница 27: ...Print Cartridge 211 Maintenance Kit 212 Specifications 213 Mainframe 213 Options 216 Trademarks 220 INDEX 223 5...

Страница 28: ...olving user errors This symbol is located at the end of sections It indicates where you can find further relevant information Indicates the names of keys on the machine s display or control panels mai...

Страница 29: ...the label contains the following your machine is a region A model CODE XXXX 22 27 220 240V mainly North America If the label contains the following your machine is a region B model CODE XXXX 11 120 1...

Страница 30: ...Model types Model types Model name Type 1 SP 5200DN Type 2 SP 5210DN 8...

Страница 31: ...flammable and might ignite when exposed to an open flame Disposal should take place at an authorized dealer or an appropriate collection site If you dispose of the used toner containers yourself disp...

Страница 32: ...bel indicating a hot surface CEC248 The printer weighs approximately 23 kg 51 lb When moving the printer use the inset grips on both sides and lift slowly in pairs Power Switch Symbols The meanings of...

Страница 33: ...ages and resolving jams Driver Installation Guide Contains procedures for installing the printer driver This manual is included on the driver CD ROM Software Guide Contains information about using thi...

Страница 34: ...Manuals provided are specific to printer types 12...

Страница 35: ...odule Memory Unit Type I 512 MB SDRAM module Gigabit Ethernet Board Type A Gigabit Ethernet board IEEE 802 11a g Interface Unit Type L Wireless LAN interface unit IEEE 802 11a g Interface Unit Type M...

Страница 36: ...on the CD ROM MANUAL_HTML LANG language manual unv Depending on your computer s operating environments you can select the HTML manual from the following two versions Standard version Simplified versi...

Страница 37: ...Administrators group member The system requirements for installing the manuals are as follows Operating system Windows XP Vista 7 Windows Server 2003 2003 R2 2008 2008 R2 Minimum display resolution 80...

Страница 38: ...16...

Страница 39: ...ass Tray Extension Pull this out when loading a sheet that is longer than A4 and 8 1 2 11 Letter on the Bypass Tray 3 Bypass Tray Up to 100 sheets of plain paper can be loaded See p 101 Supported Pape...

Страница 40: ...functions and failure can result if these vents are blocked or obstructed 8 Front Cover Release Button Press this to open the front cover 9 Power Switch Press this to turn the printer s power on and o...

Страница 41: ...their connectors 4 Vents To prevent overheating heat from internal components is released through these vents Malfunctions and failure can result if these vents are blocked or obstructed 5 SD Card Slo...

Страница 42: ...9 USB Port A Use a USB cable to connect the optional USB devices such as the authentication card reader 1 Guide to the Printer 20 1...

Страница 43: ...ller Feeds in sheets of paper for printing Be sure to clean this roller if it becomes dirty or replace the print cartridge See p 159 Cleaning the Registration Roller 3 Guide Board Open this to remove...

Страница 44: ...envelope lever according to the thickness of the paper you are printing on can improve print quality 2 Fusing Unit Fuses print images onto paper When Replacmnt Requrd Maint Kit appears on the display...

Страница 45: ...ction items at the bottom line on the display Example When this manual instructs you to press Option press the selection key on the left below the initial screen 3 Switch Functions Key Press this key...

Страница 46: ...e printer is in energy saver mode 8 Alert Indicator Lights up or flashes when a printer error occurs Steady red printing is not possible or is possible but print quality cannot be ensured Flashing yel...

Страница 47: ...ss to display the information of supplies for the printer Prt Jobs is displayed only when the hard disk is installed in the printer By default the remaining amount of toner is displayed To not display...

Страница 48: ...creen Press the left selection key to switch the input mode between lowercase uppercase and numeric characters Press the right selection key to display a list of the symbols that you can enter 2 Scrol...

Страница 49: ...the right of the character How to Enter Characters Use the following procedure to enter text in the text input screen User 2 is the text entered in this example 1 Press ab AB 12 to change the input mo...

Страница 50: ...then press the key A letter r is entered 7 Press Symbols to display a list of the symbols you can enter 8 Use the scroll keys to select and then press the OK key The list of symbols disappears and a s...

Страница 51: ...10 Press the 2 ABC key A number 2 is entered 11 Press the OK key to proceed to the next menu Entering Characters 29 1...

Страница 52: ...1 Guide to the Printer 30 1...

Страница 53: ...Unpacking 3 Load paper in the standard paper feed tray For details see p 117 Loading Paper in Trays 4 Turn the printer power on For details see p 39 Turning the Printer s Power On and Off 5 Select the...

Страница 54: ...c shock Do not use extension cords Doing so could result in fire or electric shock Do not use power cords that are damaged broken or modified Also do not use power cords that have been trapped under h...

Страница 55: ...unstable or tilted surface If it topples over an injury might occur Make sure the room where you are using the machine is well ventilated and spacious Good ventilation is especially important when th...

Страница 56: ...e room where it is placed is necessary Space Required for Installation The recommended or minimum space requirements are as follows CEC213 Optimum Environmental Conditions Permissible and recommended...

Страница 57: ...might have a unique smell This smell will subside in about one week When you detect an odd smell sufficiently ventilate and circulate the air in the room Environments to Avoid Do not use the printer i...

Страница 58: ...h or squeeze toner containers Doing so can cause toner spillage possibly resulting in dirtying of skin clothing and floor and accidental ingestion Store toner new or used toner containers and componen...

Страница 59: ...ables are not covered by warranty However if there is problem contact the store where they were purchased 1 Remove the plastic bag 2 Lift the printer with two people by using the inset grips on both s...

Страница 60: ...4 Open the front cover by pushing the front cover release button 1 2 2 CEC025 5 Remove the fixing material and adhesive tape CEC226 6 Close the front cover CEC214 2 Setting Up the Printer 38 2...

Страница 61: ...mory leading to malfunction Do not physically disturb the printer while printing is in progress Doing so may damage the printer Turning on the Power Make sure the power cord is plugged securely into t...

Страница 62: ...e wall socket 2 1 CEC057 3 Turn the power switch to On The power indicator on the control panel lights up CEC058 Wait until Ready appears on the display panel The printer may make a noise while initia...

Страница 63: ...3 Press Yes 4 Wait until a screen prompting you to turn off the main power appears and then turn the power switch to Off CEC215 Even if you follow the shutdown procedure the printer might not shutdow...

Страница 64: ...If the hard disk is active If the printer s cover is opened 2 Setting Up the Printer 42 2...

Страница 65: ...Press the or key to select Language and then press the OK key 3 Press the or key to select the preferred language and then press the OK key 4 Press the Menu key to return to the initial screen The de...

Страница 66: ...e Menu key CEC216 2 Press the or key to select List Test Print and then press the OK key 3 Press the or key to select Config Page and then press the OK key 4 Press the Menu key to return to the initia...

Страница 67: ...er feed unit Up to 2850 sheets of paper can be loaded in total 2 If you are using Type 1 model install the SDRAM module Install the expansion memory in the controller board slot There are two types of...

Страница 68: ...per feed unit see p 48 Attaching the Paper Feed Unit Internal options CEC074 1 SDRAM module For details about this option see p 55 Installing the SDRAM Module 2 SD card options For details about insta...

Страница 69: ...carefully read the instructions about re installing the controller board The following may occur if the controller board is not properly installed All control panel indicators light up No control pan...

Страница 70: ...in fire or electric shock Do not place the machine on an unstable or tilted surface If it topples over an injury might occur Lifting the paper feed unit carelessly or dropping it may cause injury The...

Страница 71: ...he printer is installed directly on the floor up to four optional paper feed units can be stacked 1 2 CEC259 To install the printer directly on the floor stack the optional paper feed unit with caster...

Страница 72: ...unplug the printer s power cord from the wall outlet 3 Remove the adhesive tape from the optional paper feed unit 4 Lift the printer using the inset grips on both sides of the printer CEC045 When movi...

Страница 73: ...Equipment on the configuration page If the paper feed unit is not installed properly reinstall it following this procedure If you cannot install it properly even after attempting reinstallation contac...

Страница 74: ...sk Beforetouchingtheharddisk touchsomethingmetaltodischargeanystaticelectricity Staticelectricity can damage the hard disk Do not subject the hard disk to physical shocks 1 Check the package contains...

Страница 75: ...roller board on a flat surface The hard disk is installed in the slot shown in the illustration below CEC019 6 Insert the protrusion on the front end of the hard disk board into the notch on the back...

Страница 76: ...rd screw from the under side of the controller board CEC018 9 To install other options on the controller board follow the installation procedure shown in the documentation provided with the option 10...

Страница 77: ...n page If the Hard disk is not properly installed repeat this procedure If you cannot install it properly even after reinstallation contact your sales or service representative For details on printing...

Страница 78: ...ed screws are required to fasten the controller board 3 Gripping the handles carefully pull out the controller board CEC075 4 Place the controller board on a flat surface The SDRAM module is installed...

Страница 79: ...rt the module at an angle CEC013 6 Keeping the module at an angle press it down until it clicks into place CEC014 7 Align the controller board with the top and bottom rails and then push it carefully...

Страница 80: ...Memory on the configuration page The table below shows the total SDRAM module capacities Standard Extended Total 256 MB 256 MB 512 MB 256 MB 512 MB 768 MB If the SDRAM module is not properly installed...

Страница 81: ...lf by touching something metal to discharge any static electricity Static electricity can damage the Gigabit Ethernet board Do not subject the Gigabit Ethernet board to physical shocks 1 Check the con...

Страница 82: ...4 Remove the two screws and remove the cover of the slot in which the Gigabit Ethernet board is installed CEC243 5 Fully insert the Gigabit Ethernet board CEC067 6 Tighten the two screws to secure the...

Страница 83: ...tep 4 If it cannot be installed correctly even after reattempting installation contact your sales or service representative For details about printing the configuration page see p 44 Test Printing Bef...

Страница 84: ...and remove the cover of the slot in which the Wireless LAN interface board is installed CEC061 4 Fully insert the Wireless LAN interface board CEC065 5 Tighten the two screws to secure the interface...

Страница 85: ...est Printing Before using the Wireless LAN interface board you must configure settings from the printer control panel For details see p 84 Wireless LAN Configuration Installing the IEEE 1284 Interface...

Страница 86: ...the two screws to secure the interface board Check the IEEE 1284 interface board is connected firmly to the interface board slot CEC060 Confirm that the IEEE 1284 interface board was correctly instal...

Страница 87: ...e procedure from step 3 If it cannot be installed correctly even after reattempting installation contact your sales or service representative For details about printing the configuration page see p 44...

Страница 88: ...d is optional to Type 1 models only To use it the optional 512 MB SDRAM module must be installed If you are using Type 1 model the optional SDRAM module must be installed to use the IPDS card 1 Check...

Страница 89: ...rd on which the settings are to be stored into the lower slot If you want to use two or more SD cards that can be inserted in the same slot contact your sales and service representative 5 Reattach the...

Страница 90: ...o confirm this setting consult your administrator IPDS card Make sure IPDS Menu appears under Print Settings NetWare card Make sure NetWare appears in Effective Protocol under Network ELP NX card Pres...

Страница 91: ...sion For users outside the United States of America properly shielded and grounded cables and connectors must be used for connections to a host computer and or peripheral in order to meet emission lim...

Страница 92: ...o the Ethernet port of the Gigabit Ethernet board 1 Attach the ferrite core to the Ethernet cable Attach the other ferrite core about 10 cm 4 inches from this core making a loop as shown CBK089 2 Conn...

Страница 93: ...inter is connected to a 10BASE T Ethernet or 100BASE TX Ethernet the green indicator will be lit Optional Gigabit Ethernet board CBK091 1 2 3 1 Green indicator If the printer is connected to a 10BASE...

Страница 94: ...USB connection is possible under Windows XP Vista 7 Windows Server 2003 2003 R2 2008 2008 R2 and Mac OS X 10 3 3 or later A USB cable is not supplied with this printer Select your cable according to...

Страница 95: ...evice such as your computer s USB interface or a USB hub The printer is now connected to the computer The Plug and Play screen appears on the computer display For details see Installing the Printer Dr...

Страница 96: ...its The printer s parallel connection is a standard bidirectional interface that requires an IEEE 1284 compliant half pitch 36 pin parallel cable and host computer parallel port Use shielded interface...

Страница 97: ...e items appear in the Network under Host Interface menu Setting Name Default Machine IPv4 Address Auto Obtain DHCP On IPv4 Address 11 22 33 44 Subnet Mask 0 0 0 0 Gateway Address 0 0 0 0 IPv6 Stateles...

Страница 98: ...g an IP Address No DHCP Follow this procedure to assign a specific IP address to the printer This is only necessary when you will use the printer on a network without DHCP or want to prevent the print...

Страница 99: ...s Enable IPv4 to use the pure IPv4 environment of NetWare5 5 1 NetWare 6 6 5 7 Press the Escape key until the screen returns to the Network menu 8 If you use IPv4 assign the IPv4 address to the printe...

Страница 100: ...confirm the settings For details about printing the configuration page see p 44 Test Printing Receiving an IP Address Automatically DHCP Follow this procedure to set the printer to receive an IP addre...

Страница 101: ...Network and then press the OK key 4 Press the or key to select Machine IPv4 Address and then press the OK key 5 Press the or key to select Auto Obtain DHCP and then press the OK key To check the dete...

Страница 102: ...ng Auto Select Ethernet II Ethernet 802 2 Ethernet 802 3 Ethernet SNAP Usually you can use the default Auto Select When you first select Auto Select the frame type detected by the printer is adopted H...

Страница 103: ...etails about printing the configuration page see p 44 Test Printing Setting the Ethernet Speed You can set the speed that the printer will use for Ethernet communications In most cases this should be...

Страница 104: ...ll duplex auto negotiation auto selection Connection cannot be established if the selected Ethernet speed does not match your network s transmission speed The use of this feature is recommended To use...

Страница 105: ...and then press the OK key 5 Press the or key to select the Ethernet speed and then press the OK key 6 Press the Menu key to return to the initial screen 7 Print a configuration page to confirm the set...

Страница 106: ...ss DHCP Frame Type NW and active protocol as explained in p 75 Ethernet Configuration The following table shows the control panel settings and their defaults These items appear in the Wireless LAN und...

Страница 107: ...so be set using Web Image Monitor 6 If 802 11 Ad hoc Mode is selected for Communication Mode confirm the channel to use for transmission 7 Press the or key to select Ad hoc Channel and then press the...

Страница 108: ...2 11 Ad hoc Mode you must specify the Service Set Identifier SSID of the wireless access point that the printer will connect to for network access Ask your network administrator for the SSID to use 1...

Страница 109: ...reen 2 If the printer is connected to an operational network and is communicating normally the lower indicator will be lit orange Cautions When Using a Wireless LAN A Wireless LAN uses radio waves ins...

Страница 110: ...these threats it is recommended that you check the available features of this printer wireless access points and other equipment that uses the Wireless LAN and configure security settings for the Wir...

Страница 111: ...w communications with other network devices Ask your network administrator for the WEP key to use 1 Press the Menu key CEC216 2 Press the or key to select Host Interface and then press the OK key 3 Pr...

Страница 112: ...aracter strings uppercase and lowercase letters are differentiated so be sure to enter characters in the required case 7 Press the or key to select WEP and then press the OK key 8 Press the Menu key t...

Страница 113: ...ce and then press the OK key 3 Press the or key to select Wireless LAN and then press the OK key 4 Press the or key to select Security Method and then press the OK key 5 Press the or key to select WPA...

Страница 114: ...further reduces vulnerability using methods such as key mixing CCMP AES Increases security using AES Advanced Encryption Standard The display returns to the WPA menu 8 Press the or key to select Authe...

Страница 115: ...WPA PSK or WPA2 PSK is selected in step 9 enter the Pre Shared Key and then press the OK key Whenenteringacharacter pressingthe OK keywillmaskitwithanasteriskforsecurityreasons Enter the Pre Shared K...

Страница 116: ...r and obtain the CA certificate Methods of obtaining certificates differ according to the operating system you are using 1 Log in to Web Image Monitor as an administrator 2 In the menu area click Conf...

Страница 117: ...e all the text copied into the CA signified certificate 13 Click OK 14 Updating appears Wait for about one or two minutes and then click OK 15 Check that the Device Certificate shows Installed 16 Clic...

Страница 118: ...lable depending on the RADIUS server you want to use Make the following settings according to the operating system you are using Select On or Off in Authenticate Server Certificate Select On or Off in...

Страница 119: ...k IEEE 802 1X 4 In User Name enter the user name set in the RADIUS server 5 Enter the domain name in Domain Name 6 Select EAP Type Configurations differ according to the EAP Type EAP TLS Make the foll...

Страница 120: ...ertificate Select On or Off in Trust Intermediate Certificate Authority Enter the host name of the RADIUS server on Server ID Select On or Off in Permit Sub domain 7 Click OK 8 Updating appears Wait f...

Страница 121: ...If you cannot identify the problem reset the printer interface to normal and then repeat the procedure from the beginning Configuring IEEE 802 1X 99 5...

Страница 122: ...5 Configuration 100 5...

Страница 123: ...irection Feed direction A5 81 2 5 1 2 Standard Paper Feed Tray Paper types Plain Paper Middle Thick Thick Paper 1 Thick Paper 2 Thick Paper 3 Thin Paper Letterhead Label Paper Special Paper 1 Special...

Страница 124: ...16K Custom Size Custom paper size The following custom sizes are supported but they must be selected using the control panel For details about custom size paper settings see p 123 Specifying custom si...

Страница 125: ...13 Folio 8 13 F GL 7 1 4 10 1 2 Executive 5 1 2 8 1 2 Half Letter 4 1 8 9 1 2 Com10 3 7 8 7 1 2 Monarch C5 Env C6 Env DL Env 16K Custom Size A5 B6 JIS 8 1 2 13 Foolscap 8 1 4 13 Folio 8 13 F GL 7 1 4...

Страница 126: ...1 4 10 1 2 Executive 5 1 2 8 1 2 Half Letter 4 1 8 9 1 2 Com 10 3 7 8 7 1 2 Monarch C5 Env C6 Env DL Env 16K Custom Size Custom paper size The following custom sizes are supported but they must be sel...

Страница 127: ...r 1 60 to 69 g m2 16 to 18 lb Plain Paper 2 70 to 90 g m2 19 to 24 lb Default Plain Paper 2 If prints made using the paper tray show heavy smudging use the followingproceduretochangethepapertypesettin...

Страница 128: ...me Thick Paper 1 or Thick Paper 2 or Thick Paper 3 the OK key Thick Paper 1 106 to 130 g m2 28 to 35 lb Thick Paper 2 131 to 163 g m2 35 to 43 lb Thick Paper 3 164 to 220 g m2 44 to 59 lb Paper type s...

Страница 129: ...y can be used Maintenance Default Letterhead 1 Letterhead 1 Letterhead 2 Letterhead 3 If prints made using the paper tray show heavy smudging use the following procedure to change the paper type setti...

Страница 130: ...ngs Label Paper Setting and then select Label Paper 1 Label Paper 2 Label Paper 3 or Label Paper 4 When specifying paper thickness remember that a higher number indicates greater thickness Also becaus...

Страница 131: ...per Type tray name Preprinted Paper the OK key Paper type setting using the printer driver Preprinted Supported input tray Any input tray can be used Duplex printing Not Supported Color Paper Paper ty...

Страница 132: ...ansparency the OK key Paper type setting using the printer driver Transparency Supported input tray This paper type can be printed only from the bypass tray Duplex printing Not supported Envelopes Pap...

Страница 133: ...nel Press the Menu key select Maintenance General Settings Envelope Setting and then select Envelope 1 Envelope 2 Envelope 3 or Envelope 4 When specifying paper thickness remember that a higher number...

Страница 134: ...tray If printed envelopes come out badly creased load the envelopes in the opposite direction Also configure the printer driver to rotate the print object 180 degrees Environmental factors can degrad...

Страница 135: ...esult in poor print quality paper misfeeds or printer damage Recommendations are as follows Avoid storing paper in humid areas Avoid exposing paper to direct sunlight Store on a flat surface Keep pape...

Страница 136: ...ng paper printed on by other than a laser printer e g monochrome and color copiers ink jet printers etc Surface processed paper excluding specified paper Special paper such as thermal paper and carbon...

Страница 137: ...he following diagram shows the print area for this printer Paper CEC244 2 3 3 1 4 4 Print area Feed direction Approx 4 2 mm 0 2 inches Approx 4 2 mm 0 2 inches The print area may vary depending on the...

Страница 138: ...EC245 4 1 2 3 3 3 Print area Feed direction Approx 10 mm 0 4 inches Approx 15 mm 0 6 inches The print area may vary depending on the paper size printer language and printer driver settings 6 Loading P...

Страница 139: ...aper jams Do not mix different types of paper in the same paper tray First load the paper in the tray and then specify the paper type and size using the control panel When printing a document specify...

Страница 140: ...ad paper larger than 8 1 2 14 Legal you should extend the tray as follows 1 Slide the catches inwards to unlock the tray CEC007 2 Slide the tray until it stops CEC008 3 Return the catches to their ori...

Страница 141: ...he end guide and slide it inward to match the standard size CEC011 5 Set the paper thickness setting switch on the front side of the paper tray according to the type of the loaded paper When loading p...

Страница 142: ...lush against the paper s sides 8 Adjust the paper guides to close any gaps Do not move paper loaded in the tray more than a few millimeters Moving the loaded paper excessively can cause damage to pape...

Страница 143: ...ss the or key to select Paper Input and then press the OK key 3 Press the or key to select Paper Size tray name and then press the OK key 4 Select Auto Detect using the scroll keys and then press the...

Страница 144: ...e scroll keys and then press the OK key 5 Press the Menu key to return to the initial screen For details about the available paper size see p 101 Supported Paper for Each Tray After specifying the pap...

Страница 145: ...Press the or key to select Paper Input and then press the OK key 3 Press the or key to select Paper Size tray name and then press the OK key In the illustration below Paper Size Tray 1 is selected for...

Страница 146: ...specifying the paper size specify a paper type using the control panel and printer driver For details on specifying a paper type using the control panel p 124 Specifying a paper type for standard or o...

Страница 147: ...Tray 1 is selected for Tray 1 4 Press the or key to select the paper type that is loaded and then press the OK key About two seconds later the display returns to the Paper Input screen 5 Press the Men...

Страница 148: ...the settings do not conflict Otherwise the paper may jam or the print quality may be affected Load paper with the print side up During printing do not open or close the printer covers or bypass tray...

Страница 149: ...er Types Specifying standard size paper for the bypass tray The standard size paper selected using the printer driver overrides that selected using the control panel so do not make settings using the...

Страница 150: ...he OK key 5 Press the Menu key to return to the initial screen After specifying the paper size specify a paper type using the control panel or printer driver For details on specifying a paper type usi...

Страница 151: ...nder Machine Modes in Print Settings any settings made using the printer s control panel have priority over any settings made using the printer driver You cannot print on custom size paper with an app...

Страница 152: ...s the OK key mainly Europe and Asia mainly North America 7 Press the Menu key to return to the initial screen After specifying the paper size specify a paper type using the control panel or printer dr...

Страница 153: ...ne Setting s is selected for Tray Setting Priority under Machine Modes in Print Settings any settings made using the printer s control panel have priority over any settings made using the printer driv...

Страница 154: ...the Menu key to return to the initial screen If the printing result is badly smudged change the setting on the printer s control panel For details see p 101 Supported Paper for Each Tray 6 Loading Pap...

Страница 155: ...e Before loading envelopes flatten their leading edges the edge going into the printer by running a pencil or ruler across them Some kinds of envelope might cause misfeeds wrinkles or print poorly Pri...

Страница 156: ...CEC033 3 Close the rear cover CEC049 4 Hold the both sides of the bypass tray and pull it toward you CEC217 6 Loading Paper 134 6...

Страница 157: ...separate them Before loading envelopes flatten them out so that their curl does not exceed that shown in the illustration below CBK240 If the curl is severe flatten out the envelopes using your finger...

Страница 158: ...CEC219 Keep the envelope lever lowered when printing normally CEC034 Specifying envelope size for the bypass tray The envelope size selected using the printer driver overrides that selected using the...

Страница 159: ...he Menu key CEC216 2 Press the or key to select Paper Input and then press the OK key 3 Press the or key to select Paper Size Bypass Tray and then press the OK key 4 Select the envelope type using the...

Страница 160: ...type using the control panel see p 131 Specifying a paper type for the bypass tray For details about the printer driver see the printer driver Help Loading Envelopes into a Standard or Optional Paper...

Страница 161: ...over CEC049 4 Lift and pull tray carefully and then pull it out with both hands CEC031 Place the tray on a flat surface 5 Pinch the side guides and then slide them outward until they stop CEC263 Loadi...

Страница 162: ...ding paper thicker than 105 g m2 28 lb slide the switch to the left CEC253 8 Fan envelopes and then align their edges before loading CBK239 When fanning envelopes make sure the envelope flaps are not...

Страница 163: ...n in the illustration below CBK241 If envelopes are severely curled after printing flatten them by bending them back against the curl 9 Load envelopes into the paper tray with the print side down and...

Страница 164: ...EC265 11 Pinch the rear guide and then slide it along the edge of the envelope stack CEC266 12 Hold the tray with both hands slide it along the rails of the printer body and then push it straight in C...

Страница 165: ...then press the OK key 3 Press the or key to select Paper Size tray name and then press the OK key 4 Select the envelope size you want to set using the scroll keys and then press the OK key 5 Press the...

Страница 166: ...per 2 using the control panel and printer driver For details on specifying a paper type using the control panel p 124 Specifying a paper type for standard or optional paper feed tray For details about...

Страница 167: ...ntout result according to the combination of paper feed direction and letterhead settings in the control panel and PCL printer driver Paper Orientation Paper trays 1 5 Bypass Tray Letterhead Setting O...

Страница 168: ...ss the OK key On Always The printer always prints on paper that has a fixed orientation Auto Detect The printer will print on paper that has a fixed orientation only if Letterhead or Preprinted is spe...

Страница 169: ...display the paper type name correctly if it is registered using non alphanumeric characters i e other than a z A Z or 0 9 1 Log in to Web Image Monitor as an administrator 2 Click Configuration 3 Cli...

Страница 170: ...lick OK 6 Click Logout 7 Quit the Web Image Monitor Printing Using Registered Paper Types 1 Select your application s print command 2 On the tab in the properties dialog box that appears select a regi...

Страница 171: ...and components that have been in contact with toner out of reach of children If toner or used toner is inhaled gargle with plenty of water and move into a fresh air environment Consult a doctor if ne...

Страница 172: ...c objects to fall inside the printer Do not expose the print cartridge without its cover to direct sunlight for a long time When removing print cartridge be careful not to drop it Store print cartridg...

Страница 173: ...cartrdg soon Toner is almost empty Contact your local vendor CEE109 Replace print cartrdg soon Component at end of life Replace if blurred streaked CEE133 The print cartridge must be replaced when the...

Страница 174: ...rtridge out of the printer by holding the grips of the cartridge CEC026 3 Be sure to put the print cartridge on a stable flat surface 4 Wipe around the metallic registration roller by turning with a s...

Страница 175: ...it stops CEC028 7 Close the front cover CEC214 Do not close the front cover with excessive force If you cannot close the cover easily pull out the print cartridge from the printer and reinsert it agai...

Страница 176: ...r off before replacing parts Not allowing the printer to cool may result in burns When to replace the Maintenance Kit The maintenance kit contains parts for maintaining the printer Replace the mainten...

Страница 177: ...nterior is not cleaned regularly dust will accumulate Fire and breakdown can result from heavy accumulation of dust inside this machine Contact your sales or service representative for details about a...

Страница 178: ...wall outlet When disconnecting the power cord from the wall outlet always pull the plug not the cord Pulling the cord can damage the power cord Use of damaged power cords could result in fire or elec...

Страница 179: ...on a flat surface When there is paper in the tray remove paper 4 Wipe the friction pad with a damp cloth CEC041 5 Wipe the rubber part of the roller with a soft damp cloth After that wipe it with a dr...

Страница 180: ...the wall socket securely Connect all the interface cables that were removed 8 Turn the power switch on If misfeeds or multi feeds of paper occur after cleaning the friction pad and paper feed roller c...

Страница 181: ...ith a label indicating the hot surface Otherwise an injury might occur Clean the registration roller if dots caused by specks of paper stuck to the roller appear on printed OHP transparencies Do not h...

Страница 182: ...olding the grips of the cartridge CEC026 4 Wipe around the metallic registration roller by turning with a soft damp cloth CEC040 5 Holding the grips of the print cartridge push it into the printer unt...

Страница 183: ...er CEC214 Carefully close the front cover If you cannot close the cover easily pull the print cartridge out of the printer and insert it again After that close the front cover again Cleaning the Regis...

Страница 184: ...7 Maintaining the Printer 162 7...

Страница 185: ...printouts Image Density settings should be made from the application or the printer driver whenever possible 1 Press the Menu key CEC216 2 Press the or key to select Maintenance and then press the OK...

Страница 186: ...6 Press the Menu key To maintain a darker image under high volume printing conditions Selecting 3 from the control panel is highly recommended You can adjust the image density in seven steps from 3 to...

Страница 187: ...o not need to update the printing position However updating is useful in some cases when the optional paper feed unit is installed 1 Press the Menu key CEC216 2 Press the or key to select Maintenance...

Страница 188: ...f the image on the test sheet and then adjust the registration value Use this sheet to confirm the current print position 8 Press the Escape key until the screen returns to the Registration menu 9 Pre...

Страница 189: ...shift the print area in the direction indicated by the symbol 1 2 CEC241 Print Area Paper Feed Direction Pressing the or key adjusts the value up or down in 0 1 mm increments 12 Press the OK key to re...

Страница 190: ...d then press the OK key 3 Press the or key to select General Settings and then press the OK key 4 Press the or key to select the paper type you want to use and then press the OK key The following pape...

Страница 191: ...Setting select the tray you want to set using the or key and then press the OK key 6 Press the or key to select the paper setting and then press the OK key 7 Press the Menu key to return to the initia...

Страница 192: ...8 Adjusting the Printer 170 8...

Страница 193: ...cover to the normal mode Hex Dump Mode In Hex Dump mode the printer receives data in hexadecimal format Turn off the printer after printing and then turn back on Job Suspended All jobs are suspended T...

Страница 194: ...Paper Misfeed Message Y1 Y2 Y3 Y4 Y2 Remove misfeed in Tray 3 Opn cls Frt Cov Remove the jammed paper in the source tray and then load the paper again To reset the error open the front cover and then...

Страница 195: ...n Code Error A classification code is not specified for the print job Enter a classification code using the printer properties and print the document again For details see Registering Classification C...

Страница 196: ...09 The same IPv6 address already exists Consult your network administrator Load paper in tray name or Cancel to FormFeed There is no paper in the specified tray Load the specified paper in the tray pr...

Страница 197: ...the Print Cartridge ReplacmntRequrd Maint Kit MaintenanceKitReplacmntisrequired PressMenukeytocheck Supplies You need to replace the Maintenance Kit Contact your sales or service representative to ob...

Страница 198: ...s 102 202 The IPv4 address specified for the printer is already in use by another device on the network Consult your network administrator The selected job has already been printed or deleted This mes...

Страница 199: ...d Single long beep Job completed A Printer job has finished Four long beeps Printer initialized The screen is changing back to the initial screen after the printer came out of the energy saving mode o...

Страница 200: ...and the computer Connect the interface cable securely If it has a fastener fasten it securely as well Are you using the correct interface cable The type of interface cable you should use depends on t...

Страница 201: ...lick Printers and Faxes 2 Click the icon of the printer On the File menu click Properties 3 Click the Ports tab 4 In the Print to the following port s list confirm the correct port is selected Windows...

Страница 202: ...ht up try the following procedures to check the port connection Use About This Mac to check the USB information Use the printer browser to check if the printer is displayed Using About This Mac 1 Clic...

Страница 203: ...etails see the printer driver Help Solid lines are printed as broken lines Change the Dithering setting in the PostScript 3 printer driver s dialog box For details see the printer driver Help The whol...

Страница 204: ...Position Adjust the end guide and both side paper guides to match the paper size See p 117 Loading Paper in Trays Images are printed at an angle CEC223 Adjust the end guide and both side paper guides...

Страница 205: ...arencies black or white dots are obvious The registration roller is dirty Clean the registration roller Contact your sales service representatives Image quality varies when printing on thick paper or...

Страница 206: ...nd guide and the paper or between the paper guides on both sides and the paper in the paper tray Be sure to close any gaps by repositioning the guides See p 117 Loading Paper in Trays Paper is either...

Страница 207: ...n function to reduce the image and then print For details see the printer driver Help PDF Direct Print is not executed PDF file is not printed You must install an optional hard disk drive or set the v...

Страница 208: ...ter driver For details see the printer driver Help Prints do not stack properly Paper is damp Use paper that has been stored properly See p 105 Supported Paper Types Pull out the extender It takes too...

Страница 209: ...s Check that the paper size and direction set in the printer driver are the same as those set in the application If the settings are not the same change the settings of the printer driver An empty tra...

Страница 210: ...transmitted the e mail will not be received Check the e mail address set for the destination Confirm the printer s operation history using Web Image Monitor s System Log menu in Network If the e mail...

Страница 211: ...rlier notification level arrives later e mail will not be sent even if the notification level is changed after When no date information is included in sent e mail the mail server has a malfunction Con...

Страница 212: ...9 Troubleshooting 190 9...

Страница 213: ...er into the fabric and make removing the stain impossible When removing jammed paper or replacing toner avoid getting toner new or used on your skin If toner comes into contact with your skin wash the...

Страница 214: ...t Check your print job for missing pages and reprint any pages that did not print out If paper is still misfed after you have checked the above mentioned causes contact your sales or service represent...

Страница 215: ...r feed section Forcefully removing misfed paper may cause paper to tear and leave scraps of paper in the printer This might cause a misfeed and damage the printer Remove the paper from the bypass tray...

Страница 216: ...nd then close it to reset the misfeed condition 1 2 2 CEC025 CEC214 When the paper was fed from the standard paper feed tray or the optional paper feed tray 1 Pull out the paper tray until it stops an...

Страница 217: ...o the printer until it stops CEC229 3 Open the front cover by pushing the front cover release button 1 2 2 CEC025 4 Pull the print cartridge out of the printer by holding the grips of the cartridge CE...

Страница 218: ...sides of paper Be careful not to get toner dust on your hands or clothes 1 2 CEC080 6 Hold the grips of the print cartridge and then push it into the printer until it stops CEC028 7 Close the front c...

Страница 219: ...the printer If paper is fed from the bypass tray be sure to remove all the paper from the bypass tray and close it before opening the front cover Be sure to put the print cartridge on a stable flat s...

Страница 220: ...hes CEC246 4 Hold the grips of the print cartridge and then push it into the printer until it stops CEC028 If the printer does not recover from the error a paper jam may have occurred in another locat...

Страница 221: ...6 Lift the lock levers of the fusing unit as shown in the illustration CEC050 7 Pull the fusing unit out CEC052 8 Hold the tab and then remove the misfed paper CEC087 Paper Misfeed Message B C 199 10...

Страница 222: ...9 Push the fusing unit until it stops CEC053 10 Push the lock levers of the fusing unit down until they click CEC051 11 Close the rear cover CEC049 10 Removing Misfed Paper 200 10...

Страница 223: ...12 Close the front cover CEC214 Paper Misfeed Message B C 201 10...

Страница 224: ...using tray 2 as an example The same procedure can be used for the other optional trays Forcefully removing misfed paper may cause paper to tear and leave scraps of paper in the printer This might caus...

Страница 225: ...e the paper tray into the printer until it stops CEC083 3 Open the front cover by pushing the front cover release button and then close it to reset the misfeed condition 1 2 2 CEC081 Paper Misfeed Mes...

Страница 226: ...CEC082 10 Removing Misfed Paper 204 10...

Страница 227: ...oving misfed paper may cause paper to tear and leave scraps of paper in the printer This might cause a misfeed and damage the printer If paper is fed from the bypass tray be sure to remove all the pap...

Страница 228: ...ror a paper jam may have occurred in another location In that case proceed to the following steps 4 Lift and pull Tray 1 carefully and then pull it out with both hands CEC031 5 Push down on the Z2 lev...

Страница 229: ...along the rails of the printer body and then push it straight in CEC032 7 Open the front cover by pushing the front cover release button and then close it to reset the misfeed condition 1 2 2 CEC025 C...

Страница 230: ...10 Removing Misfed Paper 208 10...

Страница 231: ...d When disconnecting the power cord from the wall outlet always pull the plug not the cord Pulling the cord can damage the power cord Use of damaged power cords could result in fire or electric shock...

Страница 232: ...ons 3 Lift the printer with two people by using the inset grips on both side of the printer and then move it horizontally to the place where you want to install it CEC045 4 If you removed options reat...

Страница 233: ...ave installed If print cartridges are not changed when necessary printing will become impossible We recommend keeping a stock of cartridges or purchasing them soon The actual number of printable pages...

Страница 234: ...ansfer roller and paper feed roller 120 000 pages The actual number of printable pages varies depending on the image volume and density number of pages to be printed at a time paper type and paper siz...

Страница 235: ...ime there may be a short delay before the first page starts printing Printing Speed Model types Printing Speed A4 Printing Speed 81 2 11 Letter Type 1 maximum 45 pages per minute maximum 47 pages per...

Страница 236: ...onds 23 C 71 6 F 1 1 When no error is occurred Dimensions W D H Printer only tray not extended 411 435 400 mm 16 2 17 1 15 8 inches Weight Approximately 23 kg 51 lb Toner included Noise Emission 1 Sou...

Страница 237: ...system Type 1 Stand by Less than 44 5 dB A Printing Less than 69 8 dB A Complete system Type 2 Stand by Less than 46 0 dB A Printing Less than 70 0 dB A 1 The preceding measurements made in accordanc...

Страница 238: ...Script 3 PDF Fonts PCL 5e PCL 6 45 fonts 13 International fonts PostScript 3 PDF 136 fonts Network Topology The physical or logical layout of the nodes devices in a network 10BASE T 100BASE TX 1000BAS...

Страница 239: ...a Storing log data Storage capacity is subject to change without prior notice The optional hard disk is provided with an SD card to enhance the security features By using the provided SD card the foll...

Страница 240: ...12Mbps Full speed Protocol TCP IP IPX SPX AppleTalk Maximum Length of Cable Between Devices Ethernet 100 m USB 5 m IEEE 802 11a g Interface Unit Type M mainly Europe and Asia Transmission Specificati...

Страница 241: ...ollowing speed 1 Mbps 2 Mbps 5 5 Mbps 6 Mbps 9 Mbps 11 Mbps 12 Mbps 18 Mbps 24 Mbps 36 Mbps 48 Mbps 54 Mbps Frequency Range 2412 to 2472 Mhz 1 to 13 Channels 5180 to 5240 Mhz 36 40 44 and 48 Channels...

Страница 242: ...demark of Hewlett Packard Company UNIX is a registered trademark of The Open Group Other product names used herein are for identification purposes only and might be trademarks of their respective comp...

Страница 243: ...e product names of Windows Server 2008 are as follows Microsoft Windows Server 2008 Standard Microsoft Windows Server 2008 Enterprise Microsoft Windows Server 2008 Standard without Hyper VTM Microsoft...

Страница 244: ...11 Appendix 222 11...

Страница 245: ...ernet 75 95 Ethernet cable connection 69 Ethernet configuration 75 Ethernet speed 81 Exterior 17 19 F Friction pad 156 G Gigabit Ethernet board 59 H Hard disk drive 52 How to enter character 27 HTML m...

Страница 246: ...et 165 Printer does not print 178 Printer set up procedure 31 Printing on fixed orientation paper 145 Printing position 165 Prt jobs 25 R Recycled paper 109 Registration roller 159 Removing the packag...

Страница 247: ...2010...

Страница 248: ...Operating Instructions Hardware Guide M020 8502 EN US...

Страница 249: ...dy for future reference For safe and correct use be sure to read Safety Information before using the machine 1 About Quick Install 2 Network Connection 3 Local Connection 4 When Using the Printer unde...

Страница 250: ...cy If you have any questions concerning the legality of copying or printing certain items consult with your legal advisor Important Contents of this manual are subject to change without prior notice I...

Страница 251: ...ient Port 21 Using as the Windows Network Printer 28 Installing the PCL printer driver 28 Installing the PostScript 3 printer driver 29 Using as the NetWare Print Server Remote Printer 31 When using t...

Страница 252: ...P Windows Server 2003 2003 R2 49 Windows Vista Windows Server 2008 50 Windows 7 Windows Server 2008 R2 50 Messages Displayed When Installing the Printer Driver 51 Windows XP Windows Server 2003 2003 R...

Страница 253: ...g to environment You can manually specify which port you want to use based on the configuration of your environment This method also allows you to configure the PCL and PostScript 3 drivers to print o...

Страница 254: ...al SmartDeviceMonitor for Client 2 is referred to as SmartDeviceMonitor for Client To use SmartDeviceMonitor for Client download the printer driver from the manufacturer s website and install it on yo...

Страница 255: ...per misfeeds damage to originals or loss of data Be sure to read these explanations Indicates supplementary explanations of the machine s functions and instructions on resolving user errors This symbo...

Страница 256: ...6...

Страница 257: ...system settings If this happens launch Setup exe on the CD ROM root directory 3 Select an interface language and then click OK The default interface language is English 4 On the CD ROM menu click Qui...

Страница 258: ...lete Quick Install is not available unless bidirectional communication between the printer and computer is enabled via parallel connection For details about bidirectional communication between the pri...

Страница 259: ...n Method This printer can be used as the Windows printing port or network printer Using This Printer as the Windows Printing Port Network connections can be established through Ethernet and Wireless L...

Страница 260: ...ails about the IPP port see p 14 Using the IPP Port For details about the LPR port see p 16 Using the LPR Port For details about the WSD port see p 18 Using the WSD Port For details about the SmartDev...

Страница 261: ...ll the printer driver for each type of network printers For details about Windows network printer see p 28 Using as the Windows Network Printer For details about a NetWare print server and remote prin...

Страница 262: ...nch Setup exe on the CD ROM root directory 3 Select an interface language and then click OK The default interface language is English 4 Click PCL Printer Drivers The software license agreement appears...

Страница 263: ...e A message appears if there is a newer version of the printer driver already installed If there is you cannot install the printer driver using Auto Run If you still want to install the printer driver...

Страница 264: ...cted driver click Cancel before installation is complete A message appears if there is a newer version of the printer driver already installed If there is you cannot install the printer driver using A...

Страница 265: ...Select Browse for a printer and then click Next 7 In the Printer or URL box enter http printer s IP address or host name printer or ipp as the printer s address and then click Next or Select 8 Click...

Страница 266: ...click Cancel before installation is complete Using the LPR Port This describes how to install the PCL or PostScript 3 printer drivers using the LPR port Manage Printers permission is required to inst...

Страница 267: ...d then click OK The port is added 14 Check that the port of the selected printer is displayed in Port 15 Configure the user code default printer and shared printer as necessary 16 Click Continue 17 Cl...

Страница 268: ...ick Next 12 Follow the instructions that appear Modify settings such as printer name default printer and printer sharing configuration as necessary You can also print the test page 13 Click Finish To...

Страница 269: ...les of the printer driver are stored in the following locations PCL 5e D DRIVERS PCL5E XP_VISTA or x64 language DISK1 PCL 5c D DRIVERS PCL5C XP_VISTA or x64 language DISK1 PCL 6 D DRIVERS PCL6 XP_VIST...

Страница 270: ...Start menu click Devices and Printers 6 Click Add a printer 7 Click Add a local printer 8 Select the Use an existing port check box and select the WSD port 9 Click Next 10 Click Have Disk 11 Insert t...

Страница 271: ...t click the printer s icon in the Network window and then click Uninstall Using the SmartDeviceMonitor for Client Port This describes how to install the printer driver using the SmartDeviceMonitor for...

Страница 272: ...nter you want to use and then click OK Only printers that respond to a broadcast from the computer appear To use a printer not listed here click Specify Address and then enter the IP address or host n...

Страница 273: ...st from the computer appear To use a printer not listed here click Specify Address and then enter the IP address or host name of the printer 11 Select the brand name and model name of the printer you...

Страница 274: ...n the operating system printer model and port 10 Click Port and then click Add 11 Click SmartDeviceMonitor for Client 2 and then click OK 12 Click IPP 13 In the Printer URL box enter http printer s IP...

Страница 275: ...t work with certain operating system settings If this happens launch Setup exe on the CD ROM root directory 3 Select an interface language and then click OK The default interface language is English T...

Страница 276: ...cessary You can also print the test page 16 Click Finish To stop installation of the selected software click Cancel before the installation is complete A message appears if there is a newer version of...

Страница 277: ...ices and Printers The Devices and Printers window appears 2 Right click the icon of the printer you want to use and then click Printer Properties 3 Click the Ports tab and then click Configure Port Th...

Страница 278: ...settings If this happens launch Setup exe on the CD ROM root directory If the User Account Control window appears click Continue or Yes 3 Select an interface language and then click OK The default int...

Страница 279: ...rinter driver already installed If there is you cannot install the printer driver using Auto Run If you still want to install the printer driver use Add Printer See p 51 Messages Displayed When Instal...

Страница 280: ...default printer as necessary and then click Next 11 Click Finish When you are prompted to restart your computer restart it by following the instructions that appear A user code can be set after the pr...

Страница 281: ...name CAREE Queue name R QUEUE 1 Close all applications except this manual 2 Insert the CD ROM into the CD ROM drive The installer starts Auto Run may not work with certain operating system settings I...

Страница 282: ...ting the computer open the printer properties from the Printers and Faxes window Under Windows Server 2003 2003 R2 launch the Printers window and then open the printer properties 19 Click the NetWare...

Страница 283: ...rding to the operating system used Clear the Form feed check box on the NetWare Settings tab in the printer properties window Banner Page Do not use NetWare to configure a banner page Follow the proce...

Страница 284: ...2 Network Connection 34 2...

Страница 285: ...with this printer Windows XP Windows Server 2003 2003 R2 USB 1 Close all applications except this manual 2 Check that the power of the printer is off 3 Connect the printer to your computer with a USB...

Страница 286: ...is added to the Printers Printers and Faxes or Devices and Printers window To disable Auto Run press the left Shift key when inserting the CD ROM into the drive and keep it pressed until the computer...

Страница 287: ...driver location and then click Next 9 Click Close If the installation is successful the icon of the printer connected to the USB001 port is added to the Printers Printers and Faxes or Devices and Prin...

Страница 288: ...MUI or language DISK1 If the file path of the printer driver contains the word MUI the driver will be installed in the language of the operating system The PostScript 3 printer driver with the selecte...

Страница 289: ...connected to the USB ports and then turn on the power again Windows has already configured the USB settings Open Windows Device Manager and then under Universal Serial Bus controllers remove any confl...

Страница 290: ...nd then click OK The default interface language is English 4 Click PCL Printer Drivers The software license agreement appears in the License Agreement window 5 After reading the agreement select the I...

Страница 291: ...this happens launch Setup exe on the CD ROM root directory If the User Account Control window appears click Continue to allow the auto play program to run 3 Select an interface language and then click...

Страница 292: ...iver Help A message appears if there is a newer version of the printer driver already installed If there is you cannot install the printer driver using Auto Run If you still want to install the printe...

Страница 293: ...you want to use AppleTalk use the control panel or Web Image Monitor to enable it The default is Inactive AppleTalk cannot be used under Mac OS X 10 6 Installing the PPD Files Follow the procedure bel...

Страница 294: ...Name list Mac OS X 10 4 Select the printer you are using from the Print Using pop up menu 4 Select the PPD file for the model you are using and then click Add Under Mac OS X 10 5 or 10 6 click Add 5 Q...

Страница 295: ...6 start System Preferences and click Print Fax 5 Click Add or Mac OS X 10 5 or 10 6 Click Default Mac OS X 10 4 Click a printer that has USB indicated in the Connection column Mac OS X 10 3 or lower C...

Страница 296: ...r indicated in the Connection column Mac OS X 10 3 or lower Click Rendezvous on the pop up menu 3 Select the name of the connected printer from the list of printer models Mac OS X 10 5 or 10 6 Select...

Страница 297: ...box Mac OS X 10 5 or 10 6 Click Advanced Mac OS X 10 3 or 10 4 Select Built in Ethernet or Ethernet and then click Configure 3 Click the AppleTalk tab 4 Select the Make AppleTalk Active check box 5 T...

Страница 298: ...4 When Using the Printer under Mac OS X 48 4...

Страница 299: ...and then follow the instructions that appear on the screen If the CD ROM drive is D the exe file will be stored in the following location D DRIVERS PS x64 MUI or language SETUP EXE Windows XP Windows...

Страница 300: ...ace you are using for connection to the printer For details see p 9 Network Connection or p 35 Local Connection Windows 7 Windows Server 2008 R2 Use the following procedure to install the PCL PostScri...

Страница 301: ...e instructions in Add Printer Wizard If the printer driver is on the CD ROM the location of the driver is DRIVERS PCL6 PCL5C PCL5E or PS XP_VISTA language or MUI DISK1 If the installer starts click Ca...

Страница 302: ...es and Printers 2 Click Add a printer 3 Follow the instructions in Add Printer Window If the printer driver is on the CD ROM the location of the driver is DRIVERS PCL6 PCL5C PCL5E or PS XP_VISTA langu...

Страница 303: ...rt must be used In addition to the above one of the following conditions must also be met The TCP IP protocol or the IPP protocol is used When using the IPP protocol the IPP port name must include the...

Страница 304: ...nu click Properties When using Windows Vista or Windows Server 2008 right click the icon of the printer you want to use and then click the Properties When using Windows 7 or Windows Server 2008 R2 rig...

Страница 305: ...ber The operating systems compatible with Font Manager are Windows XP Vista 1 Close all applications except this manual 2 Insert the CD ROM into the CD ROM drive The installer starts 3 Select an inter...

Страница 306: ...C PM6 RSRC PPD4 For PageMaker 6 5 default installation The directory is C PM65 RSRC USENGLISH PPD4 The USENGLISH may vary depending on your language selection For PageMaker 7 0 default installation Th...

Страница 307: ...ard Company Other product names used herein are for identification purposes only and might be trademarks of their respective companies We disclaim any and all rights to those marks The proper names of...

Страница 308: ...ndows Server 2008 are as follows Microsoft Windows Server 2008 Standard Microsoft Windows Server 2008 Enterprise Microsoft Windows Server 2008 Standard without Hyper V Microsoft Windows Server 2008 En...

Страница 309: ...twork printer 10 O Option settings 53 P PageMaker 56 Parallel cable 40 41 PCL printer driver 12 14 16 21 23 28 40 PostScript 3 printer driver 13 14 17 22 25 29 32 41 PPD files 43 44 Printer driver 3 P...

Страница 310: ...MEMO 60 EN GB EN US M0208518...

Страница 311: ...2010...

Страница 312: ...Operating Instructions Driver Installation Guide M020 8518 GB EN US EN...

Страница 313: ...sure to read Safety Information before using the machine 1 Preparing for Printing 2 Printing Documents 3 Printing Stored Documents 4 Making Printer Settings Using the Control Panel 5 Monitoring and C...

Страница 314: ...cy If you have any questions concerning the legality of copying or printing certain items consult with your legal advisor Important Contents of this manual are subject to change without prior notice I...

Страница 315: ...DeviceMonitor for Admin 19 DeskTopBinder 19 SmartDeviceMonitor for Client 20 If User Authentication is Specified 21 User Code Authentication Using the Printer Driver 21 Log in Using the Control Panel...

Страница 316: ...ctly 49 Using DeskTopBinder 49 Expanding DeskTopBinder features 49 Function palette 50 PDF Direct Printing Using Function Palette 50 PDF Direct Print Properties 51 Using Commands to Print 52 Specifyin...

Страница 317: ...ol Panel Menu Chart 83 Applying the Machine Settings to Other Printers 89 About the Machine Settings Export Function 89 Exporting the Machine Settings to a SD Card 89 Importing the Machine Settings St...

Страница 318: ...cking the Error Log 136 5 Monitoring and Configuring the Printer Using Web Image Monitor 139 Introduction to Web Image Monitor 139 Displaying Top Page 140 When User Authentication is Set 141 About Men...

Страница 319: ...160 Setting Up as a Remote Printer NetWare 3 x 162 Setting Up as a Remote Printer NetWare 4 x 5 5 1 6 6 5 163 7 Mac OS X Configuration Using PostScript 3 167 Job Type 167 Paper Type 173 Fit to Paper 1...

Страница 320: ...utions 184 Connecting a Dial Up Router to a Network 184 When the Wireless LAN Interface Unit is Installed 184 Copyright Information about Installed Applications 186 expat 186 NetBSD 186 FreeBSD 4 6 2...

Страница 321: ...Trademarks 217 INDEX 219 7...

Страница 322: ...where you can find further relevant information Indicates the names of keys on the machine s display or control panels mainly Europe and Asia mainly North America Differences in the functions of Regi...

Страница 323: ...the label contains the following your machine is a region A model CODE XXXX 22 27 220 240V mainly North America If the label contains the following your machine is a region B model CODE XXXX 11 120 1...

Страница 324: ...Model types Model types Model name Type 1 SP 5200DN Type 2 SP 5210DN 10...

Страница 325: ...s and resolving jams Driver Installation Guide Contains procedures for installing the printer driver This manual is included on the driver CD ROM Software Guide This manual Contains information about...

Страница 326: ...referred to as using general names Product name General name DeskTopBinder Lite and DeskTopBinder Professional 1 DeskTopBinder SmartDeviceMonitor for Client 2 SmartDeviceMonitor for Client Enhanced L...

Страница 327: ...SDRAM module Gigabit Ethernet Board Type A Gigabit Ethernet board IEEE 802 11a g Interface Unit Type L Wireless LAN interface unit IEEE 802 11a g Interface Unit Type M Wireless LAN interface unit IEE...

Страница 328: ...14...

Страница 329: ...ter For details about these utilities see p 19 Downloading Utility Software Using User Authentication Using authentication administrators manage the printer and its users To enable authentication info...

Страница 330: ...nded feature is installed use the or key to select the extended feature you want to access 5 Press the OK key On Type 1 models function switching is possible only when the VM card is installed This ma...

Страница 331: ...load them from the manufacturer s Web site The provided CD ROM contains printer drivers for Windows XP x64 Vista x64 7 x64 and Windows Server 2003 x64 2003 R2 x64 2008 x64 2008 R2 Printing requires in...

Страница 332: ...2008 R2 Enterprise 6 Mac OS X 10 2 later PCL Printer Drivers Two kinds of PCL printer drivers PCL 5e and PCL 6 are included These drivers allow your computer to communicate with this printer using a...

Страница 333: ...able as a free download Contact your local dealer for information on downloading the software For details about the functionality see the manual for SmartDeviceMonitor for Admin DeskTopBinder This sec...

Страница 334: ...plication images scanned with a scanner and existing images as one document SmartDeviceMonitor for Client has the following functions Checking printer supplies such as paper or toner Checking results...

Страница 335: ...he printer driver you must specify a user code in the printer Printing Preference of the printer driver The following procedure explains how to configure the printer driver settings under Windows XP I...

Страница 336: ...Setting Authentication 1 On the Start menu click Printers and Faxes 2 Click the icon of the printer you want to specify authentication for 3 On the File menu click Properties 4 Click the Advanced Opti...

Страница 337: ...them configure your Web browser s settings so that this information is not saved If User Code Authentication is used Web Image Monitor cannot be used to log in to the printer The procedure may differ...

Страница 338: ...1 Preparing for Printing 24 1...

Страница 339: ...he Administrators group have Manage Printers permission by default You cannot change the printer default settings for individual users Settings made in the Printer Properties dialog box are applied to...

Страница 340: ...ing Windows XP WordPad as an example 1 On the File menu click Print 2 In the Select Printer list select the printer you want to use 3 Click Preferences 4 Make the settings you require and then click O...

Страница 341: ...ing Preferences dialog box in the document s native application 3 Make the settings you require 4 Click Register Current Settings Enter a name and comment that describe the setting and then click OK T...

Страница 342: ...that any jobs for which Locked Print is not specified will be deleted according to the default setting of ELP NX For details about how to print using ELP NX see the manuals provided with the applicati...

Страница 343: ...the size of the original to be printed 7 In the Input Tray list select the paper tray that contains the paper you want to print onto If you select Auto Tray Select in the Input Tray list the source t...

Страница 344: ...7 Change any other print settings if necessary 8 To save current setting in the One Click Preset List click Register Current Settings Enter a name and comment that describe the setting and then click...

Страница 345: ...0 356 mm 6 3 14 01 inches in length When loading custom size paper in tray 1 5 be sure to specify the custom size using both the control panel and the printer driver Bypass Tray supports custom size p...

Страница 346: ...e PCL 5e printer driver select Open to Left or Open to Top in the Duplex list in the printer properties dialog box Types of booklet printing This section explains the page binding methods available wh...

Страница 347: ...ains how to print multiple pages onto a single sheet The combine printing function allows you to economize on paper by printing multiple sheets at reduced size onto a single sheet The combine printing...

Страница 348: ...nces dialog box 10 Print the document using the print function in the document s native application For the PCL 5e printer driver 1 In the application on the File menu click Print 2 Selecttheprinter a...

Страница 349: ...ordering pattern for the combination For 2 pages per sheet combine you can select from two patterns When combining 4 or more pages onto a single sheet of paper four patterns are available The followi...

Страница 350: ...5e printer driver select one of the following four patterns Right then Down Left then Down Down then Right Down then Left 4 Pages per Sheet Right then Down CBK523 Left then Down CBK524 Down then Right...

Страница 351: ...CBK525 Down then Left CBK526 Frequently Used Print Methods 37 2...

Страница 352: ...of the print job you can proceed with printing by using the bypass tray For details about this function see p 39 Specifying Printer Driver or Print Command Priority Paper menu You can enable disable t...

Страница 353: ...r sizes select Any Size Type for Bypass Tray in Tray Setting Priority under Print Settings To continue printing from the bypass tray onto custom size paper only select Any Custom Size Type for Bypass...

Страница 354: ...n proceed from the bypass tray with the job s settings applied CBK508 When this function is enabled printing may be slower than usual If paper is not loaded in the bypass tray when a job is received a...

Страница 355: ...ng you of the mismatch will appear on the control panel For the procedure to resolve this problem see p 62 Proceeding with Printing Using the Bypass Tray Printing on Cover Sheet Using this function yo...

Страница 356: ...the body paper feed tray body paper will be delivered from a tray that contains paper set in portrait orientation Therefore if the cover paper is set to landscape orientation the orientation of the co...

Страница 357: ...sheets The slip sheet should be the same size and orientation as the body paper If AutoTraySelect hasbeensetasthepaperfeedtrayforthebodypaper thepaperwillbedelivered from a tray containing paper in or...

Страница 358: ...on every page You can specify only one type of watermark at a time You can create and apply custom watermarks For details about creating original watermarks see the printer driver Help Types of water...

Страница 359: ...CBK504 ORIGINAL CBK505 COPY CBK501 Advanced Printing 45 2...

Страница 360: ...printing multiple copies of meeting materials Up to 150 pages can be stored in the printer s RAM If the hard disk is installed up to 1 000 pages can be stored Collate will be canceled if an error occ...

Страница 361: ...ool printing is about 1 GB When Spool Printing is on the size of a single print job cannot exceed 500 MB When receiving jobs from multiple computers the printer can spool a maximum of ten lpr jobs and...

Страница 362: ...using Web Image Monitor 1 Log in to Web Image Monitor as an administrator For details about logging in see p 143 Access in the Administrator Mode 2 In the menu area click Job 3 On the Printer menu cl...

Страница 363: ...nnot be printed AcroForm is a function specific to PDF version 1 7 and is not supported If the document contains transparency function data it may fail to print When this happens use the printer drive...

Страница 364: ...required function and dropping it there 1 On the Start menu point to All Programs DeskTopBinder and then click Function Palette An icon for the Function palette is added to the task tray displayed at...

Страница 365: ...sides of sheets 5 Layout Prints multiple pages on a single sheet 6 Punch not supported for this printer Punches holes in printed sheets 7 Staple not supported for this printer Staples together printe...

Страница 366: ...ying the printer s IP address c lpr S printer s IP address P printer name o l path PDF file name Entering the text enclosed in brackets is optional For details about printing PDF files directly see UN...

Страница 367: ...For details about Web Image Monitor see Web Image Monitor Help Printing a PDF File Directly 53 2...

Страница 368: ...tion Code box This code identifies the user The classification code can contain up to 32 alphanumeric a z A Z 0 9 characters 6 Make any other necessary print settings and then click OK 7 Execute the p...

Страница 369: ...driver under different names and specify different classification code for each driver For details about how to view the log collected using Classification Code see the manual for the external log col...

Страница 370: ...g an account that has Administrators privilege The following Virtual Printer protocols are available TCP IP Unspecified Normal TCP IP Unspecified Priority TCP IP DIPRINT TCP IP RHPP TCP IP IPDS AppleT...

Страница 371: ...rotocol list 4 Change the configuration as required 5 Click OK For details about virtual printer configuration see Web Image Monitor Help Confirming a Virtual Printer Configuration 1 Start Web Image M...

Страница 372: ...you configured for interrupt printing Before printing for the first time specify the virtual printer you want to use 1 Log in to Web Image Monitor as an administrator For details about logging in see...

Страница 373: ...upt print job or only part of the interrupt job may be printed If this happens certain functions for the interrupt job such as stapling or storing data onto the printer can be canceled or sheets can b...

Страница 374: ...paper size setting you want to change and then press the OK key 3 Press the or key to select the paper size you require and then press the OK key 4 Press the or key to select the tray whose paper typ...

Страница 375: ...press the OK key If a tray with a smaller paper size is selected the print job may be cut short or other problems may occur Canceling a Print Job Follow this procedure for canceling the print job if...

Страница 376: ...may continue for a few pages after you press the Job Reset key A print job containing a large volume of data may take considerable time to stop To stop data printing see p 81 Canceling a Print Job Pr...

Страница 377: ...int or delete the print files This function is available only if the hard disk is installed on the printer Print Job Screen If you press Prt Jobs on the initial screen a screen prompting to select the...

Страница 378: ...nge the password of a Locked Stored Print job press Change enter the current password and then enter the new password on the confirmation screen To clear the password for the Stored Print Job press Ch...

Страница 379: ...ser whose user ID has been selected 5 Job List Switches the screen to the Job List screen Displays the print jobs of the selected user only To cancel selecting a file press the Escape key The display...

Страница 380: ...r s control panel This can reduce misprints due to mistakes in content or settings A Sample Print file cannot be stored if the hard disk is not installed in the printer the total number of Sample Prin...

Страница 381: ...Delete Stored Jobs see p 96 Maintenance Menu Sending a Sample Print file The following procedure describes how to print a Sample Print file with the PCL 6 PCL 5e or PostScript 3 printer driver Applica...

Страница 382: ...Print To cancel printing press Cancel If the set quantity is changed when User ID is pressed in step 2 the changed quantity is applied to all selected files When printing is completed the stored file...

Страница 383: ...e stored in ELP NX when user authentication is set After issuing the print command from the printer driver log in to ELP NX and print the job If you are using a Type 2 model with ELP NX installed all...

Страница 384: ...se Locked Print files For details about the error log in the display panel see p 136 Checking the Error Log For details about Auto Delete Temporary Jobs and Auto Delete Stored Jobs see p 96 Maintenanc...

Страница 385: ...en will appear if the password is not entered correctly Press Clear or the Clear key to enter the password again If you forget your password contact your administrator for help 5 Press Print To cancel...

Страница 386: ...ord contact your administrator for help 5 Press Delete To cancel deleting press Cancel Hold Print Use this function to temporarily hold a file in the printer and print it from the computer or the prin...

Страница 387: ...e time the file is sent or by changing the file name to something that can be recognized easily If you enter the document name on the printer driver s Details that name appears on the display panel It...

Страница 388: ...nt using the or key and then press Print 4 Press Print To cancel printing press Cancel When printing is completed the stored file will be deleted To stop printing after printing has started press the...

Страница 389: ...int it from the computer or the printer s control panel later Jobs are not deleted after they are printed so the same job need not be resent in order to print multiple copies A Stored Print file canno...

Страница 390: ...ile name to something that can be recognized easily If you enter the document name on the printer driver s Details that name appears on the display panel For details about the error log in the display...

Страница 391: ...If you want to print multiple copies specify a number of sets in the Quantity box Press the Clear key to correct any entry mistakes 4 Press Print To cancel printing press Cancel When multiple files a...

Страница 392: ...ails about the Auto Delete Stored Jobs see p 96 Maintenance Menu For details about User ID see p 79 Printing from the User ID Screen Deleting Stored Print files 1 Press Prt Jobs 2 Select Stored Print...

Страница 393: ...2 Press User ID 3 Select the user ID whose file you want to print using the or key and then press Job List 4 Select the file you want to print using the or key and then press Print 5 Press Print To ca...

Страница 394: ...ation screen one set less than the least number of set specified on the computer is applied for every selected document If the number of sets specified on the computer is 1 one set each is printed for...

Страница 395: ...time to stop Windows 1 Double click the printer icon on the Windows task tray A window appears showing all print jobs currently queued for printing Check the current status of the job you want to canc...

Страница 396: ...nceled if the Job Reset key is pressed while Please wait is displayed on the control panel After the interval set in I O Timeout in Printer Features has passed the next print job can be sent A print j...

Страница 397: ...e Status Displays data status inside the memory This menu can be displayed only if all the following conditions are met The optional hard disk and the SD card provided with the hard disk are installed...

Страница 398: ...ngs Timer Settings HDD Management Machine Settings Export HDD Management appears only when the hard disk is installed List Test Print Menu Multiple Lists Config Page Error Log Network Summary Supply I...

Страница 399: ...Sub Paper Size Default Printer Lang Auto Off Print Compressed Data Memory Usage Spool Printing RAM Disk Auto E mail Notify Spool Printing appears only when the hard disk is installed RAM Disk appears...

Страница 400: ...sing the Type 1 model Auto Erase Memory Setting and Erase All Memory will appear when the optional hard disk and the SD card provided with the hard disk are installed If you are using the Type 1 model...

Страница 401: ...e printer for power off To prevent damage to the hard disk or memory leading to malfunction be sure to shutdown the printer properly before turning off the power switch For details about shutting down...

Страница 402: ...Extended Features This menu is not available on the printer you are using 4 Making Printer Settings Using the Control Panel 88 4...

Страница 403: ...on the Host Interface menu Fixed USB Port under USB Settings on the Host Interface menu Exporting the Machine Settings to a SD Card 1 Make sure the printer is turned off 2 Insert the SD card in the S...

Страница 404: ...3 Turn the printer on while pressing and holding down the Job Reset key 4 When the confirmation screen appears press Yes 5 When the message regarding the completion of the import process appears turn...

Страница 405: ...ly Auto Erase Memory Setting is enabled Viewing the Status of Remaining Data in Memory 1 Press the Menu key CEC216 2 Press the or key to select Memory Erase Status and then press the OK key 3 The curr...

Страница 406: ...ecify the paper size for Bypass Tray Default mainly Europe and Asia A4 mainly North America 81 2 11 Paper Size Tray 1 to 5 You can specify the paper size for Tray 1 to 5 Default mainly Europe and Asia...

Страница 407: ...er driver and control panel Tray 1 to 5 Bypass Tray Default On On Off Tray Priority You can set a tray to be checked first when automatic tray selection is enabled from the printer driver The tray sel...

Страница 408: ...ey to select Auto Tray Select and then press the OK key 4 Press the or key to select the tray you want to print from and then press the OK key 5 Press the or key to select On and then press the OK key...

Страница 409: ...3 Press the or key to select Tray Priority and then press the OK key 4 Press the or key to select a tray you want to use and then press the OK key 5 Press the Menu key Paper Input Menu 95 4...

Страница 410: ...setting from its default value if necessary For details about adjusting the print image density see Adjusting the Image Density Hardware Guide Registration You can adjust the starting position of the...

Страница 411: ...r Setting You can select the type of plain paper Tray 1 to 5 Bypass Tray Default Plain Paper 2 Plain Paper 1 Plain Paper 2 Letterhead Setting You can select the type of letterhead paper Tray 1 to 5 By...

Страница 412: ...n the initial screen Default On On Off Menu Protect You can select whether or not to protect the menu settings If you enable this setting you must specify a protection level If you would like to lower...

Страница 413: ...ault Off On Off Display Contrast You can specify the density of the display by selecting one of seven levels Key Repeat You can specify whether or not to scroll the display panel when the or key is he...

Страница 414: ...ne will resume printing when the period of time specified by this setting has passed If you enable this setting you can specify the number of seconds the printer waits before it auto resets Specify a...

Страница 415: ...s the printer waits before it deletes documents Specify a wait time of between one and 180 days in steps of one day The default wait time is three days Default On On Off Reset IPDS Fonts Use this func...

Страница 416: ...d then press the OK key 4 Press the or key to select Auto Delete Temporary Jobs and then press the OK key 5 Press the or key to select On and then press the OK key 6 Press the or key to set automatic...

Страница 417: ...or Log You can print an error report Network Summary You can print the network device status Supply Info List You can print the supply status Menu List You can print a menu list showing all available...

Страница 418: ...he OK key 3 Press the or key to select Config Page and then press the OK key After the configuration page is printed out the screen returns to List Test print menu 4 Press the Menu key Interpreting th...

Страница 419: ...printer Paper Input Shows the current Paper Input settings For details see p 92 Paper Input Menu Maintenance Shows the current Maintenance settings For details see p 96 Maintenance Menu System Shows t...

Страница 420: ...ork the IPv4 address subnet mask and gateway address appear in parentheses For details see p 128 Host Interface Menu Interface Information Interface information is displayed User Paper Type Registered...

Страница 421: ...Specify whether or not to continue printing after a system error When you enable this setting specify how long the printer is to display error before resuming print When Auto Continue is set to on an...

Страница 422: ...he printer language to use when the printer fails to detect the printer language Default PCL PCL PS PDF Auto Off Use this function to reduce the power consumption of the printer when the printer is no...

Страница 423: ...this setting to increase print speed Depending on the document you are printing this setting might not be effective Spool Printing Specify whether or not to complete spooling before starting to print...

Страница 424: ...anging the System Menu Follow the procedure below to change the settings for Auto Off Timer 1 Press the Menu key CEC216 2 Press the or key to select System and then press the OK key 3 Press the or key...

Страница 425: ...e default paper size is used when the paper size is not specified in the print data Default mainly Europe and Asia A4 mainly North America 81 2 11 mainly Europe and Asia A4 A5 A6 B5 JIS B6 JIS C5 Env...

Страница 426: ...ing Select whether or not to smooth the edges of texts and images when printing When this setting is enabled gradation in images may be degraded Default On On Off Toner Saving Reduces toner consumptio...

Страница 427: ...y settings specified using the control panel Machine Setting s The paper settings specified on the printer s control panel are applied to all print jobs An error will occur if the paper settings speci...

Страница 428: ...tion Select the page orientation Default Portrait Portrait Landscape Form Lines Specify the number of lines per page between 5 to 128 The default paper size is used when the paper size is not specifie...

Страница 429: ...es Symbol Set You can specify the character set for the default font Default PC 8 Available sets are as follows Roman 8 Roman 9 ISO L1 ISO L2 ISO L5 ISO L6 ISO L9 PC 775 PC 8 PC 8 D N PC 850 PC 852 PC...

Страница 430: ...between 0 to 999 Default 0 Default Use Driver Command Use Driver Command Use Machine Setting s Wait Timeout You can specify how long the printer waits in seconds before it cancels receiving a job whe...

Страница 431: ...DF Password Specify the password for the PDF file executing PDF Direct Print If you do not set a PDF password this menu does not appear The password can be set using Web Image Monitor but must be sent...

Страница 432: ...ecify an IPDS form for each paper tray For each paper tray select the IPDS form you want to allocate to it Only installed trays appear on the display panel Tray 1 Tray 2 Tray 3 Tray 4 Tray 5 Bypass Tr...

Страница 433: ...319 400 404 416 420 424 428 432 2304 2305 2306 2307 2308 2309 2310 2311 5687 5707 5815 5835 20224 Chara Per Inch Specify the number of characters per inch pitch for the default font Valid values are...

Страница 434: ...reported to the host in the IPDS XOAOPC command for raster coded fonts and IM1 image support Default Auto Auto 240dpi 300dpi 600dpi Graph Char Str Specify the Graphic Character String Graphic Characte...

Страница 435: ...rome laser printer Default On On Off Tray Mapping Map the media source input tray to an ID the host uses for the media source Default Auto IPDS Tray Auto Changing the Print Settings Menu Follow the pr...

Страница 436: ...K key 5 Press the or key to select the tray whose paper type or size you want to change and then press the OK key 6 Press the or key to select the desired setting item and then press the OK key 7 Pres...

Страница 437: ...Default Off On Off Restrict User Info Display Select whether or not to display user information as when checking job information without being authenticated through user authentication Default Off On...

Страница 438: ...vilege Off Password Policy Specify the format of passwords types of characters to be used and minimum length Valid characters for passwords are upper case letters lower case letters decimal numbers an...

Страница 439: ...vice mode This setting appears only when the user has logged in as the machine administrator Default Off On Off Firmware Version Display the firmware version of the printer Network Security Level Spec...

Страница 440: ...r or not to send log information to the log collection server Default Off On Only available from the log collection server Off Machine Data Encryption Encrypt data stored on the hard disk Once you enc...

Страница 441: ...Options and then press the OK key 3 Press the or key to select Extended Security and then press the OK key 4 Press the or key to select Erase All Memory and then press the OK key 5 Press the or key t...

Страница 442: ...ng a print job If printing operation is frequently interrupted by data from other ports you can increase the timeout period Default 15 seconds 10 seconds 15 seconds 20 seconds 25 seconds 60 seconds Ne...

Страница 443: ...o configuration Default Active Active Inactive IPsec This is a security function For details contact your administrator Default Inactive Active Inactive NW Frame Type Specify the frame type for NetWar...

Страница 444: ...s Half Duplex 100Mbps Full Duplex IEEE802 1X Auth Ethernet Specify IEEE 802 1X Ethernet authentication For details about IEEE 802 1X authentication see Configuration Hardware Guide Default Inactive Ac...

Страница 445: ...is menu appears when the IEEE 1284 interface board is installed Parallel Timing Specify the parallel interface timing Default ACK outside ACK inside ACK outside STB down Parallel Comm Speed Specify wh...

Страница 446: ...7e 32 bytes If blank is specified in 802 11 Ad hoc Mode ASSID appears Ad hoc Channel Specify the channel to use when 802 11 Ad hoc Mode has been selected Set the channel that matches the type of wirel...

Страница 447: ...rs WPA Press Details and then select the Encryption and Authentication Methods Select one of the following Encryption Methods TKIP CCMP AES Select one of the following Authentication Methods WPA PSK W...

Страница 448: ...below to change the I O Timeout setting 1 Press the Menu key CEC216 2 Press the or key to select Host Interface and then press the OK key 3 Press the or key to select I O Timeout and then press the O...

Страница 449: ...German Italian Spanish Dutch Norwegian Danish Swedish Polish Portuguese Hungarian Czech Finnish Russian Changing the Language Menu Follow the procedure below to change the interface language 1 Press t...

Страница 450: ...ed Print Jobs Checking the Error Log If a document could not be printed due to a printing error identify the cause of the error by checking the error log in the control panel The most recent 30 errors...

Страница 451: ...and then press the OK key If you select All all error logs appears 4 Select the error log you want to check using the or key Press the Menu key until the initial screen appears after checking the log...

Страница 452: ...4 Making Printer Settings Using the Control Panel 138 4...

Страница 453: ...r settings Checking the print job status or history Interrupting currently printing jobs Resetting the printer Managing the Address Book Making printer settings Making network protocol settings Making...

Страница 454: ...contact your administrator When using the SSL encryption protocol enter https printer s IP address When you are using Firefox fonts and colors may be different or tables may be out of shape When using...

Страница 455: ...pear 3 Header area The dialog box for switching to the user mode and administrator mode appears and each mode s menu will be displayed The link to help and dialog box for keyword search appears 4 Help...

Страница 456: ...tatus Supplies Device Info and Counter tab are displayed Details of the tab menu are displayed on the work area 2 Printer Print Jobs Allows you to display a list of Sample Print Locked Print Hold Prin...

Страница 457: ...is located on Top Page For details about messages and settings see Web Image Monitor Help Access in the Administrator Mode Follow the procedure below to access Web Image Monitor in the administrator m...

Страница 458: ...To create a link for the Help button save the downloaded Help files on a Web server Linking the URL of the downloaded Help You can link the URL of the help file on a Web server to the button 1 Log in...

Страница 459: ...can manage accounts according to individual clients or account titles Classification Code Based Process example CBK519 1 Divisions sections departments project teams users etc to be managed 2 The appr...

Страница 460: ...classification code requirement is Optional 1 Log in to Web Image Monitor as an administrator For details about logging in see p 143 Access in the Administrator Mode 2 Click Configuration in the menu...

Страница 461: ...ils contact your administrator Restoring Address Book Data Follow the procedure below to restore previously saved address book data to the printer 1 Log in to Web Image Monitor as an administrator For...

Страница 462: ...evices connected to the network Use of this software is recommended for administrators only You can download SmartDeviceMonitor for Admin from the manufacturer s Web site For details about SmartDevice...

Страница 463: ...be different from each other When setting SSL a protocol for encrypted communication under the environment where the device certificate is installed enter https printer s IP address Internet Explorer...

Страница 464: ...tion s Help The e mail notification functions you can set are as follows Auto e mail notification Information including the printer status is automatically sent by e mail Before you use this function...

Страница 465: ...POP before SMTP column Configure the POP server Check your mailing environment and then specify the necessary items You can also perform mail authentication for the POP server Items in the POP3 IMAP4...

Страница 466: ...ick OK 6 Click Logout 7 Quit Web Image Monitor The user name and e mail address that is already registered as e mail destination cannot be specified as the recipient of e mail notification Mail Authen...

Страница 467: ...in to Web Image Monitor as an administrator For details about logging in see p 143 Access in the Administrator Mode 2 In the menu area click Configuration 3 Under Device Settings click E mail 4 Make t...

Страница 468: ...Web Image Monitor Help On demand E mail Notification 1 Log in to Web Image Monitor as an administrator For details about logging in see p 143 Access in the Administrator Mode 2 In the menu area click...

Страница 469: ...Format of the request e mail Item Description To Enter the specified e mail address in E mail Notification E mail Address Subject Enter requeststatus From Specify a valid mail address The device infor...

Страница 470: ...5 Monitoring and Configuring the Printer 156 5...

Страница 471: ...inter Management access authentication under Windows Vista 7 Full Control access authentication Log on to the file server as an Administrator group 1 Open the Printers and Faxes window from the Start...

Страница 472: ...etWare Print Settings Print Server Name Enter the NetWare print server name To use the interface board as a print server enter the name of a print server that is not active on the file server Use up t...

Страница 473: ...ed user If you cannot identify the printer you want to configure check the printer name against the configuration page printed from the printer For details about printing a configuration page see p 10...

Страница 474: ...a queued print server in a pure IP environment of NetWare 5 5 1 or NetWare 6 6 5 create a print queue on the file server using NetWare Administrator This printer is not available as a remote printer...

Страница 475: ...en click Create 21 Click Assignments and then click Add in the Assignments area 22 In the Available objects box click the queue you created and then click OK 23 Check the settings and then click OK 24...

Страница 476: ...Options menu click Print Server Information and then press the Enter key 8 To create a new print server press the Insert key and then enter a print server name For a currently defined print server se...

Страница 477: ...nfiguration in the menu area and then click NetWare Print Settings 3 Confirm the settings and then click Device Name Configuration is now complete Wait several minutes before restarting Web Image Moni...

Страница 478: ...er name 11 Select the Define additional properties check box and then click Create 12 Assign print queues to the created printer Click Assignments and then click Add in the Assignments area 13 In the...

Страница 479: ...see p 143 Access in the Administrator Mode 2 Click Configuration in the menu area and then click NetWare Print Settings 3 Confirm the settings and then click Device Name Configuration is now complete...

Страница 480: ...6 Using a Printer Server 166 6...

Страница 481: ...h the application For details about the option settings of ELP NX consult your administrator The following shows the tabs or menus where you can select this function Job Type on Job Log in the print d...

Страница 482: ...characters a z A Z 0 9 The password can contain 4 8 digits The File Name can contain up to 16 alphanumeric characters a z A Z 0 9 You can assign a password to a saved document but password assignment...

Страница 483: ...ved on the hard disk in the following cases You can check the error log for jobs not saved When there are 100 Sample Print Locked Print Hold Print and Stored Print jobs saved on the hard disk When the...

Страница 484: ...ed in the application s print dialog box more prints than intended may be printed Print jobs are not saved on the hard disk in the following cases You can check the error log for jobs not saved When t...

Страница 485: ...option is selected in the application s print dialog box more prints than intended may be printed Print jobs are not saved on the hard disk in the following cases You can check the error log for jobs...

Страница 486: ...wing cases You can check the error log for jobs not saved When there are 100 Sample Print Locked Print Hold Print and Stored Print jobs saved on the hard disk When the total number of pages saved on t...

Страница 487: ...select this function Fit to Paper is displayed under General 1 in the Feature Sets list on Printer Features in the print dialog box Prompt User Print is performed with the size of document to be prin...

Страница 488: ...rinter Features in the print dialog box For details about the gradation types see the printer driver Help Image Smoothing Use this to select the image smoothing type The following shows where you can...

Страница 489: ...dithering method automatically depending on the appearance of the document to be printed Photographic Performs dithering using an appropriate pattern for photographs Text Performs dithering using an a...

Страница 490: ...nder General 2 in the Feature Sets list on Printer Features in the print dialog box Watermark Angle Select the Watermark angle The following shows where you can select this function Watermark Angle is...

Страница 491: ...s Terminal Service or Citrix Presentation Server Citrix XenApp Citrix Presentation Server Citrix XenApp Auto creating client printers Using Auto creating client printers can select a logical printer c...

Страница 492: ...er replication can distribute printer drivers across all servers in a server farm We strongly recommend testing this function in your network environment before using it for your work If the printer d...

Страница 493: ...connects to the ISDN line whenever a packet is transferred from the printer If there is more than one DHCP server use the same setting for all servers The printer operates using data from the DHCP ser...

Страница 494: ...NetBIOS name is registered by broadcast The NetBIOS name can be entered using up to 13 alphanumeric characters Using Web Image Monitor 1 Log in to Web Image Monitor as an administrator For details ab...

Страница 495: ...t name CNAME will not be registered For DHCPv4 settings As a substitute for the printer the DHCP server updates the record and one of the following occurs When the printer acquires the IP address from...

Страница 496: ...ds Microsoft DNS servers with standard Windows Server 2003 2003 R2 2008 2008 R2 features BIND 8 2 3 or higher DNS servers with standard NetWare 5 or a higher version features For IPv6 setting Microsof...

Страница 497: ...For details see Using telnet UNIX Supplement Using the Dynamic DNS Function 183 8...

Страница 498: ...nter with NetWare 1 Following the setup method described earlier in this manual configure the file server 2 Set the frame type for NetWare environment Configuring the printer without NetWare 1 When no...

Страница 499: ...elow to improve the situation Position the access point nearer to the printer Clear the space between access point and printer of obstructions Moveradiowavegeneratingappliances suchasmicrowaves awayfr...

Страница 500: ...EMENT IN NO EVENT SHALL THE AUTHORS OR COPYRIGHT HOLDERS BE LIABLE FOR ANY CLAIM DAMAGES OR OTHER LIABILITY WHETHER IN AN ACTION OF CONTRACT TORT OR OTHERWISE ARISING FROM OUT OF OR IN CONNECTION WITH...

Страница 501: ...OF THE POSSIBILITY OF SUCH DAMAGE II Authors Name List All product names mentioned herein are trademarks or registered trade marks of their respective owners The following notices are required to sat...

Страница 502: ...ir G Crooks This product includes software developed by Alistair G Crooks for the NetBSD project This product includes software developed by Allen Briggs This product includes software developed by Am...

Страница 503: ...SD Project This product includes software developed by Colin Wood This product includes software developed by Cybernet Corporation and Nan Yang Computer Services Limited This product includes software...

Страница 504: ...cludes software developed by Ian F Darwin and others This product includes software developed by Ian W Dall This product includes software developed by Ichiro FUKUHARA This product includes software d...

Страница 505: ...e developed by MINOURA Makoto Takuya Harakawa This product includes software developed by Manuel Bouyer This product includes software developed by Marc Horowitz This product includes software develop...

Страница 506: ...software developed by Per Fogelstrom This product includes software developed by Peter Galbavy This product includes software developed by Phase One Inc This product includes software developed by Phi...

Страница 507: ...his product includes software developed by Toru Nishimura This product includes software developed by Trimble Navigation Ltd This product includes software developed by WIDE Project and its contributo...

Страница 508: ...ultural College and Garrett A Wollman This product includes software developed by the University of Vermont and State Agricultural College and Garrett A Wollman by William F Jolitz and by the Universi...

Страница 509: ...ar operating systems Similar operating systems includes mainly non profit oriented systems for research and education including but not restricted to NetBSD FreeBSD Mach by CMU This software includes...

Страница 510: ...ed by the product manufacturer under separate agreement s d The source code of the modified code of the Sablotron 0 82 is available at http support download com services device sablot notice082 html e...

Страница 511: ...SE DATA OR PROFITS WHETHER IN AN ACTION OF CONTRACT NEGLIGENCE OR OTHER TORTIOUS ACTION ARISING OUT OF OR IN CONNECTION WITH THE USE OR PERFORMANCE OF THIS SOFTWARE RSA BSAFE This product includes RSA...

Страница 512: ...EXEMPLARY OR CONSEQUENTIAL DAMAGES INCLUDING BUT NOT LIMITED TO PROCUREMENT OF SUBSTITUTE GOODS OR SERVICES LOSS OF USE DATA OR PROFITS OR BUSINESS INTERRUPTION HOWEVER CAUSED AND ON ANY THEORY OF LIA...

Страница 513: ...NO EVENT SHALL THE AUTHOR OR CONTRIBUTORS BE LIABLE FOR ANY DIRECT INDIRECT INCIDENTAL SPECIAL EXEMPLARY OR CONSEQUENTIAL DAMAGES INCLUDING BUT NOT LIMITED TO PROCUREMENT OF SUBSTITUTE GOODS OR SERVIC...

Страница 514: ...ffice worldwide More information can be found e g at http www cs hut fi crypto The legal status of this program is some combination of all these permissions and restrictions Use only at your own respo...

Страница 515: ...a All rights reserved Redistribution and use in source and binary forms with or without modification are permitted provided that the following conditions are met 1 Redistributions of source code must...

Страница 516: ...tation and or other materials provided with the distribution THIS SOFTWARE IS PROVIDED BY THE AUTHOR AS IS AND ANY EXPRESS OR IMPLIED WARRANTIES INCLUDING BUT NOT LIMITED TO THE IMPLIED WARRANTIES OF...

Страница 517: ...TS OR CONTRIBUTORS BE LIABLE FOR ANY DIRECT INDIRECT INCIDENTAL SPECIAL EXEMPLARY OR CONSEQUENTIAL DAMAGES INCLUDING BUT NOT LIMITED TO PROCUREMENT OF SUBSTITUTE GOODS OR SERVICES LOSS OF USE DATA OR...

Страница 518: ...opyright c 1997 2005 Kungliga Tekniska H gskolan Royal Institute of Technology Stockholm Sweden All rights reserved Redistribution and use in source and binary forms with or without modification are p...

Страница 519: ...difications Copyright c 1995 Mike Mitchell Modifications Copyright c 1995 John Hay WPA Supplicant Copyright c 2003 2009 Jouni Malinen j w1 fi and contributors All Rights Reserved Redistribution and us...

Страница 520: ...RCHANTABILITY AND FITNESS FOR A PARTICULAR PURPOSE ARE DISCLAIMED IN NO EVENT SHALL THE AUTHOR OR CONTRIBUTORS BE LIABLE FOR ANY DIRECT INDIRECT INCIDENTAL SPECIAL EXEMPLARY OR CONSEQUENTIAL DAMAGES I...

Страница 521: ...if it was added to the Program by such Contributor itself or anyone acting on such Contributor s behalf Contributions do not include additions to the Program which i are separate modules of software d...

Страница 522: ...ach Contributor represents that to its knowledge it has sufficient copyright rights in its Contribution if any to grant the copyright license set forth in this Agreement 3 REQUIREMENTS A Contributor m...

Страница 523: ...warranties are such Commercial Contributor s responsibility alone Under this section the Commercial Contributor would have to defend claims against the other Contributors related to those performance...

Страница 524: ...ward reserves the right to publish new versions including revisions of this Agreement from time to time No one other than the Agreement Steward has the right to modify this Agreement IBM is the initia...

Страница 525: ...are we are referring to freedom not price Our General Public Licenses are designed to make sure that you have the freedom to distribute copies of free software and charge for this service if you wish...

Страница 526: ...opy of this License along with the Program You may charge a fee for the physical act of transferring a copy and you may at your option offer warranty protection in exchange for a fee 2 You may modify...

Страница 527: ...section b above The source code for a work means the preferred form of the work for making modifications to it For an executable work complete source code means all the source code for all modules it...

Страница 528: ...twaredistributedthroughthatsysteminrelianceonconsistent application of that system it is up to the author donor to decide if he or she is willing to distribute software through any other system and a...

Страница 529: ...w Programs If you develop a new program and you want it to be of the greatest possible use to the public the best way to achieve this is to make it free software which everyone can redistribute and ch...

Страница 530: ...Youshouldalsogetyouremployer ifyouworkasaprogrammer oryourschool ifany tosigna copyright disclaimer for the program if necessary Here is a sample alter the names Yoyodyne Inc hereby disclaims all copy...

Страница 531: ...poration in the United States and or other countries Monotype is a registered trademark of Monotype Imaging Inc NetWare IPX IPX SPX are either registered trademarks or trademarks of Novell Inc OpenLDA...

Страница 532: ...as follows Microsoft Windows Server 2003 R2 Standard Edition Microsoft Windows Server 2003 R2 Enterprise Edition The product names of Windows Server 2008 are as follows Microsoft Windows Server 2008 S...

Страница 533: ...19 DHCP 179 Dial up router 184 Dithering 175 Downloading utility software 19 Duplex printing 29 Dynamic DNS 181 E Error log 136 F Finishing menu 38 Fit to paper 173 Form feed 60 Format of on demand e...

Страница 534: ...nding a PDF file 52 Slip sheets 42 SmartDeviceMonitor for Admin 19 148 SmartDeviceMonitor for Client 20 149 Spool printing 47 Standard printing 28 Store and Print 167 Stored print 75 79 Supported prin...

Страница 535: ...2010...

Страница 536: ...Operating Instructions Software Guide M020 8504 EN US...

Страница 537: ...he machine 1 Getting Started 2 Configuring Administrator Authentication 3 Configuring User Authentication 4 Protecting Data from Information Leaks 5 Securing Information Stored on the Hard Disk 6 Mana...

Страница 538: ...items consult with your legal advisor Important Contents of this manual are subject to change without prior notice In no event will the company be liable for direct indirect special incidental or cons...

Страница 539: ...ecurity 17 2 Configuring Administrator Authentication Administrators 19 User Administrator 19 Machine Administrator 20 Network Administrator 20 File Administrator 20 Supervisor 20 About Administrator...

Страница 540: ...thentication 47 Printer Job Authentication 50 User Lockout Function 52 Specifying the user lockout function 53 Unlocking a locked user account 53 Auto Logout Function 55 Authentication Using an Extern...

Страница 541: ...anel to Specify Log Files Settings 76 Using Remote Communication Gate S to Manage Log Files 77 Using Web Image Monitor to Manage Log Files 77 7 Enhanced Network Security Preventing Unauthorized Access...

Страница 542: ...the Extended Security Functions 129 Extended Security Settings 129 Limiting Printer Operation to Customers Only 134 Settings 134 Specifying Service Mode Lock Preparation 134 Canceling Service Mode Lo...

Страница 543: ...trator Settings 153 Control Panel 153 Settings via Web Image Monitor 153 The Privilege for User Account Settings in the Address Book 155 User Settings Control Panel Settings 157 Panel Menu 157 User Se...

Страница 544: ...icates the names of keys on the machine s display or control panels IP Address In this manual IP address covers both IPv4 and IPv6 environments Read the instructions that are relevant to the environme...

Страница 545: ...For details about the specifications of each option see Specifications Hardware Guide 7...

Страница 546: ...e to read this Quick Installation Guide Contains procedures for removing the printer from its box and connecting it to a computer Hardware Guide Contains information about paper names and functions of...

Страница 547: ...ter This manual is provided in English only The following software products are referred to as using general names Product name General name DeskTopBinder Lite and DeskTopBinder Professional 1 DeskTop...

Страница 548: ...10...

Страница 549: ...of security breaches by users 3 Before setting this printer s security features and to ensure appropriate operation by users administrators must read the Security Reference completely and thoroughly p...

Страница 550: ...ogging in to Web Image Monitor as an administrator see p 22 Using Web Image Monitor to Configure Administrator Authentication 8 Install the server certificate For details see p 94 Protection Using Enc...

Страница 551: ...stalled Authentication and Access Limits Using authentication administrators manage the printer and its users To enable authentication information about both administrators and users must be registere...

Страница 552: ...login user name and login password Administrator Authentication Administrators are authenticated by their login user name and login password supplied by the administrator when specifying the printer s...

Страница 553: ...Logout This action is required with administrator and user authentication This action is required when you have finished using the printer or changing the settings Glossary 15 1...

Страница 554: ...o users For information on how to specify which functions are available see p 75 Limiting Available Functions Ensuring Information Security Printing confidential files Using the Locked Print function...

Страница 555: ...zed operation you can specify who is allowed to access each of the printer s functions For details about limiting available functions for users and groups see p 75 Limiting Available Functions Enhance...

Страница 556: ...analyzed and tampered with For details about safer communication using SSL SNMPv3 and IPsec see p 94 Protection Using Encryption 1 Getting Started 18 1...

Страница 557: ...ge each administrator s password Administrators are limited to managing the printer s settings and controlling user access so they cannot use normal functions such as printing To use such functions th...

Страница 558: ...y the network administrator By making this setting you can prevent unauthorized users from changing the settings and disabling the printer and thus ensure correct network operation For instructions on...

Страница 559: ...o enable only the machine administrator to set data security for Printing log deletion and other defaults 3 Network Administrator This administrator manages the network settings You can set the printe...

Страница 560: ...rtDeviceMonitor for Admin Administrators are limited to managing the printer s settings and controlling user access so they cannot use normal functions including printing To use these functions the ad...

Страница 561: ...nd login password By default the login name is admin and the password is empty For details about changing the administrator password using the supervisor s authority see p 143 Supervisor Operations Fo...

Страница 562: ...see Web Image Monitor Help If administrator authentication has already been specified log in using a registered administrator name and password For details about logging in and out with administrator...

Страница 563: ...irst time as the administrator enter admin 4 Enter the login password and then press the OK key If assigning the administrator for the first time press the OK key without entering login password Authe...

Страница 564: ...ory 4 Select Administrator1 Administrator2 Administrator3 or Administrator4 andthen click OK If you would like to have one administrator to carry out multiple administrative works select a single acco...

Страница 565: ...strict usage of the printer to users who are registered in the Address Book only The user administrator can manage user permissions through the Address Book For details about administrator capabilitie...

Страница 566: ...ns on the printer including printing 2 Group A group performs normal operations on the printer including printing 3 Unauthorized User 4 Authentication Using a login user name and password user authent...

Страница 567: ...ication Specifying User Authentication p 31 User Code Authentication p 33 Basic Authentication p 36 Windows Authentication p 43 LDAP Authentication p 47 Integration Server Authentication To specify Ba...

Страница 568: ...no more than eight digits and is used for User Code authentication can be carried over and used as a login user name even after the authentication method has switched fromUserCodeauthenticationtoBasi...

Страница 569: ...nu area 3 Click Administrator Authentication Management in the Device Settings category 4 Click On in the Machine Administrator Authentication area and then click OK 5 Click User Authentication Manage...

Страница 570: ...ecify this setting if you want to print using unauthenticated printer drivers or without any printer driver Authentication is required for printing with non specified devices 1 Select Simple Limitatio...

Страница 571: ...Click User Authentication Management and then select Basic Authentication in the User Authentication Management list 6 Select the Printer Job Authentication level If you select Entire or Simple All p...

Страница 572: ...Simple proceed to step 4 2 Select IPv4 Address 1 IPv4 Address 2 IPv4 Address 3 IPv4 Address 4 or IPv4 Address 5 and then enter the IPv4 address on the Limitation Range IPv4 area Be sure the number you...

Страница 573: ...Information area 5 Click Change in the Login Password area 6 Enter the login password and then click OK 7 Specify Available Function The initial value is set at Basic Authentication If the value is r...

Страница 574: ...e LDAP If SSL is being used a version of Windows that supports TLS v1 SSL v2 or SSL v3 is required Windows Server 2003 2003 R2 2008 2008 R2 Operational Requirements for Kerberos authentication To spec...

Страница 575: ...functions available under Default Group To enable Kerberos authentication you must first register a Kerberos realm The realm name can contain capital letters only For details about registering a Kerb...

Страница 576: ...If you select Simple All you can print even with unauthenticated printer drivers or devices Specify this setting if you want to print with a printer driver or device that cannot be identified by the...

Страница 577: ...le USB Simple and the clients IPv4 address range in which printer job authentication is not required Specify this setting if you want to print using unauthenticated printer drivers or without any prin...

Страница 578: ...hentication box and then specify the printer functions Windows Authentication will be applied to the selected functions Users can use the selected functions only 6 Click OK 7 Click Logout 8 Close Web...

Страница 579: ...ck Next 14 Read the notes and then click Next 15 Select the role service you want to use and then click Next 16 Click Install 17 When the installation is complete click Close 18 Close Server Manager C...

Страница 580: ...7 Wait a moment for the device to restart and then click OK Installed appears under Certificate Status to show that a device certificate for the printer has been installed 8 Click Logout 9 Close Web I...

Страница 581: ...server such as the user s name is automatically registered in the printer If user information on the server is changed information registered in the printer may be overwritten when authentication is...

Страница 582: ...nd can use the functions available under Available Functions during LDAP Authentication To limit the available functions for each user register each user and corresponding Available Functions setting...

Страница 583: ...nd then retrieve the user information from the LDAP server so it is transferred to the printer s address book The method for selecting the user name depends on the server environment Check the server...

Страница 584: ...a search criterion to obtain information about an authenticated user You can create a search filter based on the Login Name Attribute select a user and then retrieve the user information from the LDAP...

Страница 585: ...site certificate are checked every time you access the SSL server During Integration Server authentication the data registered in the server such as the user s name is automatically registered in the...

Страница 586: ...se secure sockets layer SSL for authentication click Off 3 Enter the Integration Server Name box 4 Select Authentication Type in the list If you set Authentication Type to Windows Authentication NT Co...

Страница 587: ...arallel Interface Simple area 4 Click Apply in the USB Simple area 5 Click On in the Integration Server Authentication Settings area To not use secure sockets layer SSL for authentication click Off 6...

Страница 588: ...is successful If user authentication fails the print job is reset C Printing is possible if user authentication is successful and Driver Encryption Key for the printer driver and printer match X Prin...

Страница 589: ...simple encryption to login passwords For details about turning off Simple Encryption and allowing the use of simple encryption see p 129 Specifying the Extended Security Functions 3 If the User Authe...

Страница 590: ...e lockout function settings can be made using Web Image Monitor Setting Item Description Setting Values Default Setting Lockout Specify whether or not to enable the lockout function Active Inactive In...

Страница 591: ...d 5 If you want to disable lockout after a specified time elapses set the Lockout Release Timer to Active 6 In the Lock Out User for field enter the number of minutes that must elapse before lockout i...

Страница 592: ...itor To unlock a locked out administrator or supervisor account turn the printer s power switch off and then on again or select Program Change Administrator under Configuration in Web Image Monitor 3...

Страница 593: ...h administrator authentication see p 22 Using Web Image Monitor to Configure Administrator Authentication 1 Log in to Web Image Monitor as an administrator 2 Click Configuration in the Menu area 3 Cli...

Страница 594: ...Authentication Using an External Device To authenticate using an external device see the device manual For details contact your sales representative 3 Configuring User Authentication 56 3...

Страница 595: ...ion settings To store files temporarily select Stored Print in the printer driver If you select Share stored print files you can also share these files Specifying a Locked Print File Using the printer...

Страница 596: ...If multiple print files are selected the printer prints files that correspond to the entered password The number of files to be printed is displayed on the confirmation screen 5 Press Print Deleting...

Страница 597: ...assword and then press the OK key 7 Re enter the password and then press the OK key Unlocking Locked Print Files If you specify On for Enhance File Protection the file will be locked and become inacce...

Страница 598: ...You can use the same procedure to unlock stored print files also 4 Protecting Data from Information Leaks 60 4...

Страница 599: ...n specify who is allowed to access the data in the Address Book By making this setting you can prevent the data in the Address Book being used by unregistered users For details about logging in and ou...

Страница 600: ...key 5 Press the or key to select On and then press Enc Key 6 Enter the encryption key and then press the OK key Enter the encryption key using up to 32 alphanumeric characters 7 Re enter the encrypti...

Страница 601: ...stored in the printer s NVRAM memory that remains even after the printer has been turned off and on the Hard Disk The following data is encrypted Address Book data User authentication information Temp...

Страница 602: ...Data is specified Use the following procedure to enable the encryption settings when first setting up the machine or after encryption settings have been canceled and settings must be made again The p...

Страница 603: ...urs The Erase All Memory function also clears the printer s security settings with the result that afterward neither printer nor user administration will be effective Ensure that users do not save any...

Страница 604: ...for retrieving backup data When the encryption key is updated encryption is performed using the new key After completing the procedure on the printer s control panel turn off the power and restart the...

Страница 605: ...ity Options and then press the OK key 3 Press the or key to select Machine Data Encryption and then press the OK key 4 Press the or key to select Cancel Encryption and then press the OK key 5 Select t...

Страница 606: ...Memory To erase all the data on the hard disk at once specify Erase All Memory Methods of Erasing the Data You can select the method of erasing the data from the following The factory default is Rand...

Страница 607: ...thentication p 25 Logging out Using Administrator Authentication When Auto Erase Memory is set to On temporary data that remained on the hard disk when Auto Erase Memory was set to Off might not be ov...

Страница 608: ...tions and then press the OK key 3 Press the or key to select Auto Erase Memory Setting and then press the OK key 4 Press the or key to select Off and then press the OK key Types of Data that can or ca...

Страница 609: ...Address Book can also be backed up using Web Image Monitor For details see SmartDeviceMonitor for Admin Help or Web Image Monitor Help Other than pausing no operations are possible during the Erase Al...

Страница 610: ...se Memory is completed overwriting will continue once the main power switch is turned back to On If an error occurs before overwriting is completed turn off the main power Turn it on again and then re...

Страница 611: ...ettings can be modified The following administrator types are available User Administrator For a list of settings that the user administrator can specify see p 145 User Administrator Settings Machine...

Страница 612: ...Press the or key to select General Settings and then press the OK key 4 Press the or key to select Menu Protect and then press the OK key 5 Press the or key to select the menu protect level and then...

Страница 613: ...e functions available to users For details about logging in and logging out with administrator authentication see p 22 Using Web Image Monitor to Configure Administrator Authentication 1 Log in to Web...

Страница 614: ...or Authentication and Logging out Using Administrator Authentication You can specify settings such as whether or not to transfer logs to Remote Communication Gate S and whether or not to delete all lo...

Страница 615: ...sing Remote Communication Gate S to Manage Log Files For details about using Remote Communication Gate S to manage log files see the manual supplied with Remote Communication Gate S Using Web Image Mo...

Страница 616: ...ut 7 Close Web Image Monitor The greater the Access Log Collect setting value the more logs are collected Disabling log transfer to Remote Communication Gate S This can be specified by the machine adm...

Страница 617: ...Web Image Monitor In order to enable encryption either Collect Job Logs or Collect Access Logs or both must be set to Active Deleting all logs This can be specified by the machine administrator Use th...

Страница 618: ...the Download button Any logs recorded after the Download button is clicked will not be downloaded The Result field of the log entry for uncompleted jobs will be blank Download time may vary depending...

Страница 619: ...2 168 15 16 to 192 168 15 20 For details about logging in and out with administrator authentication see p 22 Using Web Image Monitor to Configure Administrator Authentication Using access control you...

Страница 620: ...ls about making settings using telnet see Remote Maintenance Using telnet UNIX Supplement To disable SMTP on Web Image Monitor in E mail settings set the protocol to anything other than SMTP For detai...

Страница 621: ...r for Admin Remote Communication Gate S Functions that require sftp cannot be used You can restrict personal information from beingdisplayedby making settings on the control panel using Restrict User...

Страница 622: ...tor for Admin telnet Remote Communication Gate S SMB printing functions cannot be used NBT NetBIOS over TCP IPv4 UDP 137 UDP 138 telnet SMB printing functions via TCP IP as well as NetBIOS designated...

Страница 623: ...Admin Remote Communication Gate S Functions that require RSH RCP cannot be used You can restrict personal information from beingdisplayedby making settings on the control panel using Restrict User Inf...

Страница 624: ...te cannot be used DIPRINT TCP 9100 Web Image Monitor telnet SmartDeviceMonitor for Admin Remote Communication Gate S DIPRINT functions cannot be used RFU TCP 10021 telnet Printer firmware can be updat...

Страница 625: ...nd disabling protocols using the control panel This can be specified by the network administrator Use the following procedure to enable or disable each protocol using the control panel 1 Press the Men...

Страница 626: ...this setting when it is necessary to protect confidential information from outside threats Select Level 1 for moderate security to protect important information Use this setting if the printer is conn...

Страница 627: ...figuration in the Menu area and then click Network Security under Security category 3 Select the network security level in Security Level 4 Click OK 5 Click OK 6 Click Logout 7 Close Web Image Monitor...

Страница 628: ...tting RC2 2 Active Active Active DIPRINT Active Active Inactive LPR Active Active Inactive FTP Active Active Active sftp Active Active Active ssh Active Active Active RSH RCP Active Active Inactive TE...

Страница 629: ...e Inactive SNMPv3 Function Active Active Active Permit SNMPv3 Communication Encryption Cleartext Encryption Cleartext Encryption Only 1 The same settings are applied to IPv4 and IPv6 2 This setting is...

Страница 630: ...encryption key on the printer You can enhance security to make login passwords harder to break For details about logging in and logging out with administrator authentication see p 25 Logging in Using...

Страница 631: ...k Configuration in the Menu area under Security category and then click IPP Authentication 3 Select DIGEST from the Authentication list 4 Enter the user name in the User Name box 5 Enter the password...

Страница 632: ...pecified by the network administrator To protect the communication path and establish encrypted communication create and install the device certificate There are two ways of installing a device certif...

Страница 633: ...hority 2 Installing the device certificate Install the device certificate using Web Image Monitor 3 Enabling SSL Enable the SSL TLS setting using Web Image Monitor To confirm whether SSL configuration...

Страница 634: ...ems see Web Image Monitor Help For details about logging in and out with administrator authentication see p 22 Using Web Image Monitor to Configure Administrator Authentication 1 Log in to Web Image M...

Страница 635: ...Using Web Image Monitor to Configure Administrator Authentication 1 Log in to Web Image Monitor as an administrator 2 Click Configuration in the Menu area and then click Device Certificate under Secur...

Страница 636: ...under Security category 3 Click Active for the protocol version used in SSL TLS 4 Select the encryption communication mode for Permit SSL TLS Communication 5 If you want to disable a protocol click In...

Страница 637: ...ows Vista 7 or Windows Server 2008 2008 R2 is possible only after the hostname or IP address is specified in the device certificate s Common Name setting If the host name or IP address has changed the...

Страница 638: ...ication mode 5 Click OK 6 Click Logout 7 Close Web Image Monitor The SSL TLS encrypted communication mode can also be specified using Web Image Monitor For details see Web Image Monitor Help SNMPv3 En...

Страница 639: ...trator s Encryption Password setting and Encryption Key in SNMP Authentication Information in SmartDeviceMonitor for Admin in addition to specifying Permit SNMPv3 Communication on the printer For deta...

Страница 640: ...ems disable IPsec on the control panel and then access Web Image Monitor For details about disabling IPsec using the control panel see p 126 Deactivating IPsec Using the Control Panel IPsec is not app...

Страница 641: ...tication algorithm and authentication key are specified automatically Some operating systems use the term Compliance in place of Authentication Encryption Key Auto Exchange Settings and Encryption Key...

Страница 642: ...c Settings IPsec settings for this printer can be made on Web Image Monitor The following table explains individual setting items Encryption Key Auto Exchange Manual Settings Shared Settings Setting D...

Страница 643: ...entication and High Level Encryption Authentication and High Level Encryption Select this level if you want to encrypt the data packets as well as authenticate the transmission partner and prevent una...

Страница 644: ...ive Inactive 2 Encryption Key Auto Exchange Setting Items When you specify a security level the corresponding security settings are automatically configured but other settings such as address type loc...

Страница 645: ...s Ifyouarenotsettinganaddress range enter 32 after an IPv4 address or enter 128 after an IPv6 address Remote Address Specify the address of the IPsec transmission partner You can also specify an addre...

Страница 646: ...1 Diffie Hellman Group Phase 1 Validity Period Phase 2 Security Protocol Phase 2 Authentication Algorithm Phase 2 Encryption Algorithm Permissions Phase 2 PFS Phase 2 Validity Period Apply Bypass Dis...

Страница 647: ...you specify Certificate the certificate for IPsec must be installed and specified before it can be used Phase 1 Hash Algorithm Specify the Hash Algorithm to be used in phase 1 auto setting MD5 SHA1 P...

Страница 648: ...1 2 14 Phase 2 Validity Period Specify the time period for which the SA settings in phase 2 are valid Specify a period in seconds from 300 5min to 172800 48 hrs Encryption Key Manual Settings Items S...

Страница 649: ...oint the beginning and ending IP addresses In Tunnel End Point set the same address for the beginning point as you set in Local Address SPI Output Specify the same value as your transmission partner s...

Страница 650: ...according to the encryption algorithm hexadecimal value 0 9 a f A F If HMAC MD5 96 set 32 digits If HMAC SHA1 96 set 40 digits ASCII IF HMAC MD5 96 set 16 characters If HMAC SHA1 96 set 20 characters...

Страница 651: ...value 0 9 a f A F DES set 16 digits 3DES set 48 digits AES 128 set 32 digits AES 192 set 48 digits AES 256 set 64 digits ASCII DES set 8 characters 3DES set 24 characters AES 128 set 16 characters AE...

Страница 652: ...ablished Specifying encryption key auto exchange settings This can be specified by the network administrator For details about logging in and out with administrator authentication see p 22 Using Web I...

Страница 653: ...Authentication 1 Log in to Web Image Monitor as an administrator 2 Click Configuration in the Menu area and then click Device Certificate under Security category 3 Select the certificate to be used fo...

Страница 654: ...k OK twice 13 Click Add in the Rules tab The Security Rule Wizard appears 14 Click Next 15 Select This rule does not specify a tunnel and then click Next 16 Select the type of network for IPsec and th...

Страница 655: ...nd then set Negotiate security to Permit 36 Click OK 37 Click Close 38 Select the security policy that you have just created right click on it and then click Assign To disable the computer s IPsec set...

Страница 656: ...Specifying encryption key manual settings This can be specified by the network administrator For details about logging in and out with administrator authentication see p 22 Using Web Image Monitor to...

Страница 657: ...o exchange settings IKE install the certificate using Web Image Monitor A certificate cannot be installed using telnet ipsec To display IPsec related settings information use the ipsec command Display...

Страница 658: ...de it for IPsec transmission Entering all specifies all protocols collectively ipsec manual To display or specify the encryption key manual settings use the ipsec manual command Display current settin...

Страница 659: ...between 256 4095 for both the SPI input and output values Encapsulation mode setting msh ipsec manual 1 2 3 4 default mode transport tunnel Enter the separate setting number 1 4 or default and specif...

Страница 660: ...tion algorithm or key displays the current setting The encryption key is not displayed Reset setting values msh ipsec manual 1 2 3 4 default all clear Enter the separate setting number 1 4 or default...

Страница 661: ...lt proto ah esp dual Enter the separate setting number 1 4 or default and specify the security protocol To specify AH enter ah To specify ESP enter esp To specify AH and ESP enter dual Not specifying...

Страница 662: ...ault psk PSK character string If you select PSK as the authentication method enter the separate setting number 1 4 or default and specify the PSK character string Specify the character string in ASCII...

Страница 663: ...se 2 encryption algorithm setting msh ipsec ike 1 2 3 4 default ph2 encrypt null des 3des aes128 aes192 aes256 Entertheseparatesettingnumber 1 4 or default andspecifytheIPsecSA phase2 encryption algor...

Страница 664: ...setting you must log in as a network administrator For details about how to log in and out with administrator authentication see p 25 Logging in Using Administrator Authentication and p 25 Logging ou...

Страница 665: ...elow View Settings msh authfree If print job authentication exclusion is not specified authentication exclusion control is not displayed IPv4 address settings msh authfree ID range_addr1 range_addr2 I...

Страница 666: ...Authentication by IEEE 802 1X IEEE 802 1X enables authentication in an Ethernet or Wireless LAN environment For details see Configuring IEEE 802 1X Hardware Guide 7 Enhanced Network Security 128 7...

Страница 667: ...ails about logging in and logging out with administrator authentication see p 25 Logging in Using Administrator Authentication and p 25 Logging out Using Administrator Authentication To change the ext...

Страница 668: ...nhance File Protection This can be specified by the file administrator By specifying a password you can limit operations such as printing deleting and sending files and can prevent unauthorized people...

Страница 669: ...ministrator This setting lets you specify whether or not authentication is required for operations such as canceling jobs under the printer function If you select Login Privilege authorized users and...

Страница 670: ...strator Communication via HTTPS for Remote Service is disabled if you select Prohibit Default Do not Prohibit Prohibit Do not Prohibit Update Firmware This can be specified by the machine administrato...

Страница 671: ...yed on the control panel screen If the firmware structure change is unnecessary contact your service representative When Change Firmware Structure is set to Prohibit administrator authentication must...

Страница 672: ...strator Authentication Service Mode Lock Service mode is used by a service representative for inspection or repair If you set the service mode lock to On service mode cannot be used unless the machine...

Страница 673: ...to the printer and cancel the service mode lock 1 Press the Menu key 2 Press the or key to select Security Options and then press the OK key 3 Press the or key to select Service Mode Lock and then pre...

Страница 674: ...8 Specifying the Extended Security Functions 136 8...

Страница 675: ...e appears deal with the problem according to the information contained in the message Messages Cause Solutions Privileges are required to use this function The authority to use the function is not spe...

Страница 676: ...Manager Failed to obtain URL Server authentication failed Make sure server authentication is specified correctly on the printer Authentication failed The entered login user name or login password is i...

Страница 677: ...s without the authority to do so Files can be deleted by the file creator owner or file administrator To delete a file which you are not authorized to delete contact the file creator owner If a messag...

Страница 678: ...User authentication is disabled yet destinations specified using the printer do not appear User authentication may have been disabled while All Users is not specified Re enable user authentication and...

Страница 679: ...The Encrypting Data function is disabled TheSDcardhasbeenconfigured by another printer Insert an SD card that was configured by this printer Enable the function using the printer s control panel If Au...

Страница 680: ...9 Troubleshooting 142 9...

Страница 681: ...the supervisor login user name and login password If you do forget them a service representative will to have to return the printer to its default state This will result in all data in the printer bei...

Страница 682: ...ogin Password area 6 Enter the password and then click OK 7 Click Logout 8 Close Web Image Monitor Resetting an Administrator s Password 1 Log in to Web Image Monitor in the supervisor mode 2 Click Co...

Страница 683: ...ettings via Web Image Monitor Address Book All the settings can be specified Device Settings System Display Panel Language Administrator Authentication Management User Administrator Authentication Pro...

Страница 684: ...tings All settings can be specified Machine Settings Export Export the machine settings to a SD card List Test Print All settings can be specified System All settings can be specified Print Settings A...

Страница 685: ...ge Monitor Home Reset Device Reset Printer Job Job Job List Current Waiting Jobs Printer Spool Printing Device Settings System Spool Printing Protect Printer Display Panel Display Panel Language Permi...

Страница 686: ...All the settings can be specified Administrator Authentication Management Machine Administrator Authentication Program Change Administrator You can specify the following administrator settings for th...

Страница 687: ...his printer PDF Fixed Password All the settings can be specified Interface USB Network SNMPv3 Access Type Machine Administrator Security User Lockout Policy All the settings can be specified RC Gate A...

Страница 688: ...tings can be specified Host Interface If DHCP is set to On the settings that are automatically obtained via DHCP cannot be specified Network All settings can be specified Wireless LAN 1 All settings c...

Страница 689: ...ess LAN Settings 1 All the settings can be specified 1 Wireless LAN interface unit option must be installed Network IPv4 All the settings can be specified IPv6 All the settings can be specified NetWar...

Страница 690: ...on All the settings can be specified SSL TLS All the settings can be specified ssh All the settings can be specified Site Certificate All the settings can be specified Device Certificate All the setti...

Страница 691: ...ge All settings can be specified Settings via Web Image Monitor Printer Print Jobs The file administrator can Edit Delete the Print Job List and Unlock the print job Device Settings System Display Pan...

Страница 692: ...Auto Delete Temporary Print Jobs Auto Delete Stored Print Jobs Webpage Webpage Download Help File 10 Appendix 154 10...

Страница 693: ...nd has a login password and user name Full Control This is a user granted full control Abbreviations in the table columns A You can view and change the setting B You can view the setting C You cannot...

Страница 694: ...nly User Edit User Edit Delete User Full Control Register ed User User Admin Protect Destination C C C A A A Add to Group Settings Read only User Edit User Edit Delete User Full Control Register ed Us...

Страница 695: ...tings that are not in the list can only be viewed regardless of the menu protect level setting Panel Menu The default for menu protect level is 2 Paper Input Settings Off Level 1 Level 2 All Settings...

Страница 696: ...ed Jobs R W R R Reset IPDS Fonts R W R R List Test Print Settings Off Level 1 Level 2 All Settings R W R W R W System Settings Off Level 1 Level 2 Print Error Report R W R R Auto Continue R W R R Memo...

Страница 697: ...dge Print R W R R Duplex R W R R Rotate by 180 Degrees R W R R Blank Page Print R W R R Edge Smoothing R W R R Toner Saving R W R R Letterhead Setting R W R R Tray Setting Priority R W R R Tray Switch...

Страница 698: ...eb Image Monitor Settings The following settings can be specified when Menu Protect is set to Off Printer Print Jobs Print Delete Printer PDF Temporary Password Webpage Webpage Download Help File 10 A...

Страница 699: ...1 Control Panel Machine Data Encryption Basic Authentication Hard disk Web Image Monitor Basic Authentication Windows Authentication Hard disk Web Image Monitor Windows Authentication LDAP Authenticat...

Страница 700: ...ems Inc in the U S and other countries UNIX is a registered trademark of The Open Group UPnPTM is a trademark of the UPnP Implementers Corporation Other product names used herein are for identificatio...

Страница 701: ...R2 Enterprise Edition The product names of Windows Server 2008 are as follows Microsoft Windows Server 2008 Standard Microsoft Windows Server 2008 Enterprise Microsoft Windows Server 2008 Standard wi...

Страница 702: ...10 Appendix 164 10...

Страница 703: ...key auto exchange 104 Encryption Key auto exchange security level 104 Encryption Key auto exchange setting items 104 Encryption key manual settings 104 Encryption key manual settings items 104 Encrypt...

Страница 704: ...61 63 129 Security Functions 81 Security Measures Provided by this Printer 16 Security options 145 146 150 153 Self signed certificate 95 Service mode lock 134 Setting Up the Printer 12 Simple encrypt...

Страница 705: ...MEMO 167...

Страница 706: ...MEMO 168 EN GB EN US M0208505...

Страница 707: ...2010...

Страница 708: ...Operating Instructions Security Guide M020 8505 EN US...

Страница 709: ...Read this manual carefully before you use this product and keep it handy for future reference 1 Command Configuration 2 Remote Maintenance Using telnet UNIX Supplement...

Страница 710: ...s not inclusive We assume no responsibility for its completeness or accuracy If you have any questions concerning the legality of copying or printing certain items consult with your legal advisor Impo...

Страница 711: ...nstallation Shell Script 11 Solaris 13 HP UX 14 Printing Method 16 Printing with lpr lp 16 Printing with rsh rcp ftp 17 Printer Status 19 Viewing the Print Job Status with lpq and lpstat 19 Viewing th...

Страница 712: ...ote Maintenance Using telnet Using telnet 39 8021x 40 access 41 authfree 42 autonet 43 bonjour 44 devicename 45 dhcp 46 dhcp6 47 diprint 47 dns 48 domainname 50 etherauth 51 etherconfig 51 help 51 hos...

Страница 713: ...np 71 web 71 wiconfig 72 wins 76 wsmfp 77 Getting Printer Information over the Network 79 Current Printer Status 79 Printer Configuration 83 Understanding the Displayed Information 85 Print Job Inform...

Страница 714: ...per misfeeds damage to originals or loss of data Be sure to read these explanations Indicates supplementary explanations of the machine s functions and instructions on resolving user errors This symbo...

Страница 715: ...the device option as well as the printer host name and the IP address For details see p 7 Using the Installation Shell Script 2 Start printing For details see p 16 Printing Method Using the rsh rcp f...

Страница 716: ...et up the network environment Consult the administrator for the local setting information 3 To print under Windows install Printing service for UNIX or LPD Print Service as the network application For...

Страница 717: ...e the setting see the operating instructions for Red Hat When you use NIS Network Information Service or DNS you should configure the server before running the installation shell script Installation s...

Страница 718: ...tered with an IP address the server can access the printer using its host name instead of its IP address Executing the Installation Shell Script Having configured the printer IP address follow the pro...

Страница 719: ...default name press the RETURN ENTER key Enter a new name if you want to use a different one The host name entered in step 5 followed by _prn appears in default 7 Set the print option Enter remote pri...

Страница 720: ...see Specifying the Device Option p 16 Printing Method p 21 Specifying the Device Option Deleting the printer To print using the lp or lpr command the option specified when the installation shell scrip...

Страница 721: ...line is the comment The etc hosts file contains a list of the IP addresses and host names of all hosts communicating on the network Each entry is delimited with a space or a tab and each line is sepa...

Страница 722: ...aracter names referred to as capabilities For details about capabilities see the following table Capability Explanation Value required for the network printer rm Host name of the printer The host name...

Страница 723: ...the var log directory The log file name is the printer name followed by d errs The log file is used for logging errors or warning messages by the UNIX workstation The log file should be made for ever...

Страница 724: ...evice Option lp will be assigned if the option is not used When printing with the lp command use _ instead of and instead of for operating systems that cannot use and such as Solaris 2 5 or later 3 If...

Страница 725: ...b lpshut 2 Register the printer usr lib lpadmin Pnp v dev null mrmodel ormnphost orpoption ob3 np is the printer name nphost is the host name For details about option see Specifying the Device Option...

Страница 726: ...e O and L after the printer name For example If the printer s IP address is 192 168 0 123 the printer name is np and the file name is file1 c print file1 txt lpr S 192 168 0 123 P np c print file1 txt...

Страница 727: ...er is 3 rsh rsh host_name print file_name For example host name is nphost file name is file1 rsh nphost print file1 host_name is the name entered when executing the installation shell script If you ar...

Страница 728: ...o set options with the mput command 1 Start ftp using the IP address or host name of the printer ftp IP_address 2 Enter the user name and password and then press the RETURN ENTER key For details about...

Страница 729: ...inter name is np lpq Pnp System V UNIX Solaris HP UX lpstat o printer_name For example Printer name is np lpstat o np If you are using HP UX do not put a space between o and printer name Viewing the P...

Страница 730: ...istrator indicates standard output Display will be displayed on screen if standard output has not been specified Copying Information to a File Use the rcp or ftp command to copy information about spec...

Страница 731: ...name File_name is the file name you want to print The device option is specified in the form of option value For details about types of device options and values see the following explanations For exa...

Страница 732: ...e Installation Shell Script Using the cd command with ftp For printing with ftp if the option is specified using the cd command it becomes available whenever the put or mput command is used ftp cd opt...

Страница 733: ...mber of collated sets 1 999 Specifies the number to collate duplex on off Specifies whether duplex printing is on or off binding longedge shortedge left right top Specifiesthebindingdirectionfor duple...

Страница 734: ...5 Specifythesetofprintcharacters The value or actions that can be selected differ depending on the model you are using For details about available value see the manual that comes with this printer Pri...

Страница 735: ...e1 rcp rcp file1 nphost filter text ftp ftp put file1 filter text Input Tray Select a default input tray tray value of input tray Input tray Value Tray 1 tray1 Tray 2 tray2 Tray 3 tray3 Tray 4 tray4 T...

Страница 736: ...omes with this printer Paper Size Select the paper size paper value of paper size Paper size Value A4 a4 A5 a5 A6 a6 B5JIS Japanese Industrial Standard jisb5 B6JIS jisb6 81 2 14 legal 81 2 11 letter 5...

Страница 737: ...4 ftp ftp put file1 paper a4 The value or actions that can be selected differ depending on the model you are using For details about available paper size see the manual that comes with this printer Pa...

Страница 738: ...terhead Preprinted paper preprinted Labels labels Bond paper bond Cardstock cardstock Middle thick middlethick Envelope envelope Coated Paper Glossy glossycoated Coated Paper Glossy Thick thickglossyc...

Страница 739: ...p file1 nphost mediatype recycled ftp ftp put file1 mediatype recycled The value or actions that can be selected differ depending on the model you are using For details about available paper type see...

Страница 740: ...ollowing sample shows how to print 10 copies host name nphost file name file1 rsh rsh nphost print copies 10 file1 rcp rcp file1 nphost copies 10 ftp ftp put file1 copies 10 Collating Specify the numb...

Страница 741: ...nphost duplex on binding longedge ftp ftp put file1 duplex on binding longedge Before selecting duplex the binding option must be set to on Data and paper volume affect the completion of the print jo...

Страница 742: ...ore selecting the binding option the duplex option must be set to on Data and paper volume affect completion of the print job Orientation Select the paper feed orientation This function is only for PC...

Страница 743: ...rotation using the imagedirection function host name nphost file name file1 rsh rsh nphost print imagedirection reverse file1 rcp rcp file1 nphost imagedirection reverse ftp ftp put file1 imagedirecti...

Страница 744: ...the resolution must be set to 600 dpi bitsperdot value of gradation quality Gradation quality Value Fine 2 Standard 1 The following sample shows how to print with 600 dpi and the fine quality host nam...

Страница 745: ...fore a password can be less than the maximum value 228 bytes This also implies the maximum value 228 bytes is secured as long as the normal syntax is used Usercode Specify the usercode Usercode value...

Страница 746: ...t Value Arabic 8 arabic8 Desktop desktop Greek 8 greek8 Hebrew 7 hebrew7 Hebrew 8 hebrew8 ISO 4 iso4 ISO 6 iso6 ISO 11 iso11 ISO 15 iso15 ISO 17 iso17 ISO 21 iso21 ISO 60 iso60 ISO 69 iso69 ISO Cyrill...

Страница 747: ...775 pc775 PC 850 pc850 PC 851 pc851 PC 852 pc852 PC 858 pc858 PC 862 pc862 PC 864 pc864 PC 866 pc866 PC 866U pc866u PC 1004 pc1004 PC 8 D N pc8dn PC 8 Greek pc8grk PC8 TK pc8tk Pifont pifont PS Math...

Страница 748: ...yr Win Greek wingrk Win L1 winl1 Win L2 winl2 Win L5 winl5 The following sample shows how to print the ISO 4 character set host name nphost file name file1 rsh rsh nphost print symset iso4 file1 rcp r...

Страница 749: ...se the IP address or the host name of the printer to start telnet telnet IP_address 2 Enter your user name and password Contact your administrator for information about the settings 3 Enter a command...

Страница 750: ...st be specified if EAP TTLS or PEAP is selected Do not make these settings when using other EAP authentication types If you select EAP TTLS you can select chap mschap mschapv2 pap or md5 If you select...

Страница 751: ...t is off srvid character string You can set the server ID and sub domain of the certificate server Usable characters ASCII 0x20 0x7e 128 bytes The default is blank clear a each command all Returns the...

Страница 752: ...sethe flush commandtorestorethedefaultsettingssothatallaccessrangesbecome 0 0 0 0 for IPv4 and for IPv6 The access range restricts computers from use of the printer by IP address If you do not need to...

Страница 753: ...hfree flush autonet Use the autonet command to view and configure AutoNet parameters View settings The following command displays the current AutoNet settings msh autonet Configuration You can configu...

Страница 754: ...ric characters Bonjour Installation location information setting You can enter information about the location where the printer is installed msh bonjour location location Information about the locatio...

Страница 755: ...If you do not specify an interface the Ethernet interface is automatically selected wlan can be specified only when the Wireless LAN interface unit is installed Interface Interface configured ether Et...

Страница 756: ...e specified only when the Wireless LAN interface unit is installed Interface name Interface configured ether Ethernet interface wlan Wireless LAN interface Current interface priority configuration dis...

Страница 757: ...DNS server address selection obtained from the dhcpv6 server user specified value msh dhcp6 dnsaddr dhcp static DUID DHCP unique ID deletion and display msh dhcp6 duid clear Viewing and specifying the...

Страница 758: ...nnection The default is multi dns Use the dns command to configure or display DNS Domain Name System settings View settings The following command displays the current DNS settings msh dns IPv4 DNS ser...

Страница 759: ...d when records overlap update To delete old records and register new records add To add new records and store the old records When CNAME overlaps it is always changed irrespective of the setting CNAME...

Страница 760: ...me settings You can configure the Ethernet interface or Wireless LAN interface View settings The following command displays the current domain name msh domainname Interface domain configuration msh do...

Страница 761: ...ew settings msh etherconfig Specify Ethernet Speed msh etherconfig speed auto 10f 10h 100f 100h auto Auto Select 10f 10 Mbps Full Duplex 10h 10 Mbps Half Duplex 100f 100 Mbps Full Duplex 100h 100 Mbps...

Страница 762: ...alizing the printer name for each interface msh hostname interface_name clear name ifconfig Use the ifconfig command to view and configure TCP IP IP address subnet mask broadcast address default gatew...

Страница 763: ...when using the optional Wireless LAN interface unit is installed To get the above addresses contact your administrator Use the default configuration if you cannot obtain setting addresses The IP addr...

Страница 764: ...figure the IPsec settings Viewing settings The following command displays the current IPsec settings msh ipsec ipp Use the ipp command to view and configure the IPP settings Viewing settings The follo...

Страница 765: ...appears User configuration changed ipv6 Use the ipv6 command to display and configure the IPv6 settings View setting msh ipv6 IPv6 stateless address msh ipv6 stateless on off If on is selected IPv6 re...

Страница 766: ...r Detection Function lpr prnerrchk on off If you set this to on the printer stops receiving data and will wait until the error is resolved before continuing processing a job netware Use the netware co...

Страница 767: ...in mode for NDS tree msh netware login tree Setting login mode for NDS tree name msh netware tree NDS name File transfer protocol msh netware trans ipv4pri ipxpri ipv4 ipx If you do not specify the pr...

Страница 768: ...the MTU size of the sent data is larger than the router s MTU the router will declare it impassable and communication will fail If this happens setting pathmtu to off optimizes the MTU size and preve...

Страница 769: ...he routing table All route information display msh route get destination Specify the IPv4 address to destination 0 0 0 0 cannot be specified as the destination address Enabling disabling specified IPv...

Страница 770: ...as a registered record You cannot register a record that uses 0000 0000 0000 0000 0000 0000 0000 0000 as its destination Deleting a specified IPv6 destination from routing table msh route delete6 des...

Страница 771: ...etware msh set smb msh set protocol When protocol is specified information about IPv4 IPv6 IPsec AppleTalk NetWare and SMB appears msh set parallel msh set usb msh set lpr msh set lpr6 msh set ftp msh...

Страница 772: ...s by mistake you can use the control panel to enable remote access via IPv4 Disabling IPv4 also disables lpr ftp rsh diprint web snmp ssl ipp http bonjour and sftp msh set ipv6 up down If you disable...

Страница 773: ...available for the printer you cannot use the function by enabling it msh set nrs up down msh set rfu up down msh set rfu6 up down msh set ssh up down msh set ssdp up down msh set nbt up down msh set...

Страница 774: ...can be used by SLP multicast packet The default value of TTL is 1 A search is executed only within a local segment If the router does not support multicast the settings are not available even if the...

Страница 775: ...ration settings such as the community name View settings msh snmp Default access settings 1 is as follows Community name public IPv4 address 0 0 0 0 IPv6 address IPX address 00000000 000000000000 Acce...

Страница 776: ...read only write read and write trap user is notified of trapmessages Protocol configuration Use the following command to set protocols active or inactive If you set a protocol inactive all access set...

Страница 777: ...p location Deleting sysLocation msh snmp clear location sysContact setting msh snmp contact Deleting sysContact msh snmp clear contact SNMP v1v2 function configuration msh snmp v1v2 on off Specify on...

Страница 778: ...Time Protocol SNTP Use the sntp command to change the SNTP settings View settings msh sntp NTP server address configuration You can specify the IP address of the NTP server msh sntp server IP_address...

Страница 779: ...le Job Spool or off to disable it Resetting Job Spool setting msh spoolsw clearjob on off When the printer power is cut during job spooling this determines whether to reprint the spooled job Protocol...

Страница 780: ...SSH SFTP communication login timeout setting msh ssh logintimeout 0 65535 The default is 300 Setting an open key for SSH SFTP msh ssh genkey 512 768 1024 character string Create an open key for SSH SF...

Страница 781: ...in the printer s system log View message msh syslog For details about the information displayed see Message List p 97 Message List upnp Use the upnp command to display and configure the universal plu...

Страница 782: ...corresponding number to the link name msh web name Name you want to display Resetting URL names registered as link destinations msh web x clear name Specify 1 or 2 for x as the number corresponding to...

Страница 783: ...e WEP function To enable the WEP function specify on to disable it specify off To start the WEP function enter the correct WEP key The default is 11 key key value val 1 2 3 4 You can specify the WEP k...

Страница 784: ...You can omit the numbers with val The key number is set to 1 when making these omissions encval 1 2 3 4 You can specify which of the four WEP keys is used for packet encoding 1 is set if a number is n...

Страница 785: ...ls EAP TTLS leap LEAP peap PEAP chap mschap mschapv2 pap md5 andtlsare settingsforthephase2method andoneofthese must be specified if EAP TTLS or PEAP is selected Do not make these settings when using...

Страница 786: ...The default is off srvid character string You can set the server ID and sub domain of the certificate server connectinfo Obtains connection information clear a each command all Returns the selected se...

Страница 787: ...ace_name primary secondary IP address Use the primary command to configure the primary WINS server IPv4 address Use the secondary command to configure the secondary WINS server IPv4 address Do not use...

Страница 788: ...URL Enter the URL string in the URL WSD Device TCP port configuration msh wsmfp devport 1024 65535 The Default is 53000 WSD Printer TCP port configuration msh wsmfp prnport 1024 65535 The Default is...

Страница 789: ...ion has failed Cover Open Front Cover The front or top cover is open Cover Open Left Cover The left cover is open Cover Open Rear Cover The rear cover is open Cover Open Top Cover The top cover is ope...

Страница 790: ...full Hex Dump Mode It is a hex dump mode Independent supplier Toner Toner that is not recommended is set Jobs Suspended All jobs are suspended Loading Toner Toner is being supplied Low Black Toner Th...

Страница 791: ...fer Roller Near Replacing Maintenance Kit Prepare a new Maintenance Kit Near Replacing Print Cartridge Prepare a new print cartridge Nearly Full Waste Toner Waste toner bottle is nearly full No Paper...

Страница 792: ...sfer unit is not correctly set Not Detected WasteToner Bottle Waste toner bottle is not correctly set Offline The printer is offline Panel Off Mode The printer is in Panel Off mode Paper in Duplex Uni...

Страница 793: ...ed Supplies Order Call failed The supply order call has failed Tray Error Duplex Printing Selected paper tray cannot be used for duplex printing Warming Up The printer is warming up W T Bttl notDetect...

Страница 794: ...Name Name of the output tray status Current status of the output tray Normal Normal PaperExist Paper exist OverFlow Paper is full Error Other errors Printer Language Item Description No ID number of t...

Страница 795: ...rinting 1st 2nd 3rd 4th Waiting to be transferred to the printer Owner Print request user name Job Print request number Files The name of the document Total Size The size of the data spooled The defau...

Страница 796: ...due to the printing application Not applicable to the ftp or rprinter command Time Time the print requested was received Time of print request reception User ID Printer driver configured User ID Appe...

Страница 797: ...ol Settings AppleTalk IPv4 IPv6 IPsec NetWare SMB Device Up Down Device Settings Parallel USB Ethernet interface Syslog priority NVRAM version Device name Comment Location Contact Soft switch AppleTal...

Страница 798: ...iption Type Zone TCP IP TCP IP settings Mode IPv4 Mode IPv6 ftp lpr rsh diprint web http ftpc snmp ipp autonet Bonjour ssl nrs rfu nbt ssdp ssh sftp WSD Device WSD Printer 2 Remote Maintenance Using t...

Страница 799: ...Address Netmask Broadcast Gateway IPv6 Stateless Manual Gateway DHCPv6 lite DUID DHCPv6 option lifetime IPsec Manual Mode Excluded Protocol https dns dhcp wins EncapType Host name DNS Domain Understa...

Страница 800: ...5 SNTP Server Time settings Time Zone SNTP Server polling time SYSLOG server Websys settings Home page URL1 Home page link name1 Home page URL2 Home page link name2 Help page URL IPDS Port IPDS timeou...

Страница 801: ...P interval time NDS Tree Name Transfer Protocol SMB SMB settings Switch Mode Direct print Notification Workgroup name Computer name Comment Share name 1 Protocol Wireless LAN Wireless LAN settings Hos...

Страница 802: ...ication Pre Shared Key User name Domain name EAP Type Password Phase 2 user name Phase 2 Method TTLS Phase 2 Method PEAP Server cert Intermediate CA Server ID Sub domain Mic check Ethernet 802 1X Auth...

Страница 803: ...in name ether wlan DDNS ether wlan WINS WINS settings ether Primary WINS Secondary WINS wlan Primary WINS Secondary WINS SSDP SSDP settings UUID Profile TTL UPnP UPnP settings URL Bonjour Bonjour Rend...

Страница 804: ...Route for Multi I F IPP Port SNMP SNMP settings SNMPv1v2 SNMPv3 Protocol v1Trap v2Trap v3Trap SNMPv1v2 Remote Setting SNMPv3 Privacy ssh ssh settings Compression Port TimeOut LoginTimeOut AuthFree Au...

Страница 805: ...hk Certificate Verification WS MFP Network Device Name Comments Location Presentation URL WSD Device TCP Port WSD Printer TCP Port WSD Printer Job Timeout MetadataVersion UUID IEEE 802 1X IEEE 802 1X...

Страница 806: ...Item Description Phase 2 Method TTLS Phase 2 Method PEAP Server cert Intermediate CA Server ID Sub domain Shell mode Remote maintenance tool mode 2 Remote Maintenance Using telnet 96 2...

Страница 807: ...untisdisabled Thiscouldbebecauseitusesthesameaccountnameastheadministratoraccount account is unavailable The authentication password is not set up User account is disabled This could be because the au...

Страница 808: ...print queue name The system connects to the print queue when the print server goes online authenticating The supplicant is authenticating with the access point EAP or WPA authentication mode mismatch...

Страница 809: ...to FileServer error number Connection to the file server could not be established when the remote printer went online The file server refused the connection for unknown reason Check the file server s...

Страница 810: ...ID Connection to the print server was established when the remote printer went online exiting The LPD service was completed and the process is exiting Exit pserver In the print server mode The print...

Страница 811: ...s ISAKMP SA Oakley group matches that of the communicating host IKE phase 1 mismatched DH group local DH group number 1 remote DH group number 2 This printer s ISAKMP SA Oakley group DH group number 1...

Страница 812: ...spooled job was canceled due to error or user request LeaseTime lease time sec RenewTime renew time sec The resource lease time received from the DHCP server is displayed in lease time in seconds The...

Страница 813: ...server address was successful nbtd start The nbtd NetBIOS over TCP IP Daemon has started no RADIUS authentication server The supplicant has received a message reporting that a usable RADIUS server can...

Страница 814: ...ed when the print server is online Make sure that the print queue exists on the specified file server Print server print server name has no printer The printer was not assigned to the print server whe...

Страница 815: ...s could be because The specified DNS server could not be found No connection to the network has been established The specified DNS server could not be found An incorrect DNS server is specified The sp...

Страница 816: ...r port number is incorrect Check the DNS Server s IP address and SMTP server s IP address or the SMTP server name and SMTP port number or the SMTP server s SMTP port number or the network connection a...

Страница 817: ...he network was denied Verify that the print server name and password are correct Logintothefileserverfailedwhentheprintserverwasonline Theprintserverisnotregisteredorapassword is specified Register th...

Страница 818: ...ccurred while the printer was writing to the spool file Wait for the current print job to finish When it finishes more HDD space will be available Only pages that were spooled when the error occurred...

Страница 819: ...rinting 31 E etherauth 51 etherconfig 51 F ftp 17 19 97 ftp commands 5 G Gradation quality 34 H help 51 hostname 51 How to read this manual 4 HP UX 14 16 19 I ifconfig 52 Image direction 33 info 53 In...

Страница 820: ...p commands 5 Resolution 33 rhpp 59 route 59 rsh 17 19 97 rsh commands 5 S set 61 sftp 97 show 64 slp 64 smb 64 snmp 65 sntp 68 Solaris 13 16 19 spoolsw 69 ssdp 69 ssh 70 status 71 Symbol set 36 syslog...

Страница 821: ...MEMO 111...

Страница 822: ...MEMO 112 EN GB EN US M0668513...

Страница 823: ...Microsoft Windows XP Tablet PC Edition Microsoft Windows XP Professional x64 Edition The product names of Windows Vista are as follows Microsoft Windows Vista Ultimate Microsoft Windows Vista Busines...

Страница 824: ...UNIX Supplement EN GB M066 8513 EN US...

Отзывы: