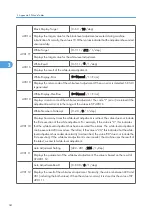
2802 1
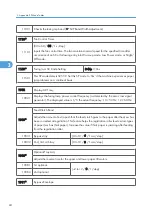
Initializes the developer and checks the TD sensor output (Vt). The machine mixes the
developer for 2 minutes while reading and displaying the Vt value. The machine does not
initialize the TD sensor output. If the machine has not been used for a long period of time,
prints may have a dirty background. In this case, use this SP mode to mix the developer.
The message "Completed" is displayed when the program ends normally.
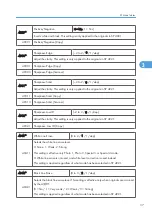
2906*
Tailing Correction
2906 1
Shift value
[0.0 to 1.0 / 0.0 / 0.1 mm/step]
Shifts the image writing position in intervals specified by SP 2906 2. When making many
copies of an original that contains vertical lines (such as in tables), the paper may not
separate correctly. This can cause tailing images (ghosts of the vertical lines continuing
past the bottom of the table). This SP can be used to prevent this.
2906 2
Interval
[1 to 10 / 1 / 1 page/step]
Changes the interval for the image shift specified by SP 2906 1.
2908
Forced Toner Supply
2908 1
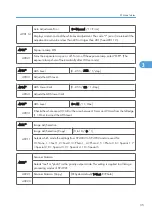
Forces the toner bottle to supply toner to the toner supply unit. Press "1" to start. The machine
continues to supply toner until the toner concentration in the development unit reaches the
standard level, or for up to 2 minutes (whichever comes first).
2915*
Polygon Mirror Motor Idling Time
2915 1
[0 = None / 1 = 15 s / 2 = 25 s]
Selects the polygon mirror motor idling time. To increase the speed of the first copy, the
mirror motor begins idling when the user sets an original, touches a key, or opens the platen
cover or DF. If this setting is left at the default (15 s), the motor will stop if the user does
nothing for 15s. If the setting is "0", the motor will not switch off during standby. (But note
that regardless of the setting, the motor will switch off when the machine enters energy
saver mode.)
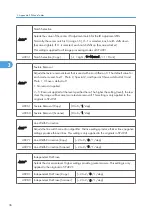
2921*
Toner Supply Mode
2921 1
[0 = Sensor 1 / 1 = Sensor 2 (DFU) / 2 = Fixed 1 (DFU) / 3 = Fixed 2]
Selects the toner supply mode. Under normal conditions this should be set to "0". You can
temporarily change this to "3" if the TD sensor is defective. Do not set to "1" or "2", as these
are for design use only ( Toner Density Control).
3. Appendix: SP Mode Tables
28
3
Содержание Aficio MP 1600L2
Страница 1: ...Model K C3 5L Machine Code B244 B276 B277 B268 B269 Field Service Manual 3 December 2010 ...
Страница 2: ......
Страница 12: ...10 ...
Страница 14: ...Machine Configuration 1 Product Information 12 1 ...
Страница 20: ...1 Product Information 18 1 ...
Страница 70: ...2 Installation 68 2 ...
Страница 71: ...3 Preventive Maintenance PM Tables See Appendices for the PM Tables 69 3 ...
Страница 74: ...7 Wait until the message Completed shows 8 Quit the SP mode 3 Preventive Maintenance 72 3 ...
Страница 86: ...Platen Cover Sensor 1 Top rear cover 2 Platen cover sensor A x 1 4 Replacement and Adjustment 84 4 ...
Страница 121: ...Paper Size Switch 1 Paper cassette 2 Switch cover A x 1 3 Paper size switch B x 1 Paper Feed Section 119 4 ...
Страница 139: ...PSU Power Supply Unit 1 Left cover p 79 2 PSU A All connectors x 6 Other Replacements 137 4 ...
Страница 151: ...SP Mode Tables See Appendices for the SP Mode Tables SP Mode Tables 149 5 ...
Страница 171: ...1 1 0 0 A5 SEF 1 1 1 0 B5 SEF 1 Detected Using SP Modes 169 5 ...
Страница 207: ...Model K C3 5L Machine Code B244 B276 B277 B268 B269 Appendices 3 December 2010 ...
Страница 208: ......
Страница 210: ...2 ...
Страница 228: ...2 Appendix Preventive Maintenance 20 2 ...
Страница 262: ...MEMO 54 ...
Страница 263: ...MEMO 55 ...
Страница 264: ...MEMO 56 EN ...


